1998 NISSAN PICK-UP warning
[x] Cancel search: warningPage 1184 of 1659
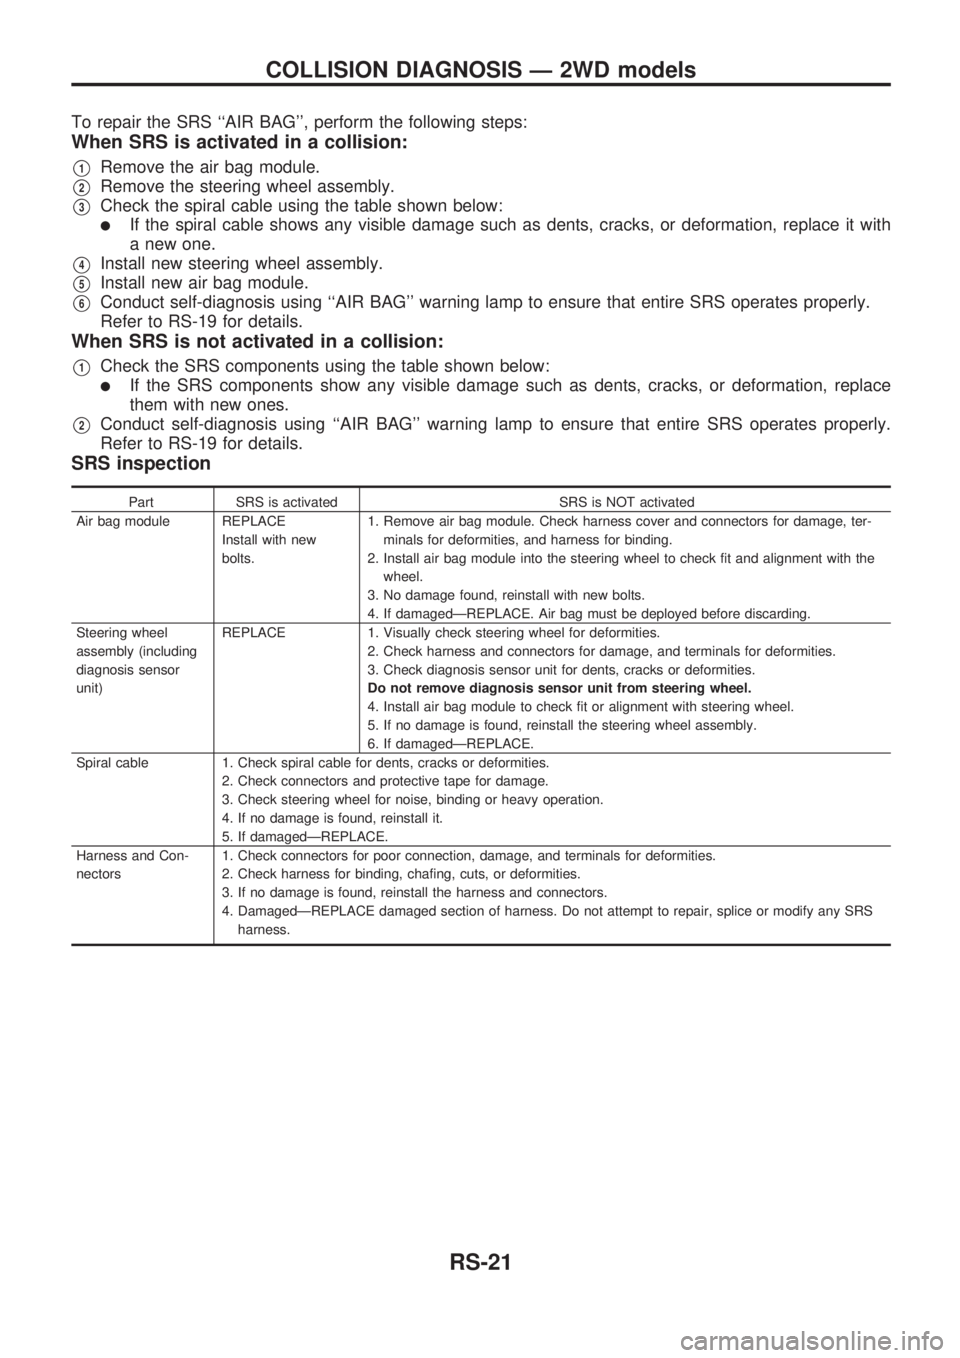
To repair the SRS ``AIR BAG'', perform the following steps:
When SRS is activated in a collision:
V1Remove the air bag module.
V2Remove the steering wheel assembly.
V3Check the spiral cable using the table shown below:
lIf the spiral cable shows any visible damage such as dents, cracks, or deformation, replace it with
a new one.
V4Install new steering wheel assembly.
V5Install new air bag module.
V6Conduct self-diagnosis using ``AIR BAG'' warning lamp to ensure that entire SRS operates properly.
Refer to RS-19 for details.
When SRS is not activated in a collision:
V1Check the SRS components using the table shown below:
lIf the SRS components show any visible damage such as dents, cracks, or deformation, replace
them with new ones.
V2Conduct self-diagnosis using ``AIR BAG'' warning lamp to ensure that entire SRS operates properly.
Refer to RS-19 for details.
SRS inspection
Part SRS is activated SRS is NOT activated
Air bag module REPLACE
Install with new
bolts.1. Remove air bag module. Check harness cover and connectors for damage, ter-
minals for deformities, and harness for binding.
2. Install air bag module into the steering wheel to check fit and alignment with the
wheel.
3. No damage found, reinstall with new bolts.
4. If damagedÐREPLACE. Air bag must be deployed before discarding.
Steering wheel
assembly (including
diagnosis sensor
unit)REPLACE 1. Visually check steering wheel for deformities.
2. Check harness and connectors for damage, and terminals for deformities.
3. Check diagnosis sensor unit for dents, cracks or deformities.
Do not remove diagnosis sensor unit from steering wheel.
4. Install air bag module to check fit or alignment with steering wheel.
5. If no damage is found, reinstall the steering wheel assembly.
6. If damagedÐREPLACE.
Spiral cable 1. Check spiral cable for dents, cracks or deformities.
2. Check connectors and protective tape for damage.
3. Check steering wheel for noise, binding or heavy operation.
4. If no damage is found, reinstall it.
5. If damagedÐREPLACE.
Harness and Con-
nectors1. Check connectors for poor connection, damage, and terminals for deformities.
2. Check harness for binding, chafing, cuts, or deformities.
3. If no damage is found, reinstall the harness and connectors.
4. DamagedÐREPLACE damaged section of harness. Do not attempt to repair, splice or modify any SRS
harness.
COLLISION DIAGNOSIS Ð 2WD models
RS-21
Page 1185 of 1659
Trouble Diagnoses Introduction
CAUTION:
lDo not use a circuit tester to check SRS harness connectors unless instructed to in this Service
Manual. SRS wiring harnesses can be identified with yellow harness protector or yellow insula-
tion tape before the harness connectors.
lDo not attempt to repair, splice or modify the SRS wiring harness. If the harness is damaged,
replace it with a new one.
lKeep ground portion clean.
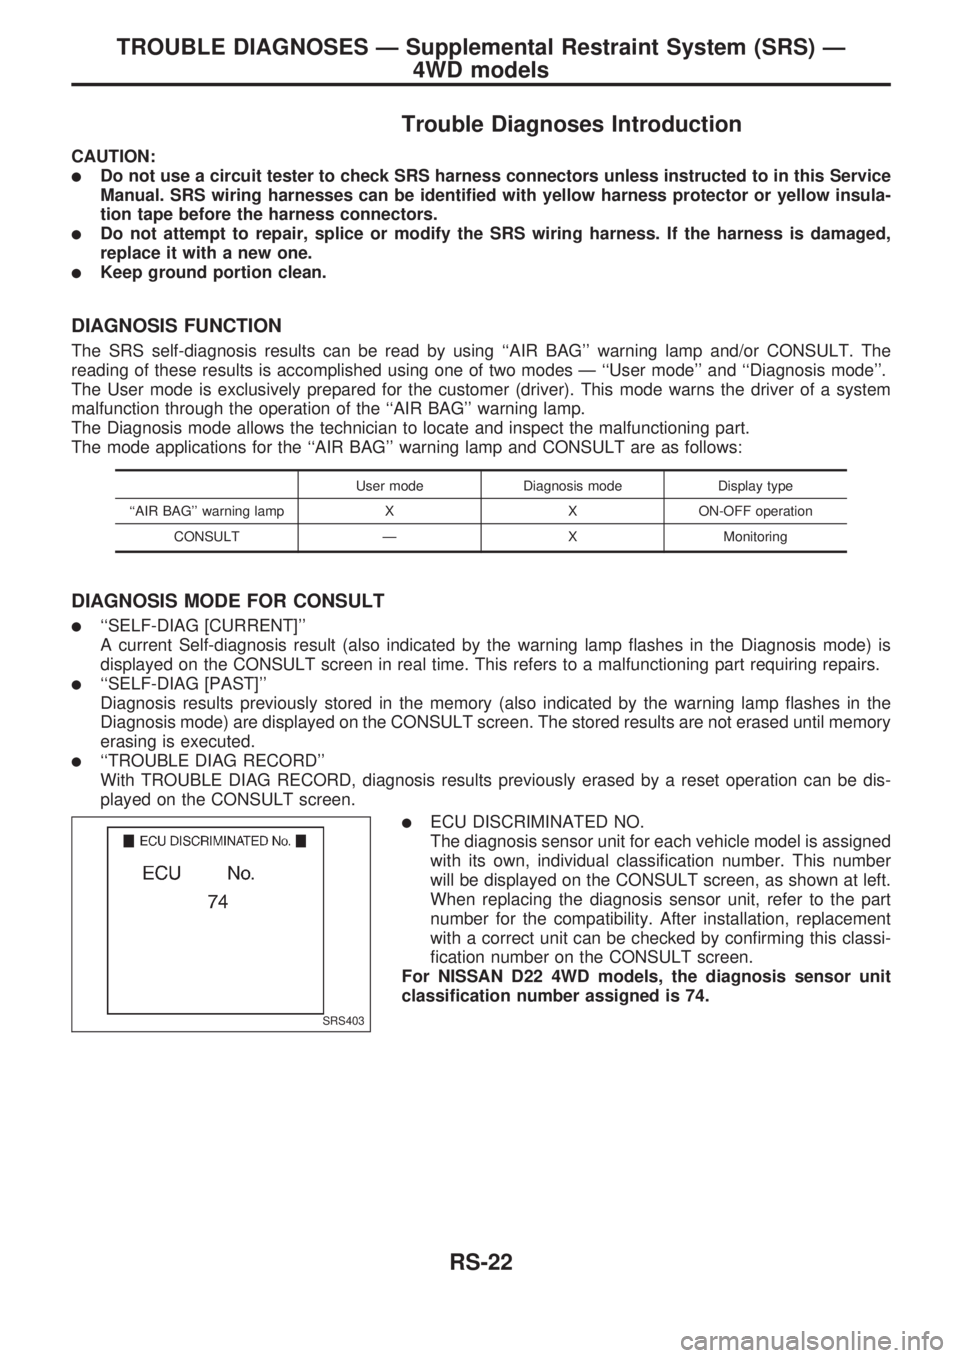
DIAGNOSIS FUNCTION
The SRS self-diagnosis results can be read by using ``AIR BAG'' warning lamp and/or CONSULT. The
reading of these results is accomplished using one of two modes Ð ``User mode'' and ``Diagnosis mode''.
The User mode is exclusively prepared for the customer (driver). This mode warns the driver of a system
malfunction through the operation of the ``AIR BAG'' warning lamp.
The Diagnosis mode allows the technician to locate and inspect the malfunctioning part.
The mode applications for the ``AIR BAG'' warning lamp and CONSULT are as follows:
User mode Diagnosis mode Display type
``AIR BAG'' warning lamp X X ON-OFF operation
CONSULT Ð X Monitoring
DIAGNOSIS MODE FOR CONSULT
l``SELF-DIAG [CURRENT]''
A current Self-diagnosis result (also indicated by the warning lamp flashes in the Diagnosis mode) is
displayed on the CONSULT screen in real time. This refers to a malfunctioning part requiring repairs.
l``SELF-DIAG [PAST]''
Diagnosis results previously stored in the memory (also indicated by the warning lamp flashes in the
Diagnosis mode) are displayed on the CONSULT screen. The stored results are not erased until memory
erasing is executed.
l``TROUBLE DIAG RECORD''
With TROUBLE DIAG RECORD, diagnosis results previously erased by a reset operation can be dis-
played on the CONSULT screen.
lECU DISCRIMINATED NO.
The diagnosis sensor unit for each vehicle model is assigned
with its own, individual classification number. This number
will be displayed on the CONSULT screen, as shown at left.
When replacing the diagnosis sensor unit, refer to the part
number for the compatibility. After installation, replacement
with a correct unit can be checked by confirming this classi-
fication number on the CONSULT screen.
For NISSAN D22 4WD models, the diagnosis sensor unit
classification number assigned is 74.
SRS403
TROUBLE DIAGNOSES Ð Supplemental Restraint System (SRS) Ð
4WD models
RS-22
Page 1187 of 1659
![NISSAN PICK-UP 1998 Repair Manual HOW TO ERASE SELF-DIAGNOSIS RESULTS
With CONSULT
l``SELF-DIAG [CURRENT]
A current Self-diagnosis result is displayed on the CONSULT screen in real time. After the malfunction
is repaired completely, NISSAN PICK-UP 1998 Repair Manual HOW TO ERASE SELF-DIAGNOSIS RESULTS
With CONSULT
l``SELF-DIAG [CURRENT]
A current Self-diagnosis result is displayed on the CONSULT screen in real time. After the malfunction
is repaired completely,](/manual-img/5/57374/w960_57374-1186.png)
HOW TO ERASE SELF-DIAGNOSIS RESULTS
With CONSULT
l``SELF-DIAG [CURRENT]''
A current Self-diagnosis result is displayed on the CONSULT screen in real time. After the malfunction
is repaired completely, no malfunction is detected on ``SELF-DIAG [CURRENT]''.
l``SELF-DIAG [PAST]''
Return to the ``SELF-DIAG [CURRENT]'' CONSULT screen by
pushing ``BACK'' key of CONSULT and select ``SELF-DIAG
[CURRENT]'' in ``SELECT DIAG MODE''. Touch ``ERASE'' in
``SELF-DIAG [CURRENT]'' mode.
NOTE:
If the memory of the malfunction in ``SELF-DIAG [PAST]'' is
not erased, the User mode shows the system malfunction by
the operation of the warning lamp even if the malfunction is
repaired completely.
l``TROUBLE DIAG RECORD''
The memory of TROUBLE DIAG RECORD cannot be erased.
Without CONSULT
After a malfunction is repaired, switch the ignition ``OFF'' for at least one second, then back ``ON''. Diagno-
sis mode returns to the User mode. At that time, the problem code is cleared.
How to Perform Trouble Diagnoses for Quick
and Accurate Repair
A good understanding of the malfunction conditions can make troubleshooting faster and more accurate.
In general, each customer feels differently about a problem. It is important to fully understand the symptoms
or conditions for a customer complaint.
INFORMATION FROM CUSTOMER
WHAT ........ Vehicle model
WHEN ....... Date, Frequencies
WHERE ..... Road conditions
HOW .......... Operating conditions, Symptoms
PRELIMINARY CHECK
Check that the following parts are in good order.
lBattery [Refer to EL section (``BATTERY'').]
lFuse [Refer to EL section (``Fuse'', ``POWER SUPPLY ROUTING'').]
lSystem component-to-harness connections
SRS357
TROUBLE DIAGNOSES Ð Supplemental Restraint System (SRS) Ð
4WD models
Trouble Diagnoses Introduction (Cont'd)
RS-24
Page 1188 of 1659
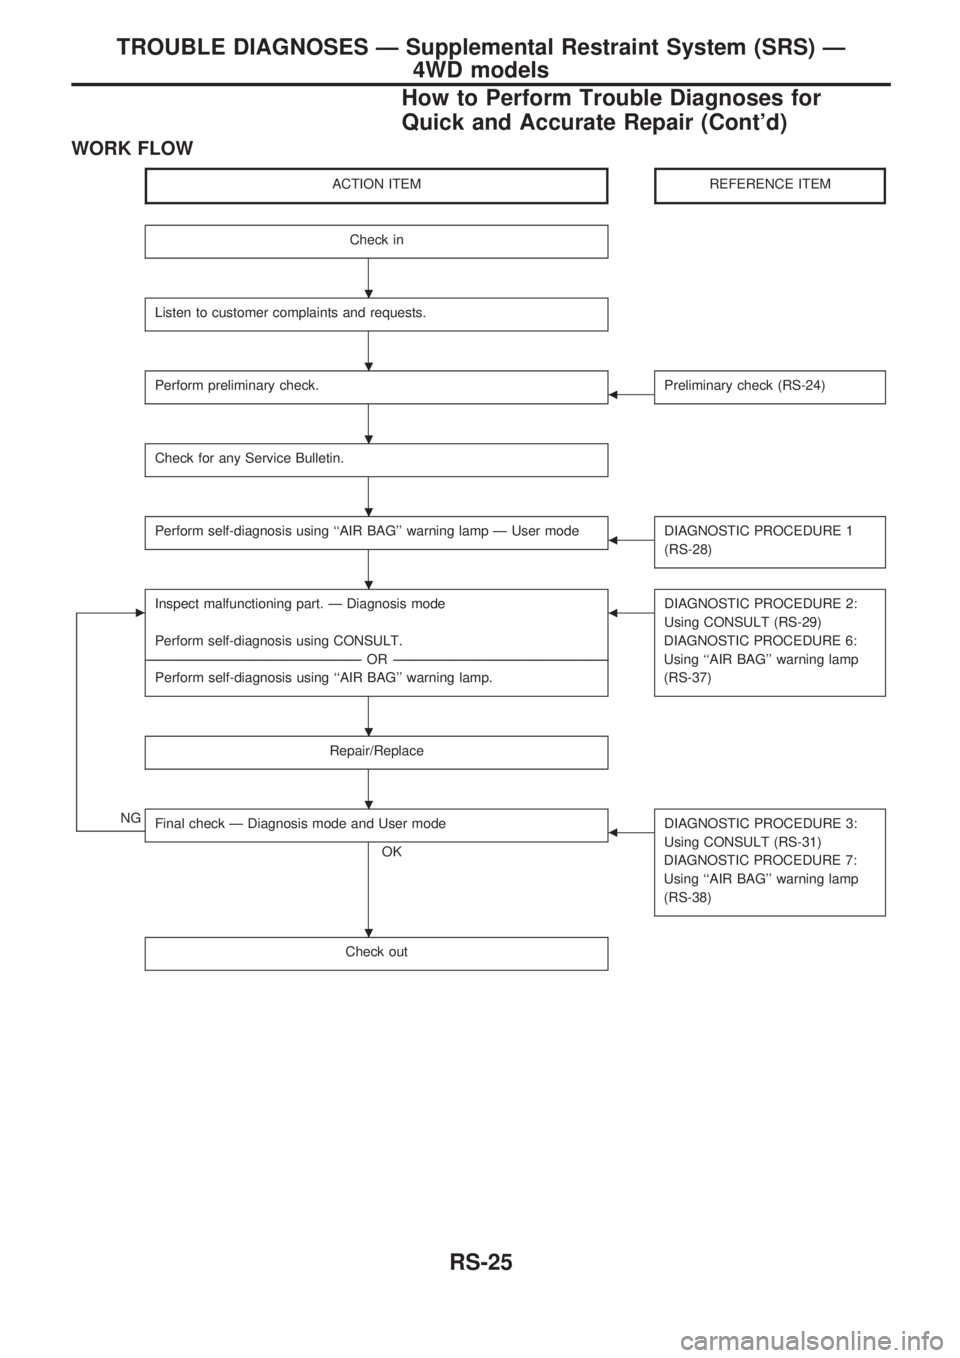
WORK FLOW
ACTION ITEMREFERENCE ITEM
Check in
Listen to customer complaints and requests.
Perform preliminary check.bPreliminary check (RS-24)
Check for any Service Bulletin.
Perform self-diagnosis using ``AIR BAG'' warning lamp Ð User modebDIAGNOSTIC PROCEDURE 1
(RS-28)
cInspect malfunctioning part. Ð Diagnosis mode
Perform self-diagnosis using CONSULT.
-----------------------------------------------------------------------------------------------------------------------------------------------------------------------------------------------------------------------------------------OR-----------------------------------------------------------------------------------------------------------------------------------------------------------------------------------------------------------------------------------------
Perform self-diagnosis using ``AIR BAG'' warning lamp.bDIAGNOSTIC PROCEDURE 2:
Using CONSULT (RS-29)
DIAGNOSTIC PROCEDURE 6:
Using ``AIR BAG'' warning lamp
(RS-37)
Repair/Replace
NGFinal check Ð Diagnosis mode and User mode
OK
bDIAGNOSTIC PROCEDURE 3:
Using CONSULT (RS-31)
DIAGNOSTIC PROCEDURE 7:
Using ``AIR BAG'' warning lamp
(RS-38)
Check out
.
.
.
.
.
.
.
.
TROUBLE DIAGNOSES Ð Supplemental Restraint System (SRS) Ð
4WD models
How to Perform Trouble Diagnoses for
Quick and Accurate Repair (Cont'd)
RS-25
Page 1191 of 1659
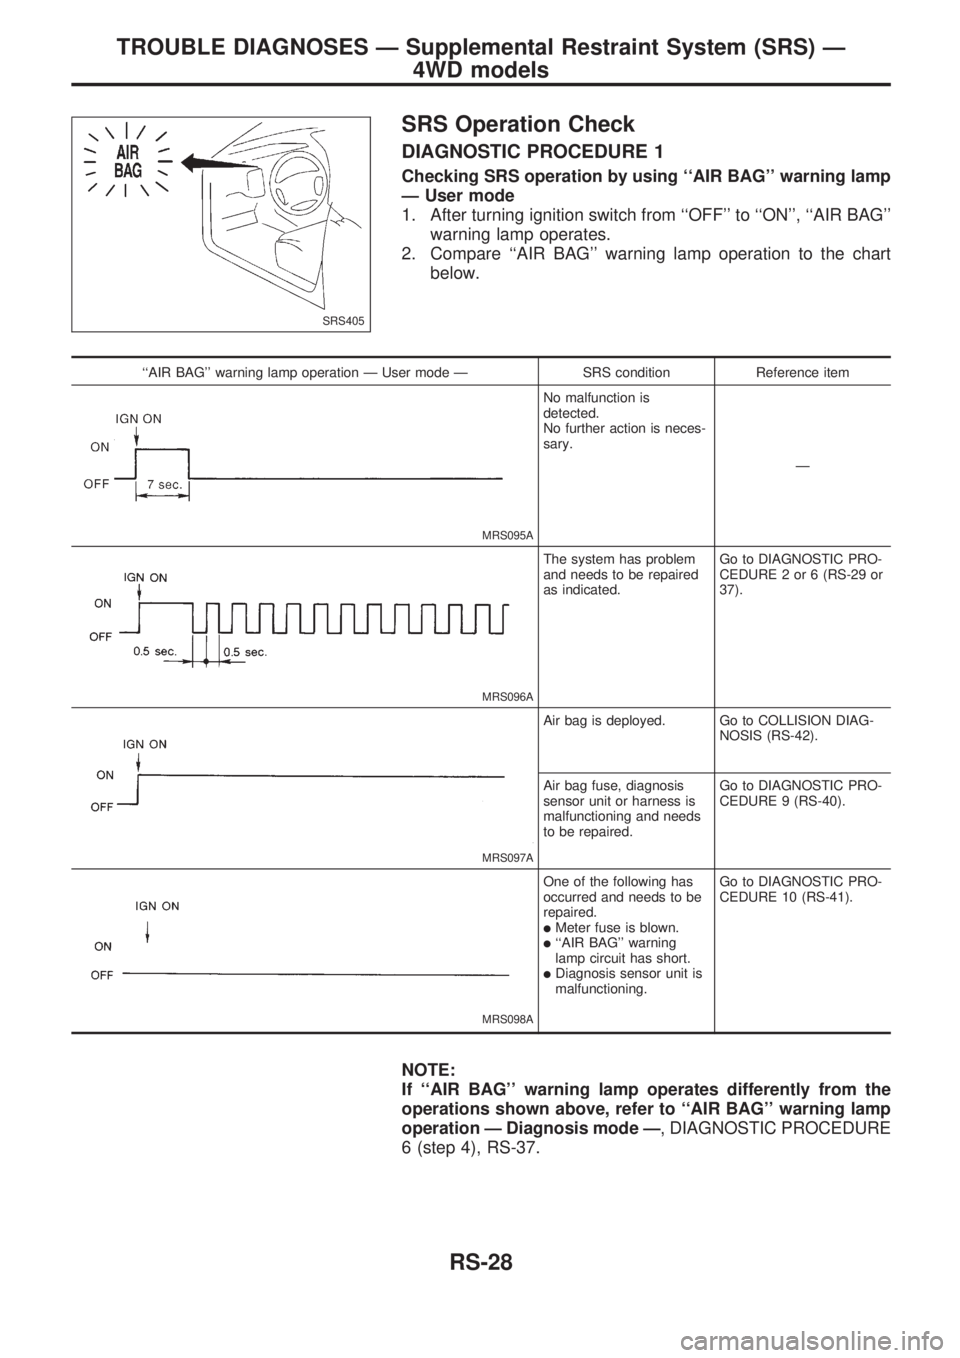
SRS Operation Check
DIAGNOSTIC PROCEDURE 1
Checking SRS operation by using ``AIR BAG'' warning lamp
Ð User mode
1. After turning ignition switch from ``OFF'' to ``ON'', ``AIR BAG''
warning lamp operates.
2. Compare ``AIR BAG'' warning lamp operation to the chart
below.
``AIR BAG'' warning lamp operation Ð User mode Ð SRS condition Reference item
MRS095A
No malfunction is
detected.
No further action is neces-
sary.
Ð
MRS096A
The system has problem
and needs to be repaired
as indicated.Go to DIAGNOSTIC PRO-
CEDURE 2 or 6 (RS-29 or
37).
MRS097A
Air bag is deployed. Go to COLLISION DIAG-
NOSIS (RS-42).
Air bag fuse, diagnosis
sensor unit or harness is
malfunctioning and needs
to be repaired.Go to DIAGNOSTIC PRO-
CEDURE 9 (RS-40).
MRS098A
One of the following has
occurred and needs to be
repaired.
lMeter fuse is blown.l``AIR BAG'' warning
lamp circuit has short.
lDiagnosis sensor unit is
malfunctioning.Go to DIAGNOSTIC PRO-
CEDURE 10 (RS-41).
NOTE:
If ``AIR BAG'' warning lamp operates differently from the
operations shown above, refer to ``AIR BAG'' warning lamp
operation Ð Diagnosis mode Ð, DIAGNOSTIC PROCEDURE
6 (step 4), RS-37.
SRS405
TROUBLE DIAGNOSES Ð Supplemental Restraint System (SRS) Ð
4WD models
RS-28
Page 1193 of 1659
![NISSAN PICK-UP 1998 Repair Manual If no self-diagnostic failure is detected on ``SELF-DIAG [CUR-
RENT] even though malfunction is detected in DIAGNOSTIC
PROCEDURE 1, check the battery voltage. If the battery voltage
is less than 9V, NISSAN PICK-UP 1998 Repair Manual If no self-diagnostic failure is detected on ``SELF-DIAG [CUR-
RENT] even though malfunction is detected in DIAGNOSTIC
PROCEDURE 1, check the battery voltage. If the battery voltage
is less than 9V,](/manual-img/5/57374/w960_57374-1192.png)
If no self-diagnostic failure is detected on ``SELF-DIAG [CUR-
RENT]'' even though malfunction is detected in DIAGNOSTIC
PROCEDURE 1, check the battery voltage. If the battery voltage
is less than 9V, charge the battery. Then go to DIAGNOSTIC
PROCEDURE 3, page RS-31. If the battery voltage is OK, go to
DIAGNOSTIC PROCEDURE 4, page RS-33, to diagnose the
following situations:
lDiagnosis results (previously stored in the memory) might not
be erased after repair.
lThe SRS system malfunctions intermittently.
8. Touch ``PRINT''.
9. Compare diagnostic codes to the CONSULT DIAGNOSTIC
CODE CHART, page RS-30.
10. Touch ``BACK'' key of CONSULT until SELECT SYSTEM
appears in order to return to User mode from Diagnosis
mode, then turn off CONSULT.
11. Turn ignition switch ``OFF'', then disconnect CONSULT and
both battery cables.
12. Repair the system as outlined by the ``Repair order'' in CON-
SULT DIAGNOSTIC CODE CHART, that corresponds to the
problem code. For replacement procedure of component
parts, refer to RS-10.
13. After repairing the system, go to DIAGNOSTIC PROCE-
DURE 3 for final checking, page RS-31.
CONSULT DIAGNOSTIC CODE CHART (``SELF-DIAG [CURRENT]'')
Diagnostic item Explanation/Possible causesRepair order
Recheck SRS at each replace-
ment.
NO SELF DIAGNOSTIC
FAILURE INDICATED.When malfunction is indi-
cated by the ``AIR BAG''
warning lamp in User
mode.
lSelf-diagnostic failure ``SELF-
DIAG [PAST]'' (previously stored
in the memory) might not be
erased after repair.
lIntermittent problem has been
detected in the past.
lGo to DIAGNOSTIC PROCE-
DURE 4 (RS-33).
lNo malfunction is detected.lGo to DIAGNOSTIC PROCE-
DURE 3 (RS-31).
AIRBAG MODULE
[OPEN]
lDriver's air bag module circuit is open. (including the spiral
cable)1. Visually check the wiring harness
connection.
2. Replace the harness if it has vis-
ible damage.
3. Replace driver's air bag module.
(Before disposal of it, it must be
deployed.)
4. Replace the spiral cable.
5. Replace the diagnosis sensor
unit. AIRBAG MODULE
[VB-SHORT]
lDriver's air bag module circuit is shorted to some power sup-
ply circuit. (including the spiral cable)
AIRBAG MODULE
[GND-SHORT]
lDriver's air bag module circuit is shorted to ground. (including
the spiral cable)
AIRBAG MODULE
[SHORT]
lDriver's air bag module circuits are shorted to each other.
CONTROL UNIT
lDiagnosis sensor unit is out of order. 1. Visually check the wiring harness
connections.
2. Replace the diagnosis sensor
unit.
* Follow the procedures in numerical order when repairing malfunctioning parts. Confirm whether malfunction is eliminated
using the air bag warning lamp or CONSULT each time repair is finished. If malfunction is still observed, proceed to the
next step. When malfunction is eliminated, further repair work is not required.
SRS049
TROUBLE DIAGNOSES Ð Supplemental Restraint System (SRS) Ð
4WD models
Trouble Diagnoses with CONSULT (Cont'd)
RS-30
Page 1195 of 1659
![NISSAN PICK-UP 1998 Repair Manual 8. Touch ``ERASE.
NOTE:
Touch ``ERASE to clear the memory of the malfunction
(SELF-DIAG [PAST]).
If the memory of the malfunction is ``SELF-DIAG [PAST] is
not erased, the User mode shows the sys NISSAN PICK-UP 1998 Repair Manual 8. Touch ``ERASE.
NOTE:
Touch ``ERASE to clear the memory of the malfunction
(SELF-DIAG [PAST]).
If the memory of the malfunction is ``SELF-DIAG [PAST] is
not erased, the User mode shows the sys](/manual-img/5/57374/w960_57374-1194.png)
8. Touch ``ERASE''.
NOTE:
Touch ``ERASE'' to clear the memory of the malfunction
(SELF-DIAG [PAST]).
If the memory of the malfunction is ``SELF-DIAG [PAST]'' is
not erased, the User mode shows the system malfunction by
the operation of the warning lamp even if the malfunction is
repaired completely.
9. Touch ``BACK'' key of CONSULT to select ``SELF-DIAG
[PAST]'' in the ``SELECT DIAG MODE'' screen. Touch
``SELF-DIAG [PAST]''.
10. Check that no self-diagnostic failure is detected on ``SELF-
DIAG [PAST]''.
11. Touch ``BACK'' key of CONSULT until SELECT SYSTEM
appears in order to return to User mode from Diagnosis
mode, turn off CONSULT, then disconnect CONSULT.
12. Turn ignition switch ``OFF''.
13. Go to DIAGNOSTIC PROCEDURE 1, page RS-28 to check
SRS operation by using ``AIR BAG'' warning lamp with User
mode.
SRS357
SRS050
SRS062
TROUBLE DIAGNOSES Ð Supplemental Restraint System (SRS) Ð
4WD models
Trouble Diagnoses with CONSULT (Cont'd)
RS-32
Page 1200 of 1659
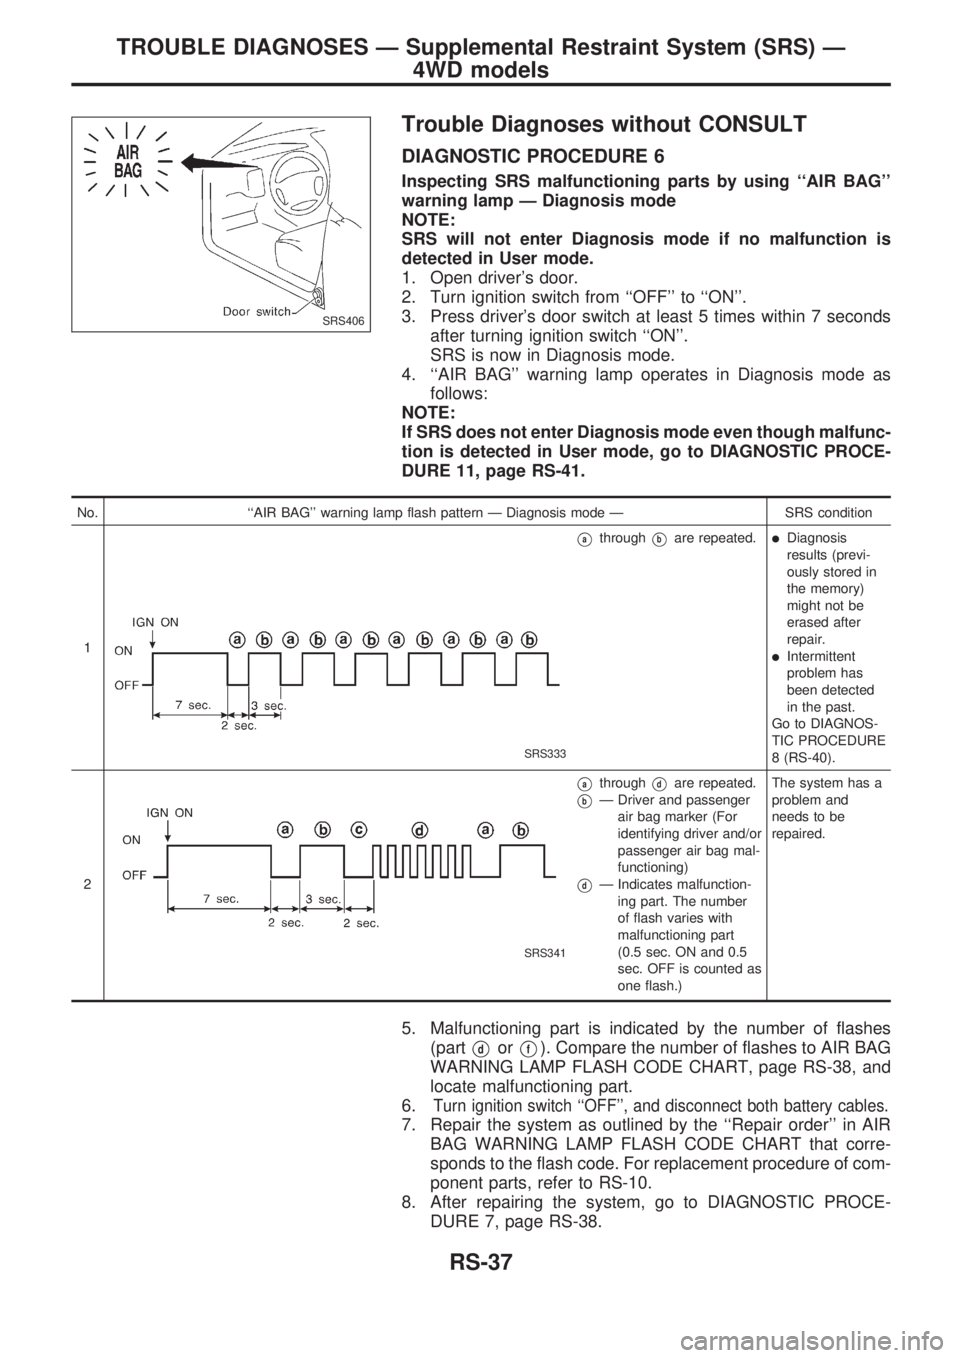
Trouble Diagnoses without CONSULT
DIAGNOSTIC PROCEDURE 6
Inspecting SRS malfunctioning parts by using ``AIR BAG''
warning lamp Ð Diagnosis mode
NOTE:
SRS will not enter Diagnosis mode if no malfunction is
detected in User mode.
1. Open driver's door.
2. Turn ignition switch from ``OFF'' to ``ON''.
3. Press driver's door switch at least 5 times within 7 seconds
after turning ignition switch ``ON''.
SRS is now in Diagnosis mode.
4. ``AIR BAG'' warning lamp operates in Diagnosis mode as
follows:
NOTE:
If SRS does not enter Diagnosis mode even though malfunc-
tion is detected in User mode, go to DIAGNOSTIC PROCE-
DURE 11, page RS-41.
No. ``AIR BAG'' warning lamp flash pattern Ð Diagnosis mode Ð SRS condition
1
SRS333
VathroughVbare repeated.lDiagnosis
results (previ-
ously stored in
the memory)
might not be
erased after
repair.
lIntermittent
problem has
been detected
in the past.
Go to DIAGNOS-
TIC PROCEDURE
8 (RS-40).
2
SRS341
VathroughVdare repeated.
VbÐ Driver and passenger
air bag marker (For
identifying driver and/or
passenger air bag mal-
functioning)
VdÐ Indicates malfunction-
ing part. The number
of flash varies with
malfunctioning part
(0.5 sec. ON and 0.5
sec. OFF is counted as
one flash.)The system has a
problem and
needs to be
repaired.
5. Malfunctioning part is indicated by the number of flashes
(part
VdorVf). Compare the number of flashes to AIR BAG
WARNING LAMP FLASH CODE CHART, page RS-38, and
locate malfunctioning part.
6.
Turn ignition switch ``OFF'', and disconnect both battery cables.
7. Repair the system as outlined by the ``Repair order'' in AIR
BAG WARNING LAMP FLASH CODE CHART that corre-
sponds to the flash code. For replacement procedure of com-
ponent parts, refer to RS-10.
8. After repairing the system, go to DIAGNOSTIC PROCE-
DURE 7, page RS-38.
SRS406
TROUBLE DIAGNOSES Ð Supplemental Restraint System (SRS) Ð
4WD models
RS-37