Page 1642 of 2543
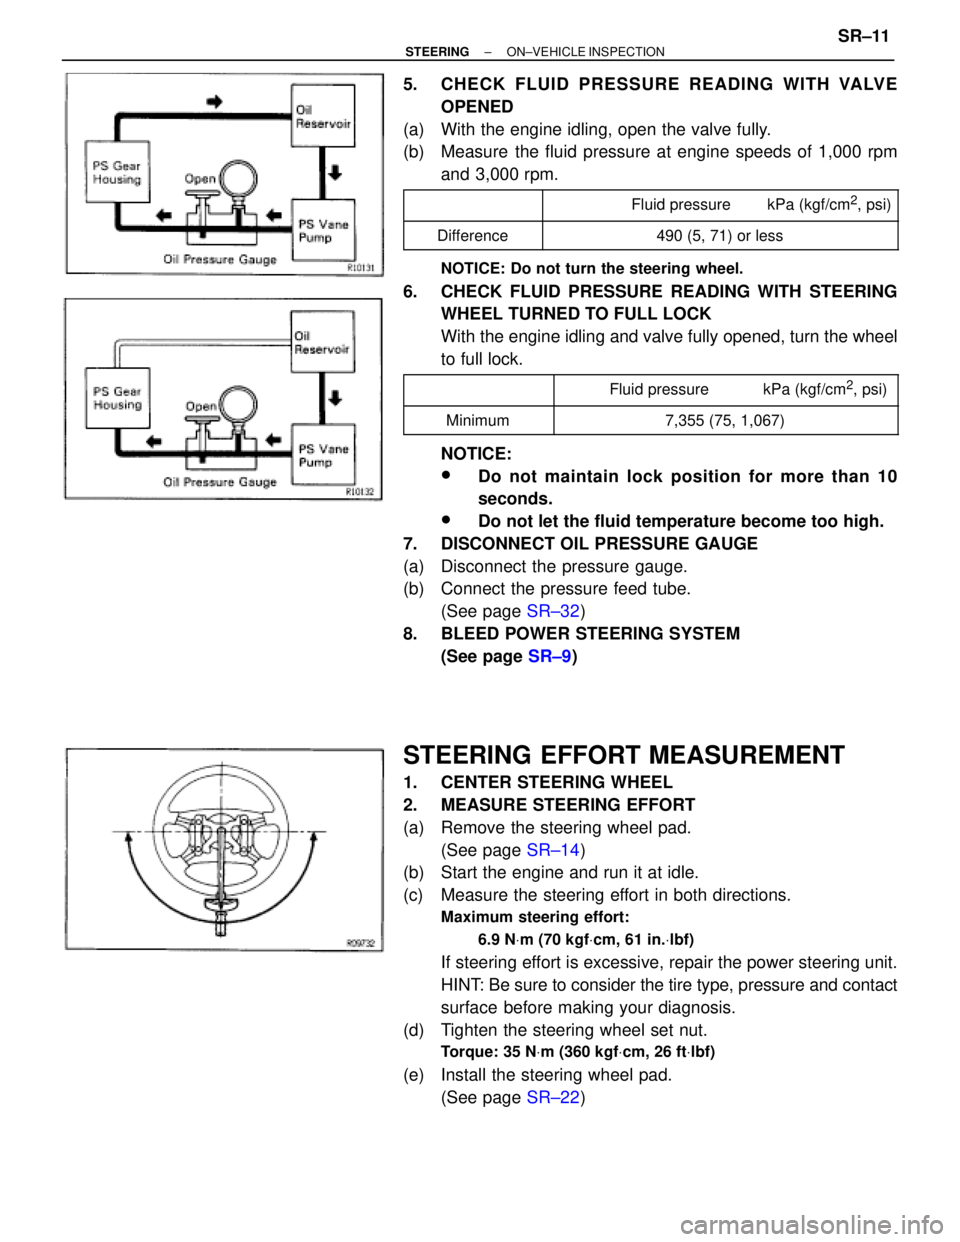
5. CHECK FLUID PRESSURE READING WITH VALVE
OPENED
(a) With the engine idling, open the valve fully.
(b) Measure the fluid pressure at engine speeds of 1,000 rpm
and 3,000 rpm.
������� �
������ �������
���������������� �
��������������� ����������������Fluid pressure kPa (kgf/cm2, psi)
������� �������Difference���������������� ����������������490 (5, 71) or less
NOTICE: Do not turn the steering wheel.
6. CHECK FLUID PRESSURE READING WITH STEERING
WHEEL TURNED TO FULL LOCK
With the engine idling and valve fully opened, turn the wheel
to full lock.
������� ����������������������� ���������������� Fluid pressure kPa (kgf/cm2, psi)������� �
������ �������Minimum
���������������� �
��������������� ����������������7,355 (75, 1,067)
NOTICE:
wDo not maintain lock position for more than 10
seconds.
wDo not let the fluid temperature become too high.
7. DISCONNECT OIL PRESSURE GAUGE
(a) Disconnect the pressure gauge.
(b) Connect the pressure feed tube.
(See page SR±32)
8. BLEED POWER STEERING SYSTEM
(See page SR±9)
STEERING EFFORT MEASUREMENT
1. CENTER STEERING WHEEL
2. MEASURE STEERING EFFORT
(a) Remove the steering wheel pad.
(See page SR±14)
(b) Start the engine and run it at idle.
(c) Measure the steering effort in both directions.
Maximum steering effort:
6.9 NVm (70 kgfVcm, 61 in.Vlbf)
If steering effort is excessive, repair the power steering unit.
HINT: Be sure to consider the tire type, pressure and contact
surface before making your diagnosis.
(d) Tighten the steering wheel set nut.
Torque: 35 NVm (360 kgfVcm, 26 ftVlbf)
(e) Install the steering wheel pad.
(See page SR±22)
± STEERINGON±VEHICLE INSPECTIONSR±11
Page 1649 of 2543
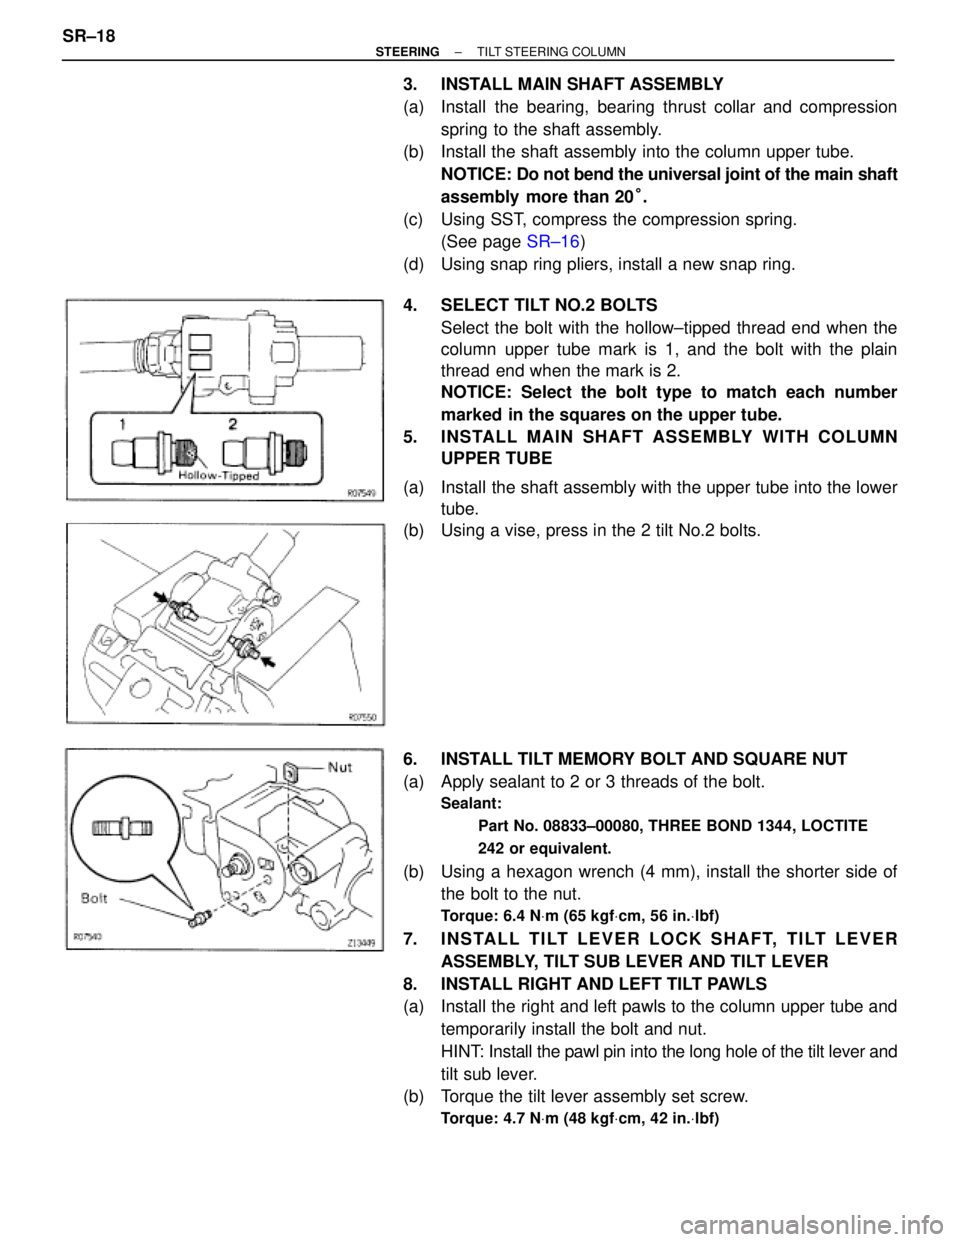
3. INSTALL MAIN SHAFT ASSEMBLY
(a) Install the bearing, bearing thrust collar and compression
spring to the shaft assembly.
(b) Install the shaft assembly into the column upper tube.
NOTICE: Do not bend the universal joint of the main shaft
assembly more than 20°.
(c) Using SST, compress the compression spring.
(See page SR±16)
(d) Using snap ring pliers, install a new snap ring.
4. SELECT TILT NO.2 BOLTS
Select the bolt with the hollow±tipped thread end when the
column upper tube mark is 1, and the bolt with the plain
thread end when the mark is 2.
NOTICE: Select the bolt type to match each number
marked in the squares on the upper tube.
5. INSTALL MAIN SHAFT ASSEMBLY WITH COLUMN
UPPER TUBE
(a) Install the shaft assembly with the upper tube into the lower
tube.
(b) Using a vise, press in the 2 tilt No.2 bolts.
6. INSTALL TILT MEMORY BOLT AND SQUARE NUT
(a) Apply sealant to 2 or 3 threads of the bolt.
Sealant:
Part No. 08833±00080, THREE BOND 1344, LOCTITE
242 or equivalent.
(b) Using a hexagon wrench (4 mm), install the shorter side of
the bolt to the nut.
Torque: 6.4 NVm (65 kgfVcm, 56 in.Vlbf)
7. INSTALL TILT LEVER LOCK SHAFT, TILT LEVER
ASSEMBLY, TILT SUB LEVER AND TILT LEVER
8. INSTALL RIGHT AND LEFT TILT PAWLS
(a) Install the right and left pawls to the column upper tube and
temporarily install the bolt and nut.
HINT: Install the pawl pin into the long hole of the tilt lever and
tilt sub lever.
(b) Torque the tilt lever assembly set screw.
Torque: 4.7 NVm (48 kgfVcm, 42 in.Vlbf)
SR±18± STEERINGTILT STEERING COLUMN
Page 1650 of 2543
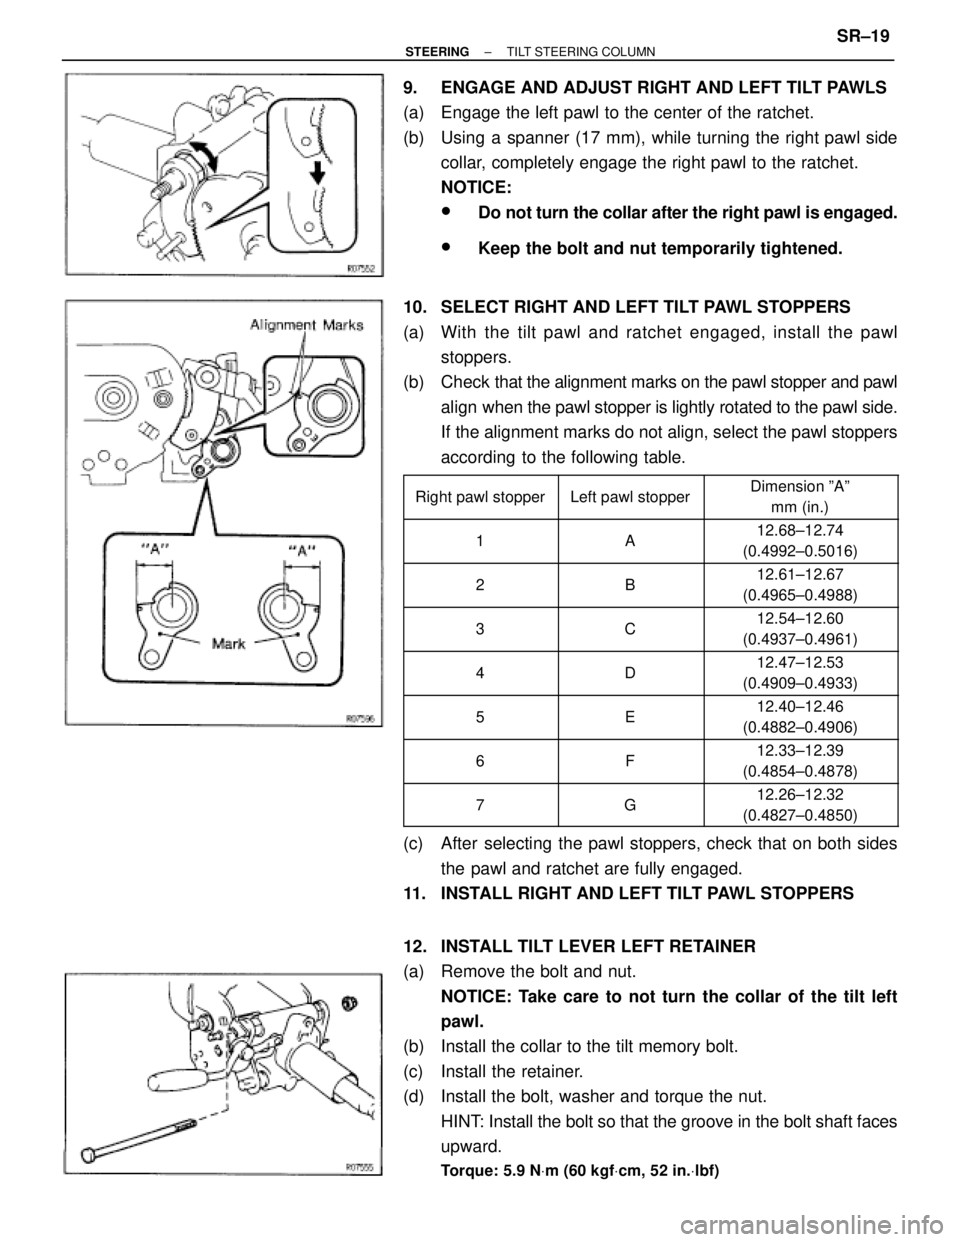
9. ENGAGE AND ADJUST RIGHT AND LEFT TILT PAWLS
(a) Engage the left pawl to the center of the ratchet.
(b) Using a spanner (17 mm), while turning the right pawl side
collar, completely engage the right pawl to the ratchet.
NOTICE:
wDo not turn the collar after the right pawl is engaged.
wKeep the bolt and nut temporarily tightened.
10. SELECT RIGHT AND LEFT TILT PAWL STOPPERS
(a) With the tilt pawl and ratchet engaged, install the pawl
stoppers.
(b) Check that the alignment marks on the pawl stopper and pawl
align when the pawl stopper is lightly rotated to the pawl side.
If the alignment marks do not align, select the pawl stoppers
according to the following table.
�������� �
������� ��������Right pawl stopper
������� �
������ �������Left pawl stopper
��������� �
�������� ���������Dimension ºAº
mm (in.)
�������� �
������� ��������1
������� �
������ �������A
��������� �
�������� ���������
12.68±12.74
(0.4992±0.5016)
�������� �
������� ��������2������� �
������ �������B��������� �
�������� ���������
12.61±12.67
(0.4965±0.4988)
�������� �
������� ��������
3������� �
������ �������
C��������� �
�������� ���������
12.54±12.60
(0.4937±0.4961)
�������� ��������4������� �������D��������� ���������12.47±12.53
(0.4909±0.4933)
�������� �
������� ��������5
������� �
������ �������E
��������� �
�������� ���������12.40±12.46
(0.4882±0.4906)
�������� �
������� ��������6
������� �
������ �������F
��������� �
�������� ���������12.33±12.39
(0.4854±0.4878)
�������� �
������� ��������7������� �
������ �������G��������� �
�������� ���������
12.26±12.32
(0.4827±0.4850)
(c) After selecting the pawl stoppers, check that on both sides
the pawl and ratchet are fully engaged.
11. INSTALL RIGHT AND LEFT TILT PAWL STOPPERS
12. INSTALL TILT LEVER LEFT RETAINER
(a) Remove the bolt and nut.
NOTICE: Take care to not turn the collar of the tilt left
pawl.
(b) Install the collar to the tilt memory bolt.
(c) Install the retainer.
(d) Install the bolt, washer and torque the nut.
HINT: Install the bolt so that the groove in the bolt shaft faces
upward.
Torque: 5.9 NVm (60 kgfVcm, 52 in.Vlbf)
± STEERINGTILT STEERING COLUMNSR±19
Page 1651 of 2543
(e) Torque the nut of the tilt No.2 bolt side.
Torque: 15 NVm (150 kgfVcm, 11 ftVlbf)
(f) Torque the nut of the memory bolt side.
Torque: 5.9 NVm (60 kgfVcm, 52 in.Vlbf)
(g) Install the spacer and a new E±ring.
13. INSTALL TILT LEVER RIGHT RETAINER
(a) Torque the nut.
Torque: 15 NVm (150 kgfVcm, 11 ftVlbf)
(b) Install a new E±ring.
14. INSTALL TURN SIGNAL BRACKET
(a) Apply sealant to 2 or 3 threads of the 2 bolts.
Sealant:
Part No. 08833±00080, THREE BOND 1344, LOCTITE
242 or equivalent.
(b) Torque the 2 bolts.
Torque: 8.8 NVm (90 kgfVcm, 78 in.Vlbf)
15. INSTALL 3 TENSION SPRINGS
16. INSTALL COMPRESSION SPRING
(a) Install the 2 bushings to the spring.
(b) Apply sealant to 2 or 3 threads of the torx screw.
Sealant:
Part No. 08833±00080, THREE BOND 1344, LOCTITE
242 or equivalent.
(c) Using a torx socket wrench, torque the screw.
Torque: 6.4 NVm (65 kgfVcm, 56 in.Vlbf)
17. INSTALL COLUMN PROTECTOR AND WIRING HARNESS
CLAMP
Tighten the 2 screws.
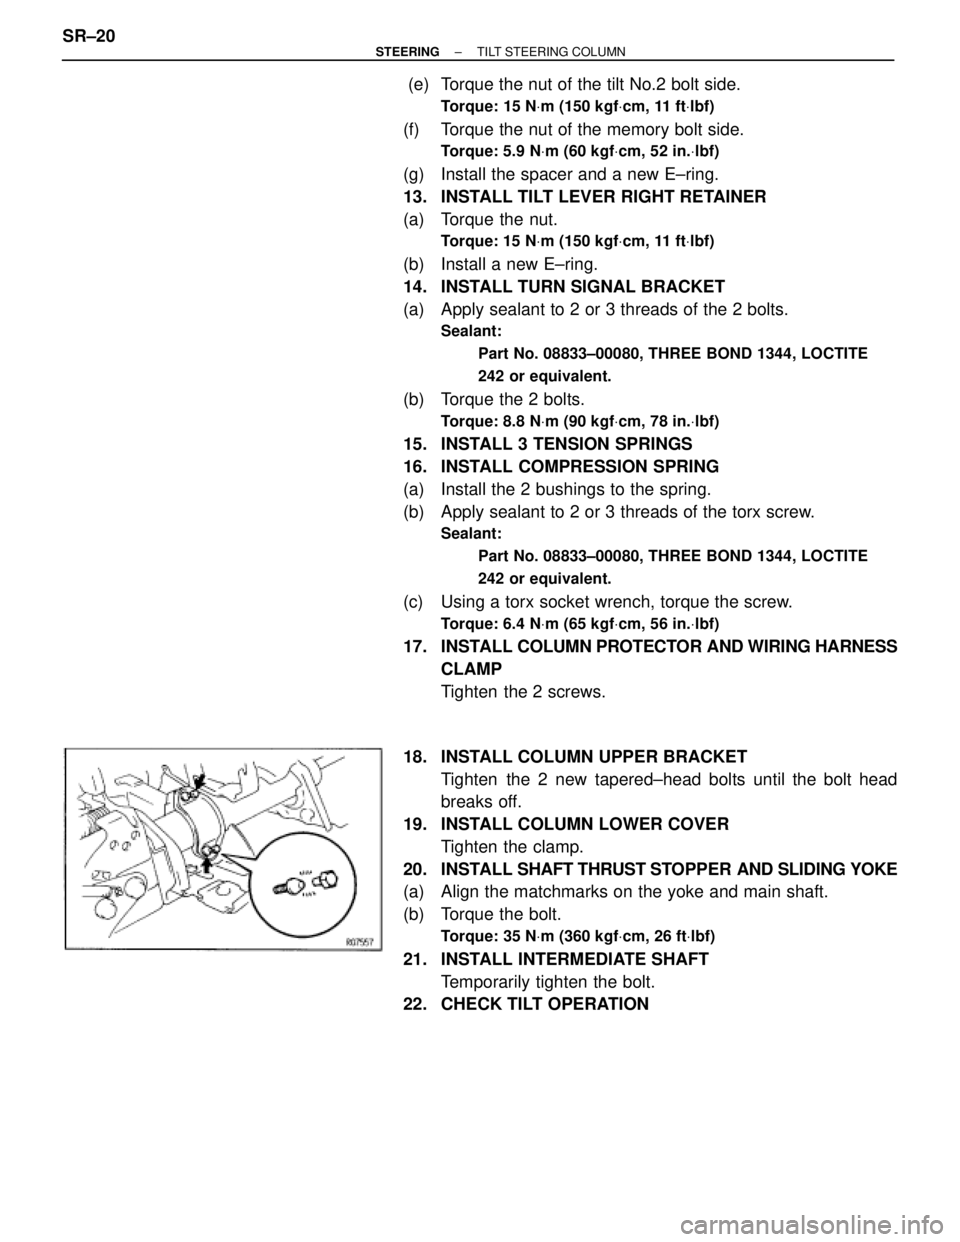
18. INSTALL COLUMN UPPER BRACKET
Tighten the 2 new tapered±head bolts until the bolt head
breaks off.
19. INSTALL COLUMN LOWER COVER
Tighten the clamp.
20. INSTALL SHAFT THRUST STOPPER AND SLIDING YOKE
(a) Align the matchmarks on the yoke and main shaft.
(b) Torque the bolt.
Torque: 35 NVm (360 kgfVcm, 26 ftVlbf)
21. INSTALL INTERMEDIATE SHAFT
Temporarily tighten the bolt.
22. CHECK TILT OPERATION SR±20
± STEERINGTILT STEERING COLUMN
Page 1652 of 2543
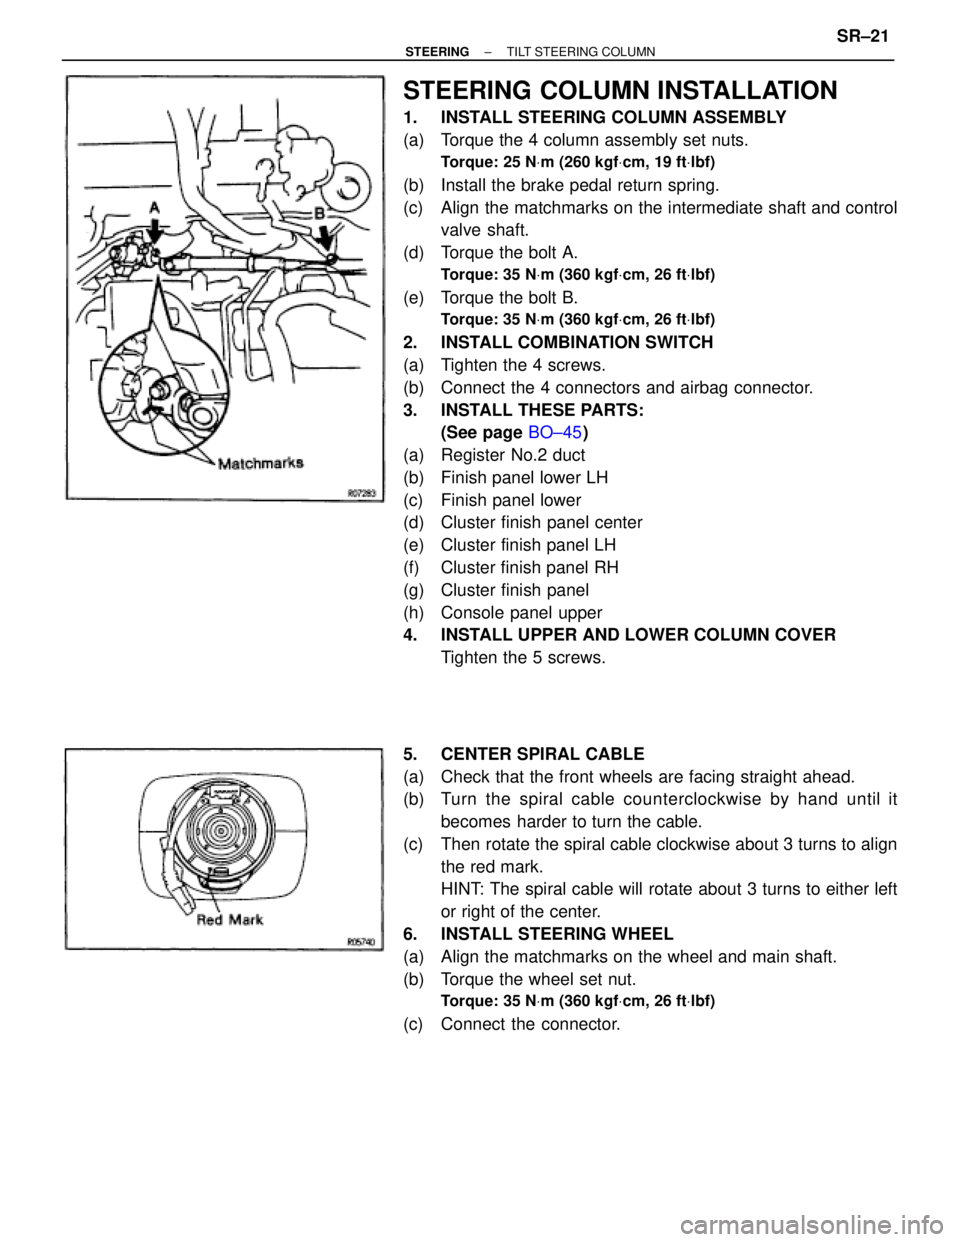
STEERING COLUMN INSTALLATION
1. INSTALL STEERING COLUMN ASSEMBLY
(a) Torque the 4 column assembly set nuts.
Torque: 25 NVm (260 kgfVcm, 19 ftVlbf)
(b) Install the brake pedal return spring.
(c) Align the matchmarks on the intermediate shaft and control
valve shaft.
(d) Torque the bolt A.
Torque: 35 NVm (360 kgfVcm, 26 ftVlbf)
(e) Torque the bolt B.
Torque: 35 NVm (360 kgfVcm, 26 ftVlbf)
2. INSTALL COMBINATION SWITCH
(a) Tighten the 4 screws.
(b) Connect the 4 connectors and airbag connector.
3. INSTALL THESE PARTS:
(See page BO±45)
(a) Register No.2 duct
(b) Finish panel lower LH
(c) Finish panel lower
(d) Cluster finish panel center
(e) Cluster finish panel LH
(f) Cluster finish panel RH
(g) Cluster finish panel
(h) Console panel upper
4. INSTALL UPPER AND LOWER COLUMN COVER
Tighten the 5 screws.
5. CENTER SPIRAL CABLE
(a) Check that the front wheels are facing straight ahead.
(b) Turn the spiral cable counterclockwise by hand until it
becomes harder to turn the cable.
(c) Then rotate the spiral cable clockwise about 3 turns to align
the red mark.
HINT: The spiral cable will rotate about 3 turns to either left
or right of the center.
6. INSTALL STEERING WHEEL
(a) Align the matchmarks on the wheel and main shaft.
(b) Torque the wheel set nut.
Torque: 35 NVm (360 kgfVcm, 26 ftVlbf)
(c) Connect the connector.
± STEERINGTILT STEERING COLUMNSR±21
Page 1653 of 2543
7. INSTALL STEERING WHEEL PAD
(a) Connect the airbag connector.
(b) Install the pad after confirming that the circumference groove
of the torx screw is caught on the screw case.
(c) Using a torx socket wrench, torque the 2 screws.
Torque: 7.1 NVm (72 kgfVcm, 62 inVlbf)
NOTICE:
wMake sure the pad is installed to the specified torque.
wIf the pad has been dropped, or there are cracks, dents or
other defects in the case or connector, replace the pad
with a new one.
wWhen installing the pad, take care that the wiring does
not interfere with other parts and is not pinched between
other parts.
8. CHECK STEERING WHEEL CENTER POINT SR±22
± STEERINGTILT STEERING COLUMN
Page 1658 of 2543
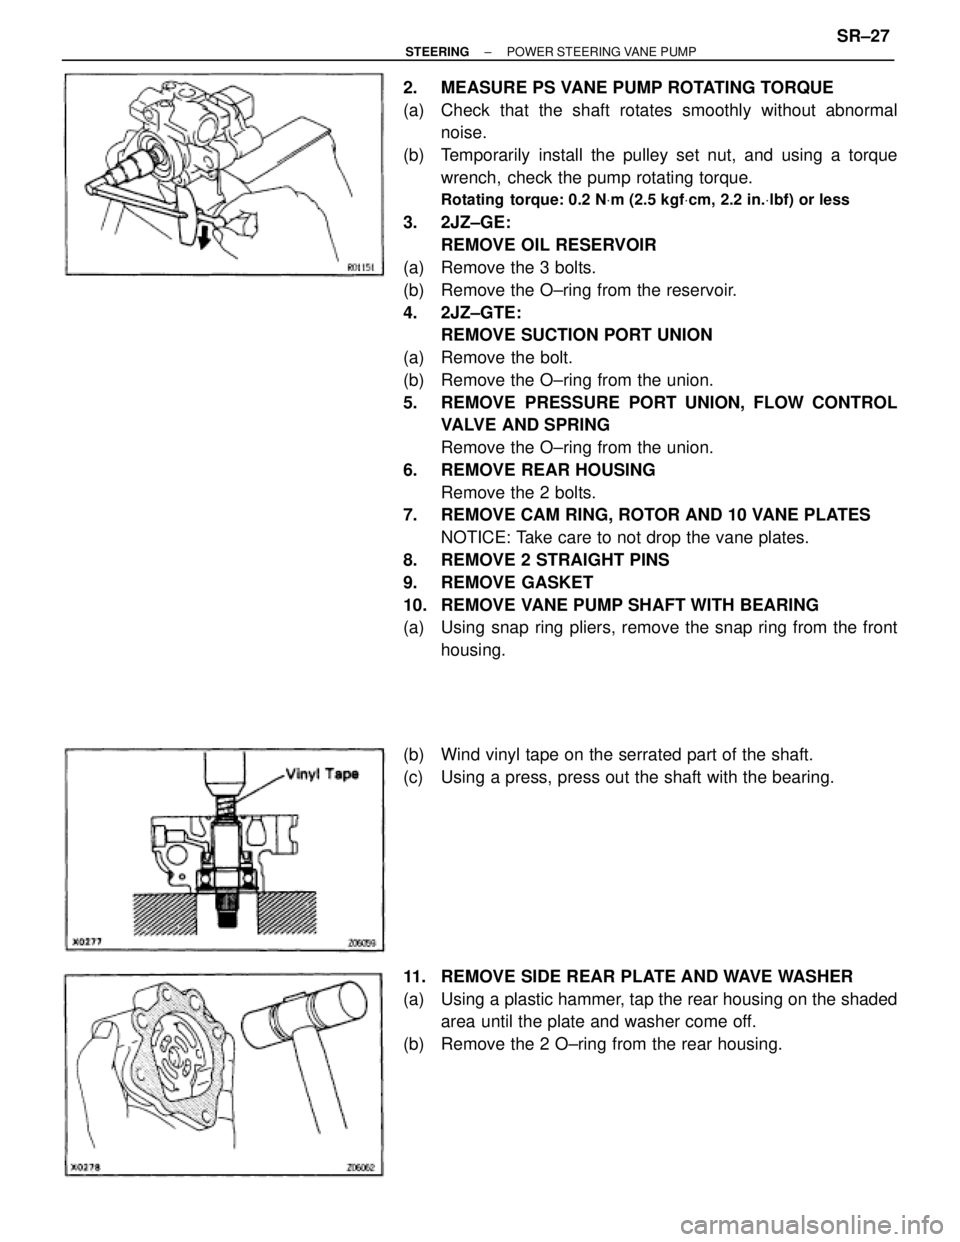
2. MEASURE PS VANE PUMP ROTATING TORQUE
(a) Check that the shaft rotates smoothly without abnormal
noise.
(b) Temporarily install the pulley set nut, and using a torque
wrench, check the pump rotating torque.
Rotating torque: 0.2 NVm (2.5 kgfVcm, 2.2 in.Vlbf) or less
3. 2JZ±GE:
REMOVE OIL RESERVOIR
(a) Remove the 3 bolts.
(b) Remove the O±ring from the reservoir.
4. 2JZ±GTE:
REMOVE SUCTION PORT UNION
(a) Remove the bolt.
(b) Remove the O±ring from the union.
5. REMOVE PRESSURE PORT UNION, FLOW CONTROL
VALVE AND SPRING
Remove the O±ring from the union.
6. REMOVE REAR HOUSING
Remove the 2 bolts.
7. REMOVE CAM RING, ROTOR AND 10 VANE PLATES
NOTICE: Take care to not drop the vane plates.
8. REMOVE 2 STRAIGHT PINS
9. REMOVE GASKET
10. REMOVE VANE PUMP SHAFT WITH BEARING
(a) Using snap ring pliers, remove the snap ring from the front
housing.
(b) Wind vinyl tape on the serrated part of the shaft.
(c) Using a press, press out the shaft with the bearing.
11. REMOVE SIDE REAR PLATE AND WAVE WASHER
(a) Using a plastic hammer, tap the rear housing on the shaded
area until the plate and washer come off.
(b) Remove the 2 O±ring from the rear housing.
± STEERINGPOWER STEERING VANE PUMPSR±27
Page 1662 of 2543
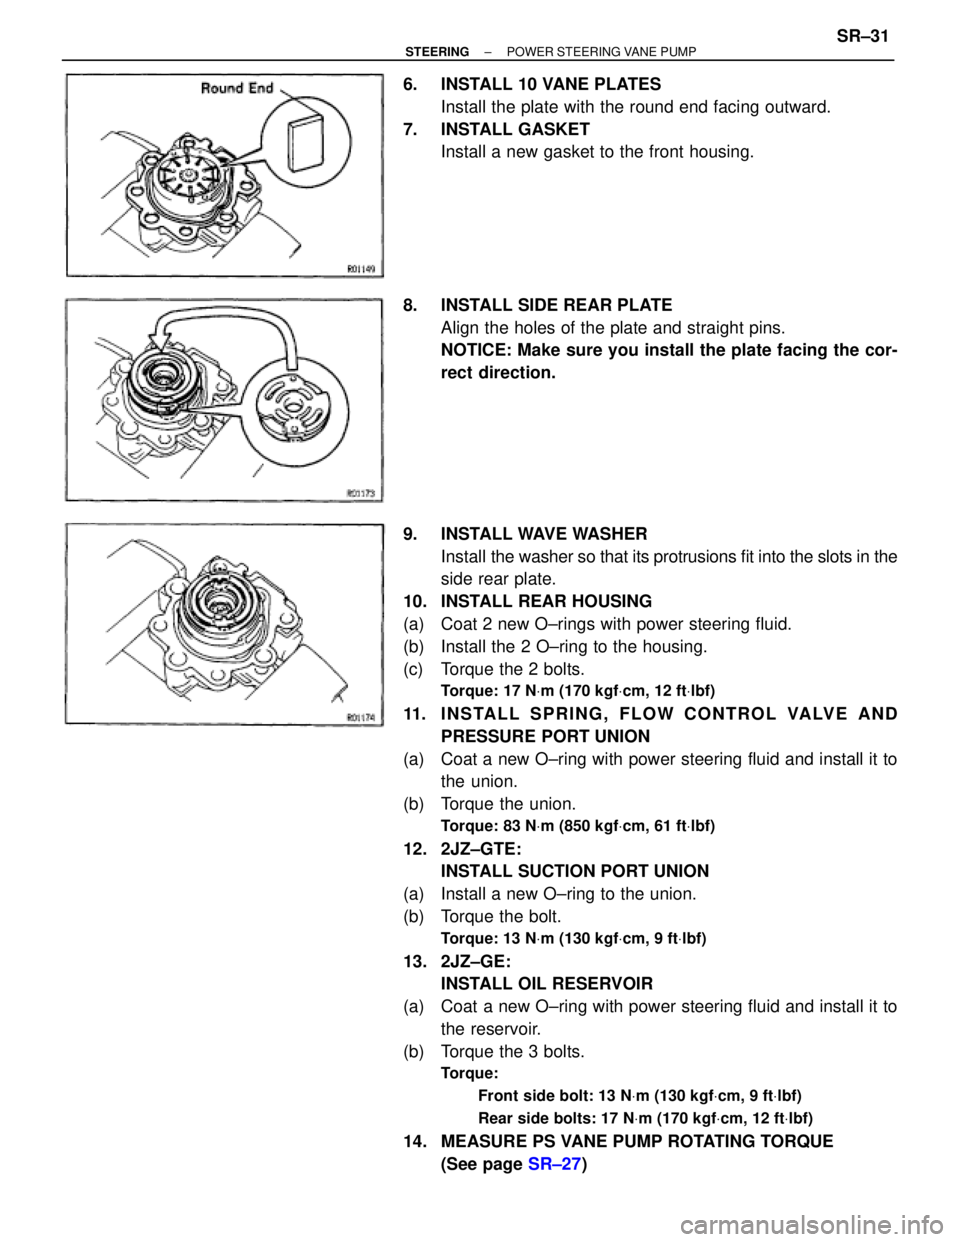
6. INSTALL 10 VANE PLATES
Install the plate with the round end facing outward.
7. INSTALL GASKET
Install a new gasket to the front housing.
8. INSTALL SIDE REAR PLATE
Align the holes of the plate and straight pins.
NOTICE: Make sure you install the plate facing the cor-
rect direction.
9. INSTALL WAVE WASHER
Install the washer so that its protrusions fit into the slots in the
side rear plate.
10. INSTALL REAR HOUSING
(a) Coat 2 new O±rings with power steering fluid.
(b) Install the 2 O±ring to the housing.
(c) Torque the 2 bolts.
Torque: 17 NVm (170 kgfVcm, 12 ftVlbf)
11. I N S TA L L S P R I N G , F L O W C O N T R O L VA LV E A N D
PRESSURE PORT UNION
(a) Coat a new O±ring with power steering fluid and install it to
the union.
(b) Torque the union.
Torque: 83 NVm (850 kgfVcm, 61 ftVlbf)
12. 2JZ±GTE:
INSTALL SUCTION PORT UNION
(a) Install a new O±ring to the union.
(b) Torque the bolt.
Torque: 13 NVm (130 kgfVcm, 9 ftVlbf)
13. 2JZ±GE:
INSTALL OIL RESERVOIR
(a) Coat a new O±ring with power steering fluid and install it to
the reservoir.
(b) Torque the 3 bolts.
Torque:
Front side bolt: 13 NVm (130 kgfVcm, 9 ftVlbf)
Rear side bolts: 17 NVm (170 kgfVcm, 12 ftVlbf)
14. MEASURE PS VANE PUMP ROTATING TORQUE
(See page SR±27)
± STEERINGPOWER STEERING VANE PUMPSR±31