Page 817 of 2543
FRONT DOOR ADJUSTMENT
1. ADJUST DOOR IN FORWARD / REARWARD AND VER-
TICAL DIRECTIONS
Using SST, adjust the door by loosening the body side hinge
bolts.
SST 09812±00020
Torque: 52 NVm (530 kgfVcm, 38 ftVlbf)
2. ADJUST DOOR IN LEFT/RIGHT AND VERTICAL
DIRECTIONS
Using SST, adjust the door by loosening the door side hinge
bolts.
SST 09812±00010
HINT: Substitute the standard bolt for the centering bolt. (See
page BO±10)
Torque: 25 NVm (260 kgfVcm, 19 ftVlbf)
3. ADJUST DOOR LOCK STRIKER
(a) Check that the door fit and door lock linkages are adjusted
correctly.
(b) Using a screwdriver, remove the striker cover.
(c) Using a torx wrench, loosen the striker mounting screws.
(d) Using a brass bar and hammer, tap the striker to adjust it.
CAUTION: Do not tap the striker too hard. BO±12
± BODYFRONT DOOR
Page 822 of 2543

BACK DOOR
BACK DOOR ADJUSTMENT
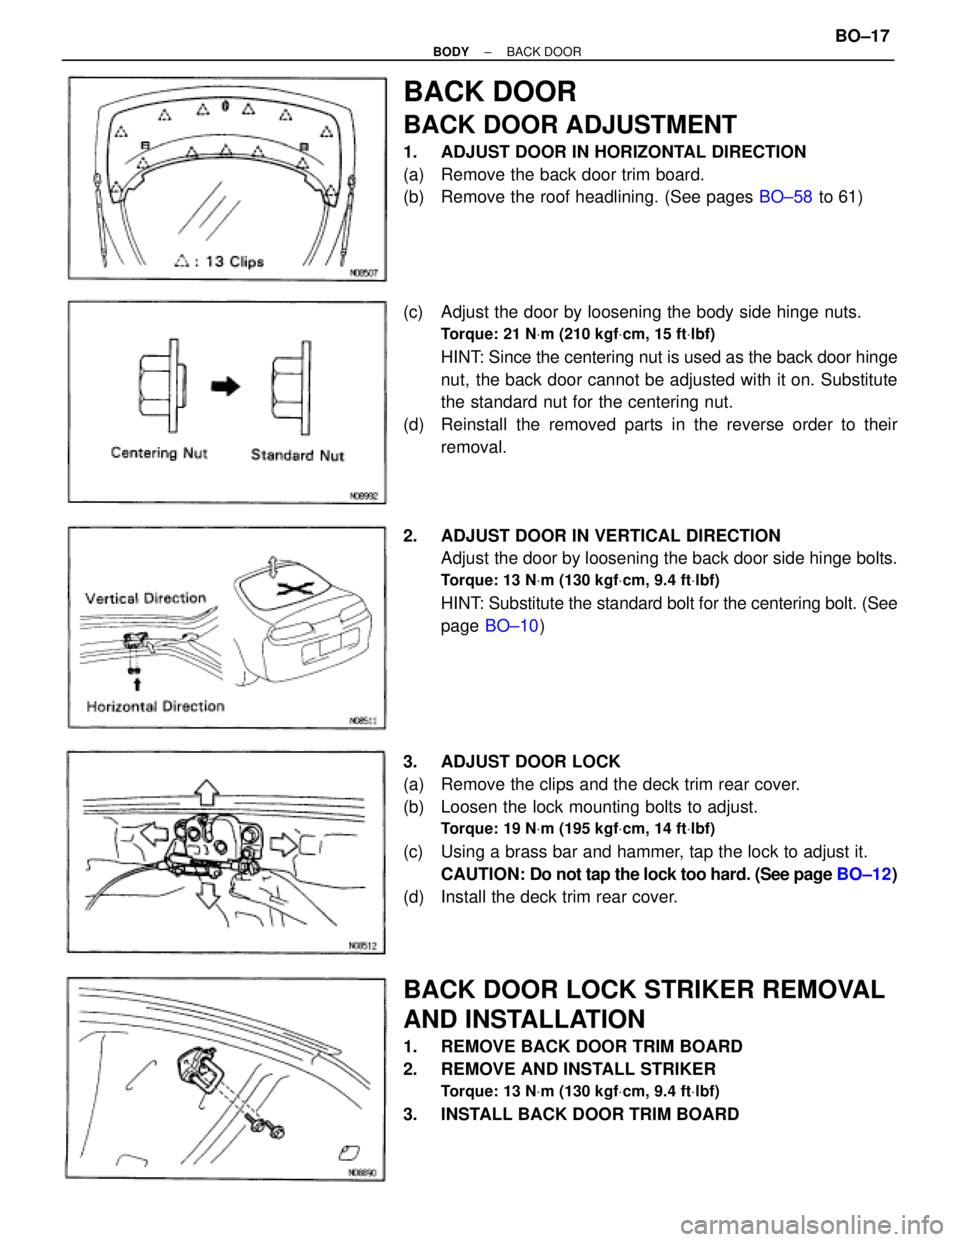
1. ADJUST DOOR IN HORIZONTAL DIRECTION
(a) Remove the back door trim board.
(b) Remove the roof headlining. (See pages BO±58 to 61)
(c) Adjust the door by loosening the body side hinge nuts.
Torque: 21 NVm (210 kgfVcm, 15 ftVlbf)
HINT: Since the centering nut is used as the back door hinge
nut, the back door cannot be adjusted with it on. Substitute
the standard nut for the centering nut.
(d) Reinstall the removed parts in the reverse order to their
removal.
2. ADJUST DOOR IN VERTICAL DIRECTION
Adjust the door by loosening the back door side hinge bolts.
Torque: 13 NVm (130 kgfVcm, 9.4 ftVlbf)
HINT: Substitute the standard bolt for the centering bolt. (See
page BO±10)
3. ADJUST DOOR LOCK
(a) Remove the clips and the deck trim rear cover.
(b) Loosen the lock mounting bolts to adjust.
Torque: 19 NVm (195 kgfVcm, 14 ftVlbf)
(c) Using a brass bar and hammer, tap the lock to adjust it.
CAUTION: Do not tap the lock too hard. (See page BO±12)
(d) Install the deck trim rear cover.
BACK DOOR LOCK STRIKER REMOVAL
AND INSTALLATION
1. REMOVE BACK DOOR TRIM BOARD
2. REMOVE AND INSTALL STRIKER
Torque: 13 NVm (130 kgfVcm, 9.4 ftVlbf)
3. INSTALL BACK DOOR TRIM BOARD
± BODYBACK DOORBO±17
Page 823 of 2543

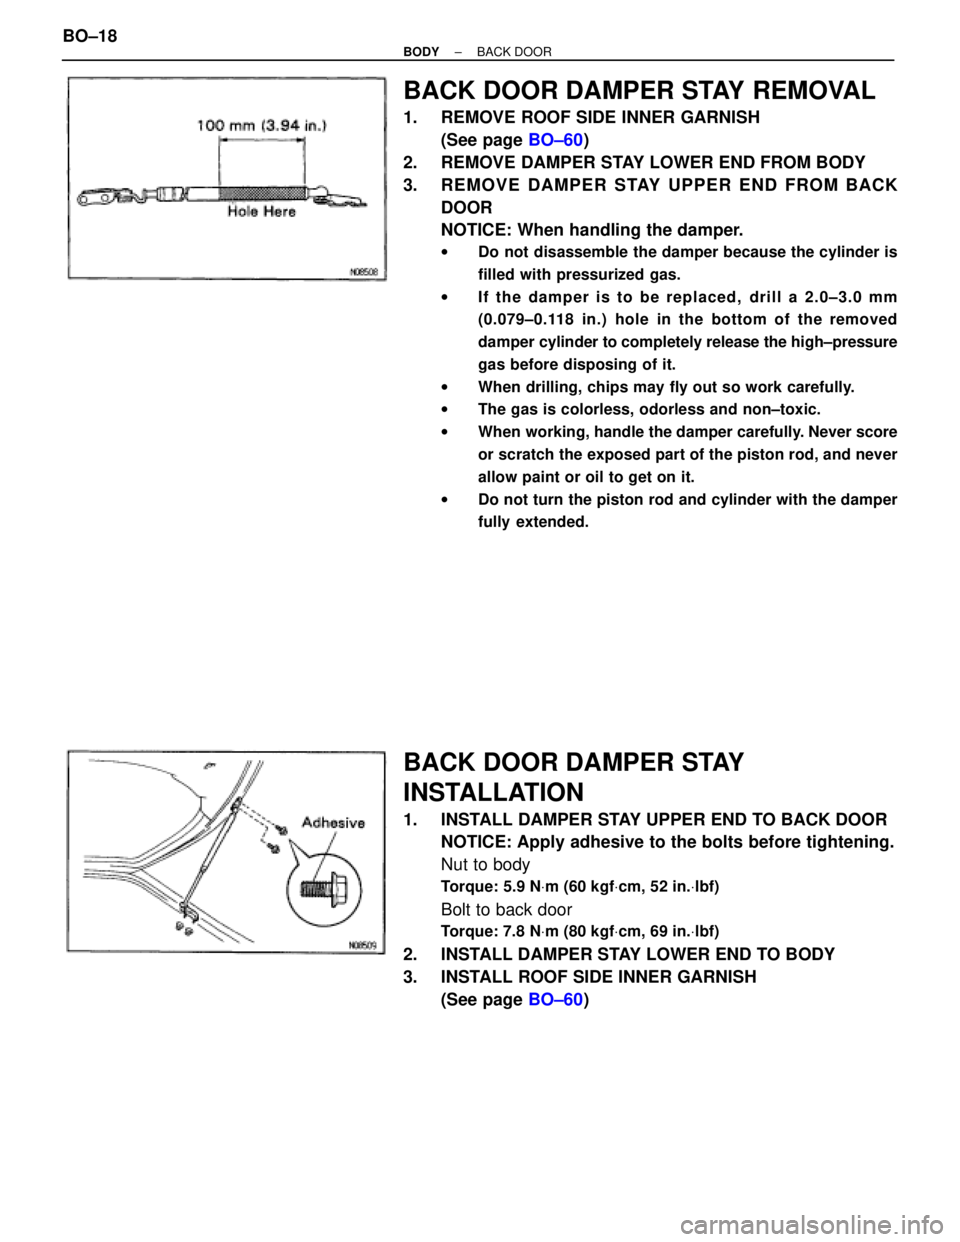
BACK DOOR DAMPER STAY REMOVAL
1. REMOVE ROOF SIDE INNER GARNISH
(See page BO±60)
2. REMOVE DAMPER STAY LOWER END FROM BODY
3. REMOVE DAMPER STAY UPPER END FROM BACK
DOOR
NOTICE: When handling the damper.
wDo not disassemble the damper because the cylinder is
filled with pressurized gas.
wIf the damper is to be replaced, drill a 2.0±3.0 mm
(0.079±0.118 in.) hole in the bottom of the removed
damper cylinder to completely release the high±pressure
gas before disposing of it.
wWhen drilling, chips may fly out so work carefully.
wThe gas is colorless, odorless and non±toxic.
wWhen working, handle the damper carefully. Never score
or scratch the exposed part of the piston rod, and never
allow paint or oil to get on it.
wDo not turn the piston rod and cylinder with the damper
fully extended.
BACK DOOR DAMPER STAY
INSTALLATION
1. INSTALL DAMPER STAY UPPER END TO BACK DOOR
NOTICE: Apply adhesive to the bolts before tightening.
Nut to body
Torque: 5.9 NVm (60 kgfVcm, 52 in.Vlbf)
Bolt to back door
Torque: 7.8 NVm (80 kgfVcm, 69 in.Vlbf)
2. INSTALL DAMPER STAY LOWER END TO BODY
3. INSTALL ROOF SIDE INNER GARNISH
(See page BO±60) BO±18
± BODYBACK DOOR
Page 826 of 2543

FRONT WIPER REMOVAL
1. REMOVE THESE PARTS:
(a) Wiper arm and blade
(b) Cowl top ventilator louver
2. REMOVE FRONT WIPER MOTOR
(a) Disconnect the connector, then unfasten the 3 bolts.
(b) Remove the wiper motor with the link.
FRONT WIPER INSTALLATION
1. INSTALL THESE PARTS:
(a) Wiper motor with link
(b) Cowl top ventilator louver
2. INSTALL WIPER ARM AND BLADE
(a) Install the wiper arms and operate the wipers once and turn
the wiper switch OFF.
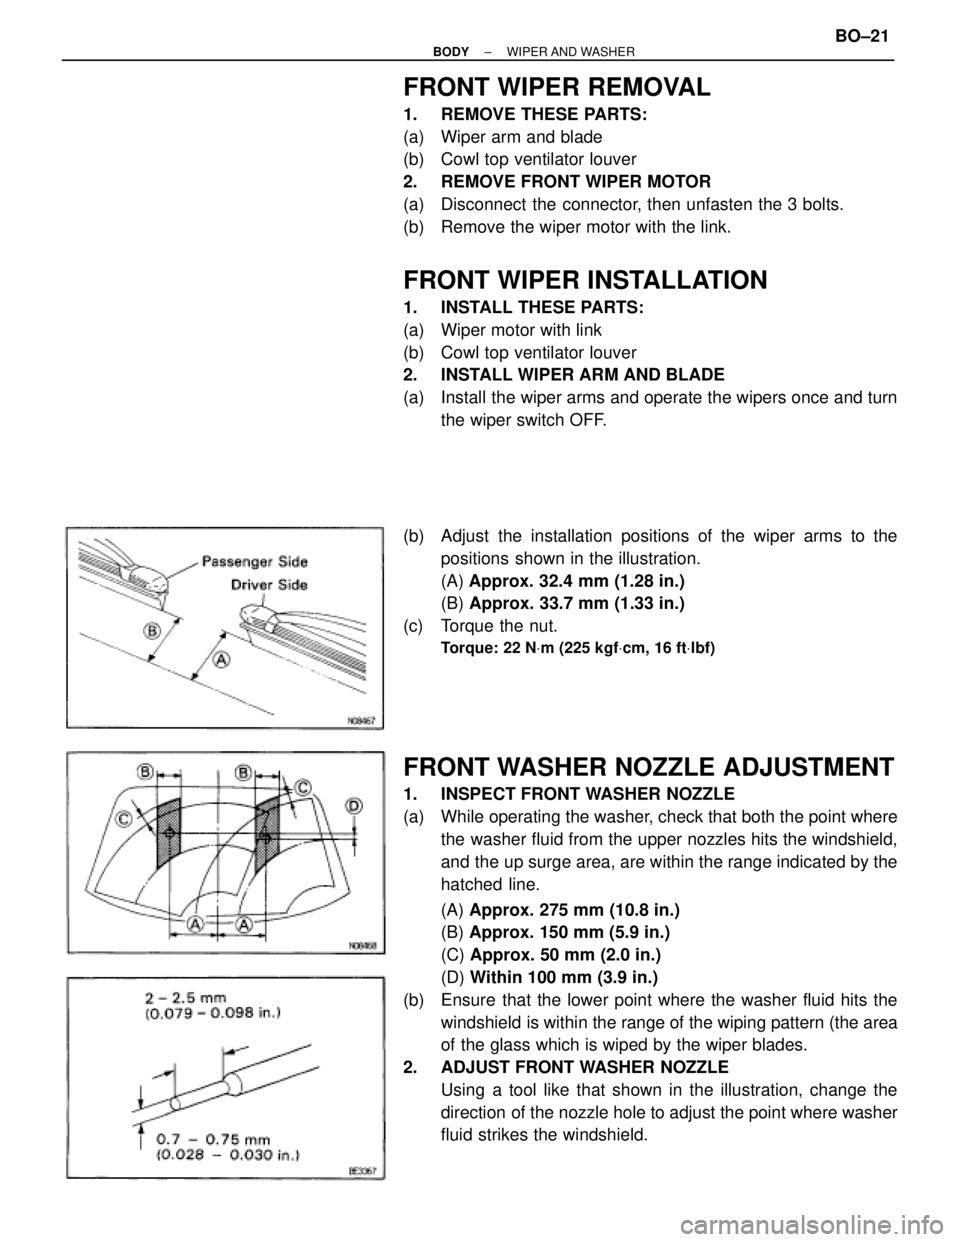
(b) Adjust the installation positions of the wiper arms to the
positions shown in the illustration.
(A) Approx. 32.4 mm (1.28 in.)
(B) Approx. 33.7 mm (1.33 in.)
(c) Torque the nut.
Torque: 22 NVm (225 kgfVcm, 16 ftVlbf)
FRONT WASHER NOZZLE ADJUSTMENT
1. INSPECT FRONT WASHER NOZZLE
(a) While operating the washer, check that both the point where
the washer fluid from the upper nozzles hits the windshield,
and the up surge area, are within the range indicated by the
hatched line.
(A) Approx. 275 mm (10.8 in.)
(B) Approx. 150 mm (5.9 in.)
(C) Approx. 50 mm (2.0 in.)
(D) Within 100 mm (3.9 in.)
(b) Ensure that the lower point where the washer fluid hits the
windshield is within the range of the wiping pattern (the area
of the glass which is wiped by the wiper blades.
2. ADJUST FRONT WASHER NOZZLE
Using a tool like that shown in the illustration, change the
direction of the nozzle hole to adjust the point where washer
fluid strikes the windshield.
± BODYWIPER AND WASHERBO±21
Page 827 of 2543
REAR WIPER REMOVAL
1. REMOVE WIPER ARM AND BLADE
2. REMOVE BACK DOOR TRIM BOARD
3. REMOVE WIPER MOTOR ASSEMBLY
(a) Disconnect the connector, then unfasten the 3 bolts.
(b) Remove the motor.
REAR WIPER INSTALLATION
1. INSTALL THESE PARTS:
(a) Wiper motor
(b) Back door trim board
2. INSTALL WIPER ARM AND BLADE
(a) Install the wiper arm and operate the wiper once and turn the
wiper switch OFF.
(b) Adjust the top of the wiper blade to the installation mark
printed on the glass.
(c) Torque the nut.
Torque: 11 NVm (110 kgfVcm, 8.0 ftVlbf)
REAR WASHER NOZZLE ADJUSTMENT
1. INSPECT REAR WASHER NOZZLE
While operating the washer, check that the point where the
washer fluid hits the back door glass is within the range indi-
cated by the hatched line.
(A) Approx. 300 mm (11.8 in.)
(B) Approx. 150 mm (5.9 in.)
2. ADJUST REAR WASHER NOZZLE
(See step 2 on page BO±21) BO±22
± BODYWIPER AND WASHER
Page 829 of 2543
WINDSHIELD MOULDING REMOVAL
1. REMOVE THESE PARTS:
(a) Wiper arm and blade
(b) Cowl top ventilator louver
2. REMOVE WINDSHIELD MOULDING
(a) Using a knife, cut off the moulding as shown.
(b) Cut away the adhesive at the moulding installation area as
much as possible.
NOTICE: Do not damage the body with the knife.
WINDSHIELD MOULDING INSTALLATION
1. CUT ADHESIVE AT MOULDING INSTALLATION AREA
Using the knife, cut off the adhesive around the moulding
installation area.
2. APPLY ADHESIVE AT MOULDING INSTALLATION AREA
3. INSTALL WINDSHIELD MOULDING
Place the moulding onto the body and tap it by hand.
4. INSTALL THESE PARTS:
(a) Cowl top ventilator louver
(b) Wiper arm and blade
Torque: 22 NVm (225 kgfVcm, 16 ftVlbf)
BO±24± BODYWINDSHIELD MOULDING
Page 840 of 2543
(c) Use a scraper to remove any excess or protruding adhesive.
(d) Fasten glass securely until the adhesive sets.
13. INSTALL WINDSHIELD MOULDING
Place the moulding onto the body and install it by hand.
14. INSPECT FOR LEAKS AND REPAIR
(a) Do a leak test after the hardening time has elapsed.
(b) Seal any leak with auto glass sealer.
Part No. 08833±00030
15. INSTALL THESE PARTS:
(a) Cowl top ventilator louver
(b) Wiper arms and blades
Torque: 22 NVm (225 kgfVcm, 16 ftVlbf)
(c) Hood
Torque: 13 NVm (130 kgfVcm, 9.4 ftVlbf)
(d) Front pillar garnishes
(e) Assist grip
(f) Sunvisors and holders
(g) Inner rear view mirror
± BODYWINDSHIELDBO±35
Page 845 of 2543

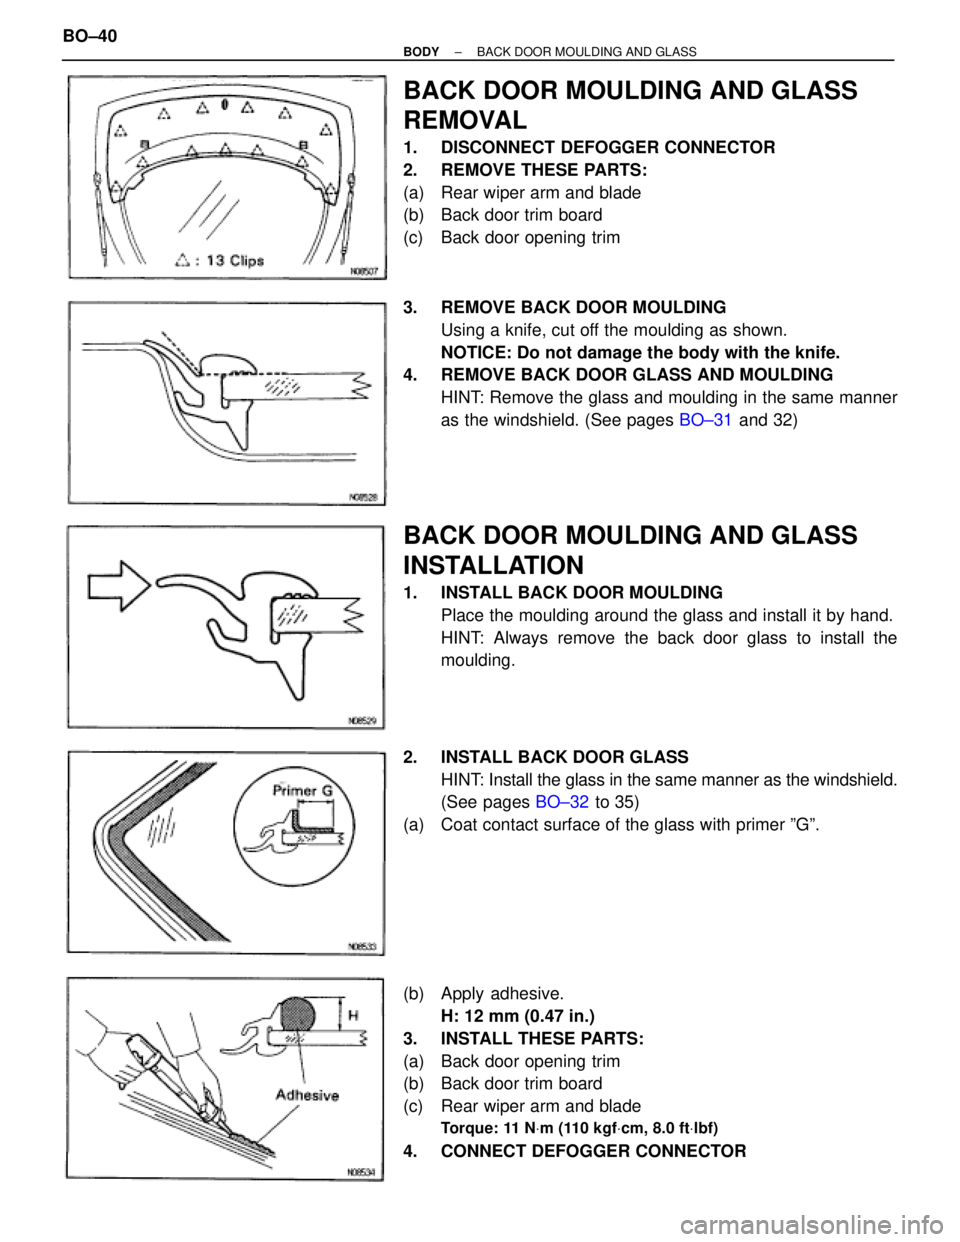
BACK DOOR MOULDING AND GLASS
REMOVAL
1. DISCONNECT DEFOGGER CONNECTOR
2. REMOVE THESE PARTS:
(a) Rear wiper arm and blade
(b) Back door trim board
(c) Back door opening trim
3. REMOVE BACK DOOR MOULDING
Using a knife, cut off the moulding as shown.
NOTICE: Do not damage the body with the knife.
4. REMOVE BACK DOOR GLASS AND MOULDING
HINT: Remove the glass and moulding in the same manner
as the windshield. (See pages BO±31 and 32)
BACK DOOR MOULDING AND GLASS
INSTALLATION
1. INSTALL BACK DOOR MOULDING
Place the moulding around the glass and install it by hand.
HINT: Always remove the back door glass to install the
moulding.
2. INSTALL BACK DOOR GLASS
HINT: Install the glass in the same manner as the windshield.
(See pages BO±32 to 35)
(a) Coat contact surface of the glass with primer ºGº.
(b) Apply adhesive.
H: 12 mm (0.47 in.)
3. INSTALL THESE PARTS:
(a) Back door opening trim
(b) Back door trim board
(c) Rear wiper arm and blade
Torque: 11 NVm (110 kgfVcm, 8.0 ftVlbf)
4. CONNECT DEFOGGER CONNECTOR BO±40
± BODYBACK DOOR MOULDING AND GLASS