Page 27 of 2543
HINT:
wIf the instruction ºProceed to next circuit inspection shown on matrix chart is given in the flow chart
for each circuit, proceed to the circuit with the next highest number in the table to continue the check.
wIf the trouble still reappears even though there are no abnormalities in any of the other circuits, then
check or replace the A/C amplifier.
AC±52
AC±54
AC±56
AC±58
AC±60
AC±62
AC±66
AC±69
IN±35
AC±71
AC±76
AC±77
AC±107
AC±92
AC±91
AC±95
AC±96
AC±98
AC±97
IG power source circuitBackup power source
circuitACC power source circuitHeater relay circuitCompressor circuitBlower motor circuitA/C amplifierTemperature set dial circuitA/C control assembly circuitRefrigeration system inspection
with manifold gauge setElectric cooling fanWater valveDrive belt tensionRefrigerant volumeCondenserExpansion valveEvaporatorHeater radiatorReceiver
± AIR CONDITIONING SYSTEMTROUBLESHOOTINGAC±27
Page 80 of 2543

AIR CONDITIONING UNIT
AIR CONDITIONING UNIT REMOVAL
1. DISCHARGE REFRIGERANT IN REFRIGERATION
SYSTEM
INSTALLATION HINT: Evacuate air from refrigeration sys-
tem.
Charge system with the refrigerant and inspect for leakage
of refrigerant.
Specified amount:
700 + 50 g (24.96 + 1.76 oz.)
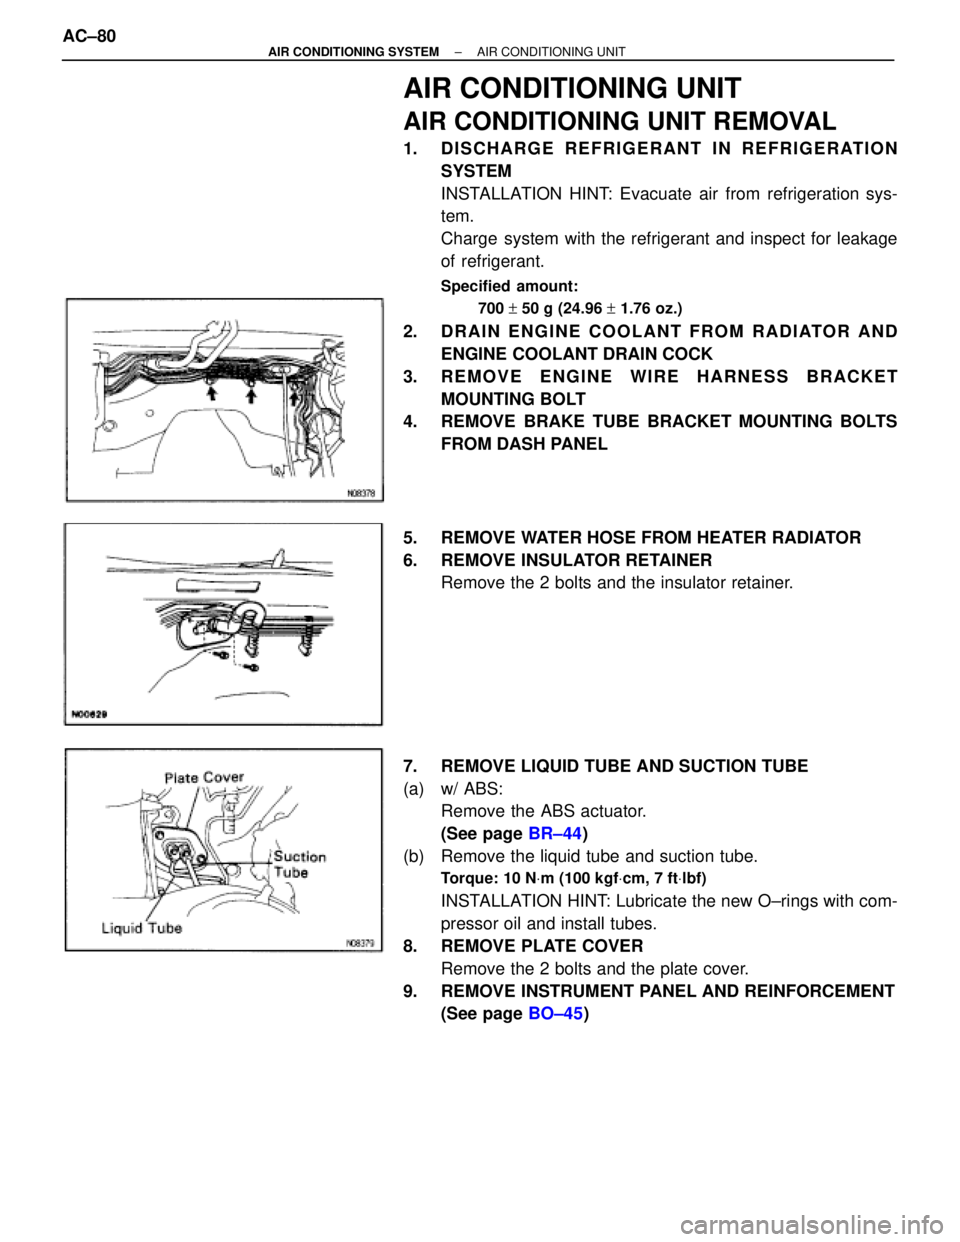
2. DRAIN ENGINE COOLANT FROM RADIATOR AND
ENGINE COOLANT DRAIN COCK
3. REMOVE ENGINE WIRE HARNESS BRACKET
MOUNTING BOLT
4. REMOVE BRAKE TUBE BRACKET MOUNTING BOLTS
FROM DASH PANEL
5. REMOVE WATER HOSE FROM HEATER RADIATOR
6. REMOVE INSULATOR RETAINER
Remove the 2 bolts and the insulator retainer.
7. REMOVE LIQUID TUBE AND SUCTION TUBE
(a) w/ ABS:
Remove the ABS actuator.
(See page BR±44)
(b) Remove the liquid tube and suction tube.
Torque: 10 NVm (100 kgfVcm, 7 ftVlbf)
INSTALLATION HINT: Lubricate the new O±rings with com-
pressor oil and install tubes.
8. REMOVE PLATE COVER
Remove the 2 bolts and the plate cover.
9. REMOVE INSTRUMENT PANEL AND REINFORCEMENT
(See page BO±45) AC±80
± AIR CONDITIONING SYSTEMAIR CONDITIONING UNIT
Page 84 of 2543
5. REMOVE AIR MIX SERVOMOTO
(a) Remove the defroster duct.
(b) Remove the 3 screws and the water valve cover.
(c) Disconnect the connector.
(d) Disconnect the control link.
(e) Remove the 2 screws and the air mix servomotor.
6. REMOVE HEATER RADIATOR AND WATER VALVE
(a) Remove the 2 screws and the plate.
(b) Remove the 2 screws and the clamp.
(c) Remove the 3 screws.
(d) Pull out the heater radiator with the water valve.
(e) Remove the 2 screws and water valve from the heater
radiator.
7. REMOVE HEATER AIR DUCT
Remove the 2 screws and the defroster air duct.
8. REMOVE VENT AIR DUCT
(a) Disconnect the control link.
(b) Remove the 2 screws and the vent air duct.
9. REMOVE ENGINE COOLANT TEMPERATURE SENSOR
(a) Disconnect the connector.
(b) After pulling off the clamp, pull out the sensor.
10. REMOVE AIR OUTLET SERVOMOTOR
(a) Disconnect the connector.
(b) Remove the 3 screws and the air outlet servomotor. AC±84
± AIR CONDITIONING SYSTEMAIR CONDITIONING UNIT
Page 91 of 2543

RECEIVER
ON±VEHICLE INSPECTION
1. OPEN THE HOOD
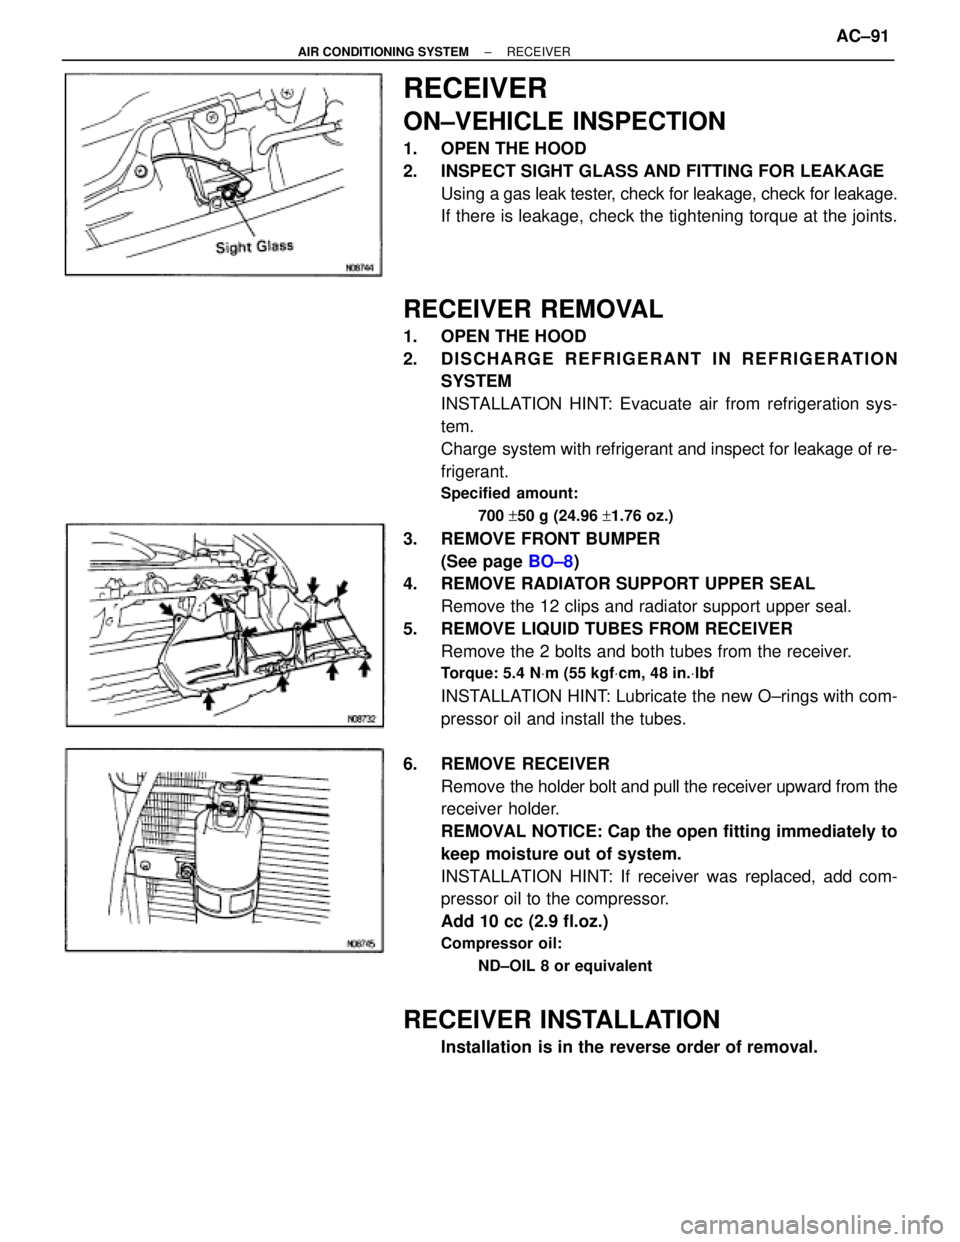
2. INSPECT SIGHT GLASS AND FITTING FOR LEAKAGE
Using a gas leak tester, check for leakage, check for leakage.
If there is leakage, check the tightening torque at the joints.
RECEIVER REMOVAL
1. OPEN THE HOOD
2. DISCHARGE REFRIGERANT IN REFRIGERATION
SYSTEM
INSTALLATION HINT: Evacuate air from refrigeration sys-
tem.
Charge system with refrigerant and inspect for leakage of re-
frigerant.
Specified amount:
700 +50 g (24.96 +1.76 oz.)
3. REMOVE FRONT BUMPER
(See page BO±8)
4. REMOVE RADIATOR SUPPORT UPPER SEAL
Remove the 12 clips and radiator support upper seal.
5. REMOVE LIQUID TUBES FROM RECEIVER
Remove the 2 bolts and both tubes from the receiver.
Torque: 5.4 NVm (55 kgfVcm, 48 in.Vlbf
INSTALLATION HINT: Lubricate the new O±rings with com-
pressor oil and install the tubes.
6. REMOVE RECEIVER
Remove the holder bolt and pull the receiver upward from the
receiver holder.
REMOVAL NOTICE: Cap the open fitting immediately to
keep moisture out of system.
INSTALLATION HINT: If receiver was replaced, add com-
pressor oil to the compressor.
Add 10 cc (2.9 fl.oz.)
Compressor oil:
ND±OIL 8 or equivalent
RECEIVER INSTALLATION
Installation is in the reverse order of removal.
± AIR CONDITIONING SYSTEMRECEIVERAC±91
Page 92 of 2543

CONDENSER
ON±VEHICLE INSPECTION
1. INSPECT CONDENSER FINS FOR BLOCKAGE OR
DAMAGE
If fins are clogged, wash them with water and dry with com-
pressed air.
NOTICE: Be careful not to damage the fins.
If fins are bent, straighten them with a screwdriver or pliers.
2. INSPECT CONDENSER AND FITTING FOR LEAKAGE
Using a gas leak tester, check for leakage.
If there is leakage, check the tightening torque at the joints.
CONDENSER REMOVAL
1. DISCHARGE REFRIGERANT IN REFRIGERATION
SYSTEM
INSTALLATION HINT: Evacuate air from refrigeration sys-
tem.
Charge system with refrigerant and inspect for leakage of re-
frigerant.
Specified amount:
700 +50g (24.96 +1.76 oz.)
2. REMOVE BATTERY
3. REMOVE AIR CLEANER DUCT
Remove the bolt and the air cleaner duct.
4. REMOVE AIR CLEANER
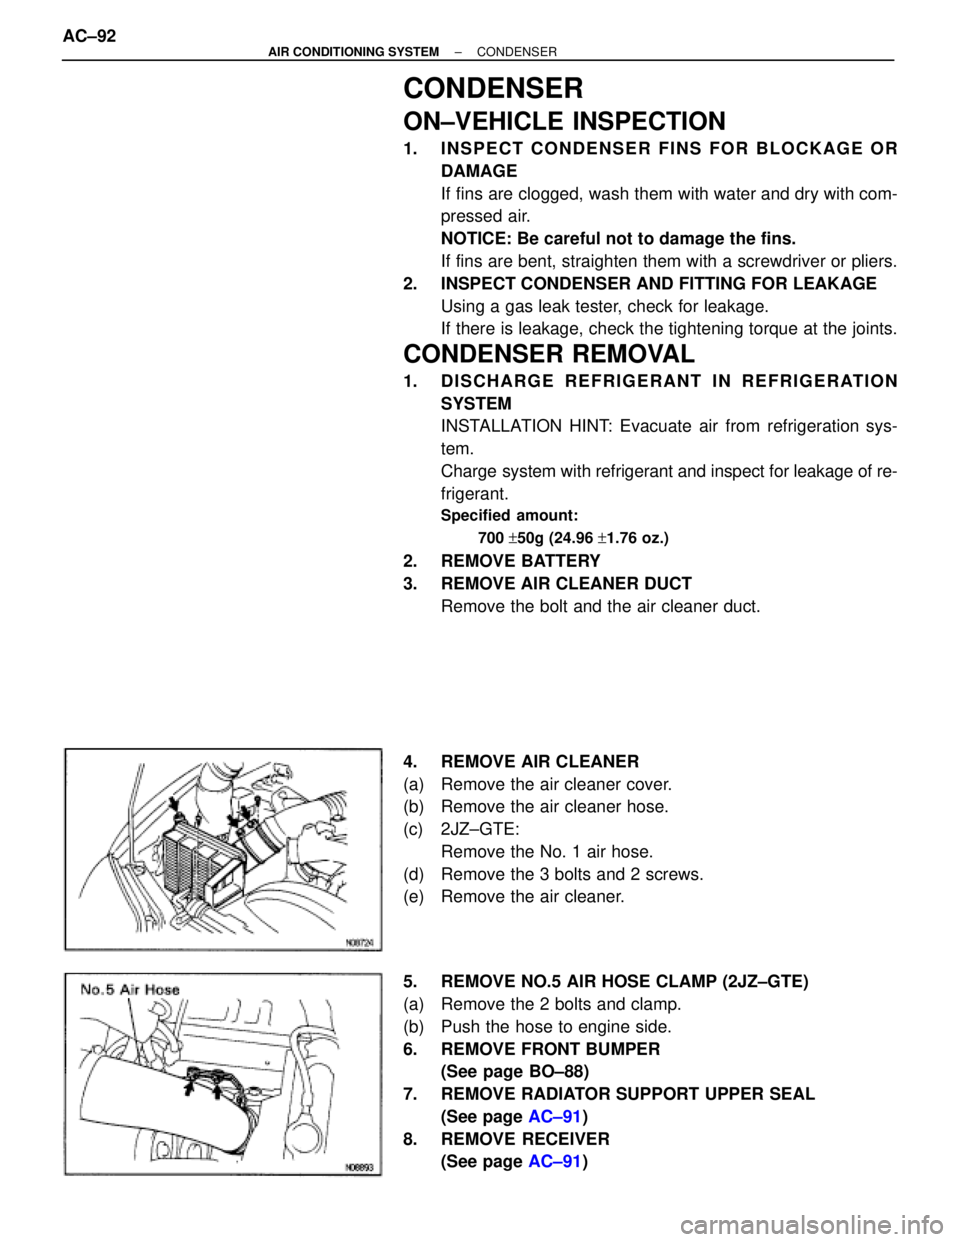
(a) Remove the air cleaner cover.
(b) Remove the air cleaner hose.
(c) 2JZ±GTE:
Remove the No. 1 air hose.
(d) Remove the 3 bolts and 2 screws.
(e) Remove the air cleaner.
5. REMOVE NO.5 AIR HOSE CLAMP (2JZ±GTE)
(a) Remove the 2 bolts and clamp.
(b) Push the hose to engine side.
6. REMOVE FRONT BUMPER
(See page BO±88)
7. REMOVE RADIATOR SUPPORT UPPER SEAL
(See page AC±91)
8. REMOVE RECEIVER
(See page AC±91) AC±92
± AIR CONDITIONING SYSTEMCONDENSER
Page 93 of 2543
9. REMOVE LIQUID TUBE AND DISCHARGE TUBE
Torque: 10 NVm (100 kgfVcm, 7 ftVlbf)
REMOVAL NOTICE: Cap the open fittings immediately to
keep moisture out of the system.
INSTALLATION HINT: Lubricate the new O±rings with com-
pressor oil and install the tubes.
10. REMOVE CONDENSER
(a) Remove the radiator upper mounting.
(b) Push the radiator to engine side.
(c) Remove the condenser upper mounting.
(d) Push the condenser to engine side and remove the liquid
tube piping clamp.
Torque: 4.1 NVm (42 kgfVcm, 36 in.Vlbf)
± AIR CONDITIONING SYSTEMCONDENSERAC±93
Page 96 of 2543
EVAPORATOR INSPECTION
1. INSPECT FINS FOR BLOCKAGE
If the fins are clogged, clean them with compressed air.
NOTICE: Never use water to clean the evaporator.
2. INSPECT FITTING FOR CRACKS OR SCRATCHES
Repair as necessary.
EVAPORATOR INSTALLATION
Installation is in the reverse order of removal.
HEATER RADIATOR
HEATER RADIATOR REMOVAL AND
INSTALLATION
(See page AC±82)
HEATER RADIATOR INSPECTION
INSPECT FINS FOR BLOCKAGE
If the fins are clogged, clean them with compressed air. AC±96
± AIR CONDITIONING SYSTEMHEATER RADIATOR
Page 97 of 2543
WATER VALVE
WATER VALVE REMOVAL
1. REMOVE HEATER RADIATOR
(See page AC±82)
2. REMOVE WATER VALVE
(a) Remove the 2 screws.
(b) Remove the water valve from heater radiator.
WATER VALVE INSTALLATION
1. INSTALL WATER VALVE
(a) Install the water valve to heater radiator.
(b) Install the 2 screws.
2. INSTALL HEATER RADIATOR
± AIR CONDITIONING SYSTEMWATER VALVEAC±97