Page 114 of 1701
Snapring,endbearings andforward one-way clutch
• Check snapringandend bearings fordeformation anddam-
age.
• Check forward one-way clutchforwear anddamage.
SAT256D
REPAIR
FORCOMPONENT PARTS
Rear Internal Gear,Forward ClutchHuband
Overrun ClutchHub(Cont'd)
INSPECTION
Rear internal gear,forward clutchhuband overrun
clutch hub
• Check rubbing surfaceforwear ordamage.
i
SAT257D
Overrun
clutch hub
1
t
t
o
~~"'",'h
Endbeari~
Rear
Internal
gear
ASSEMBLY
1. Install forward one-way clutchonforward clutch.
• Take carewiththedirection ofthe forward one-way clutch.
2. Install endbearing onforward one-way clutch.
• Apply petroleum jellytoend bearing.
r'~l
l.
!
Thrust washer
']
.
.
, .Pawl
3.
Install thrustwasher onrear internal gear.
• Apply petroleum jellytothrust washer.
• Align pawls ofthrust washer withholes ofrear internal
gear.
Rear
internal
gear
SAT143E
AT-114
Page 115 of 1701

Rearinternal
gear
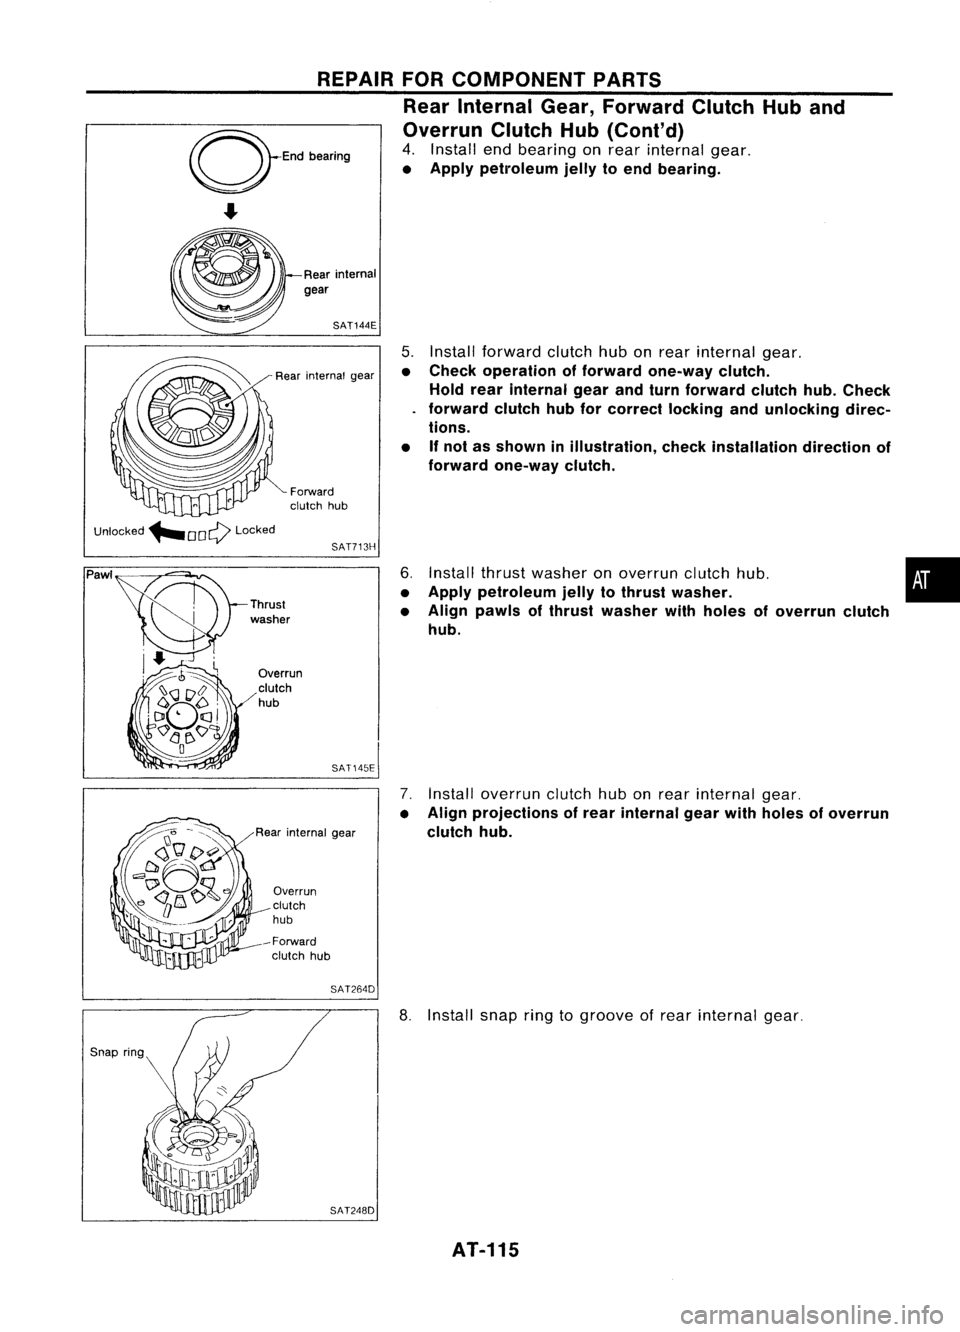
•
5.
Install forward clutchhubonrear internal gear.
• Check operation offorward one-way clutch.
Hold rearinternal gearandturn forward clutchhub.Check
forward clutchhubforcorrect lockingandunlocking direc-
tions.
• Ifnot asshown inillustration, checkinstallation directionof
forward one-way clutch.
6. Install thrustwasher onoverrun clutchhub.
• Apply petroleum jellytothrust washer.
• Align pawls ofthrust washer withholes ofoverrun clutch
hub.
7. Install overrun clutchhubonrear internal gear.
• Align projections ofrear internal gearwithholes ofoverrun
clutch hub.
SAT144E
REPAIR
FORCOMPONENT PARTS
Rear Internal Gear,Forward ClutchHuband
Overrun ClutchHub(Cont'd)
4. Install endbearing onrear internal gear.
• Apply petroleum jellytoend bearing.
SAT713H
Forward
clutch hub
Rear
internal gear
SAT145E
Overrun
clutch
hub
-Forward clutch hub
Overrun
clutch
hub
Rear internal gear
Unlocked
"'OOQ Locked
Pawl
SAT264D
SAT248D
8.
Install snapringtogroove ofrear internal gear.
AT-115
Page 147 of 1701
Forwardclutch
assembly
Bearing race
m
@
ASSEMBLY
Assembly 2
- All models -
1. Remove paperrolledaround bearing retainer.
2. Install thrustwasher onbearing retainer.
• Apply petroleum jellytothrust washer.
3. Install forward clutchassembly.
• Align teethoflow
&
reverse brakedriveplates before
installing.
.. Make surethatbearing retainer sealrings arenotspread.
- Except model34X81-
4. Install bearing raceonbearing retainer.
• Apply petroleum jellytobearing race.
•
mep,:
Applypetroleum jelly.
SAT698D
Needle bearing
@
'-
(I
SAT694D
5.
Install needle bearings onrear internal gear.
• Apply petroleum jellytoneedle bearings.
• Pay attention todirection ofneedle bearing.
- Model 34X81-
4. Install thrustneedle bearing onbearing retainer.
• Apply petroleum jellytothrust bearing.
• Pay attention todirection ofthrust needle bearing.
AT-147
Page 148 of 1701
~ru,t
,,,dl,
beanng
m@
6
/)/11/
11
~I~u ,
"ill)
ASSEMBLY
Assembly 2(Cont'd)
5. Install thrustneedle bearing onrear internal gear.
• Apply petroleum jellytothrust needle bearing.
• Pay attention todirection ofthrust needle bearing.
m
@:
Apply petroleum jelly.
SAT357D
Forward
clutch hub
Overrun
clutch hub
SAT358D
SAT359D -
All models -
6. Hold forward clutchhubandturn overrun clutchhub.
Check overrun clutchhubfordirections oflock andunlock.
• If
not asshown inillustration, checkinstalled direction of
forward one-way clutch.
"7.
Install rearinternal gearassembly.
• Align teethofforward clutchandoverrun clutchdriveplate.
,
~
"
u
Rear planetary carner
SAT152E
8.
Install needle bearing onrear planetary carrier.
• Apply petroleum jellytoneedle bearing.
• Pay attention todirection ofneedle bearing.
9. Install rearsungear onrear planetary carrier.
• Pay attention todirection ofrear sungear.
AT-148
Page 149 of 1701
Thrust
~.-b.. ~needle
~ bearing ASSEMBLY
Assembly 2(Cont'd)
10. Install rearplanetary carrierontransmission case.
11. Install thrustneedle bearing onfront planetary carrier.
• Apply petroleum jellytothrust needle bearing.
• Pay attention todirection ofthrust needle bearing.
Front
planetary carrier
SAT153E
Screwdriver
12.
Install lowone-way clutchtofront planetary carrierbyturn- •
ing itin the direction ofthe arrow asshown.
13. While holding frontplanetary carrier,turnlowone-way
clutch.
Check lowone-way clutchforcorrect directions oflock and
unlock.
14. Install frontplanetary carrierassembly ontransmission
case.
15. Install snapringwith screwdriver.
• Forward clutchandbearings mustbecorrectly installedfor
snap ringtofit groove oftransmission case.
AT-149
Page 150 of 1701
Front
sun
gear
SAT154E
SAT156E ASSEMBLY
Assembly 2(Cont'd)
16. Install needle bearing onfront sungear.
• Apply petroleum jellytoneedle bearing.
• Pay attention todirection ofneedle bearing.
17. Install frontsungear onfront planetary carrier.
18. Install needle bearing onfront sungear.
• Apply petroleum jellytoneedle bearing.
• Pay attention todirection ofneedle bearing.
19. Install highclutch hubonfront sungear.
20. Install needle bearing onhigh clutch hub.
• Apply petroleum jellytoneedle bearing.
• Pay attention todirection ofneedle bearing.
AT-150
Page 151 of 1701
Reverseclutch
assembly
SAT374DASSEMBLY
Assembly 2(Cont'd)
21. Remove paperrolledaround inputshaft.
22. Install inputshaft assembly.
• Align teethofhigh clutch driveplates before installing.
23. Install reverse clutchassembly.
• Align teethofreverse clutchdriveplates before installing.
Adjustment 2 •
When anyparts listed below arereplaced, adjusttotalendplay
and reverse clutchendplay.
Item Reverseclutch
Total endplay
endplay
Part name
Transmission case
•
•
Overrun clutchhub
••
Rear internal gear
••
Rear planetary carrier
•
•
Rear sungear
•
•
Front planetary carrier
•
•
Front sungear
•
•
High clutch hub
••
High clutch drum
••
Oil pump cover
••
Reverse clutchdrum
-
•
TOTAL ENDPLAY
• Measure clearance betweenreverseclutchdrumandnee-
dle bearing foroilpump cover.
• Select proper thickness ofbearing racesothat endplay is
within specifications.
AT-151
Page 152 of 1701
Transmissioncase SAT375DASSEMBLY
Adjustment 2(Cont'd)
1. Measure dimensions "K"and"L"and then calculate
dimension
"J".
Transmission case
Depth
gauge
/Needle bearing SAT376D
SAT377D
a.
Measure dimension "K".
b. Measure dimension "L",
c. Calculate dimension
"J".
• "J":
Distance betweenoilpump fitting surface oftransmis-
sion case andneedle bearing matingsurface ofhigh
clutch drum.
J=K-L
2. Measure dimension "M".
a. Place bearing raceandneedle bearing onoil pump assem-
bly.
SAT378D
Straightedge
Straightedge SAT379D
b.
Measure dimension "M".
• "M":
Distance betweentransmission casefitting surface
and needle bearing onoilpump cover.
• M
1:
Indication ofgauge.
AT-152