Page 1346 of 1771
6. Installation is the reverse of the removal procedure.
NOTE: After installing, adjust the position of the
front sash as necessary.
Align the front sash with the glass using the
adjusting bolt at the bottom of the front sash.
FRONT SASH
GLASS
LOCKNUT
ADJUSTING BOLT
Check for water leaks.
NOTE: Do not-high pressure water.ProCarManuals.com
Page 1348 of 1771

Doors
Glass/Regulator/Glas s Guid e Replacemen t (cont'd )
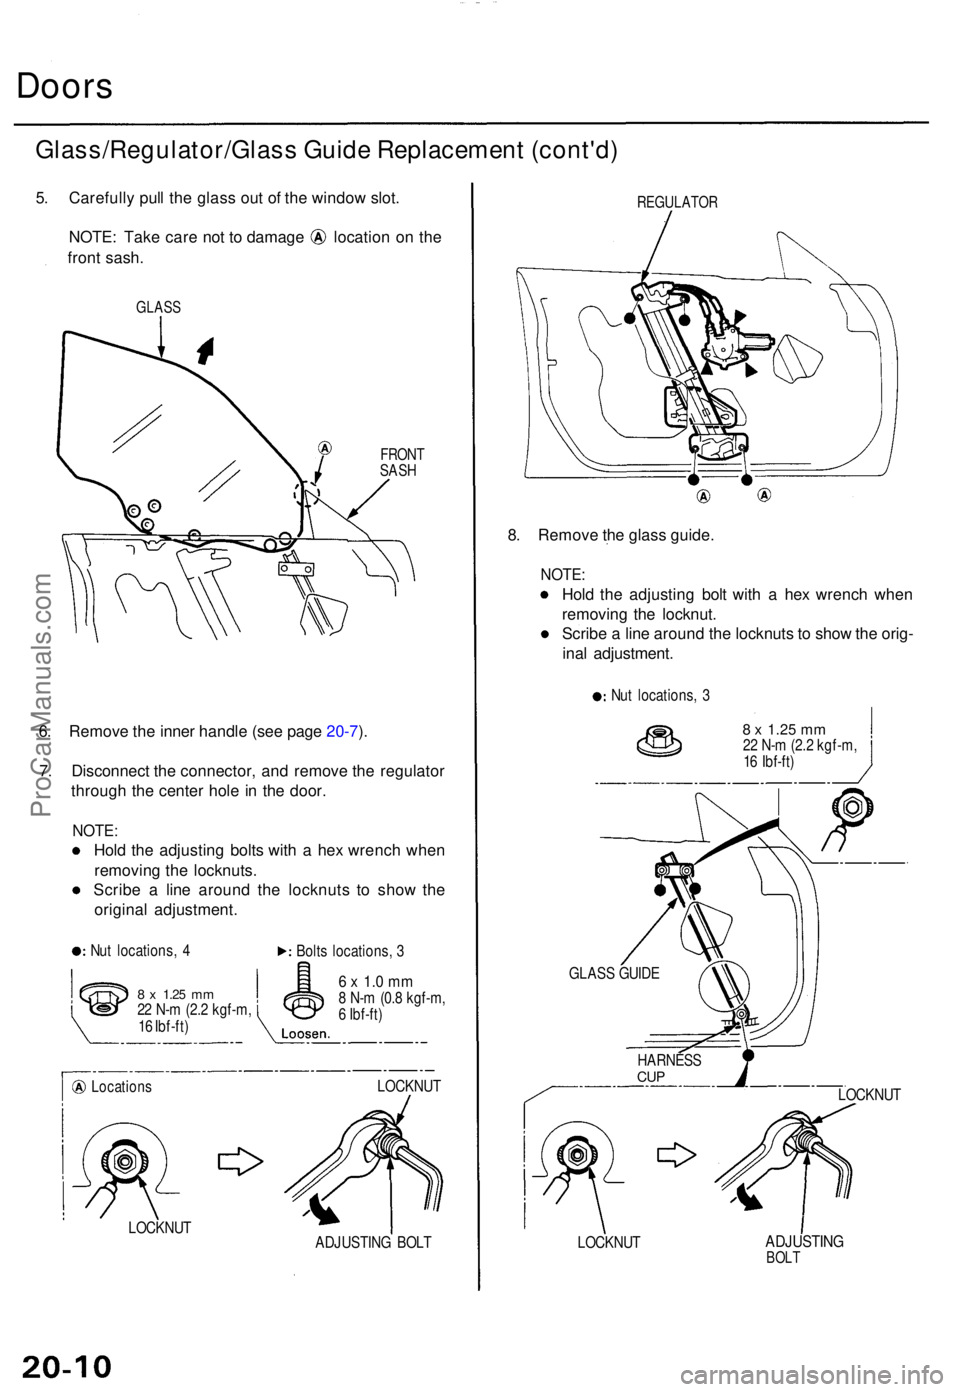
5. Carefull y pul l th e glas s ou t o f th e windo w slot .
NOTE : Tak e car e no t t o damag e locatio n o n th e
fron t sash .
GLAS S
FRONTSASH
6. Remov e th e inne r handl e (se e pag e 20-7 ).
7 . Disconnec t th e connector , an d remov e th e regulato r
throug h th e cente r hol e i n th e door .
NOTE :
Hold th e adjustin g bolt s wit h a he x wrenc h whe n
removin g th e locknuts .
Scrib e a lin e aroun d th e locknut s t o sho w th e
origina l adjustment .
Nut locations , 4
Bolts locations , 3
8 x 1.2 5 mm22 N- m (2. 2 kgf-m ,
1 6 Ibf-ft )
Location s
6 x 1. 0 m m8 N- m (0. 8 kgf-m ,
6 Ibf-ft )
LOCKNU T
LOCKNU T
ADJUSTING BOL T
REGULATO R
8. Remov e th e glas s guide .
NOTE:
Hold th e adjustin g bol t wit h a he x wrenc h whe n
removin g th e locknut .
Scrib e a lin e aroun d th e locknut s t o sho w th e orig -
ina l adjustment .
Nut locations , 3
8 x 1.2 5 mm22 N- m (2. 2 kgf-m ,
1 6 Ibf-ft )
LOCKNU T
LOCKNU T
ADJUSTIN GBOLT
GLAS S GUID E
HARNES S
CUP
ProCarManuals.com
Page 1349 of 1771
9. Greas e al l th e slidin g surface s o f th e regulato r an d
glas s guid e wher e shown .
GLASSGUIDE
10. Rol l th e glas s u p an d dow n t o se e i f i t move s freel y
withou t binding . Als o mak e sur e tha t ther e i s n o
clearanc e betwee n th e glas s an d weatherstri p whe n
th e glas s i s closed . Adjus t th e positio n o f th e glas s
a s necessar y (se e pag e 20-24 ).
11 . Attac h th e doo r harnes s t o th e doo r correctl y (se e
page 20-5 ).
12 . Disconnec t th e powe r windo w switc h fro m th e doo r
harness .
13. Whe n reinstallin g th e plasti c cover , appl y adhesiv e
alon g th e edg e wher e necessar y to maintai n a contin -
uou s sea l an d preven t wate r leak s (se e pag e 20-5 ).
14 . Instal l th e doo r pane l (se e pag e 20-4 ).
REGULATO R
Adjusting bol tlocations , 3
NOTE : Us e liqui dthrea d lock .
SILICON E GREAS E
ProCarManuals.com
Page 1356 of 1771
Outer Handl e Replacemen t
NOTE: Rais e th e glas s fully .
1 . Remove :
Doo r pane l (se e pag e 20-15 )
Plasti c cove r (se e pag e 20-16 )
2 . Remov e th e ro d protector .
Screw location , 1
RO DPROTECTO R
3. Remov e th e screw s an d clip , the n mov e th e latch .
6 x 1. 0 m m6 N- m (0. 6 kgf-m ,
4 Ibf-ft )
POWE R DOO R
LOCKACTUATO R
4. Remov e th e bolts , an d pul l ou t th e oute r handle .
Bolt locations , 2
6 x 1. 0 m m9.8 N- m (1. 0 kgf-m ,7.2 Ibf-ft )
OUTE R
HANDL E
OUTE R HANDL E
5. Installatio n i s th e revers e o f th e remova l procedure .
NOTE : Chec k th e doo r loc k an d ope n operations .
LATCH
ProCarManuals.com
Page 1359 of 1771
5. Carefull y remov e th e glas s fro m th e windo w slo t a s
shown .
NOTE: Tak e car e no t t o dro p th e glas s insid e th e door .
GLAS S
6. Remov e th e cente r glas s guide .
NOTE:
Hold th e adjustin g bolt s wit h a he x wrenc h o r a fla t
ti p screwdrive r whe n removin g th e locknuts .
Scrib e a lin e aroun d th e locknut s t o sho w th e
origina l adjustment .
8 x 1.2 5 mm22 N- m (2. 2 kgf-m ,
1 6 Ibf-ft )
ADJUSTIN G BOL T12 x 1.2 5 mm22 N- m (2. 2 kgf-m ,
1 6 Ibf-ft )
LOCKNU T
ADJUSTIN G BOL T
LOCK-NUT
CENTE R
GLAS S
GUID E
ROLLE RGUIDE
ProCarManuals.com
Page 1360 of 1771

Doors
Glass/Regulator/Cente r Glas s Guid e Replacemen t (cont'd )
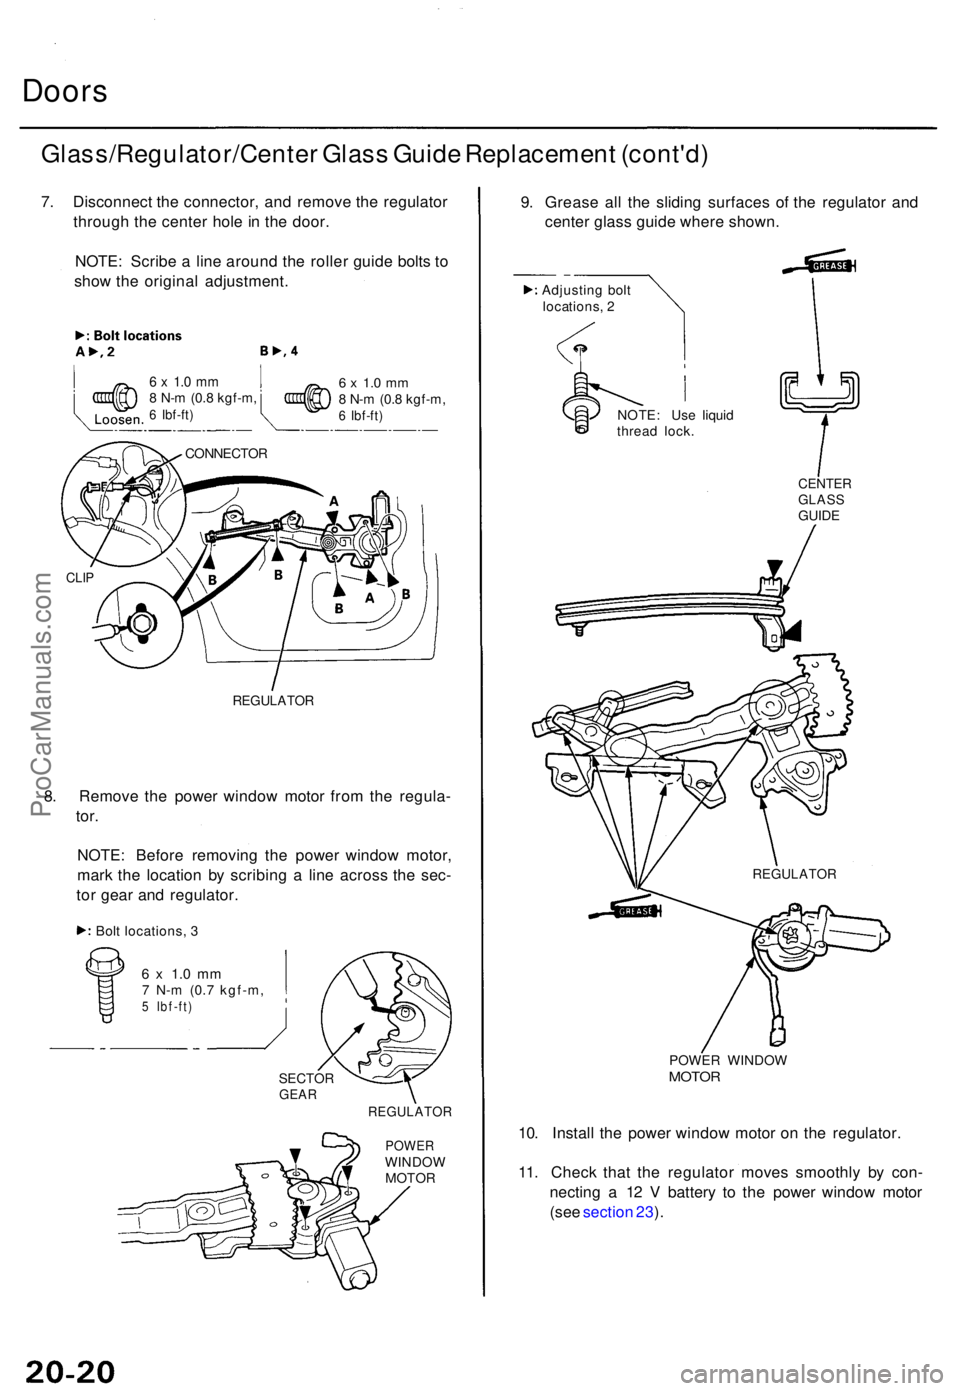
7. Disconnec t th e connector , an d remov e th e regulato r
throug h th e cente r hol e in th e door .
NOTE : Scrib e a lin e aroun d th e rolle r guid e bolt s t o
sho w th e origina l adjustment .
6 x 1. 0 m m8 N- m (0. 8 kgf-m ,6 Ibf-ft )
6 x 1. 0 m m8 N- m (0. 8 kgf-m ,6 Ibf-ft )
REGULATO R
8. Remov e th e powe r windo w moto r fro m th e regula -
tor.
NOTE : Befor e removin g th e powe r windo w motor ,
mar k th e locatio n b y scribin g a lin e acros s th e sec -
to r gea r an d regulator .
Bolt locations , 3
6 x 1. 0 m m7 N- m (0. 7 kgf-m ,5 Ibf-ft )
POWERWINDO W
MOTO R
9. Greas e al l th e slidin g surface s o f th e regulato r an d
cente r glas s guid e wher e shown .
Adjustin g bol t
locations , 2
NOTE : Us e liqui d
threa d lock .
CENTE RGLASSGUIDE
POWE R WINDO W
MOTOR
10. Instal l th e powe r windo w moto r o n th e regulator .
11 . Chec k tha t th e regulato r move s smoothl y b y con -
nectin g a 12 V batter y t o th e powe r windo w moto r
(se e sectio n 23 ).
CONNECTO R
CLIP
REGULATO R
SECTORGEARREGULATO R
ProCarManuals.com
Page 1365 of 1771
Doors
Glass Adjustment
Adjusting bolt/locknut locations
NOTE: Take care not to damage location on the front sash.
Front:
GLASS
FRONT
SASH
REGULATOR
REGULATOR
GLASS GUIDE
GLASS
GUIDE
Rear:
GLASS
STOPPER
PLATE
CENTER GLASS
GUIDE
INSIDE
STABILIZER
CENTER GLASS
GUIDE
ROLLER
GUIDE
INSIDE
STABILIZER
STOPPER
PLATES
INSIDE
STABILIZER
INSIDE
STABILIZER
STOPPER
PLATES
FRONT
SASHProCarManuals.com
Page 1368 of 1771

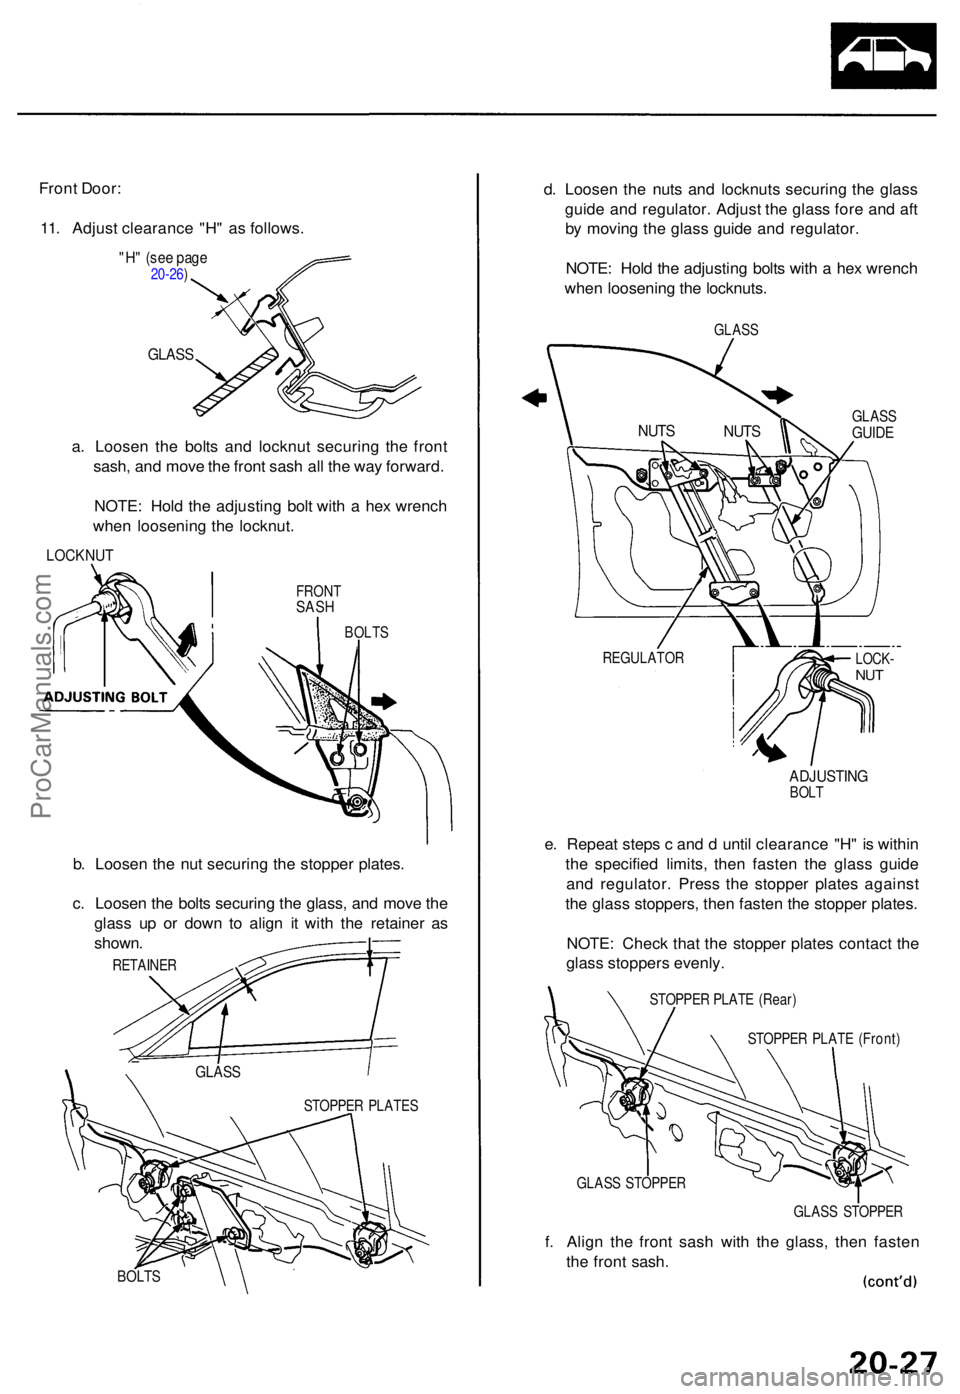
Front Door :
11 . Adjus t clearanc e "H " a s follows .
"H" (se e pag e20-26 )
GLAS S
a. Loose n th e bolt s an d locknu t securin g th e fron t
sash , an d mov e th e fron t sas h al l th e wa y forward .
NOTE : Hol d th e adjustin g bol t wit h a he x wrenc h
whe n loosenin g th e locknut .
LOCKNU T
FRONTSASH
BOLT S
b. Loose n th e nu t securin g th e stoppe r plates .
c . Loose n th e bolt s securin g th e glass , an d mov e th e
glas s u p o r dow n t o alig n i t wit h th e retaine r a s
shown .
RETAINE R
BOLTS
d. Loose n th e nut s an d locknut s securin g th e glas s
guid e an d regulator . Adjus t th e glas s for e an d af t
b y movin g th e glas s guid e an d regulator .
NOTE : Hol d th e adjustin g bolt s wit h a he x wrenc h
whe n loosenin g th e locknuts .
GLASS
GLASSGUIDE
LOCK -NUT
ADJUSTIN GBOLT
e. Repea t step s c an d d unti l clearanc e "H " i s withi n
th e specifie d limits , the n faste n th e glas s guid e
an d regulator . Pres s th e stoppe r plate s agains t
th e glas s stoppers , the n faste n th e stoppe r plates .
NOTE : Chec k tha t th e stoppe r plate s contac t th e
glas s stopper s evenly .
STOPPE R PLAT E (Rear )
STOPPE R PLAT E (Front )
GLAS S STOPPE R
GLASS STOPPE R
f. Alig n th e fron t sas h wit h th e glass , the n faste n
th e fron t sash .
STOPPE R PLATE S
GLASS
REGULATO R
NUTS
NUT
S
ProCarManuals.com