Page 1643 of 1771
License Plate Lights
A/T Gear Position
Indicator Trim Light
Replacement
1. Remove the two screws from the license plate light
assembly.
2. Pull the light out, and disconnect the 2P connector
from it.
2P CONNECTOR
LENS
BULB (8 W)
3. Take the lens off, then replace the bulb.
Replacement
1. Carefully pry the A/T gear position indicator trim out
of the center console.
A/T GEAR POSITION INDICATOR TRIM
CENTER CONSOLE
2. Turn the 2P connector counterclockwise to remove
it from the A/T gear position indicator trim.
3. Remove the bulb from the 2P connector.
A/T GEAR
POSITION
INDICATOR
TRIM
BULB (1.4 W)
2P CONNECTORProCarManuals.com
Page 1644 of 1771

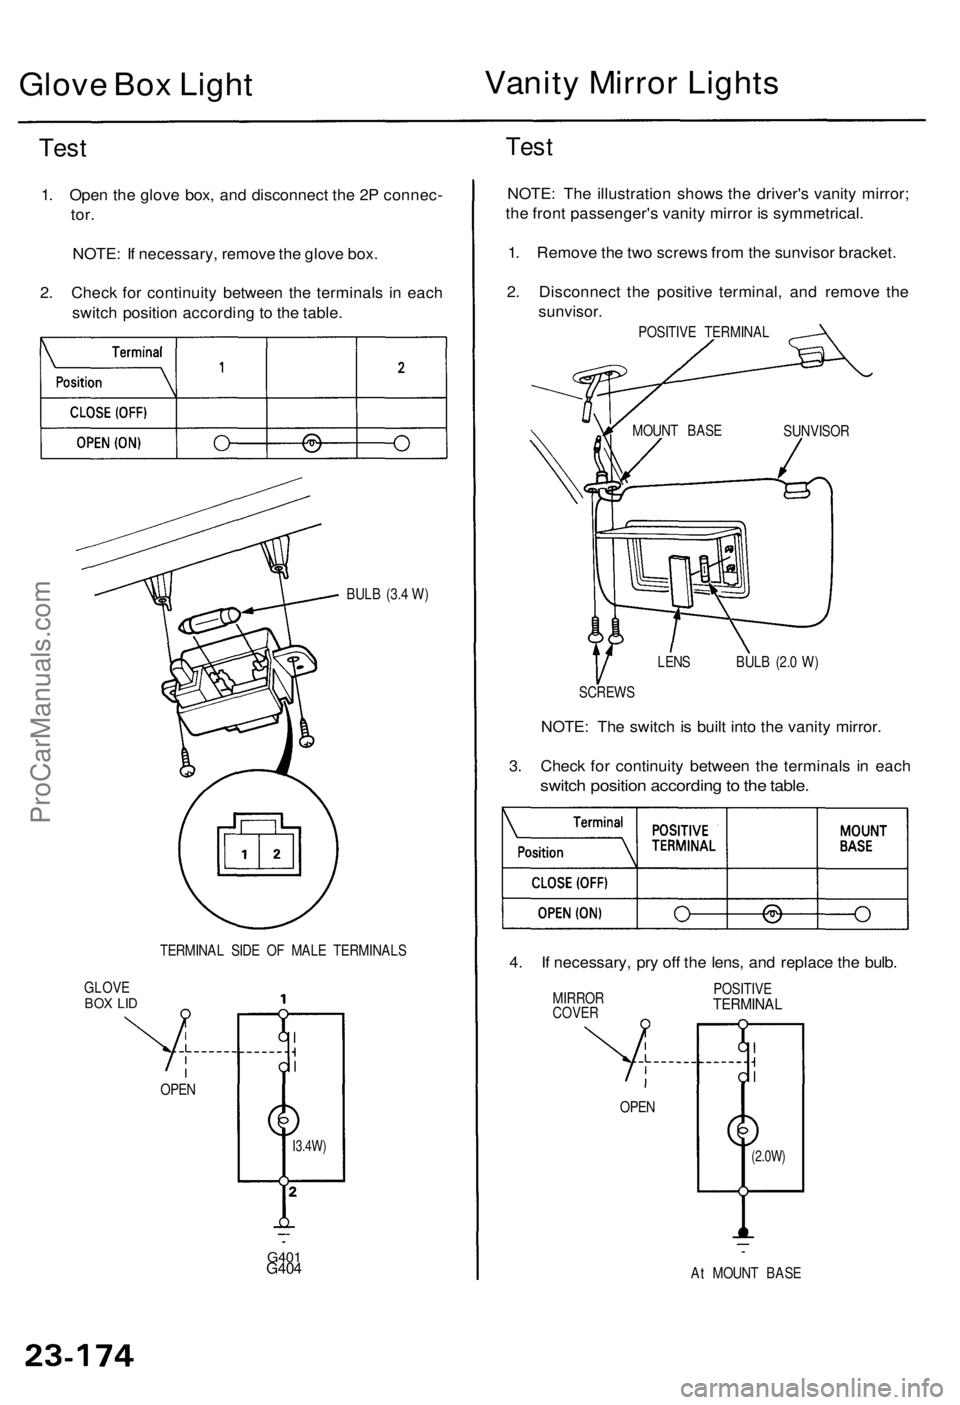
Glove Bo x Ligh t Vanit
y Mirro r Light s
Test
1. Ope n th e glov e box , an d disconnec t th e 2 P connec -
tor.
NOTE : I f necessary , remov e th e glov e box .
2 . Chec k fo r continuit y betwee n th e terminal s i n eac h
switc h positio n accordin g t o th e table .
BULB (3. 4 W )
TERMINA L SID E O F MAL E TERMINAL S
GLOV E
BOX LI D
G40 1G404
Test
NOTE : Th e illustratio n show s th e driver' s vanit y mirror ;
th e fron t passenger' s vanit y mirro r i s symmetrical .
1 . Remov e th e tw o screw s fro m th e sunviso r bracket .
2 . Disconnec t th e positiv e terminal , an d remov e th e
sunvisor .
POSITIVE TERMINA L
LEN S BUL B (2. 0 W )
SCREW S
NOTE: Th e switc h is buil t int o th e vanit y mirror .
3 . Chec k fo r continuit y betwee n th e terminal s i n eac h
switc h positio n accordin g to th e table .
4. I f necessary , pr y of f th e lens , an d replac e th e bulb .
MIRRO R
COVE R POSITIV
ETERMINA L
At MOUN T BAS E
OPE
N
OPEN
(2.0W )I3.4W)
SUNVISO R
MOUN
T BAS E
ProCarManuals.com
Page 1645 of 1771
Interior Light s
Componen t Locatio n Inde x
FRON T PASSENGER' S
VANIT Y MIRRO R LIGH T
Test , pag e 23-17 4
Replacement , pag e 23-17 4
SPOTLIGH TTest, pag e 23-17 7
Replacement , pag e 23-17 7
\
DRIVER' S
VANIT Y MIRRO R LIGH T
Test , pag e 23-17 4
Replacement , pag e 23-17 4 FRON
T PASSENGER' S DOO R
COURTES Y LIGH T
Replacement , pag e 23-18 0
FRON T PASSENGER' S
DOO R SWITC H
Test , pag e 23-18 0 RIGH
T REA R DOO R
COURTES Y LIGH T
Replacement , pag e 23-18 0
RIGH T REA R DOO R SWITC H
Test , pag e 23-18 0
TRUN K LIGH T
Test , pag e 23-18 1
Replacement , pag e 23-18 1
DRIVER' S DOO R COURTES Y
LIGH T
Replacement , pag e 23-18 0
DRIVER' S DOO R SWITC H
Test , pag e 23-18 0
LEF T REA R DOO R
COURTES Y LIGH T
Replacement , pag e 23-18 0
LEF T REA R DOO R SWITC H
Test , pag e 23-18 0
CEILIN G LIGH TTest, pag e 23-17 8
Replacement , pag e 23-17 8
TRUNK LATC H SWITC H
Test , pag e 23-18 1
Replacement , pag e 23-18 1
ProCarManuals.com
Page 1646 of 1771
Spotlight Test/Replacemen t
1. Tur n th e ligh t switc h OFF .
2. Pr y of f th e lens .
3. Remov e th e bol t an d th e housing .
4 . Disconnec t th e 4 P connecto r fro m th e housing .
4P CONNECTO R
HOUSING
5. Chec k fo r continuit y betwee n th e terminal s i n eac h
switc h positio n accordin g t o th e table .
MOUN T BAS E
TERMINA L SID E O FMAL E TERMINAL S
NOTE: Th e No . 1 an d No . 3 terminal s ar e no t used .
At MOUN T BAS E
ProCarManuals.com
Page 1647 of 1771
Interior Light s
Ceiling Ligh t Tes t (Wit h Moonroof )
1. Tur n th e ligh t switc h OFF .
2. Pr y of f th e lens .
3 . Remov e th e tw o mountin g nut s an d th e housing .
3P CONNECTO R
HOUSING
BULB (8 W )
LEN S
4. Disconnec t th e 3 P connecto r fro m th e housing . 5
. Chec k fo r continuit y betwee n th e terminal s i n eac h
switc h positio n accordin g t o th e table .
BULB (8 W )
At MOUNTIN G NU T
ProCarManuals.com
Page 1649 of 1771
Interior Light s
Courtes y Light s Replacemen t
NOTE: Th e bul b o r len s alon e ca n b e replace d withou t
removin g th e doo r panel .
1 . T o replac e th e entir e light , remov e th e doo r pane l
(see section 20 ).
2 . Remov e th e tw o screws , the n remov e th e ligh t
housin g fro m th e doo r panel .
3 . Disconnec t th e 2 P connector , an d remov e th e light .
2P CONNECTO R
BULB (3. 4 W ) LEN
S
Doo r Switc h Tes t
1. Remov e th e cove r an d th e screw , the n pul l th e switc h
out.
2. Disconnec t th e 1 P connector , an d remov e th e
switch .
BASE PLAT E
COVE R
1 P CONNECTO R
3. Chec k fo r continuit y betwee n th e terminal s i n eac h
switc h positio n accordin g t o th e table .
HOUSIN G
OPEN(ON)
CLOS E(OFF)TERMINA L
ProCarManuals.com
Page 1651 of 1771

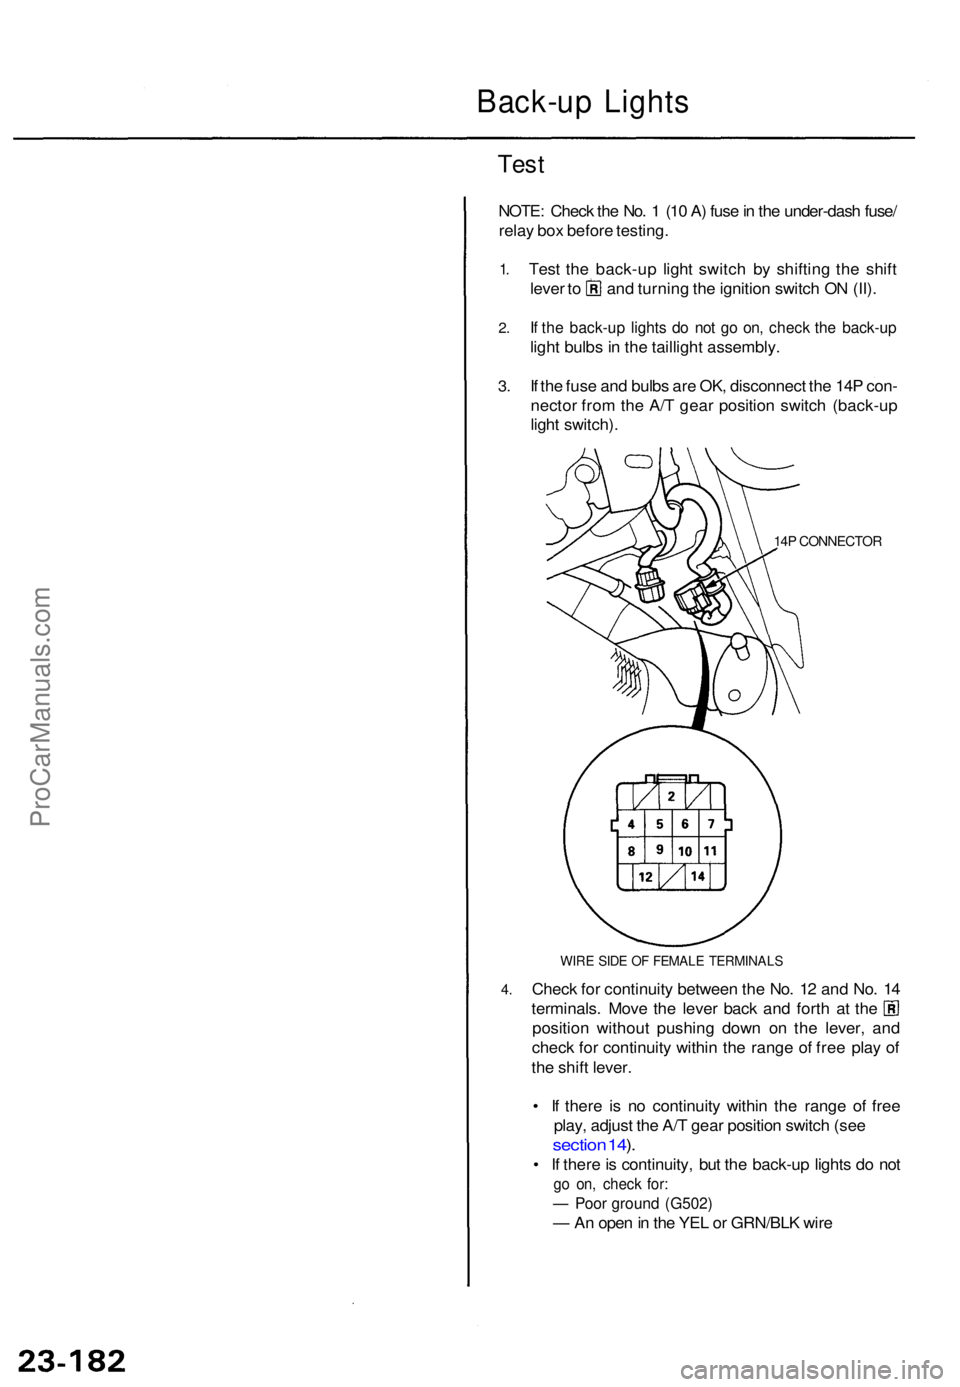
Back-up Light s
Test
NOTE : Chec k th e No . 1 (1 0 A ) fus e in th e under-das h fuse /
rela y bo x befor e testing .
1.
2 .
3.
4 .
Tes t th e back-u p ligh t switc h b y shiftin g th e shif t
lever t o an d turnin g th e ignitio n switc h O N (II) .
If th e back-u p light s d o no t g o on , chec k th e back-u p
light bulb s i n th e tailligh t assembly .
I f th e fus e an d bulb s ar e OK , disconnec t th e 14 P con -
necto r fro m th e A/ T gea r positio n switc h (back-u p
ligh t switch) .
14P CONNECTO R
WIRE SID E O F FEMAL E TERMINAL S
Check fo r continuit y betwee n th e No . 1 2 an d No . 1 4
terminals . Mov e th e leve r bac k an d fort h a t th e
positio n withou t pushin g dow n o n th e lever , an d
chec k fo r continuit y withi n th e rang e o f fre e pla y o f
th e shif t lever .
• I f ther e i s n o continuit y withi n th e rang e o f fre e
play , adjus t th e A/ T gea r positio n switc h (se e
sectio n 14 ).
• I f ther e is continuity , bu t th e back-u p light s d o no t
go on , chec k for :
— Poo r groun d (G502 )
— An ope n in th e YE L o r GRN/BL K wir e
ProCarManuals.com
Page 1652 of 1771

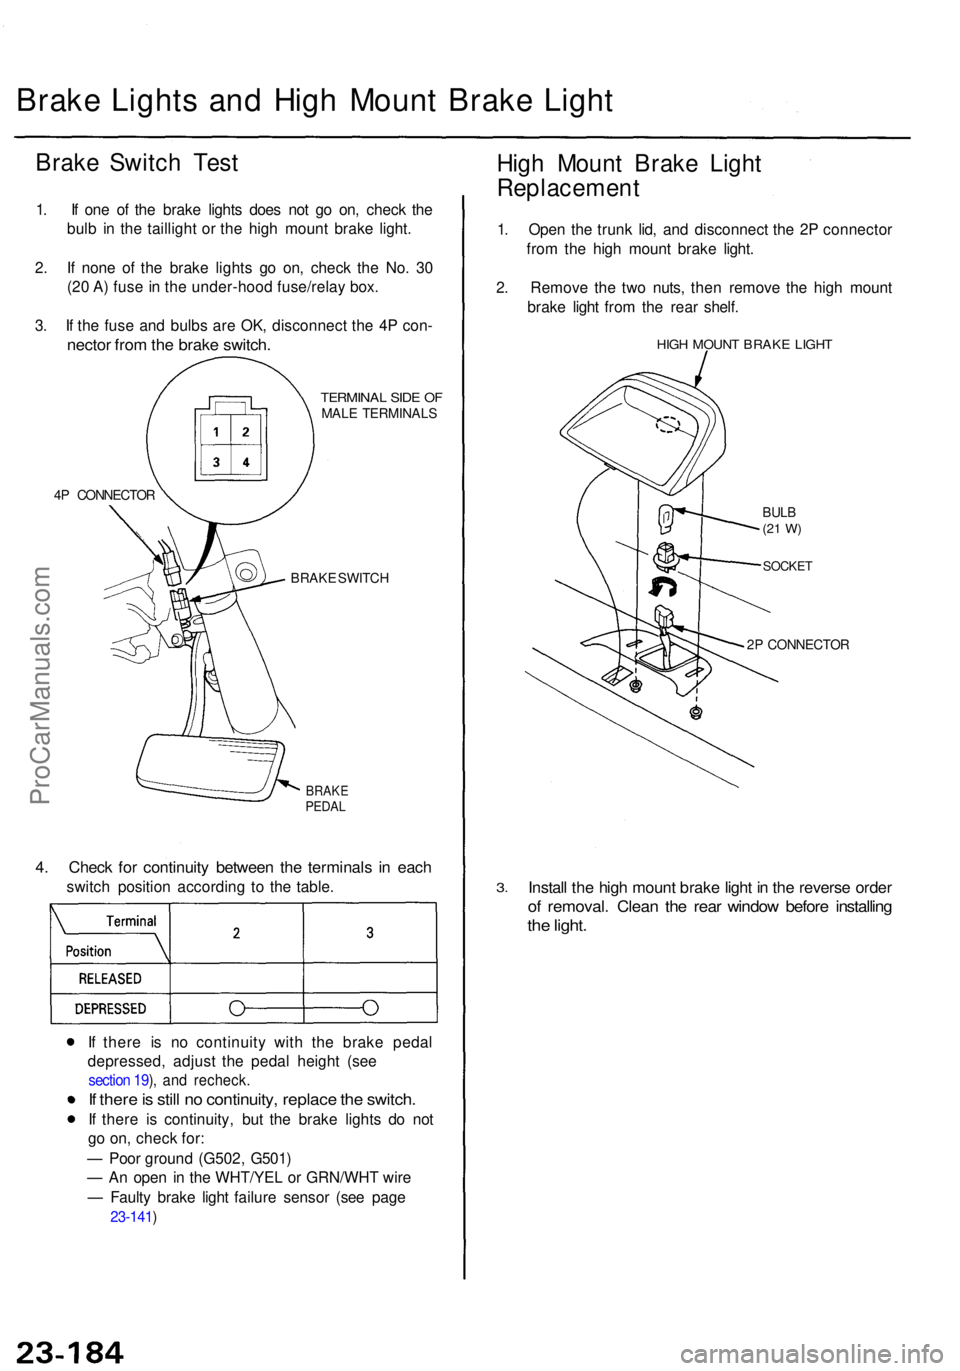
Brake Light s an d Hig h Moun t Brak e Ligh t
Brake Switc h Tes t
1. I f on e o f th e brak e light s doe s no t g o on , chec k th e
bul b i n th e tailligh t o r th e hig h moun t brak e light .
2 . I f non e o f th e brak e light s g o on , chec k th e No . 3 0
(2 0 A ) fus e in th e under-hoo d fuse/rela y box .
3 . I f th e fus e an d bulb s ar e OK , disconnec t th e 4 P con -
necto r fro m th e brak e switch .
4P CONNECTO R
TERMINAL SID E O FMAL E TERMINAL S
BRAK E SWITC H
BRAKEPEDAL
4. Chec k fo r continuit y betwee n th e terminal s i n eac h
switc h positio n accordin g t o th e table .
I f ther e i s n o continuit y wit h th e brak e peda l
depressed , adjus t th e peda l heigh t (se e
section 19 ), an d recheck .
If ther e is stil l n o continuity , replac e th e switch .
If ther e i s continuity , bu t th e brak e light s d o no t
g o on , chec k for :
— Poo r groun d (G502 , G501 )
— A n ope n i n th e WHT/YE L o r GRN/WH T wir e
— Fault y brak e ligh t failur e senso r (se e pag e
23-141 )
High Moun t Brak e Ligh t
Replacemen t
1. Ope n th e trun k lid , an d disconnec t th e 2 P connecto r
fro m th e hig h moun t brak e light .
2 . Remov e th e tw o nuts , the n remov e th e hig h moun t
brak e ligh t fro m th e rea r shelf .
HIGH MOUN T BRAK E LIGH T
BULB(21 W )
SOCKE T
2P CONNECTO R
3.Instal l th e hig h moun t brak e ligh t i n th e revers e orde r
of removal . Clea n th e rea r windo w befor e installin g
the light .
ProCarManuals.com