Page 1417 of 1771

Dashboard
Component Removal/Installation (cont'd)
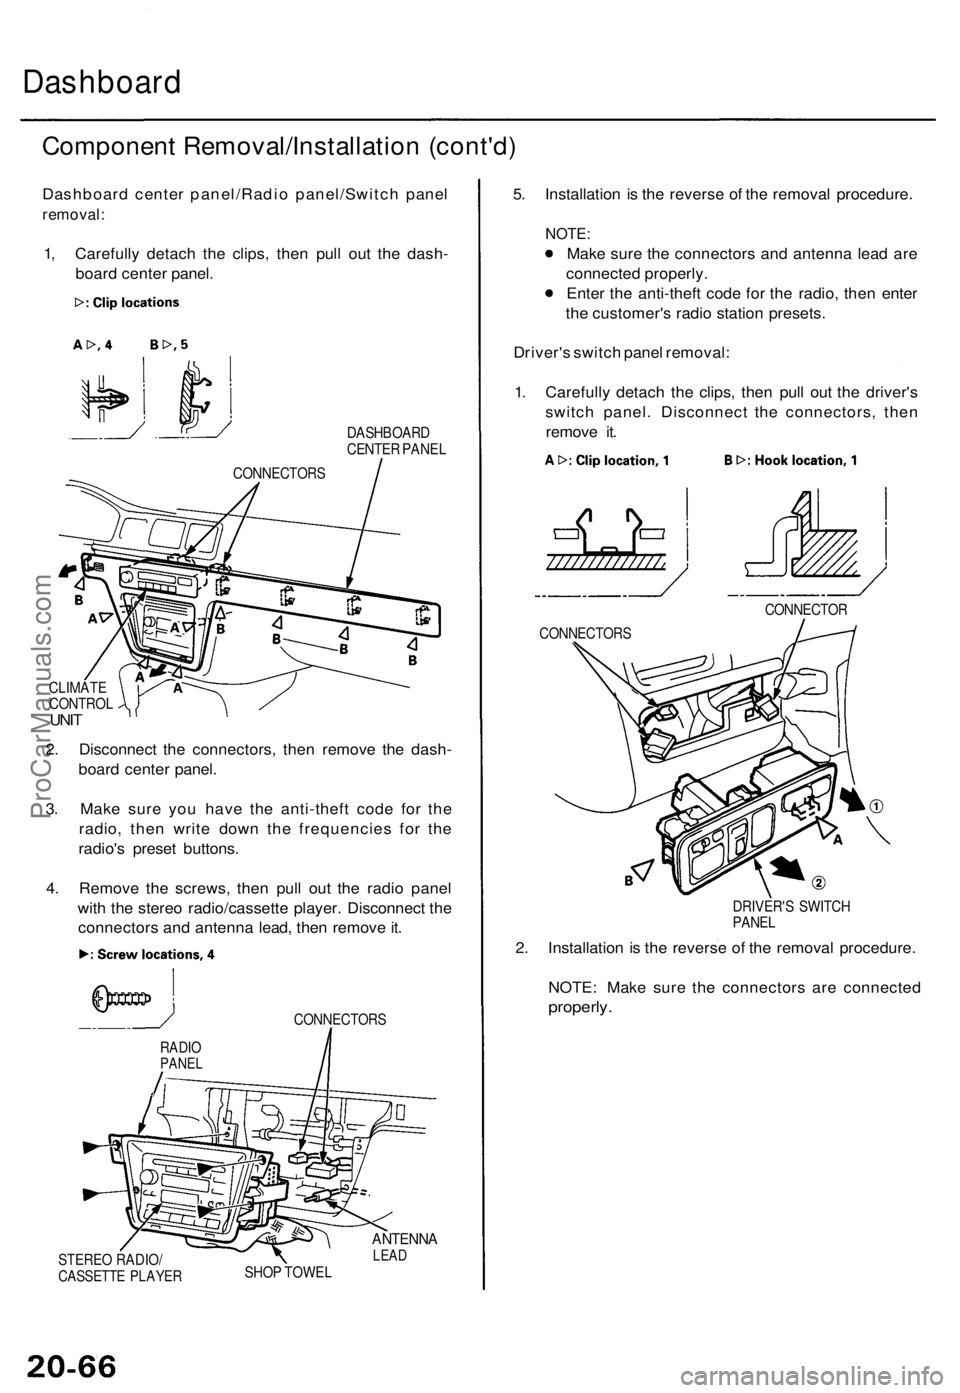
Dashboard center panel/Radio panel/Switch panel
removal:
1, Carefully detach the clips, then pull out the dash-
board center panel.
DASHBOARD
CENTER PANEL
CLIMATE
CONTROL
UNIT
2. Disconnect the connectors, then remove the dash-
board center panel.
3. Make sure you have the anti-theft code for the
radio, then write down the frequencies for the
radio's preset buttons.
4. Remove the screws, then pull out the radio panel
with the stereo radio/cassette player. Disconnect the
connectors and antenna lead, then remove it.
CONNECTORS
STEREO RADIO/
CASSETTE PLAYER
ANTENNA
LEAD
SHOP TOWEL
5. Installation is the reverse of the removal procedure.
NOTE:
Make sure the connectors and antenna lead are
connected properly.
Enter the anti-theft code for the radio, then enter
the customer's radio station presets.
Driver's switch panel removal:
1. Carefully detach the clips, then pull out the driver's
switch panel. Disconnect the connectors, then
remove it.
DRIVER'S SWITCH
PANEL
2. Installation is the reverse of the removal procedure.
NOTE: Make sure the connectors are connected
properly.
RADIO
PANEL
CONNECTOR
CONNECTORS
CONNECTORSProCarManuals.com
Page 1657 of 1771
Stereo Soun d Syste m
Componen t Locatio n Inde x
SRS component s ar e locate d in thi s area . Revie w th e SR S componen t locations , precautions , an d procedure s in th e SR S
(sectio n 24 ) befor e performin g repair s o r service .
DRIVER' S DOO R SPEAKE R
Replacement , pag e 23-19 1
WINDO W ANTENN A
Test , pag e 23-19 5
Repair , pag e 23-19 5
NOIS E CONDENSE R
Test , pag e 23-19 6
STERE O RADIO/CASSETTE/C DPLAYERRemoval , pag e 23-19 3
Terminals , pag e 23-19 4
OVERHEA D SPEAKER SReplacement , pag e 23-19 8
REAR SPEAKER SReplacement , pag e 23-19 7
TWEETER SReplacement , pag e 23-19 7
FRON T PASSENGER S DOO R SPEAKE R
Replacement , pag e 23-19 1
ANTENN A LEA D
NOIS E CONDENSE R
Test , pag e 23-19 6
ProCarManuals.com
Page 1658 of 1771
Removal
1. Mak e sur e yo u hav e th e anti-thef t cod e fo r th e radio ,
the n writ e dow n th e frequencie s fo r th e radio' s pre -
set buttons .
2. Pr y ou t th e dashboar d cente r pane l fro m th e dash -
board .
3 . Disconnec t th e connector s fro m th e climat e contro l
unit.
DASHBOAR D CENTE R PANE L
4. Remov e th e radi o pane l an d stere o radio /
cassette/C D Playe r fro m th e dashboard .
5 . Disconnec t th e 16 P an d 5 P connectors , an d antenn a
lea d fro m th e stere o radio/cassette/C D player .
5PCONNECTO RANTENNALEAD
16 P CONNECTO R
STERE O RADIO/CASSETTE/C D PLAYE R
6. Remov e th e stere o radio/cassette/C D playe r fro m
th e radi o panel .
STERE O RADIO/CASSETTE/C DPLAYER
RADIO PANE L
7. Instal l i n th e revers e orde r o f removal .
8 . Ente r th e anti-thef t cod e fo r th e radio , the n ente r th e
customer' s radi o statio n presets .
ProCarManuals.com
Page 1727 of 1771
STARTER CU T RELA YTest, pag e 23-6 3
DRIVER' S DOO R KE Y
CYLINDE R
SWITC H
Test , pag e 23-28 8
Replacement , sectio n 2 0
LEF T FRON T
PARKIN G LIGH T
Bul b Replacement , pag e
23-16 6
STERE O RADIO/CASSETTE/C DPLAYERRemoval , pag e 23-19 3
LEF T FRON T SID E
MARKE R LIGH T
Replacement , pag e 23-17 1
DRIVER' S DOO R SWITC H
Test , pag e 23-18 0
DRIVER' S DOO R LOC K KNO B
SWITC H
(In th e actuato r assembly )Test, pag e 23-24 6Replacement , sectio n 2 0
LEF T REA R DOO R LOC K KNO B
SWITC H
(I n th e actuato r assembly )
Test , pag e 23-28 8
Replacement , sectio n 2 0
LEF T REA R DOO R SWITC H
Test , pag e 23-18 0 RIGH
T TAILLIGH T
Replacement ,
pag e 23-17 2
SECURIT Y TRUN K KE Y
CYLINDE R SWITC H
Test , pag e 23-28 7
SECURIT Y TRUN K LATC H SWITC H
Test , pag e 23-28 7
LEFT TAILLIGH TReplacement , pag e 23-17 2
SECURIT
Y INDICATO R
Replacement , pag e 23-28 6
ProCarManuals.com