1995 ACURA TL headlights
[x] Cancel search: headlightsPage 217 of 1771

Idle Contro l Syste m
Idle Spee d Settin g
Inspection/Adjustmen t
NOTE:
Before settin g th e idl e speed , chec k th e followin g
items :
— Th e MI L ha s no t bee n reporte d on .
— Ignitio n timin g
— Spar k plug s
— Ai r cleane r (ACL )
— PC V syste m
(Canada ) Pul l th e parkin g brak e leve r up . Star t th e
engine , the n chec k tha t th e headlight s ar e off .
1 . Star t th e engine . Hol d th e engin e a t 3,00 0 rp m wit h
no loa d (transmissio n i n o r position ) unti l th e
radiato r fa n come s on , the n le t i t idle .
2 . Connec t a OBDI I sca n too l (se e pag e 11-32 ) o r
tachometer .
• Connec t a tachomete r t o th e ignitio n contro l
module (ICM ) secondary , or.. .
TACHOMETE R
ICM
Remov e th e rubbe r ca p fro m th e tachomete r
connecto r an d connec t a tachometer .
TACHOMETE R TACHOMETE R
CONNECTOR
RUBBERCAP
3. Disconnec t th e IA C valv e connector .
4.
5 .
IA C VALV E
Start th e engin e wit h th e accelerato r peda l slightl y
depressed . Stabiliz e th e rp m a t 1,000 , the n slowl y
releas e th e peda l unti l th e engin e idles .
Check idlin g in no-loa d conditions : headlights , blow -
er fan , rea r defogger , radiato r fan , an d ai r conditione r
ar e no t operating .
Idl e spee d shoul d be :
480 5 0 rp m
(in o r position )
Adjus t th e idl e speed , i f necessary , b y turnin g th e
idl e adjustin g screw .
NOTE : Afte r adjustin g th e idl e spee d i n thi s step ,
rechec k th e ignitio n timin g (se e sectio n 23 ).
I f i t i s ou t o f spec , g o bac k t o ste p 4 .
IDL E ADJUSTIN G SCRE W
ProCarManuals.com
Page 895 of 1771

Idle Spee d Settin g
Inspection/Adjustmen t
NOTE:
• Befor e settin g th e idl e speed , chec k th e followin g
items:
— Th e MI L ha s no t bee n reporte d on .
— Ignitio n timin g
— Spar k plug s
— Ai r cleane r
— PC V syste m
• (Canada ) Pul l th e parkin g brak e leve r up . Star t th e
engine , the n chec k tha t th e headlight s ar e off .
1 . Star t th e engine . Hol d th e engine at 3,00 0 rp m wit h
no loa d (transmissio n i n o r position ) unti l th e
radiato r fa n come s on , the n le t i t idle .
2 . Connec t a tachometer .
3 . Disconnec t th e IA C valv e connector .
IAC VALV E
4.
5.
Star t th e engin e wit h th e accelerato r peda l slightl y
depressed . Stabiliz e th e rp m a t 1,000 , the n slowl y
releas e th e peda l unti l th e engin e idles .
Check idlin g in no-loa d conditions : headlights , blow -
er fan , rea r defogger , radiato r fan , an d ai r conditione r
ar e no t operating .
Idl e spee d shoul d be :
550 ± 5 0 rp m
(in o r position )
Adjust th e idl e speed , i f necessary, by turnin g th e
idl e adjustin g screw .
NOTE : Afte r adjustin g th e idl e spee d i n thi s step ,
rechec k th e ignitio n timin g (se e sectio n 23 ).
I f i t i s ou t o f spec , g o bac k t o ste p 4 .
IDL E ADJUSTIN G SCRE W
6. Tur n th e ignitio n switc h OFF .
7 . Reconnec t th e 2 P connecto r o n th e IA C valve , the n
d o th e EC M rese t procedure .
8 . Restar t an d idl e th e engine with no-loa d condition s
fo r on e minute , the n chec k th e idl e speed .
NOTE : (Canada ) Pul l th e parkin g brak e leve r up .
Star t th e engine , the n chec k tha t th e headlight s ar e
off.
Idle spee d shoul d be :
700 ± 5 0 rp m
(in o r position )
9 . Idl e th e engin e fo r on e minut e wit h headlight s (Low )
O N an d chec k th e idl e speed .
Idl e spee d shoul d be :
770 ± 5 0 rp m
(in o r position )
10 . Tur n th e headlight s off .
Idl e th e engin e fo r on e minut e wit h heate r fa n switc h
a t H I an d ai r conditione r on , the n chec k th e idl e speed .
Idl e spee d shoul d be :
770 ± 5 0 rp m
(in o r position )
NOTE : I f th e idl e spee d i s no t withi n specification ,
se e Sympto m Char t o n pag e 11-36 .
ProCarManuals.com
Page 926 of 1771
 Contro l
Syste m (cont'd )
Intake Ai r Bypas s (IAB ) Contro l Valv e Testin g
1. Chec k th e IA B contro l valv e shaf t")
Intake Ai r Syste m Emissio
n Contro l Syste m
Intake Ai r Bypas s (IAB ) Contro l
Syste m (cont'd )
Intake Ai r Bypas s (IAB ) Contro l Valv e Testin g
1. Chec k th e IA B contro l valv e shaf t fo r bindin g o r stick -
ing.
2. Chec k th e IA B contro l valv e fo r smoot h movement .
3. Chec k tha t o f th e IA B contro l valv e is i n clos e con -
tac t wit h th e stoppe r whe n th e vacuu m hos e i s dis -
connecte d fro m th e IA B contro l diaphragm .
IAB CONTRO L VALV ESTOPPE R
4.Chec k tha t o f th e IA B contro l valv e is in clos e con -
tac t wit h th e full-clos e scre w whe n yo u appl y 5 1 kP a
(38 0 mmHg , 1 5 inHg ) o f vacuu m to th e IA B contro l
diaphragm .
FULL-CLOS ESCREW(Do no t adjust. )
If an y faul t i s found , clea n th e linkag e an d shaft s wit h
carbureto r cleaner . I f th e proble m stil l exist s afte r clean -
ing , disassembl e th e intak e manifol d an d chec k th e IA B
valv e bod y assembl y (se e sectio n 9 ).
Syste m Descriptio n
The emissio n contro l syste m include s a War m U p Thre e
Wa y Catalyti c Converte r (W U TWC) , a Thre e Wa y Catalyti c
Converte r (TWC) , Exhaus t Ga s Recirculatio n (EGR ) system ,
Positiv e Crankcas e Ventilatio n (PCV ) syste m an d
Evaporativ e Emissio n (EVAP ) Contro l system . Th e emis -
sio n contro l syste m is designe d t o mee t federa l an d stat e
emissio n standards .
Tailpipe Emissio n
Inspectio n
Do no t smok e durin g thi s procedure . Kee p
an y ope n flam e awa y fro m you r wor k area .
1 . Star t th e engine . Hol d th e engin e a t 3,00 0 rp m wit h
no loa d (transmissio n i n o r position ) unti l th e
radiato r fa n come s on , the n le t i t idle .
2 . Connec t a tachometer .
3 . Chec k an d adjus t th e idl e speed , i f necessar y (se e
pag e 11-117 ).
4 . War m u p an d calibrat e th e C O mete r accordin g to th e
mete r manufacturer' s instructions .
5 . Chec k idl e C O wit h th e headlights , heate r blower ,
rea r windo w defogger , coolin g fan , an d ai r condition -
er off .
NOTE : (Canada ) Pul l th e parkin g brak e leve r up .
Star t th e engine , the n chec k tha t th e headlight s ar e
off.
CO mete r shoul d indicat e 0.1 % maximum .
ProCarManuals.com
Page 1637 of 1771

Headlights
Replacemen t
CAUTION: Haloge n headlight s becom e ver y ho t i n use ;
d o no t touc h the m o r th e attachin g hardwar e immedi -
atel y afte r the y hav e bee n turne d off .
1 . Remov e th e fron t bumpe r (se e sectio n 20 ).
2 . Remov e th e headligh t maintenanc e cove r (lef t
headlight) , the n disconnec t th e 2 P an d 3 P connec -
tors .
3 . Remov e th e mountin g bolts , the n remov e th e head -
light assembly .
MOUNTIN GBOLTS
3P CONNECTO R
2P CONNECTO R
2 P CONNECTO R
HEADLIGHT
ASSEMBL Y
MOUNTING BOLT S
4. Instal l th e headligh t i n th e revers e orde r o f removal .
5 . Afte r replacement , adjus t th e headlight s t o loca l
requirement s (se e pag e 23-168 ).
Bul b Replacemen t
CAUTION:
Haloge n headlight s becom e ver y ho t i n use ; d o no t
touc h the m o r th e attachin g hardwar e immediatel y
afte r the y hav e bee n turne d off .
D o no t tr y t o replac e o r clea n th e headlight s wit h th e
light s on .
D o no t touc h th e glas s o f th e haloge n bulbs .
1 . Remov e th e headligh t maintenanc e cove r (lef t
headlight) , the n disconnec t th e 3 P connecto r fro m
th e headlight .
2 . Remov e th e rubbe r cap .
3 . Pul l th e retainin g sprin g awa y fro m th e bulb , the n
remov e th e bulb .
RUBBE R CA P
3 P CONNECTO R
HEADLIGH T
BULB(60/5 5 W )
4. Afte r replacement , adjus t th e headlight s t o loca l
requirement s (se e pag e 23-168 ).
ProCarManuals.com
Page 1638 of 1771
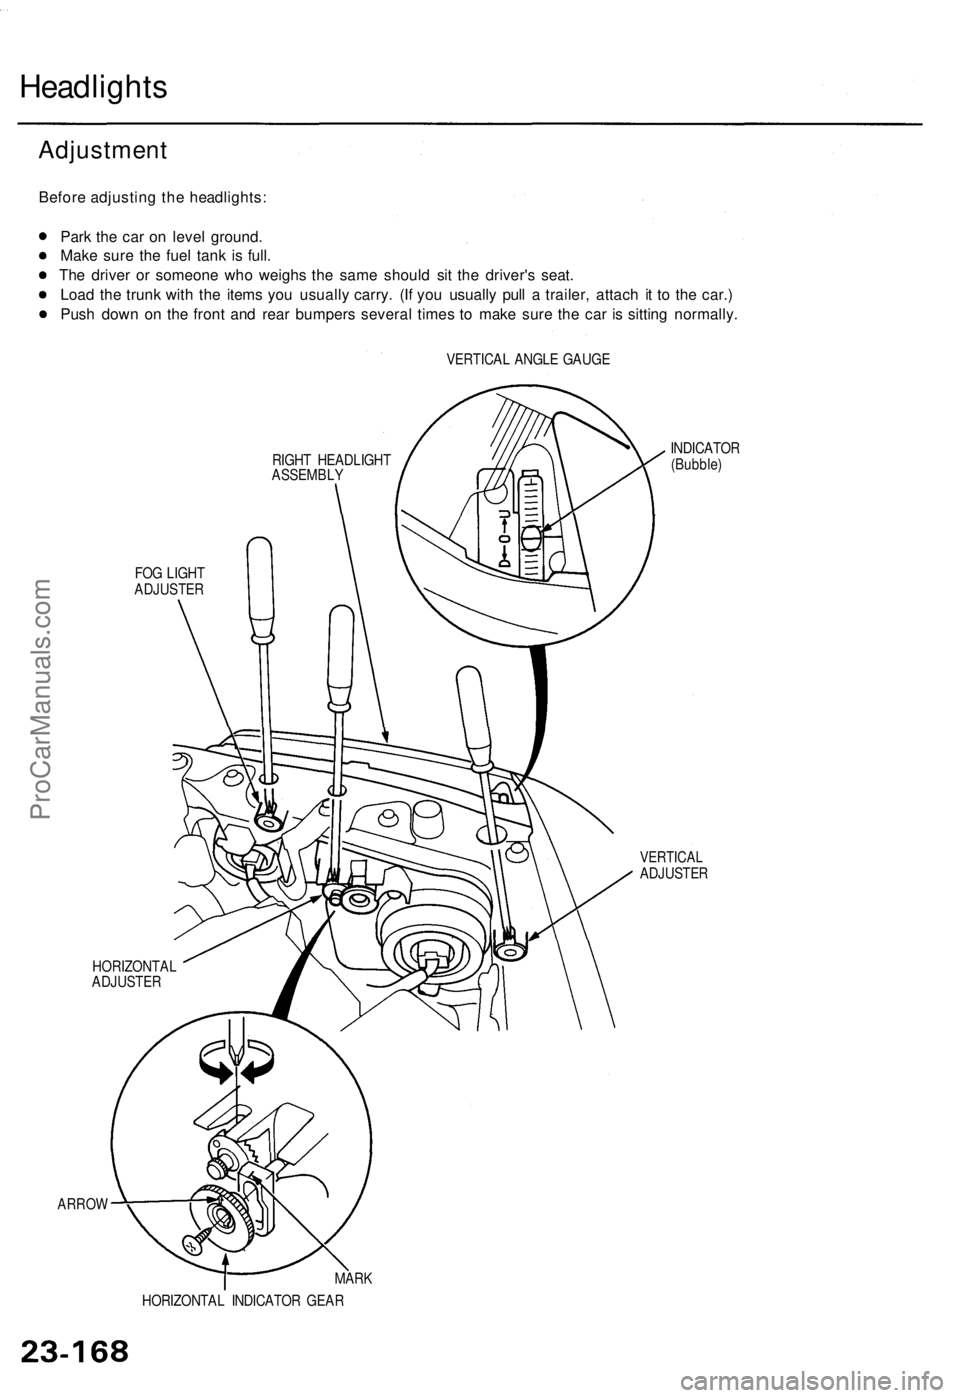
Headlights
Before adjustin g th e headlights :
Par k th e ca r o n leve l ground .
Mak e sur e th e fue l tan k i s full .
Th e drive r o r someon e wh o weigh s th e sam e shoul d si t th e driver' s seat .
Loa d th e trun k wit h th e item s yo u usuall y carry . (I f yo u usuall y pul l a trailer , attac h i t t o th e car. )
Pus h dow n o n th e fron t an d rea r bumper s severa l time s t o mak e sur e th e ca r i s sittin g normally .
VERTICAL ANGL E GAUG E
RIGH T HEADLIGH T
ASSEMBL Y
FO G LIGH T
ADJUSTE R
ARROW
INDICATO R
(Bubble )
VERTICA LADJUSTE R
HORIZONTA L
ADJUSTE R
MARK
HORIZONTA L INDICATO R GEA R
Adjustmen t
ProCarManuals.com
Page 1729 of 1771

Indicato r flashes .
0.2 se c ON/2. 4 se c OF F
Wan t th e syste m disarmed ?
(ARMED)
YES
Trun k opene d wit h key ?
Trun k li d switc h O NTrun k ke y cylinde r switc h O N (UNLO")
(From pag e 23-276 )
Indicato r flashes .
0.2 se c ON/2. 4 se c OF F
Wan t th e syste m disarmed ?
(ARMED)
YES
Trun k opene d wit h key ?
Trun k li d switc h O NTrun k ke y cylinde r switc h O N (UNLOCK )
Illega l activit y (an y o f th e following )
1 . Doo r i s opene d forcibly , o r
2 . Trun k li d i s opene d withou t usin g th e key , o r
3 . Hoo d is opened , o r
4 . Batter y terminal(s ) i s (are ) disconnecte d an d
reconnected , o r
5 . Engin e starte r circui t an d batter y circui t
ar e bypasse d b y breakin g th e ignitio n switch , o r
6 . Hood/trun k li d opene r i s operated .
Alarm
The horns , headlights , sid e marke r lights , an d taillight s
soun d an d flas h repeatedl y fo r tw o minutes .
Engin e starte r circui t i s interrupted .
Abou t tw o minute s passed ? Wan
t th e syste m disarmed ?
Unloc k eithe r doo r wit h th e key .
Eithe r doo r ke y cylinde r switc h O N
(UNLOCK )
The securit y alar m syste m is disarmed.
Indicato r stop s flashing .
Rearm th e securit y alar m system ?
(To pag e 23-276 )
END
ProCarManuals.com