1993 DODGE TRUCK wiper blades
[x] Cancel search: wiper bladesPage 432 of 1502
•
WINDSHIELD WIPER
AND
WASHER SYSTEMS
8K - 1
WINDSHIELD WIPER
AND
WASHER SYSTEMS
CONTENTS
page
INTERMITTENT WINDSHIELD WIPER FUNCTION AND SWITCH TESTING PROCEDURES
6
TWO SPEED WINDSHIELD WIPER MOTOR
AND
SWITCH TESTING PROCEDURES
1
GENERAL
INFORMATION
The windshield wipers
can be
operated with
the
windshield wiper switch only when
the
ignition switch
is in the
ACCESSORY
or RUN
position.
A
fuse located
in the
fuse block protects
the
circuitry
of
the wiper system
and the
vehicle. The same motor
is
used
for
standard
and
intermit
tent wipe systems. The wiper motor
has
permanent magnet fields.
The
speeds
are
determined
by
current flow
to the
appro
priate
set of
brushes. The intermittent wipe system
in
addition
to low
page
WINDSHIELD WASHERS .. 10
WINDSHIELD WIPER SYSTEM SERVICE PROCEDURES 7
and high speed,
has a
delay mode.
The
delay mode
has
a
range
of 2 to 15
seconds. This
is
accomplished
by
a
variable resistor
in the
wiper switch
and is
con trolled electrically
by a
control module.
The wiper system completes
the
wipe cycle when
the switch
is
turned
OFF. The
blades park
in the
lowest portion
of the
wipe pattern.
Depressing
the
washer knob while
the
system
is in
the
OFF
position, • turns
the
wiper motor
on
• allows
the
motor
to
operate through
3-4
wipe
cy
cles
and
then turn
OFF.
TWO SPEED WINDSHIELD WIPER MOTOR
AND
SWITCH TESTING PROCEDURES INDEX
page
Multifunction
(Two
Speed
Wiper) Switch Testing
Procedures
4
TWO SPEED WIPER MOTOR TESTING PROCEDURES
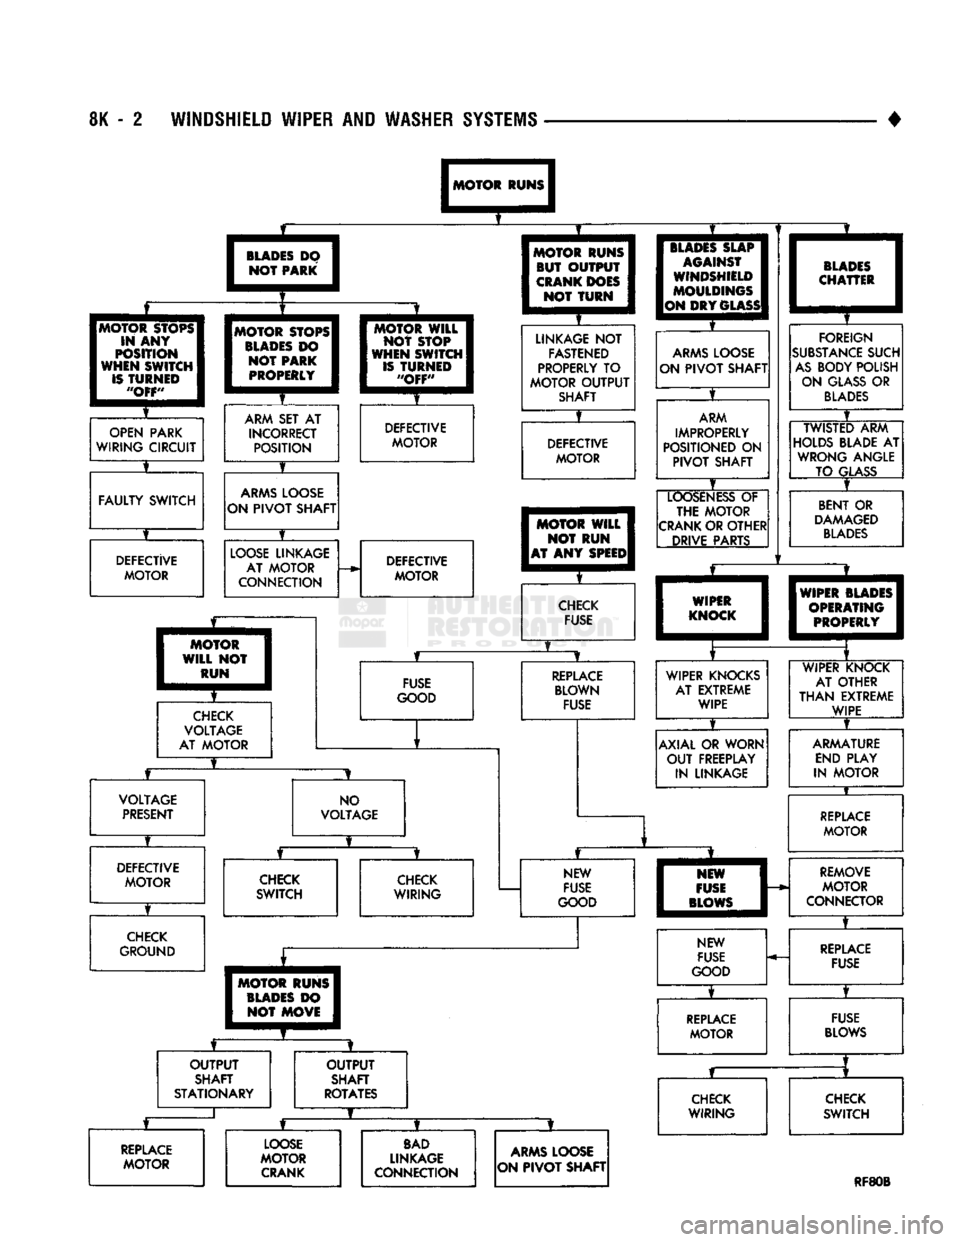
The following
is a
list
of
general wiper motor sys
tem problems.
It
contains
the
tests that
are to be
per
formed
to
locate
the
faulty part,
and the
corrective action
to be
taken.
The
same motor
is
used
for
stan
dard
and
optional systems.
If the
malfunction
in
volves only
the
Delay mode, switch,
or
wiring, refer
to
the
Intermittent Windshield Wiper Motor
and
Switch Service Procedures.
CONDITION
Motor will
not run in any
switch position.
PROCEDURE
(1) Check
for a
blown fuse
in the
fuse block.
(a)
If
fuse
is
good, proceed
to
step
No. 2.
(b)
If
fuse
is
defective, replace
and
check motor
operation
in all
switch positions.
(c)
If
motor
is
still inoperative
and the
fuse does
not blow, proceed
to
step
No. 2.
page
Two Speed
Wiper Motor Testing Procedures
1
(d)
If
replacement fuse blows, proceed
to
step
No.
5.
(2) Place switch
in low
speed position.
(3) Listen
to
motor.
If you
cannot hear
it
running,
proceed
to
step
No. 4. If you
hear
it
running, check
motor output shaft.
If
output shaft
is not
turning,
re
place motor assembly.
If it is
turning, crank
arm or
drive link
is not
properly connected. Replace worn
parts and/or properly connect drive link
to the
motor output shaft.
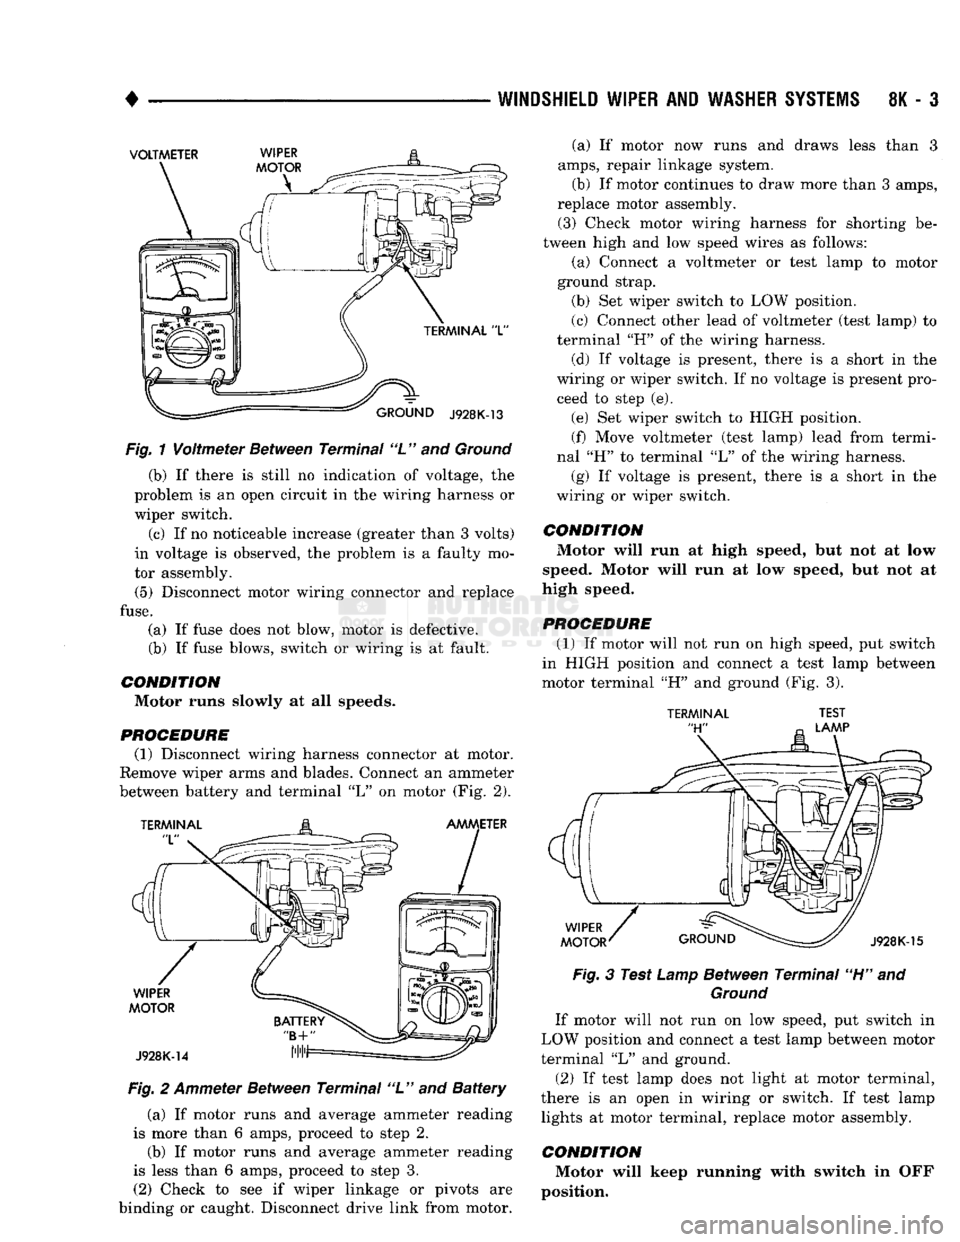
(4) Connect
a
voltmeter between motor terminal
"L"
and
ground strap
(Fig. 1). If
there
is no
voltage
or very little voltage (less than
one
volt) present,
move negative test lead from
the
ground strap
to
bat
tery negative terminal.
(a)
If an
increase
in
voltage
is
noticed,
the
prob
lem
is a bad
ground circuit. Make sure
the
motor
mounting
is
free
of
paint
and
that nuts
or
bolts
are
tight.
Page 433 of 1502
8K - 2 WINDSHIELD WIPER AND WASHER SYSTEMS
MOTOR RUNS
BLADES
DO
NOT PARK
•
MOTOR STOPS
IN
ANY
POSITION
WHEN SWITCH
IS
TURNED
"OFF"
3 I
MOTOR RUNS
|
BUT
OUTPUT
CRANK DOES NOT TURN BLADES SLAP
AGAINST
WINDSHIILD
MOULDINGS
ION DRY
GLASS
•MOTOR STOPS! BLADES
DO
NOT PARK PROPERLY MOTOR WILL
NOT STOP
I
WHEN SWITCH
|
IS
TURNED "OFF" X
LINKAGE NOT FASTENED
PROPERLY TO
MOTOR
OUTPUT
SHAFT
J ARMS
LOOSE
ON
PIVOT
SHAFT
BLADES
CHATTER
FOREIGN
SUBSTANCE
SUCH
AS
BODY POLISH ON
GLASS
OR
BLADES
OUTPUT
SHAFT
STATIONARY
T
REPLACE
MOTOR
JE
OUTPUT
SHAFT
ROTATES
t
LOOSE
MOTOR
CRANK
BAD
LINKAGE
CONNECTION
ARMS
LOOSE
ON
PIVOT
SHAFT
TWISTED
ARM
HOLDS BLADE AT WRONG ANGLE TO
GLASS
1__
REPLACE
MOTOR
FUSE
BLOWS
f
CHECK
WIRING
CHECK
SWITCH
RF80B
Page 434 of 1502
WINDSHIELD
WIPER
AND
WASHER
SYSTEMS
8K - 3
VOLTMETER
TERMINAL
"L"
GROUND
J928K-13
Fig.
1
Voltmeter
Between Terminal "L" and
Ground
(b) If there is still no indication of voltage, the
problem is an open circuit in the wiring harness or
wiper switch.
(c) If no noticeable increase (greater than 3 volts)
in voltage is observed, the problem is a faulty mo
tor assembly.
(5) Disconnect motor wiring connector and replace
fuse.
(a) If fuse does not blow, motor is defective. (b) If fuse blows, switch or wiring is at fault.
CONDITION Motor runs slowly at all speeds.
PROCEDURE (1) Disconnect wiring harness connector at motor.
Remove wiper arms and blades. Connect an ammeter
between battery and terminal "L" on motor (Fig. 2).
TERMINAL
"L
AMMETER
WIPER
MOTOR
J928K-14
Fig.
2 Ammeter Between Terminal "L" and
Battery
(a) If motor runs and average ammeter reading
is more than 6 amps, proceed to step 2.
(b) If motor runs and average ammeter reading
is less than 6 amps, proceed to step 3.
(2) Check to see if wiper linkage or pivots are
binding or caught. Disconnect drive link from motor. (a) If motor now runs and draws less than 3
amps,
repair linkage system.
(b) If motor continues to draw more than 3 amps,
replace motor assembly. (3) Check motor wiring harness for shorting be
tween high and low speed wires as follows:
(a) Connect a voltmeter or test lamp to motor
ground strap. (b) Set wiper switch to LOW position.
(c) Connect other lead of voltmeter (test lamp) to
terminal "H" of the wiring harness. (d) If voltage is present, there is a short in the
wiring or wiper switch. If no voltage is present pro ceed to step (e).
(e) Set wiper switch to HIGH position.
(f) Move voltmeter (test lamp) lead from termi
nal "H" to terminal "L" of the wiring harness.
(g) If voltage is present, there is a short in the
wiring or wiper switch.
CONDITION Motor will run at high speed, but not at low
speed. Motor will run at low speed, but not at
high speed.
PROCEDURE (1) If motor will not run on high speed, put switch
in HIGH position and connect a test lamp between
motor terminal "H" and ground (Fig. 3).
TERMINAL
"H"
TEST
LAMP
WIPER
MOTOR
J928K-15
Fig.
3 Test
Lamp
Between Terminal "H" and
Ground
If motor will not run on low speed, put switch in
LOW position and connect a test lamp between motor
terminal "L" and ground.
(2) If test lamp does not light at motor terminal,
there is an open in wiring or switch. If test lamp lights at motor terminal, replace motor assembly.
CONDITION Motor will keep running with switch in OFF
position.
Page 438 of 1502
•
WINDSHIELD WIPER
AND
WASHER
SYSTEMS
8K - 7
WINDSHIELD WIPER SYSTEM SERVICE PROCEDURES
INDEX
page
Installation
9
Linkage
Replacement (Fig. 6) 8
Wiper Arm Replacement 7
Wiper Blade Element
Change
7
WIPER
BLADES
Wiper blades exposed to the weather for a long pe
riod of time tend to lose their wiping effectiveness.
Periodic cleaning of the wiper blade is suggested to
remove the accumulation of salt and road film. The wiper blades, arms and windshield should be cleaned
with a sponge or cloth and a mild detergent or nona-
brasive cleaner. If the blades continue to streak or smear, they should be replaced.
WIPER BLADE ELEMENT CHANGE
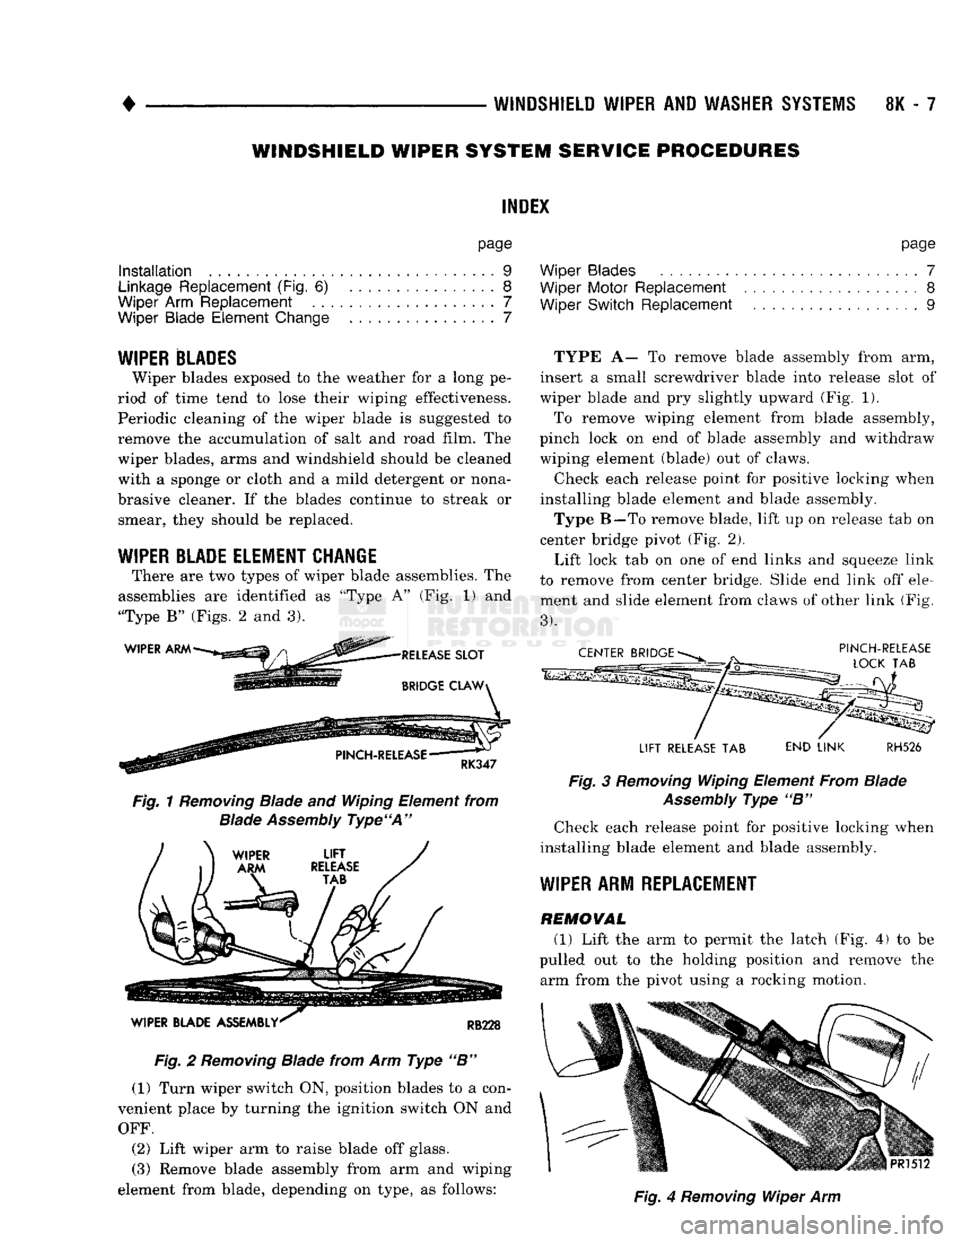
There are two types of wiper blade assemblies. The
assemblies are identified as "Type A" (Fig. 1) and
"Type B" (Figs. 2 and 3).
Fig.
1
Removing
Blade and Wiping Element from
Blade
Assembly
Type'A"
Fig.
2
Removing
Blade from Arm Type "B" (1) Turn wiper switch ON, position blades to a con
venient place by turning the ignition switch ON and
OFF.
(2) Lift wiper arm to raise blade off glass.
(3) Remove blade assembly from arm and wiping
element from blade, depending on type, as follows: page
Wiper Blades 7
Wiper Motor Replacement ................... 8
Wiper Switch Replacement .................. 9
TYPE A— To remove blade assembly from arm,
insert a small screwdriver blade into release slot of
wiper blade and pry slightly upward (Fig. 1).
To remove wiping element from blade assembly,
pinch lock on end of blade assembly and withdraw
wiping element (blade) out of claws.
Check each release point for positive locking when
installing blade element and blade assembly.
Type B—To remove blade, lift up on release tab on
center bridge pivot (Fig. 2).
Lift lock tab on one of end links and squeeze link
to remove from center bridge. Slide end link off ele ment and slide element from claws of other link (Fig,
3).
LIFT RELEASE TAB END LINK RH526
Fig.
3
Removing
Wiping Element From Blade
Assembly
Type "B" Check each release point for positive locking when
installing blade element and blade assembly.
WIPER
ARM REPLACEMENT
REMOVAL
(1) Lift the arm to permit the latch (Fig. 4) to be
pulled out to the holding position and remove the arm from the pivot using a rocking motion.
Fig.
4
Removing
Wiper Arm
Page 439 of 1502
8K
- 8
WINDSHIELD WIPER
AND
WASHER
SYSTEMS
•
CAUTION:
The use of a screwdriver or other prying
tool to remove an arm may distort it.
This
distortion
could
allow the arm to
come
off the pivot
shaft,
re
gardless
of how carefully it is installed.
INSTALLATION
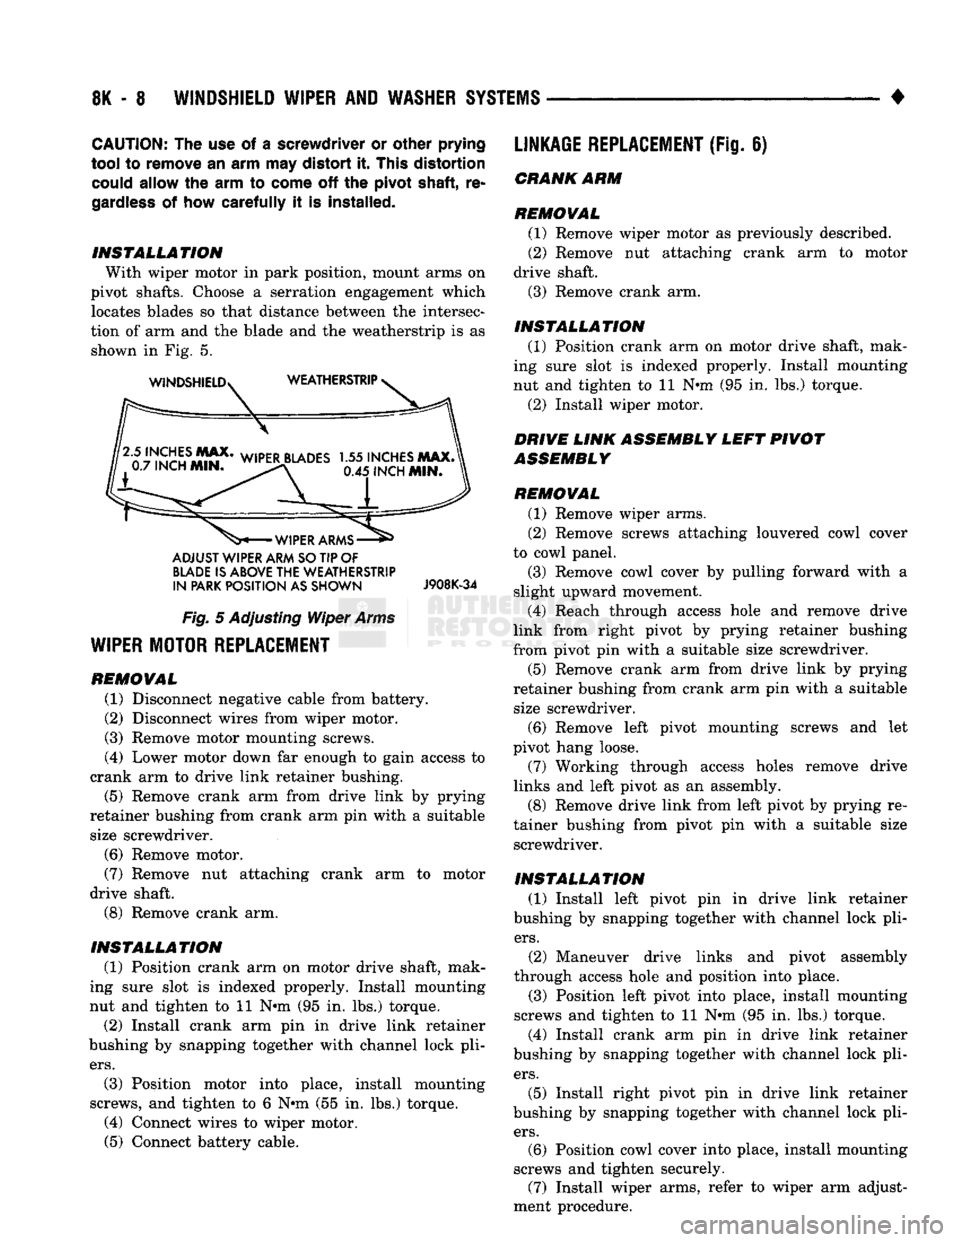
With wiper motor in park position, mount arms on
pivot shafts. Choose a serration engagement which locates blades so that distance between the intersec
tion of arm and the blade and the weatherstrip is as shown in Fig. 5.
ADJUST WIPER ARM
SO
TIP OF
BLADE
IS
ABOVE
THE WEATHERSTRIP
IN
PARK
POSITION
AS
SHOWN
J908K-34
Fig.
5 Adjusting Wiper
Arms
WIPER MOTOR REPLACEMENT
REMOVAL
(1) Disconnect negative cable from battery.
(2) Disconnect wires from wiper motor.
(3) Remove motor mounting screws.
(4) Lower motor down far enough to gain access to
crank arm to drive link retainer bushing. (5) Remove crank arm from drive link by prying
retainer bushing from crank arm pin with a suitable size screwdriver.
(6) Remove motor.
(7) Remove nut attaching crank arm to motor
drive shaft.
(8) Remove crank arm.
INSTALLATION
(1) Position crank arm on motor drive shaft, mak
ing sure slot is indexed properly. Install mounting
nut and tighten to 11 N»m (95 in. lbs.) torque.
(2) Install crank arm pin in drive link retainer
bushing by snapping together with channel lock pli
ers.
(3) Position motor into place, install mounting
screws, and tighten to 6 N»m (55 in. lbs.) torque. (4) Connect wires to wiper motor. (5) Connect battery cable.
LINKAGE
REPLACEMENT
(Fig. 8)
CRANK
ARM
REMOVAL
(1) Remove wiper motor as previously described. (2) Remove nut attaching crank arm to motor
drive shaft.
(3) Remove crank arm.
INSTALLATION
(1) Position crank arm on motor drive shaft, mak
ing sure slot is indexed properly. Install mounting
nut and tighten to 11 N*m (95 in. lbs.) torque.
(2) Install wiper motor.
DRIVE LINK ASSEMBLY
LEFT
PIVOT
ASSEMBLY
REMOVAL
(1) Remove wiper arms.
(2) Remove screws attaching louvered cowl cover
to cowl panel. (3) Remove cowl cover by pulling forward with a
slight upward movement.
(4) Reach through access hole and remove drive
link from right pivot by prying retainer bushing from pivot pin with a suitable size screwdriver.
(5) Remove crank arm from drive link by prying
retainer bushing from crank arm pin with a suitable size screwdriver.
(6) Remove left pivot mounting screws and let
pivot hang loose.
(7) Working through access holes remove drive
links and left pivot as an assembly. (8) Remove drive link from left pivot by prying re
tainer bushing from pivot pin with a suitable size screwdriver.
INSTALLATION
(1) Install left pivot pin in drive link retainer
bushing by snapping together with channel lock pli
ers.
(2) Maneuver drive links and pivot assembly
through access hole and position into place.
(3) Position left pivot into place, install mounting
screws and tighten to 11 N*m (95 in. lbs.) torque. (4) Install crank arm pin in drive link retainer
bushing by snapping together with channel lock pli
ers.
(5) Install right pivot pin in drive link retainer
bushing by snapping together with channel lock pli
ers.
(6) Position cowl cover into place, install mounting
screws and tighten securely. (7) Install wiper arms, refer to wiper arm adjust
ment procedure.