Page 888 of 1640
Horns
Component Location Index
SRS components are located in this area. Review the
SRS component locations, precautions, and procedures
in the SRS section (24) before performing repairs or ser-
vice.
HORN RELAY
Test, page 23-249
UNDER-HOOD RELAY
BOX A
CABLE REEL
Test, page 23-250
HORN SWITCH
Test, page 23-249
Overhaul, section 17
SECURITY HORNTest, page 23-248
LEFT HORN
Test, page 23-248
RIGHT HORN
Test, page 23-248
SECURITY CONTROL
UNIT
Inpu
t
Test, page 23-320
('94-'96) ('93) ('91-'92)
UNDER-HOOD
FUSE/RELAY BOX
Description
Security Alarm System:
The security alarm system is an anti-theft alarm system. If someone tries to open the trunk, hood or either door without
the ignition key, or if the roof is not fully latched the security control unit senses a signal from the sensors and activates
relays to flash the headlights and sound the horn for about two minutes.ProCarManuals.com
Page 908 of 1640

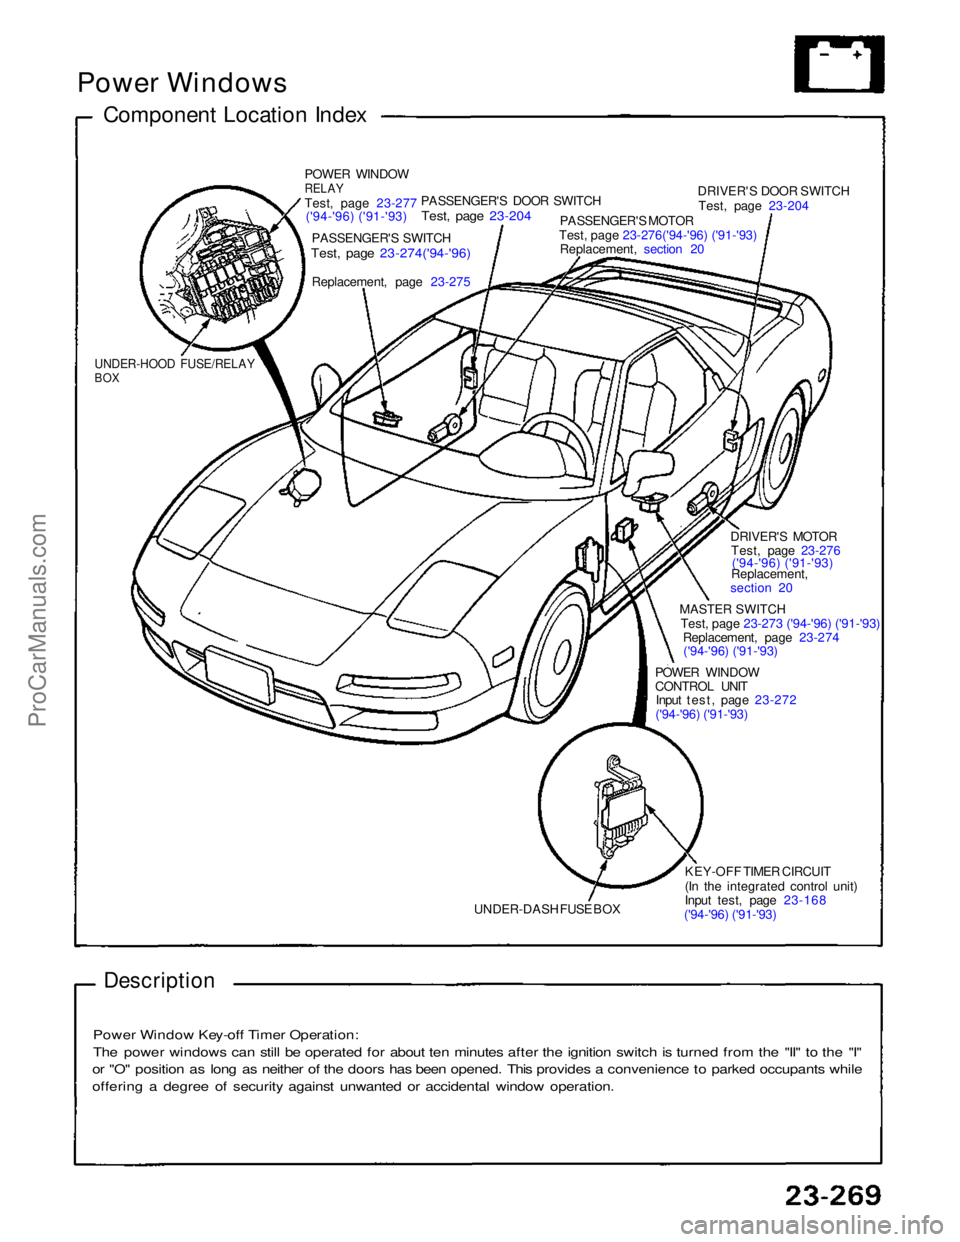
Power Windows
Component Location Index
POWER WINDOW
RELAY
Test
,
page 23-277
('94-'96) ('91-'93)
PASSENGER'S SWITCH
Test, page 23-274('94-'96)
Replacement, page
23-275
PASSENGER'S DOOR SWITCH
Test, page 23-204
PASSENGER'S MOTOR
Test, page 23-276('94-'96) ('91-'93)
Replacement, section 20
DRIVER'S DOOR SWITCH
Test, page 23-204
DRIVER'S MOTORTest, page 23-276('94-'96) ('91-'93)
Replacement,
section 20
MASTER SWITCH
Test, page 23-273 ('94-'96) ('91-'93)
Replacement, page 23-274
('94-'96) ('91-'93)
POWER WINDOW
CONTROL UNIT
Input test, page 23-272
('94-'96) ('91-'93)
KEY-OFF TIMER CIRCUIT
(In the integrated control unit)
Input test, page 23-168
('94-'96) ('91-'93)
UNDER-DASH FUSE BOX
UNDER-HOOD FUSE/RELAY
BOX
Description
Power Window Key-off Timer Operation:
The power windows can still be operated for about ten minutes after the ignition switch is turned from the "II" to the "I"
or "O" position as long as neither of the doors has been opened. This provides a convenience to parked occupants while
offering a degree of security against unwanted or accidental window operation.ProCarManuals.com
Page 915 of 1640
Relay Test
1. Remove the power window relay in the under-hood
fuse/relay box.
2. Check continuity at the relay terminals.
• There should be continuity between the C and D
terminals.
• There should be continuity between the A and B
terminals when power and ground are connect-
ed to the C and D terminals.
• There should be no continuity between the A and
B terminals when power is disconnected.ProCarManuals.com
Page 916 of 1640
Power Seats
Component Location Index
PASSENGER'S SEAT
DRIVER'S SEAT
RECLINE MOTOR
Test, page 23-273 ('93-'96) ('91-'92) ENGINE COMPARTMENT
FUSE/RELAY BOX
SLIDE MOTOR Test, page 23-281 POWER SEAT SWITCH
Test, page 23-280ProCarManuals.com
Page 919 of 1640

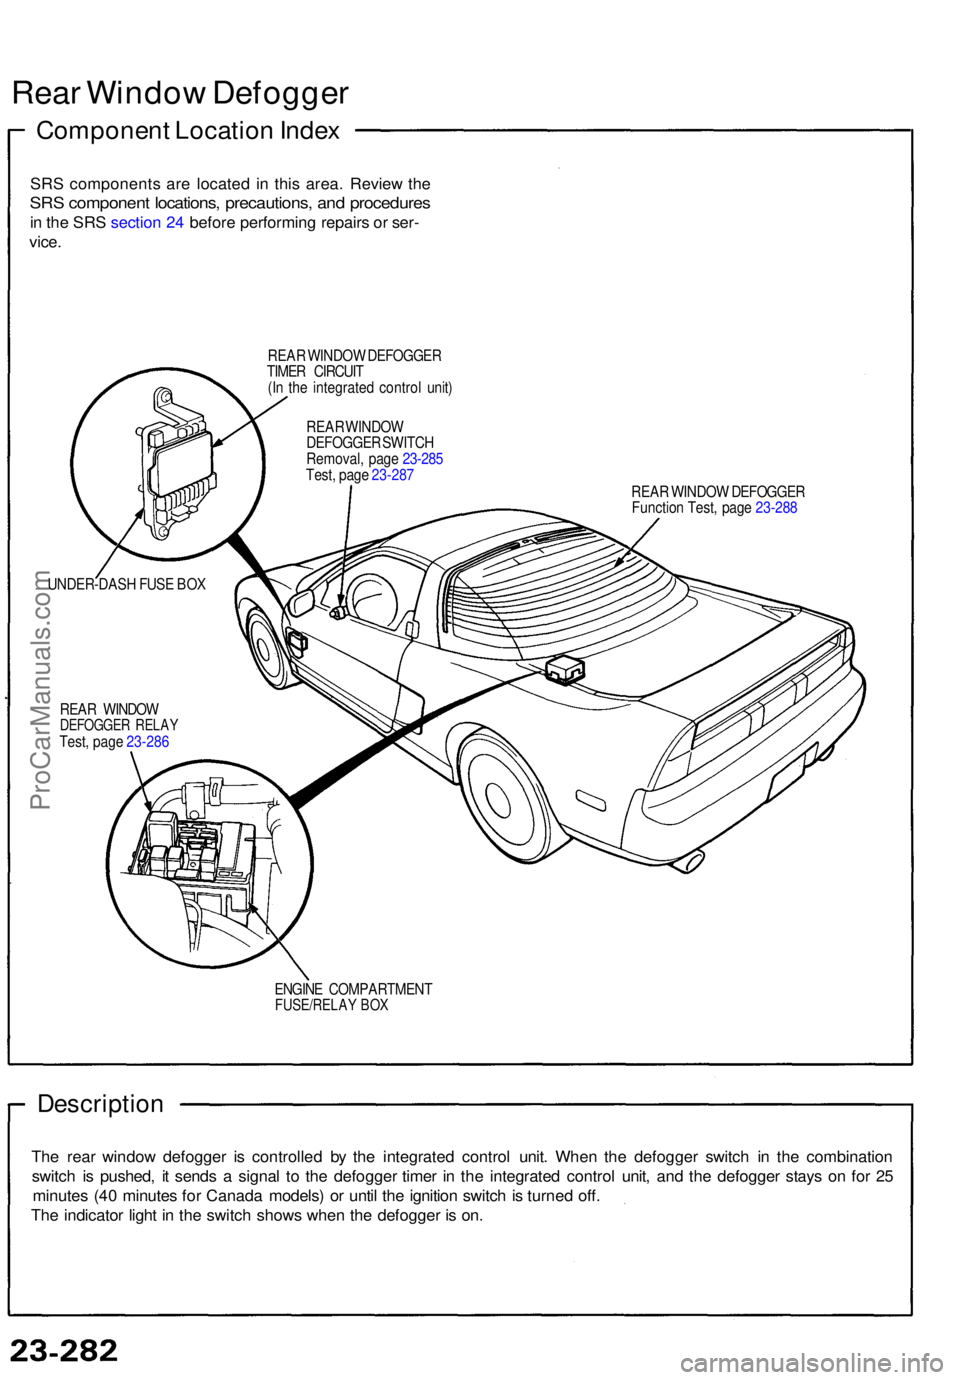
Rear Windo w Defogge r
Componen t Locatio n Inde x
SRS component s ar e locate d i n thi s area . Revie w th e
SR S componen t locations , precautions , an d procedure s
in th e SR S sectio n 24 befor e performin g repair s o r ser -
vice .
REA R WINDO W DEFOGGE R
TIME R CIRCUI T
(I n th e integrate d contro l unit )
REAR WINDO W DEFOGGE R
Functio n Test , pag e 23-28 8
UNDER-DAS H FUS E BO X
REA R WINDO W
DEFOGGE R RELA YTest, pag e 23-28 6
ENGINE COMPARTMEN T
FUSE/RELAY BO X
Descriptio n
The rea r windo w defogge r i s controlle d b y th e integrate d contro l unit . Whe n th e defogge r switc h i n th e combinatio n
switc h i s pushed , i t send s a signa l t o th e defogge r time r i n th e integrate d contro l unit , an d th e defogge r stay s o n fo r 2 5
minute s (4 0 minute s fo r Canad a models ) o r unti l th e ignitio n switc h is turne d off .
Th e indicato r ligh t i n th e switc h show s whe n th e defogge r i s on .
REA R WINDO W
DEFOGGE R SWITC H
Removal , pag e 23-28 5
Test , pag e 23-28 7
ProCarManuals.com
Page 923 of 1640
Rear Windo w Defogge r
Relay Tes t
1. Remov e th e defogge r rela y i n th e engin e compart -
men t fuse/rela y box .
2 . Chec k continuit y a t th e rela y terminals .
Ther e shoul d b e continuit y betwee n th e C an d D
terminals .
Ther e shoul d b e continuity between th e A an d B
terminal s whe n powe r an d groun d ar e connecte d
to th e C an d D terminals .
Ther e shoul d b e n o continuit y betwee n th e A
an d B terminal s whe n powe r i s disconnected .
ProCarManuals.com
Page 925 of 1640

Rear Window Defogger
Function Test
CAUTION: Be careful not to scratch or damage the
defogger wires with the tester probe.
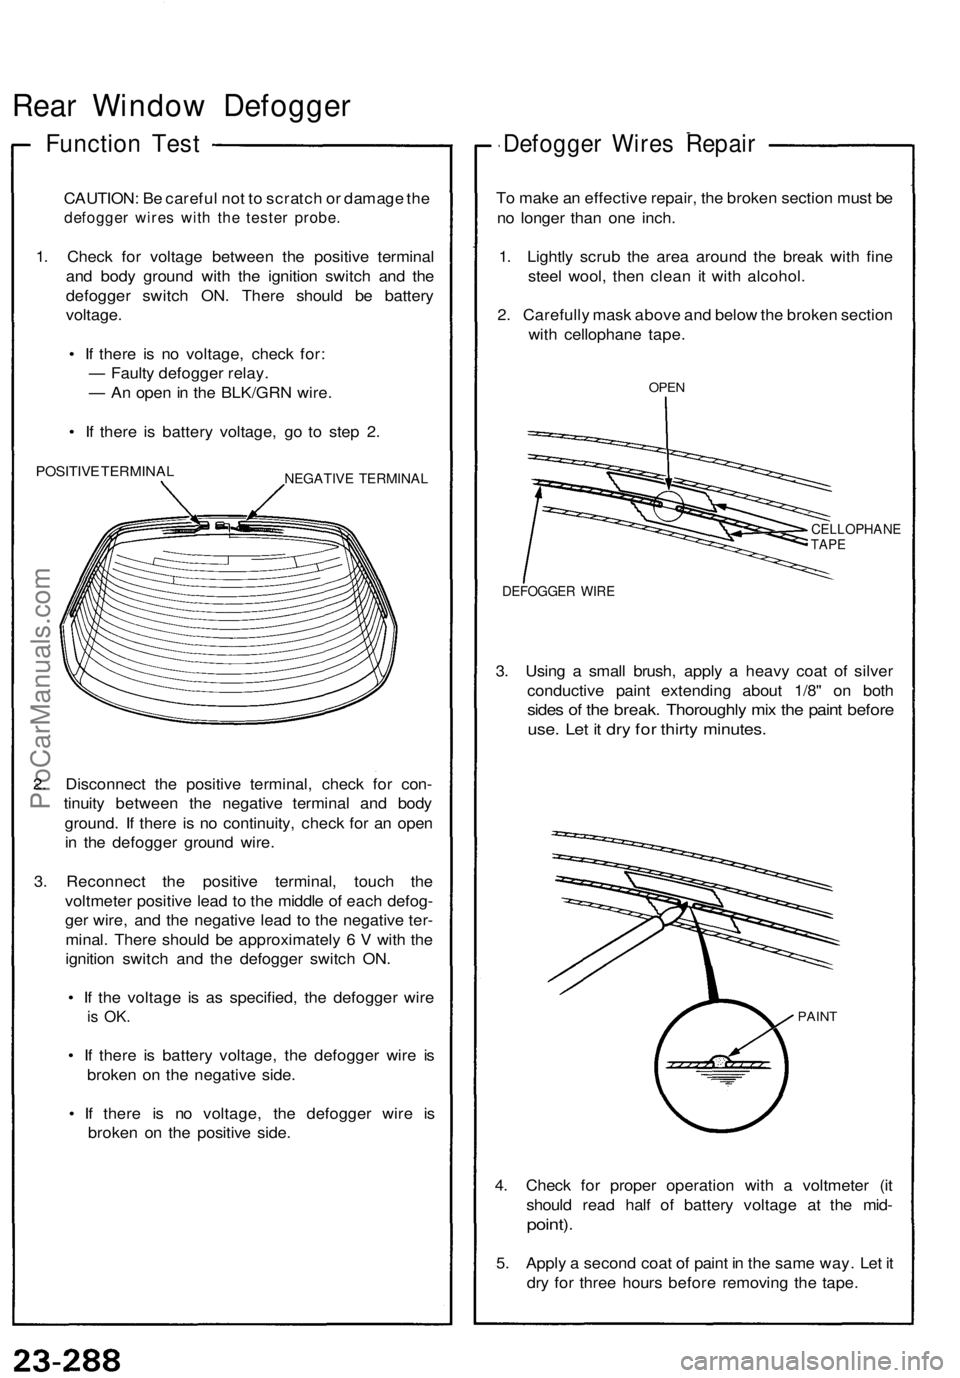
1. Check for voltage between the positive terminal
and body ground with the ignition switch and the
defogger switch ON. There should be battery
voltage.
• If there is no voltage, check for:
— Faulty defogger relay.
— An open in the BLK/GRN wire.
• If there is battery voltage, go to step 2.
POSITIVE TERMINAL
NEGATIVE TERMINAL
2. Disconnect the positive terminal, check for con-
tinuity between the negative terminal and body
ground. If there is no continuity, check for an open
in the defogger ground wire.
3. Reconnect the positive terminal, touch the
voltmeter positive lead to the middle of each defog-
ger wire, and the negative lead to the negative ter-
minal. There should be approximately 6 V with the
ignition switch and the defogger switch ON.
• If the voltage is as specified, the defogger wire
is OK.
• If there is battery voltage, the defogger wire is
broken on the negative side.
• If there is no voltage, the defogger wire is
broken on the positive side.
Defogger Wires Repair
To make an effective repair, the broken section must be
no longer than one inch.
1. Lightly scrub the area around the break with fine
steel wool, then clean it with alcohol.
2. Carefully mask above and below the broken section
with cellophane tape.
OPEN
CELLOPHANE
TAPE
DEFOGGER WIRE
3. Using a small brush, apply a heavy coat of silver
conductive paint extending about 1/8" on both
sides of the break. Thoroughly mix the paint before
use. Let it dry for thirty minutes.
PAINT
4. Check for proper operation with a voltmeter (it
should read half of battery voltage at the mid-
point).
5. Apply a second coat of paint in the same way. Let it
dry for three hours before removing the tape.ProCarManuals.com
Page 926 of 1640

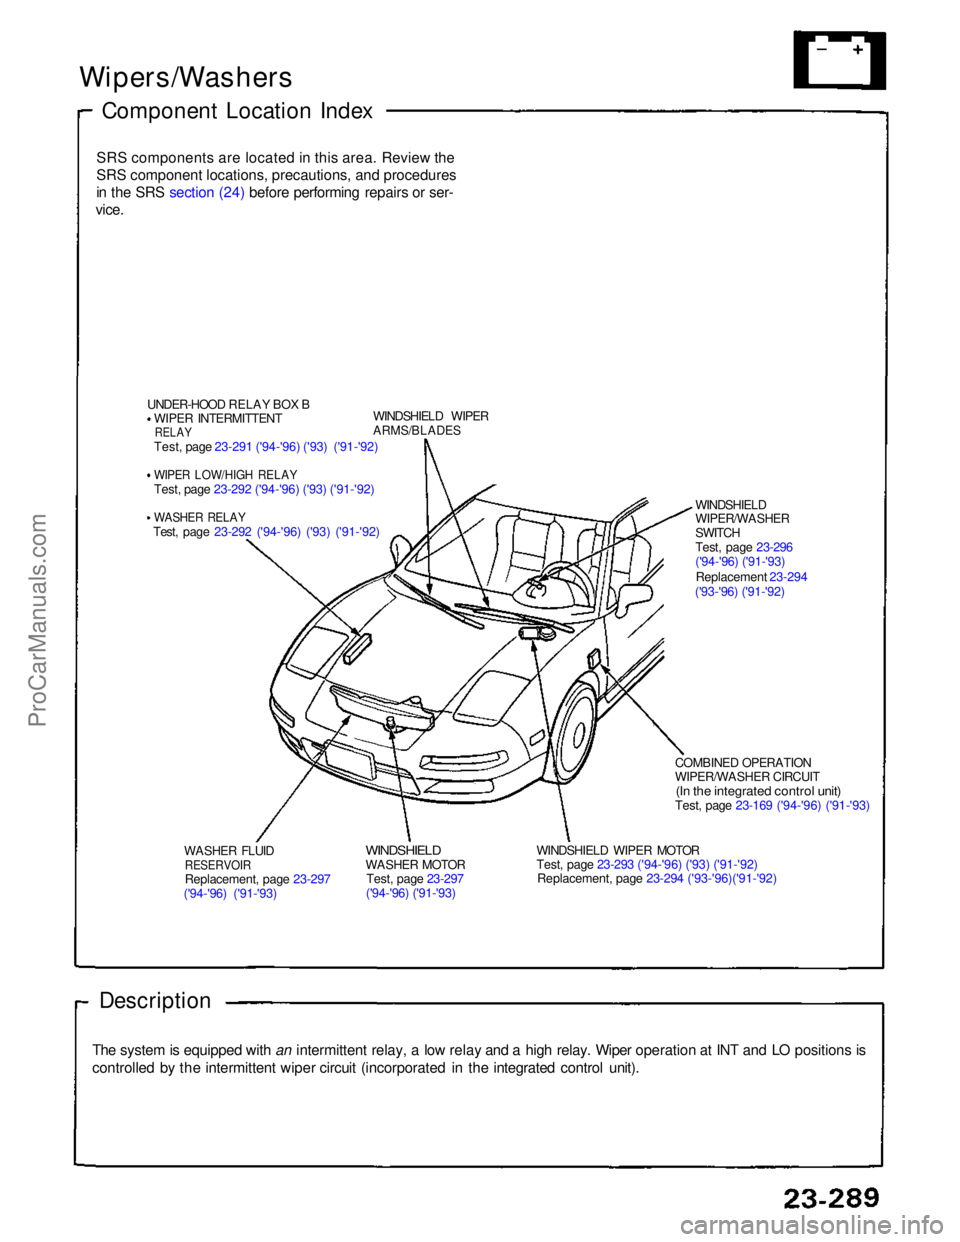
Wipers/Washers
Component Location Index
SRS components are located in this area. Review theSRS component locations, precautions, and procedures
in the SRS section (24) before performing repairs or ser-
vice.
UNDER-HOOD RELAY BOX BWIPER INTERMITTENT
RELAY
Test, page 23-291 ('94-'96) ('93) ('91-'92)
WIPER LOW/HIGH RELAY
Test, page 23-292 ('94-'96) ('93) ('91-'92)
WASHER RELAY
Test, page 23-292 ('94-'96) ('93) ('91-'92) WINDSHIELD WIPER
ARMS/BLADES
WASHER FLUID
RESERVOIR
Replacement, page 23-297
('94-'96) ('91-'93)
WINDSHIELD
WASHER MOTOR
Test, page 23-297
('94-'96) ('91-'93) WINDSHIELD WIPER MOTOR
Test, page 23-293 ('94-'96) ('93) ('91-'92)
Replacement, page 23-294 ('93-'96)('91-'92) COMBINED OPERATION
WIPER/WASHER CIRCUIT
(In the integrated control unit)
Test, page 23-169 ('94-'96) ('91-'93)
Description
The system is equipped with an intermittent relay, a low relay and a high relay. Wiper operation at INT and LO positions is
controlled by the intermittent wiper circuit (incorporated in the integrated control unit). WINDSHIELD
WIPER/WASHER
SWITCH
Test, page 23-296
('94-'96) ('91-'93)
Replacement 23-294
('93-'96) ('91-'92)ProCarManuals.com