Page 1585 of 1640

Supplemental Restraint System (SRS)
Self-diagnosis Function
The SRS unit includes a self-diagnosis function. If there
is a failure in the sensors, SRS unit, inflator, or their cir-
cuits, the SRS light in the instrument panel goes ON.
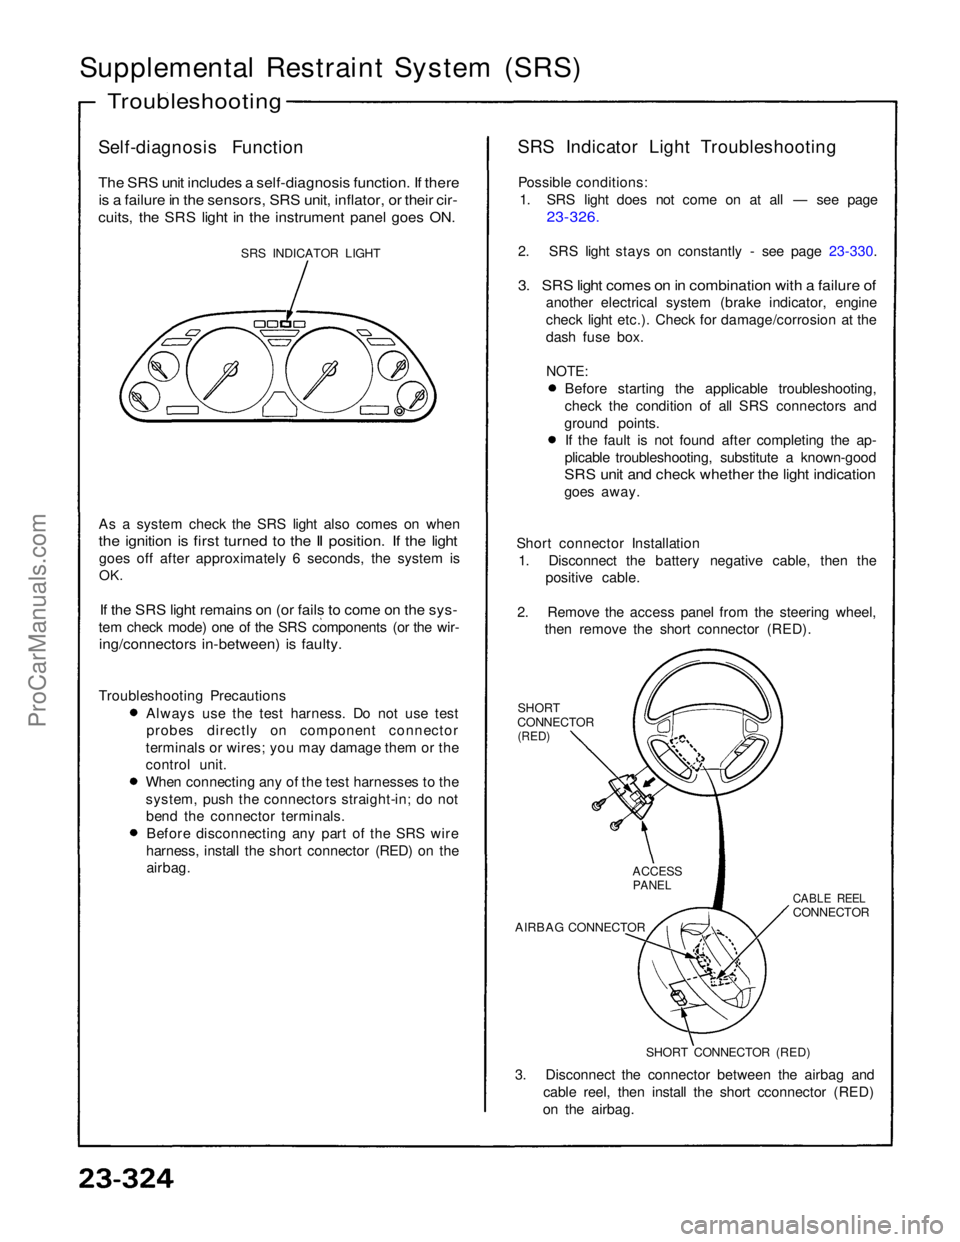
SRS INDICATOR LIGHT
As a system check the SRS light also comes on when
the ignition is first turned to the II position. If the light
goes off after approximately 6 seconds, the system is
OK.
If the SRS light remains on (or fails to come on the sys-
tem check mode) one of the SRS components (or the wir-
ing/connectors in-between) is faulty.
Troubleshooting Precautions Always use the test harness. Do not use test
probes directly on component connector
terminals or wires; you may damage them or the
control unit. When connecting any of the test harnesses to the
system, push the connectors straight-in; do not
bend the connector terminals. Before disconnecting any part of the SRS wire
harness, install the short connector (RED) on the airbag. SRS Indicator Light Troubleshooting
Possible conditions: 1. SRS light does not come on at all — see page
23-326.
2. SRS light stays on constantly - see page 23-330.
3. SRS light comes on in combination with a failure of
another electrical system (brake indicator, engine
check light etc.). Check for damage/corrosion at the
dash fuse box.
NOTE:
Before starting the applicable troubleshooting,
check the condition of all SRS connectors and
ground points. If the fault is not found after completing the ap-
plicable troubleshooting, substitute a known-good
SRS unit and check whether the light indication
goes away.
Short connector Installation 1. Disconnect the battery negative cable, then the positive cable.
2. Remove the access panel from the steering wheel, then remove the short connector (RED).
SHORT
CONNECTOR
(RED)
3. Disconnect the connector between the airbag and cable reel, then install the short cconnector (RED)
on the airbag.
Troubleshooting
SHORT CONNECTOR (RED)
AIRBAG CONNECTOR
CABLE REEL
CONNECTOR
ACCESS
PANELProCarManuals.com
Page 1594 of 1640
CAUTION:
All SRS electrical wiring harnesses are covered with
yellow outer Insulation. Before disconnecting the SRS wire harness, Install
the short connector on the airbag (see page STET). Replace the entire affected SRS harness assembly
if it has an open circuit or damaged wiring. After installation of the gauge assembly, recheck the
operation of the SRS indicator light.
Remove the dashboard lower cover, center panel and in-
strument panel. Disconnect the 8-connector (30-P) from
the gauge assembly. (See page 23-126)
Make the following input tests at the connector termi-
nals. If all tests prove OK, yet the indicator stilt fails to
work, replace the safety indicator.
A-CONNECTOR (Carries the SRS indicator signal)
SRS MAIN WIRE HARNESS
A-CONNECTOR
YEL
GRN/RED
View from terminal side
Safety Indicator
Indicator Input Test
B-CONNECTOR
RED/YEL
BLK/WHT
GRN/BLK
BLU
GRN/BLU
BLKProCarManuals.com
Page 1597 of 1640
Shift Lever Position Indicator
CAUTION: All SRS electrical wiring harnesses are covered with
yellow outer insulation. Before disconnecting the SRS wire harness, install
the short connector on the airbag (see page STET) Replace the entire affected SRS harness assembly
if it has an open circuit or damaged wiring. After installation of the gauge assembly, recheck the
operation of the SRS indicator light.
GAUGE ASSEMBLY
Removal, page 23-126
Disassembly, pages 23-129
INTERLOCK SYSTEM
See page, 23-140
A/T CONTROL SYSTEM
See Automatic Transmission, section 14
SRS MAIN WIRE HARNESS
SHIFT LEVER POSITION
INDICATOR
Input Test, page 23-158
A/T CONTROL UNIT
See Automatic Transmission
section 14
SHIFT POSITION
CONSOLE SWITCH
Test, page 23-160
Replacement, page 23-161
Component Location IndexProCarManuals.com
Page 1598 of 1640
Shift Lever Position Indicator
CAUTION: All SRS electrical wiring harnesses are covered with
yellow outer insulation. Before disconnecting the SRS wire harness, Install
the short connector on the airbus (see page 23-323). Raplace the entire affected SRS harness assembly
if it has an open circuit or damaged wiring. After installation of the gauge assembly, recheck the
operation of the SRS indicator light.
Remove the gauge assembly from the dashboard and dis-
connect the 30-P connector from the gauge assembly.
Make the following input tests at the connector termi-
nals. If all tests prove OK, yet the indicator still fails to
work, replace the main printed circuit panel, speedome-
ter, tachometer and odo/trip meter.
A-CONNECTOR (Carries the SRS indicator signal)
SRS MAIN WIRE HARNESS
A-CONNECTOR
30-P CONNECTOR
Indicator Input Test
YEL
BLK
RED/BLK
RED
LT GRN
GRN/YEL
LT GRN/WHT
YEL/BLU
GRY/WHT
GRN
LT BLU
YEL/BLK
BRN/BLK
View from wire sideProCarManuals.com
Page 1601 of 1640
YEL/RED
WHT/BLU2
ORN
BLU/RED
GRN/RED
GRN/BLU2
WHT/GRN
YEL2
BLU/WHT1
WHT/BLK
BLU/YEL
BLU/GRN
ORN/WHT
ORN/BLK
WHT/RED
View from wire side
PNK/BLU
View from terminal side
Entry Light Timer System:
Key-on Reminder:
(cont'd)ProCarManuals.com
Page 1602 of 1640
Integrated Control Unit
Input Test (cont'd)
YEL/RED
WHT/BLU2
ORN
BLU/RED
GRN/RED
GRN/BLU2
WHT/GRN
YEL2
BLU/WHT1
PNK/BLU
WHT/BLK
BLU/YEL
BLU/GRN
ORN/WHT
ORN/BLK
WHT/RED
View from wire side
View from terminal side
Lights-on Reminder:
Seat Belt Reminder:ProCarManuals.com
Page 1604 of 1640
Integrated Control Unit
Input Test (cont'd)
View from terminal side
Side Marker Light Flasher System:
YEL/RED
WHT/BLU2
ORN
BLU/RED
GRN/RED
GRN/BLU2
WHT/GRN
YEL2
BLU/WHT1
PNK/BLU
WHT/BLK
BLU/YEL
BLU/GRN
ORN/WHT
ORN/BLK
WHT/RED
View from wire side
Power Window key-off Timer System:ProCarManuals.com
Page 1606 of 1640
Lighting System
Daytime Running Lights Control Unit Input Test
Remove the glove box lower panel and glove box.
Disconnect the 8-P and 4-P connectors from the daytime
running lights control unit.
Make the following input tests at the connector termi-
nals. If all tests prove OK, yet the system still fails to
work, replace the control unit.
4P CONNECTOR
PNK/WHT
YEL/BLK
PNK/BLK
BLK
BLK/RED
GRN/RED
GRN/YEL
View from wire side
8-P CONNECTOR
DAYTIME RUNNING LIGHTS
CONTROL UNIT (Canada)ProCarManuals.com