Page 33 of 1640
Maintenance
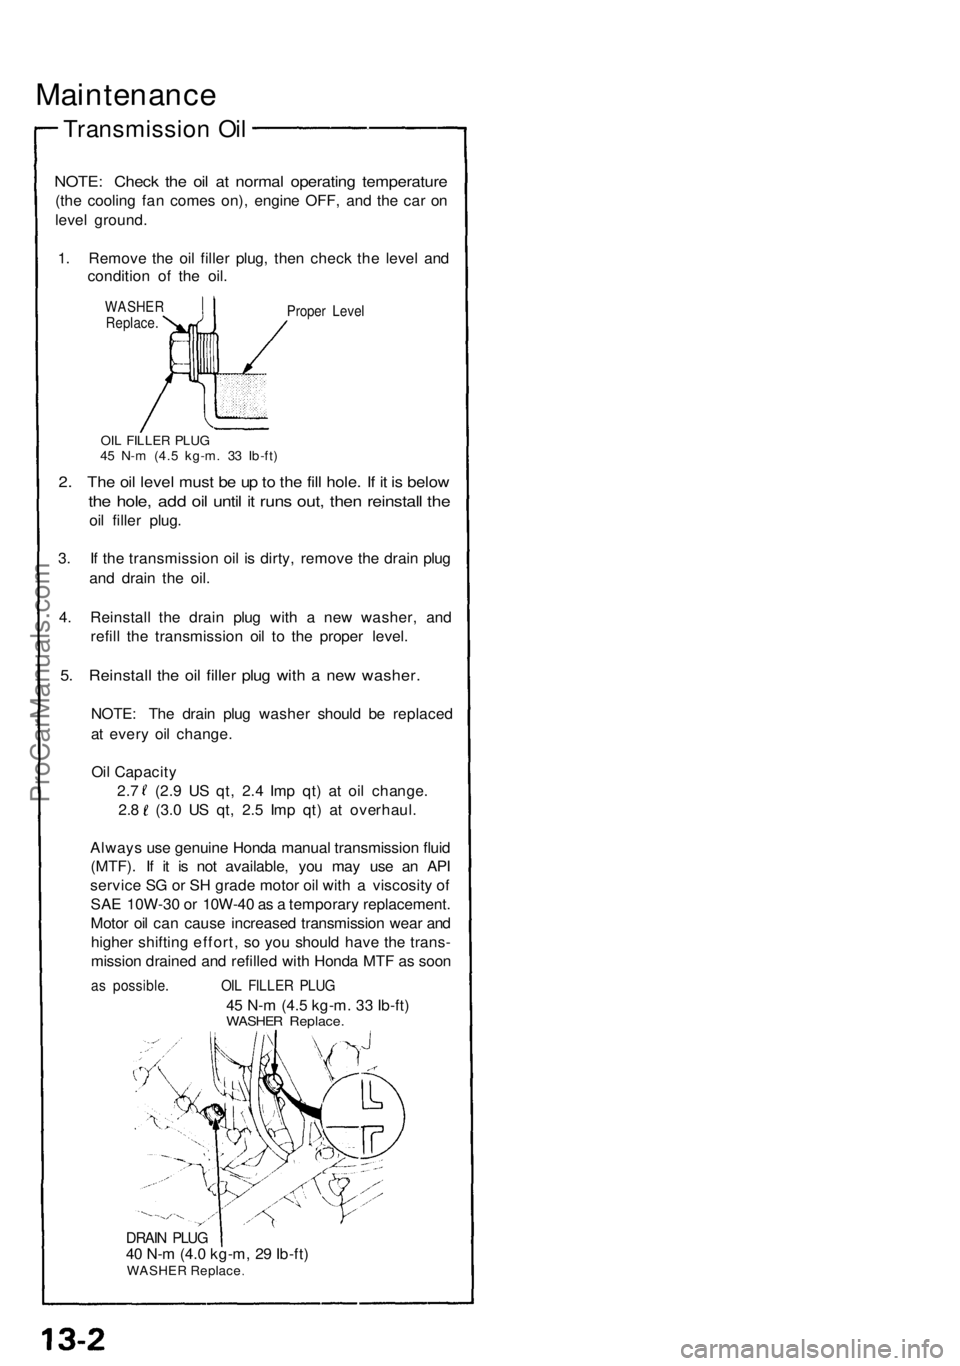
Transmissio n Oi l
NOTE : Chec k th e oi l a t norma l operatin g temperatur e
(the coolin g fa n come s on) , engin e OFF , an d th e ca r o n
leve l ground .
1 . Remov e th e oi l fille r plug , the n chec k th e leve l an d
conditio n o f th e oil .
WASHE RReplace .Proper Leve l
OIL FILLE R PLU G45 N- m (4. 5 kg-m . 3 3 Ib-ft )
2. Th e oi l leve l mus t b e u p to th e fil l hole . I f i t i s belo w
the hole , ad d oi l unti l i t run s out , the n reinstal l th e
oil fille r plug .
3 . I f th e transmissio n oi l i s dirty , remov e th e drai n plu g
an d drai n th e oil .
4 . Reinstal l th e drai n plu g wit h a ne w washer , an d
refil l th e transmissio n oi l t o th e prope r level .
5. Reinstal l th e oi l fille r plu g wit h a ne w washer .
NOTE: Th e drai n plu g washe r shoul d b e replace d
a t ever y oi l change .
Oi l Capacit y
2. 7 ( 2.9 U S qt , 2. 4 Im p qt ) a t oi l change .
2.8 (3. 0 U S qt , 2. 5 Im p qt ) a t overhaul .
Alway s us e genuin e Hond a manua l transmissio n flui d
(MTF) . I f i t i s no t available , yo u ma y us e a n AP I
servic e S G o r S H grad e moto r oi l wit h a viscosit y o f
SA E 10W-3 0 o r 10W-4 0 a s a temporar y replacement .
Moto r oi l ca n caus e increase d transmissio n wea r an d
highe r shiftin g effort , s o yo u shoul d hav e th e trans -
missio n draine d an d refille d wit h Hond a MT F a s soo n
as possible . OIL FILLE R PLU G
45 N- m (4. 5 kg-m . 3 3 Ib-ft )WASHE R Replace .
DRAIN PLU G40 N- m (4. 0 kg-m , 2 9 Ib-ft )WASHE R Replac e
ProCarManuals.com
Page 119 of 1640
Valves, Valv e Spring s an d Valv e Seal s
Installatio n Sequenc e
NOTE: Exhaust and intake valve seals are NOT interchangeable.
INTAKE VALV E SPRIN G
VALVE KEEPER S
VALV E SPRIN G
RETAINE R
VALVE SPRIN G
EXHAUS T VALV E SEA L
(BLAC K SPRING )
Replace.
NOTE: Plac e th e en d o f valv espring wit h closel y woun d coil stowar d th e cylinde r head .
INTAK E VALV E SEA L
(WHIT E SPRING )
Replace .
SPRING SEA T
NOTE : Instal l th e valv e sprin g seat sbefor e installin g th e valv e seals .
VALV E SEA L INSTALLE R
(Commerciall y available )KD-2899
VALVE SEA L
Replace .
OUTER
SPRIN G
INNE R
SPRIN G
(M/ T only )
ProCarManuals.com
Page 301 of 1640
Maintenance
Transmissio n Oi l
NOTE : Chec k th e oi l a t norma l operatin g temperatur e
(th e coolin g fa n come s on) , engin e OFF , an d th e ca r o n
leve l ground .
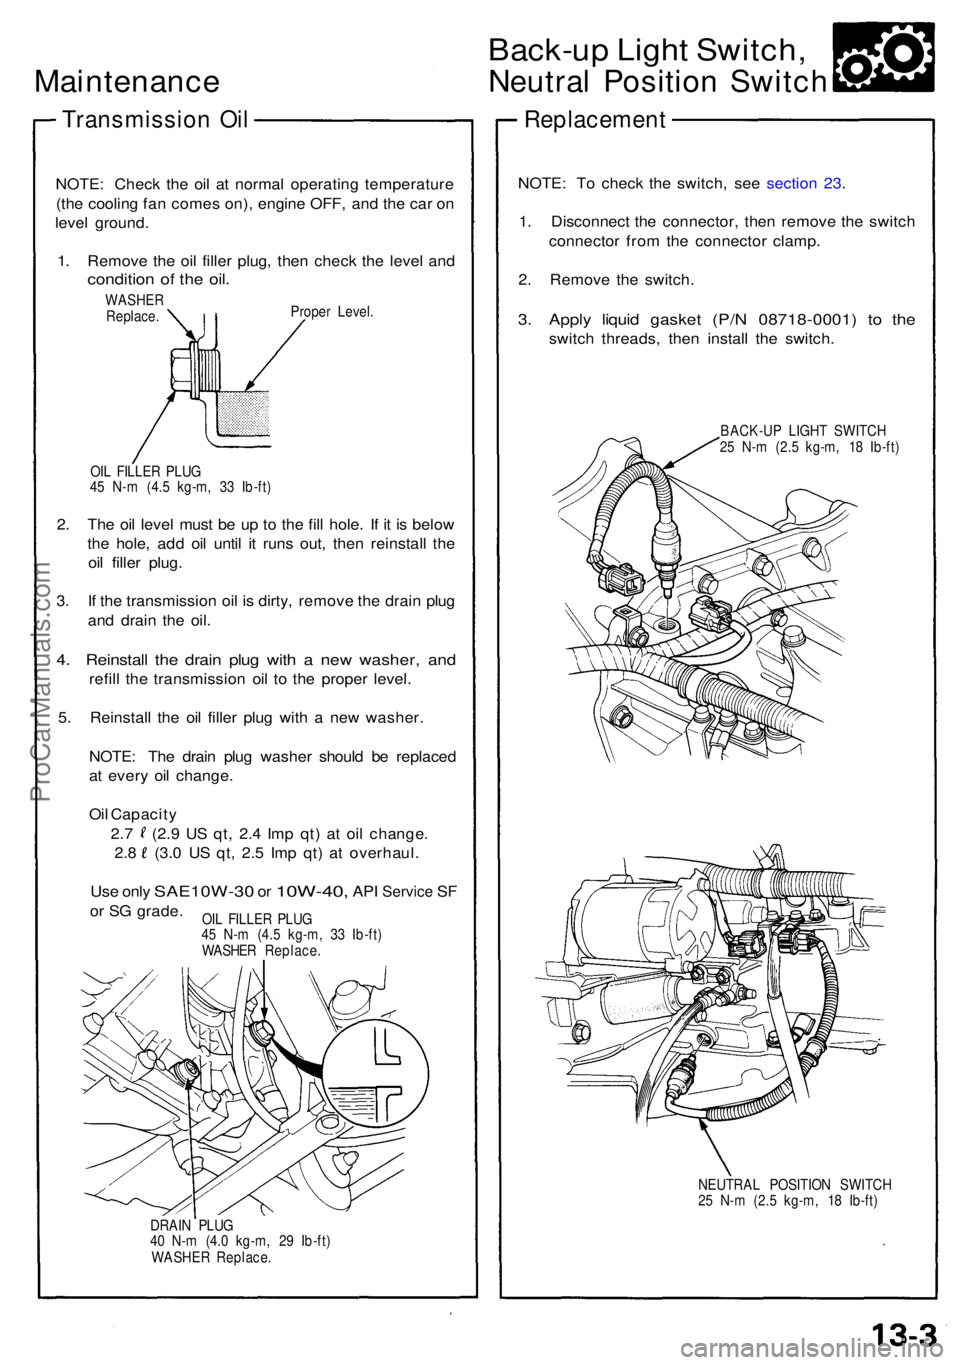
1 . Remov e th e oi l fille r plug , the n chec k th e leve l an d
conditio n o f th e oil .
WASHE R
Replace . Prope
r Level .
OI L FILLE R PLU G
4 5 N- m (4. 5 kg-m , 3 3 Ib-ft )
2. Th e oi l leve l mus t b e u p t o th e fill hole . I f i t i s belo w
th e hole , ad d oi l unti l i t run s out , the n reinstal l th e
oi l fille r plug .
3 . I f th e transmissio n oi l i s dirty , remov e th e drai n plu g
an d drai n th e oil .
4. Reinstal l th e drai n plu g wit h a ne w washer , an d
refil l th e transmissio n oi l t o th e prope r level .
5 . Reinstal l th e oi l fille r plu g wit h a ne w washer .
NOTE : Th e drai n plu g washe r shoul d b e replace d
a t ever y oi l change .
Oi l Capacity
2. 7 (2. 9 U S qt , 2. 4 Im p qt ) a t oi l change .
2.8 (3. 0 U S qt , 2. 5 Im p qt ) a t overhaul .
Use onl y SAE10W-3 0 or 10W-40 , API Servic e SF
or S G grade .
DRAIN PLU G
4 0 N- m (4. 0 kg-m , 2 9 Ib-ft )
WASHE R Replace .
Back-up Ligh t Switch ,
Neutral Positio n Switc h
Replacemen t
NOTE: T o chec k th e switch , se e sectio n 23 .
1 . Disconnec t th e connector , the n remov e th e switc h
connecto r fro m th e connecto r clamp .
2 . Remov e th e switch .
3. Appl y liqui d gaske t (P/ N 08718-0001 ) t o th e
switc h threads , the n instal l th e switch .
BACK-U P LIGH T SWITC H
2 5 N- m (2. 5 kg-m , 1 8 Ib-ft )
NEUTRA L POSITIO N SWITC H
2 5 N- m (2. 5 kg-m , 1 8 Ib-ft )
OI
L FILLE R PLU G
4 5 N- m (4. 5 kg-m , 3 3 Ib-ft )
WASHE R Replace .
ProCarManuals.com
Page 410 of 1640
System Description
Function and Operation
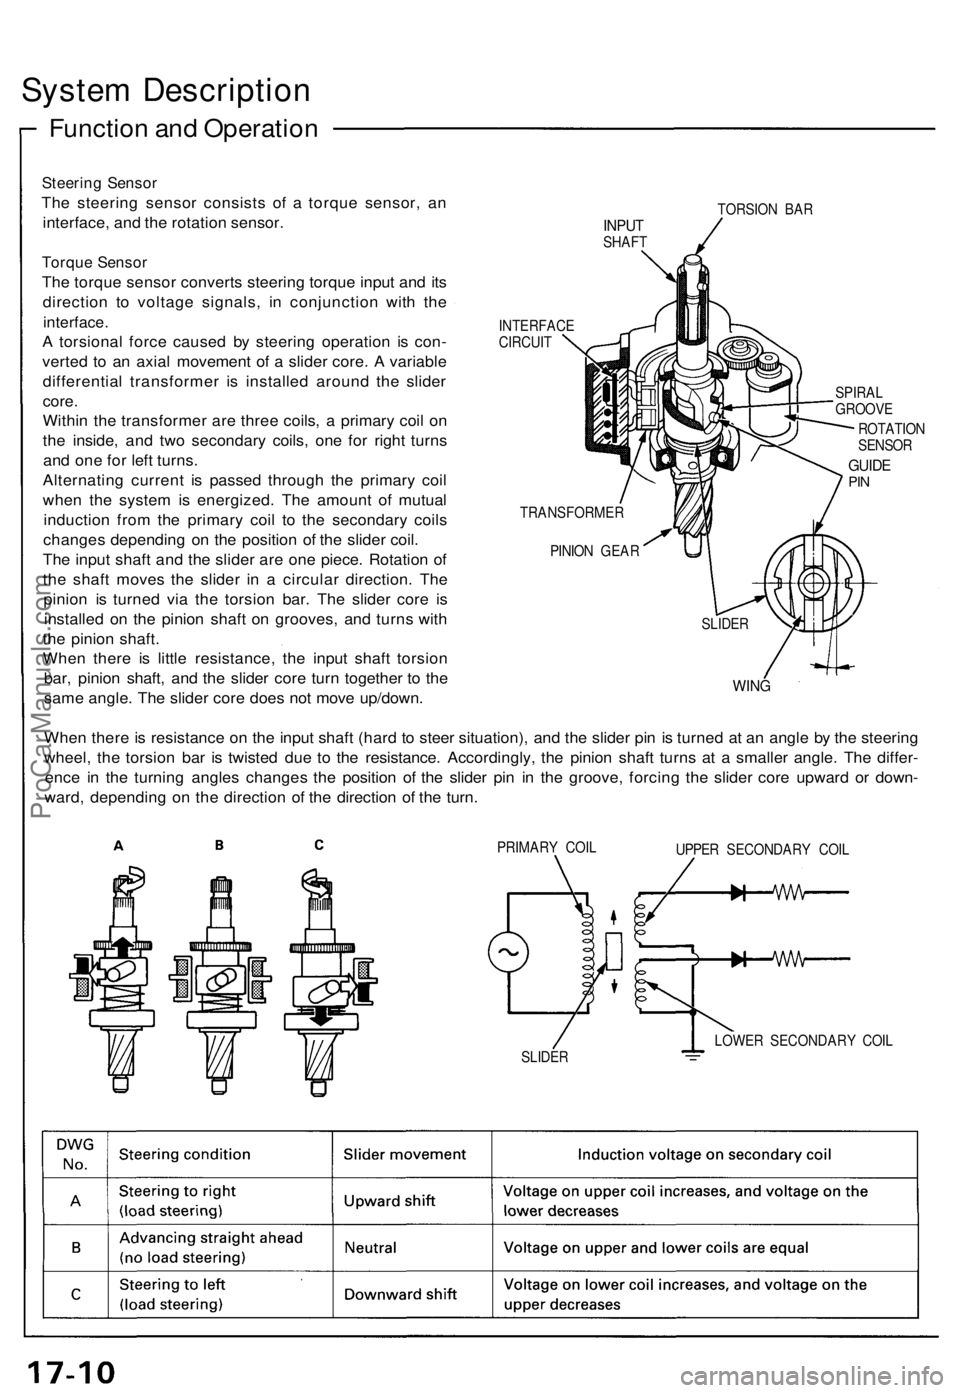
Steering Sensor
The steering sensor consists of a torque sensor, an
interface, and the rotation sensor.
Torque Sensor
The torque sensor converts steering torque input and its
direction to voltage signals, in conjunction with the
interface.
A torsional force caused by steering operation is con-
verted to an axial movement of a slider core. A variable
differential transformer is installed around the slider
core.
Within the transformer are three coils, a primary coil on
the inside, and two secondary coils, one for right turns
and one for left turns.
Alternating current is passed through the primary coil
when the system is energized. The amount of mutual
induction from the primary coil to the secondary coils
changes depending on the position of the slider coil.
The input shaft and the slider are one piece. Rotation of
the shaft moves the slider in a circular direction. The
pinion is turned via the torsion bar. The slider core is
installed on the pinion shaft on grooves, and turns with
the pinion shaft.
When there is little resistance, the input shaft torsion
bar, pinion shaft, and the slider core turn together to the
same angle. The slider core does not move up/down.
TORSION BAR
INPUT
SHAFT
INTERFACE
CIRCUIT
SPIRAL
GROOVE
ROTATION
SENSOR
GUIDE
PIN
TRANSFORMER
PINION GEAR
WING
When there is resistance on the input shaft (hard to steer situation), and the slider pin is turned at an angle by the steering
wheel, the torsion bar is twisted due to the resistance. Accordingly, the pinion shaft turns at a smaller angle. The differ-
ence in the turning angles changes the position of the slider pin in the groove, forcing the slider core upward or down-
ward, depending on the direction of the direction of the turn.
PRIMARY COIL
UPPER SECONDARY COIL
LOWER SECONDARY COIL
SLIDER
SLIDERProCarManuals.com
Page 720 of 1640
Clutch Inspectio n
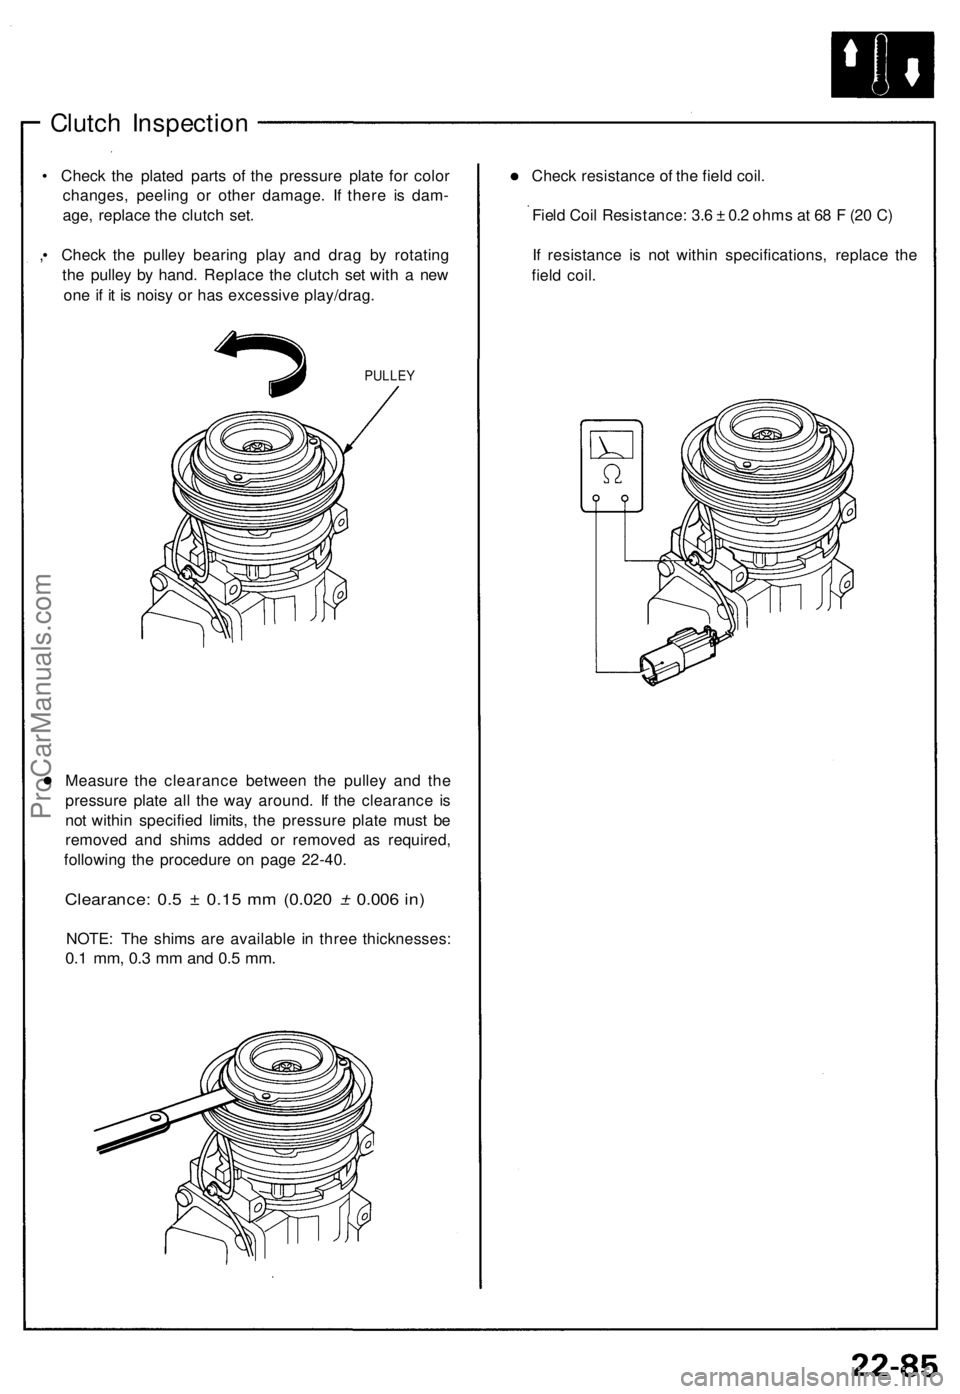
• Chec k th e plate d part s o f th e pressur e plat e fo r colo r
changes , peelin g o r othe r damage . I f ther e i s dam -
age , replac e th e clutc h set .
, • Chec k th e pulle y bearin g pla y an d dra g b y rotatin g
th e pulle y b y hand . Replac e th e clutc h se t wit h a ne w
on e if i t i s nois y o r ha s excessiv e play/drag .
PULLEY
Measur e th e clearanc e betwee n th e pulle y an d th e
pressur e plat e al l th e wa y around . I f th e clearanc e i s
no t withi n specifie d limits , th e pressur e plat e mus t b e
remove d an d shim s adde d o r remove d a s required ,
followin g th e procedur e o n pag e 22-40 .
Clearance : 0. 5 ± 0.1 5 m m (0.02 0 ± 0.00 6 in )
NOTE : Th e shim s ar e availabl e i n thre e thicknesses :
0.1 mm , 0. 3 m m an d 0. 5 mm .
Chec k resistanc e o f th e fiel d coil .
Fiel d Coi l Resistance : 3. 6 ± 0. 2 ohm s a t 6 8 F (2 0 C )
I f resistanc e i s no t withi n specifications , replac e th e
fiel d coil .
ProCarManuals.com
Page 966 of 1640
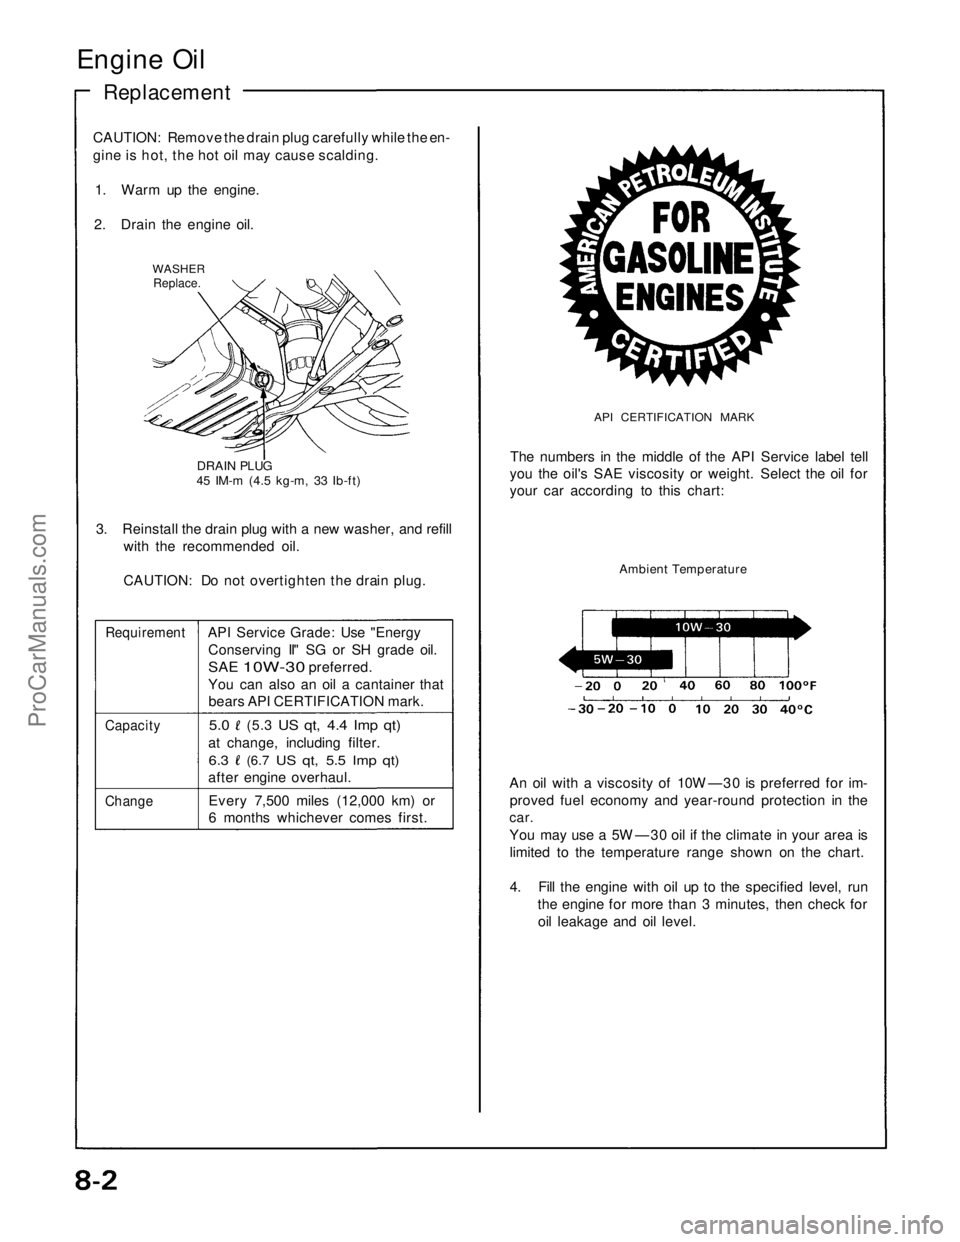
Engine Oil
Replacement
CAUTION: Remove the drain plug carefully while the en-
gine is hot, the hot oil may cause scalding.
1. Warm up the engine.
2. Drain the engine oil.
WASHER
Replace.
DRAIN PLUG
45 IM-m (4.5 kg-m, 33 Ib-ft)
3. Reinstall the drain plug with a new washer, and refill
with the recommended oil.
CAUTION: Do not overtighten the drain plug.
Requirement
API Service Grade: Use "Energy
Conserving II" SG or SH grade oil.
SAE
10W-30
preferred.
You can also an oil a cantainer that
bears API CERTIFICATION mark.
Capacity
5.0
(5.3
US qt, 4.4 Imp qt)
at change, including filter.
6.3
(6.7
US qt, 5.5 Imp qt)
after engine overhaul.
Change
Every 7,500 miles (12,000 km) or
6 months whichever comes first.
API CERTIFICATION MARK
The numbers in the middle of the API Service label tell
you the oil's SAE viscosity or weight. Select the oil for
your car according to this chart:
Ambient Temperature
An oil with a viscosity of 10W —30 is preferred for im-
proved fuel economy and year-round protection in the
car.
You may use a 5W —30 oil if the climate in your area is
limited to the temperature range shown on the chart.
4. Fill the engine with oil up to the specified level, run
the engine for more than 3 minutes, then check for
oil leakage and oil level.ProCarManuals.com
Page 1034 of 1640
Valves, Valve Springs and Valve Seals
Valve Spring and Valve Seal Installation Sequence
NOTE: Exhaust and intake valve seals are NOT interchangeable.
INTAKE VALVE SPRING
NOTE: Place the end of valve
spring with closely wound coils
toward the cylinder head.
INTAKE VALVE SEAL
(WHITE SPRING)
Replace.
VALVE SEAL INSTALLER
KD-2899
VALVE SEAL
Replace.
VALVE KEEPERS
VALVE SPRING
RETAINER
VALVE SPRING
EXHAUST VALVE SEAL
(BLACK SPRING)
Replace.
SPRING SEAT
NOTE: Install the valve spring seats
before installing the valve seals.ProCarManuals.com
Page 1044 of 1640
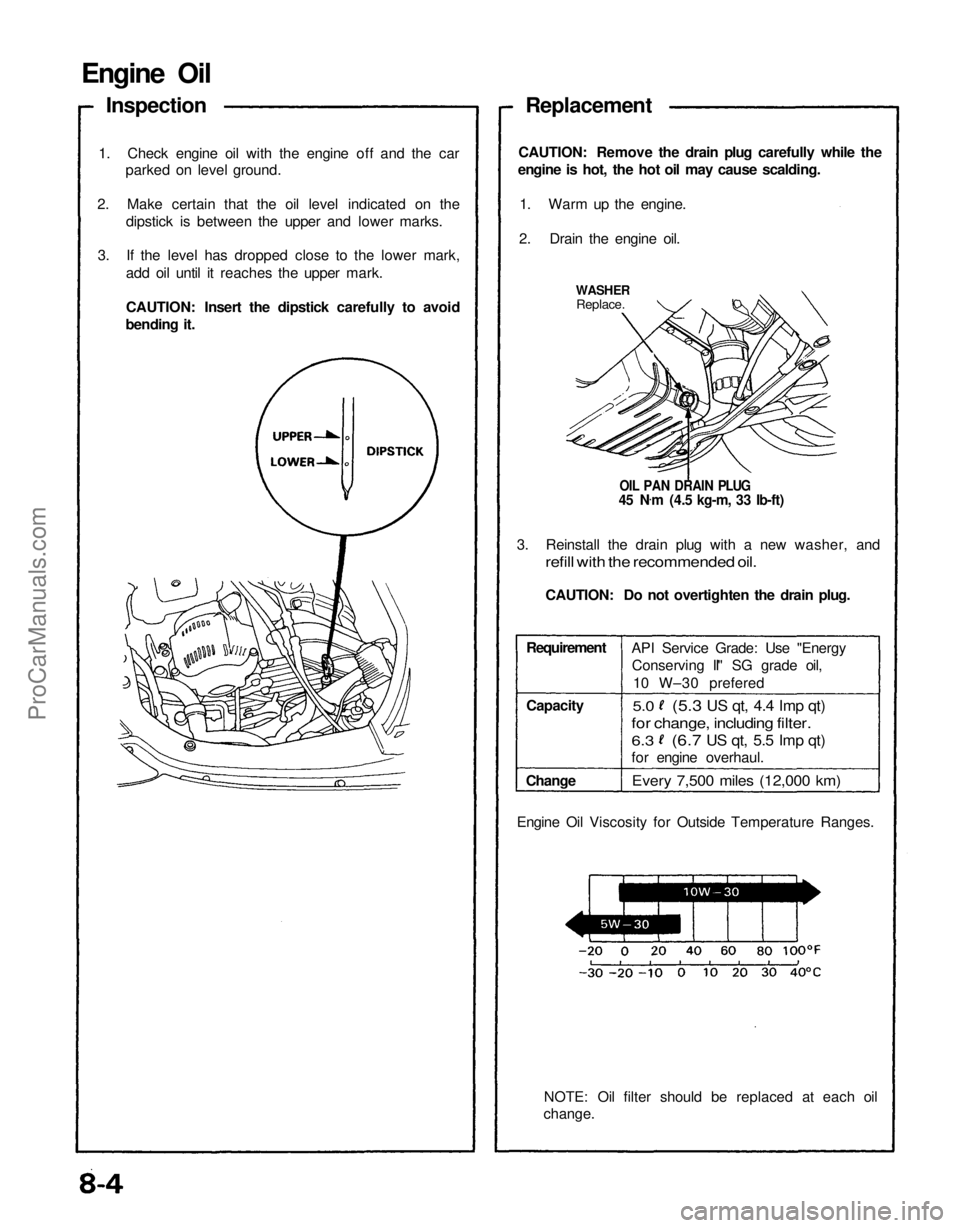
Engine Oil
Inspection
1. Check engine oil with the engine off and the car parked on level ground.
2. Make certain that the oil level indicated on the dipstick is between the upper and lower marks.
3. If the level has dropped close to the lower mark, add oil until it reaches the upper mark.
CAUTION: Insert the dipstick carefully to avoid
bending it. Replacement
CAUTION: Remove the drain plug carefully while the
engine is hot, the hot oil may cause scalding.
1. Warm up the engine.
2. Drain the engine oil.
WASHER
Replace.
OIL PAN DRAIN PLUG
45 N .
m (4.5 kg-m, 33 Ib-ft)
3. Reinstall the drain plug with a new washer, and
refill with the recommended oil.
CAUTION: Do not overtighten the drain plug.
Requirement
Capacity
Change API Service Grade: Use "Energy
Conserving II" SG grade oil,
10 W–30 prefered
5.0
Every 7,500 miles (12,000 km)
NOTE: Oil filter should be replaced at each oil
change.
Engine Oil Viscosity for Outside Temperature Ranges.
(5.3
US qt, 4.4 Imp qt)
for change, including filter.
6.3
(6.7
US qt, 5.5 Imp qt)
for engine overhaul.ProCarManuals.com