1991 ACURA NSX light
[x] Cancel search: lightPage 1545 of 1640
Transmission Housing
Removal
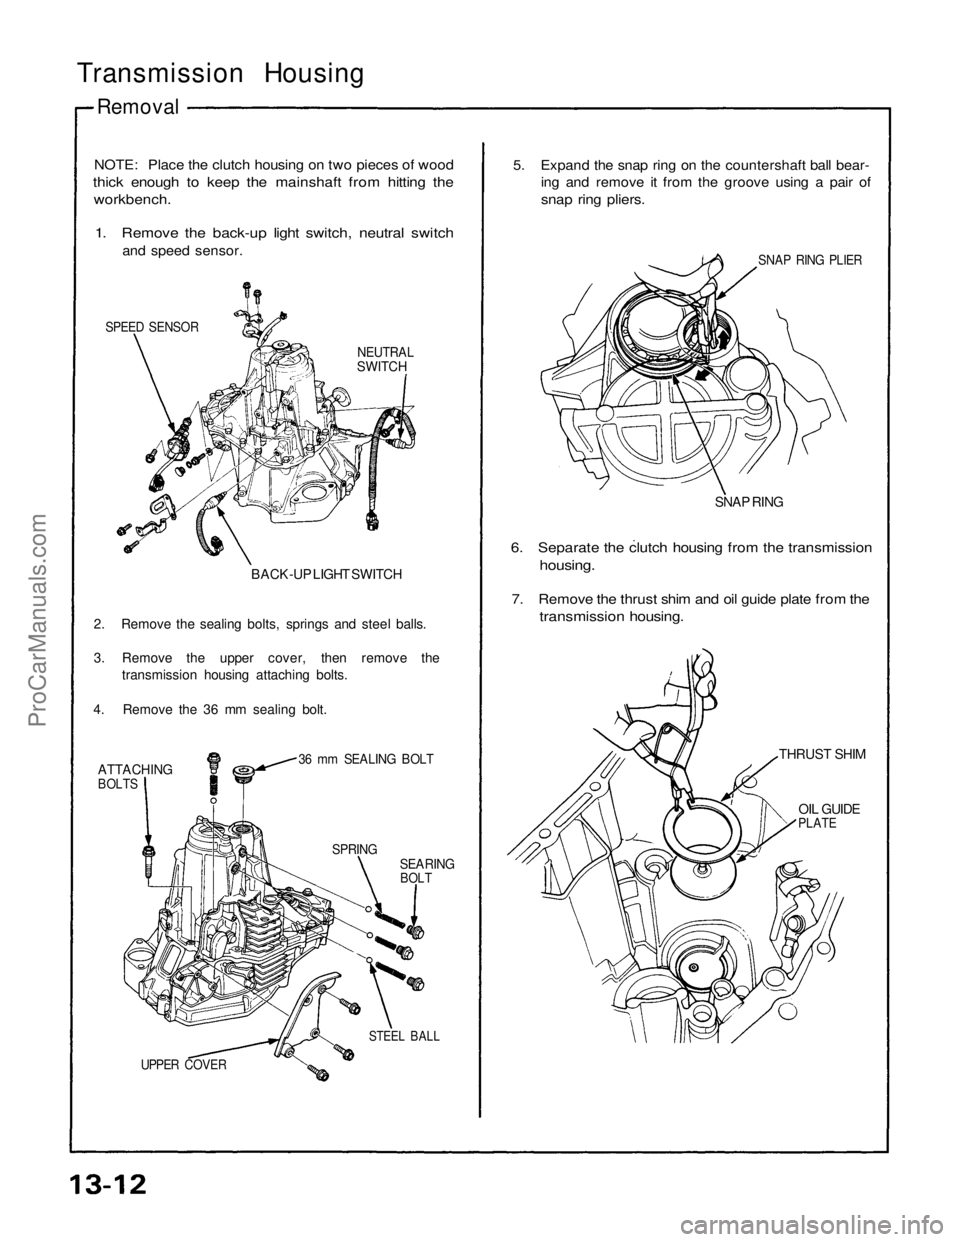
NOTE: Place the clutch housing on two pieces of wood
thick enough to keep the mainshaft from hitting the
workbench.
1. Remove the back-up light switch, neutral switch
and speed sensor.
SPEED SENSOR
NEUTRAL
SWITCH
BACK-UP LIGHT SWITCH
2. Remove the sealing bolts, springs and steel balls.
3. Remove the upper cover, then remove the transmission housing attaching bolts.
4. Remove the 36 mm sealing bolt.
ATTACHING
BOLTS
36 mm SEALING BOLT
SEARING
BOLT
SPRING
STEEL BALL
UPPER COVER
OIL GUIDE
PLATE
THRUST SHIM
6. Separate the clutch housing from the transmission
housing.
7. Remove the thrust shim and oil guide plate from the
transmission housing.
SNAP RING
SNAP RING PLIER
5. Expand the snap ring on the countershaft ball bear-
ing and remove it from the groove using a pair of
snap ring pliers.ProCarManuals.com
Page 1550 of 1640
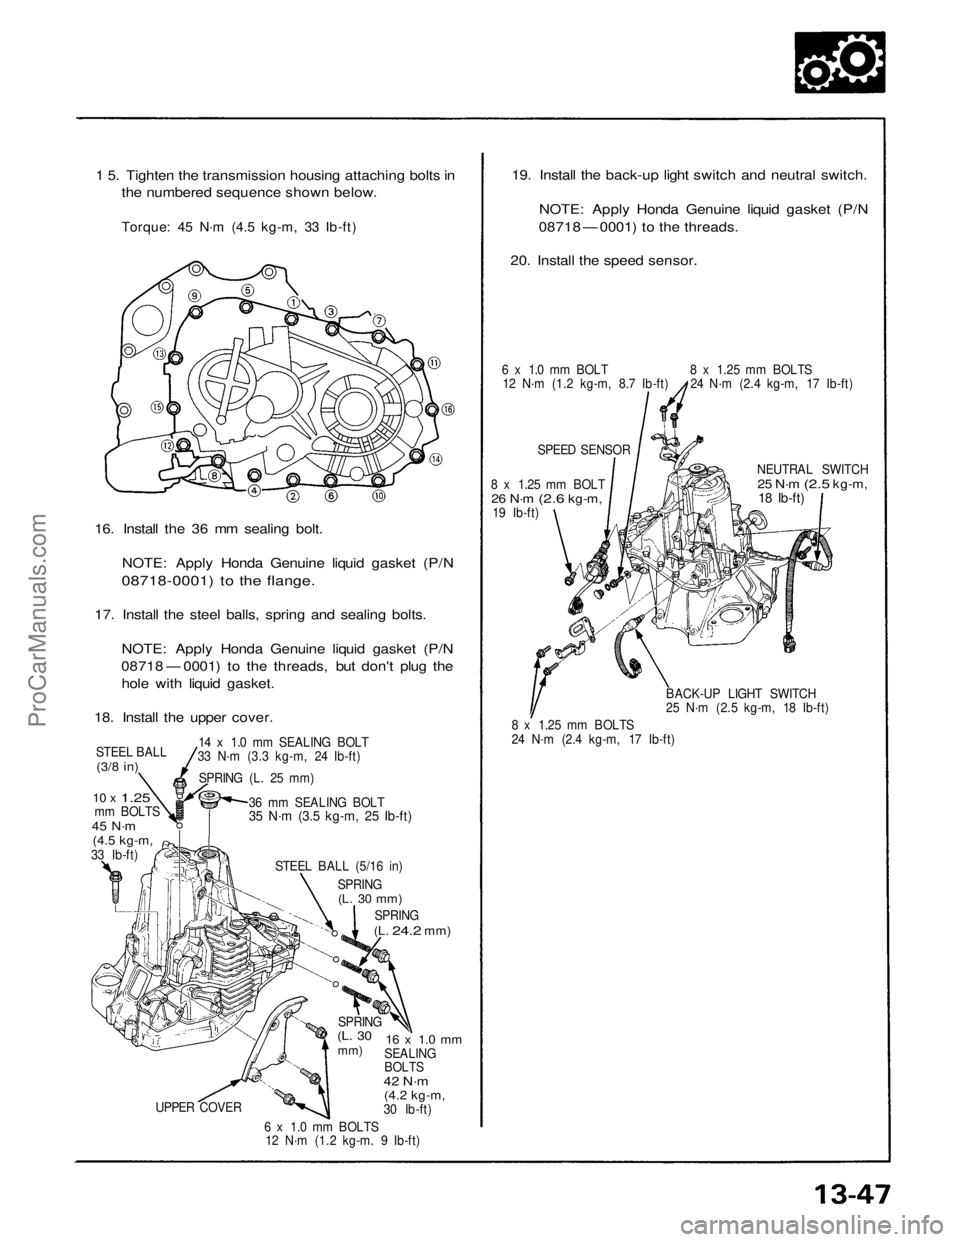
1 5. Tighten the transmission housing attaching bolts in
the numbered sequence shown below.
Torque: 45 N·m (4.5 kg-m, 33 Ib-ft)
16. Install the 36 mm sealing bolt.
NOTE: Apply Honda Genuine liquid gasket (P/N
08718-0001) to the flange.
17. Install the steel balls, spring and sealing bolts.
NOTE: Apply Honda Genuine liquid gasket (P/N
08718 — 0001) to the threads, but don't plug the
hole with liquid gasket.
18. Install the upper cover.
STEEL BALL
(3/8 in)
10 x
1.25
mm BOLTS
45 N·m
(4.5 kg-m,
33 Ib-ft)
14 x 1.0 mm SEALING BOLT
33 N·m (3.3 kg-m, 24 Ib-ft)
SPRING (L. 25 mm)
36 mm SEALING BOLT
35 N·m (3.5 kg-m, 25 Ib-ft)
STEEL BALL (5/16 in)
SPRING
(L. 30 mm)
SPRING
(L.
24.2
mm)
UPPER COVER
19. Install the back-up light switch and neutral switch.
NOTE: Apply Honda Genuine liquid gasket (P/N
08718 — 0001) to the threads.
20. Install the speed sensor.
6 x 1.0 mm BOLT
12 N·m (1.2 kg-m, 8.7 Ib-ft)
SPEED SENSOR
8 x 1.25 mm BOLT
26 N·m
(2.6
kg-m,
19 Ib-ft)
NEUTRAL SWITCH
25 N·m
(2.5
kg-m,
18 Ib-ft)
SPRING
(L. 30
mm)
16 x 1.0 mm
SEALING
BOLTS
42 N·m
(4.2 kg-m,
30 Ib-ft)
6 x 1.0 mm BOLTS
12 N·m (1.2 kg-m. 9 Ib-ft)
8 x 1.25 mm BOLTS
24 N·m (2.4 kg-m, 17 Ib-ft)
8 x 1.25 mm BOLTS
24 N·m (2.4 kg-m, 17 Ib-ft)
BACK-UP LIGHT SWITCH
25 N·m (2.5 kg-m, 18 Ib-ft)ProCarManuals.com
Page 1554 of 1640
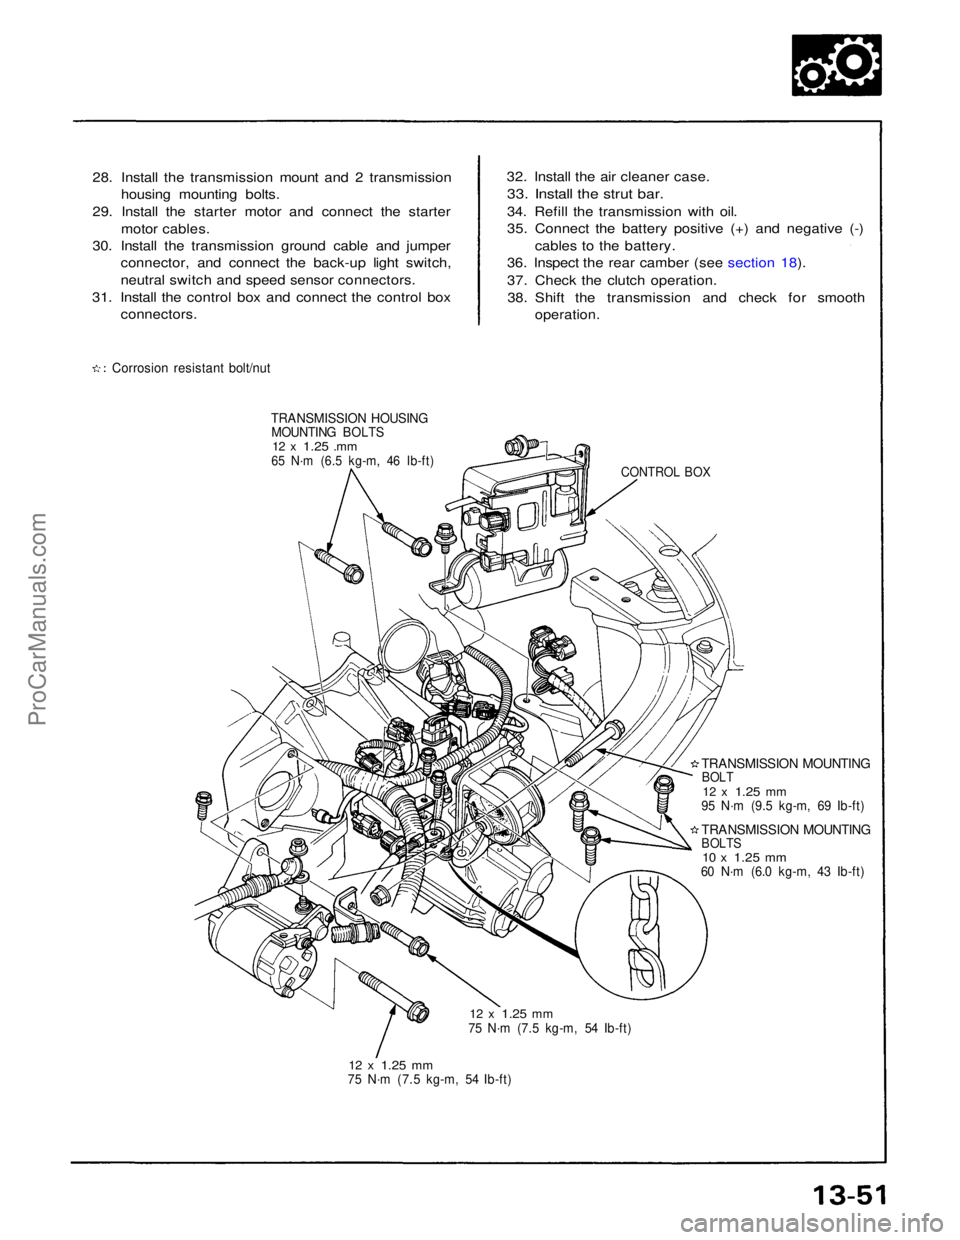
28. Install the transmission mount and 2 transmission
housing mounting bolts.
29. Install the starter motor and connect the starter motor cables.
30. Install the transmission ground cable and jumper connector, and connect the back-up light switch,
neutral switch and speed sensor connectors.
31. Install the control box and connect the control box
connectors.
Corrosion resistant bolt/nut
TRANSMISSION HOUSING
MOUNTING BOLTS
12 x
1.25
.mm
65 N·m (6.5 kg-m, 46 Ib-ft)
12 x
1.25
mm
75 N·m (7.5 kg-m, 54 Ib-ft)
12 x
1.25
mm
75 N·m (7.5 kg-m, 54 Ib-ft)
TRANSMISSION MOUNTING
BOLTS
10 x
1.25
mm
60 N·m (6.0 kg-m, 43 Ib-ft)
TRANSMISSION MOUNTING
BOLT
12 x
1.25
mm
95 N·m (9.5 kg-m, 69 Ib-ft)
CONTROL BOX
32. Install the air cleaner case.
33. Install the strut bar.
34. Refill the transmission with oil.
35. Connect the battery positive (+) and negative (-) cables to the battery.
36. Inspect the rear camber (see section 18).
37. Check the clutch operation.
38. Shift the transmission and check for smooth
operation.ProCarManuals.com
Page 1556 of 1640
Wheel Alignment
Front Wheel Alignment Adjustment Procedure (cont'd)
NOTE:
NSX four wheel alignment requires the use of equip-
ment designed specifically for four wheel indepen-
dent suspensions and capable of immediate
feedback.
The ride height is very important for setting the align-
ment. For every 10 mm of change in the front ride
height, the camber will change approximately 10
minutes.
The front alignment settings on the NSX are
interactive.
A slight change in toe will dramatically change the
camber.
1. Drive the car on the alignment rack.
2. Check the tire pressure and ride height as described on page 18 - 6.
3. Center the steering wheel.
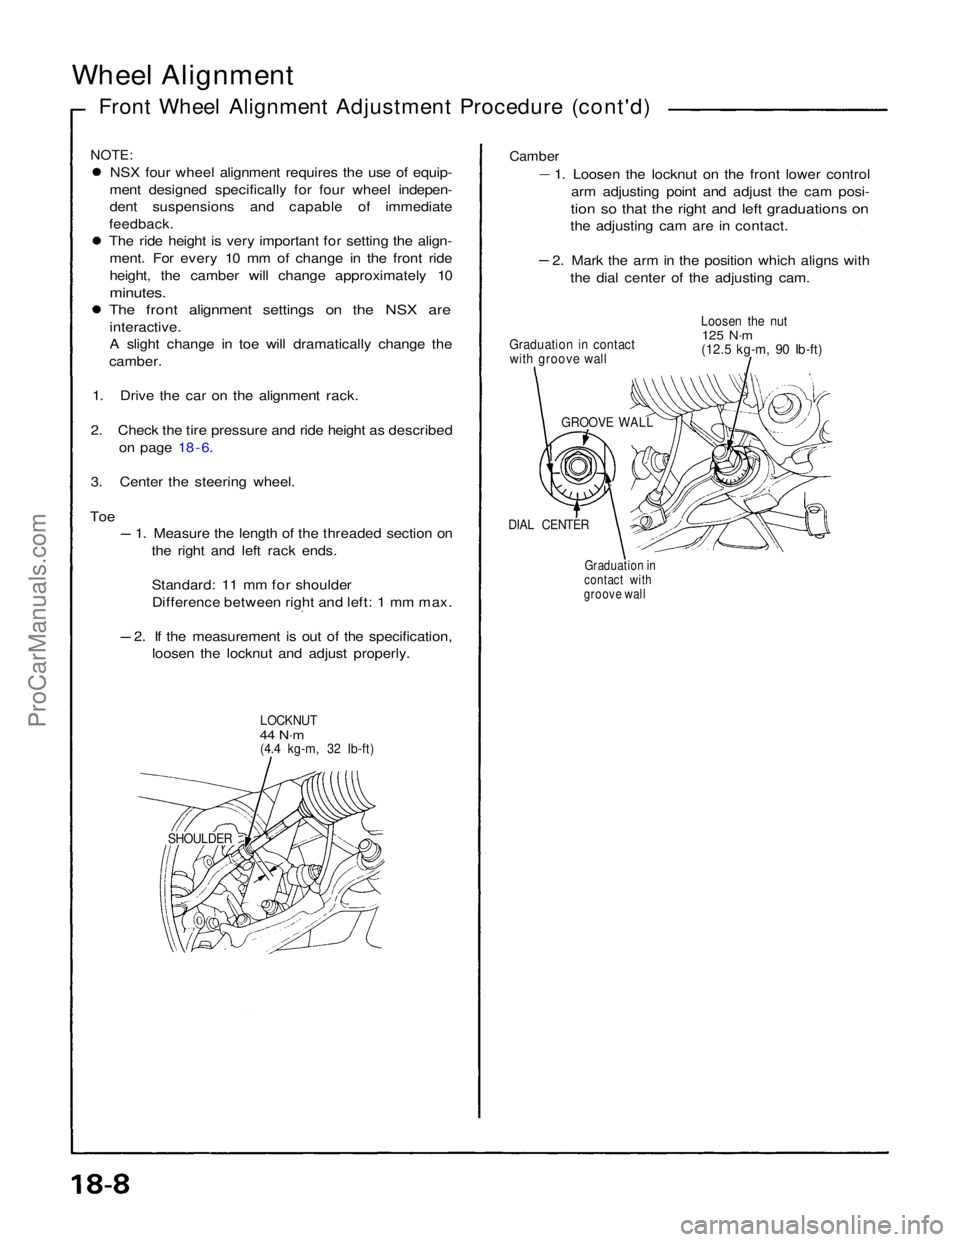
Toe
1. Measure the length of the threaded section on
the right and left rack ends.
Standard: 11 mm for shoulderDifference between right and left: 1 mm max. 2. If the measurement is out of the specification,
loosen the locknut and adjust properly.
LOCKNUT
44 N·m
(4.4 kg-m, 32 Ib-ft)
SHOULDERGraduation in
contact with
groove wall
DIAL CENTER
GROOVE WALL
Graduation in contact
with groove wall Loosen the nut
125 N·m
(12.5 kg-m, 90 Ib-ft)
Camber
1. Loosen the locknut on the front lower control
arm adjusting point and adjust the cam posi-
tion so that the right and left graduations on
the adjusting cam are in contact. 2. Mark the arm in the position which aligns with
the dial center of the adjusting cam.ProCarManuals.com
Page 1569 of 1640
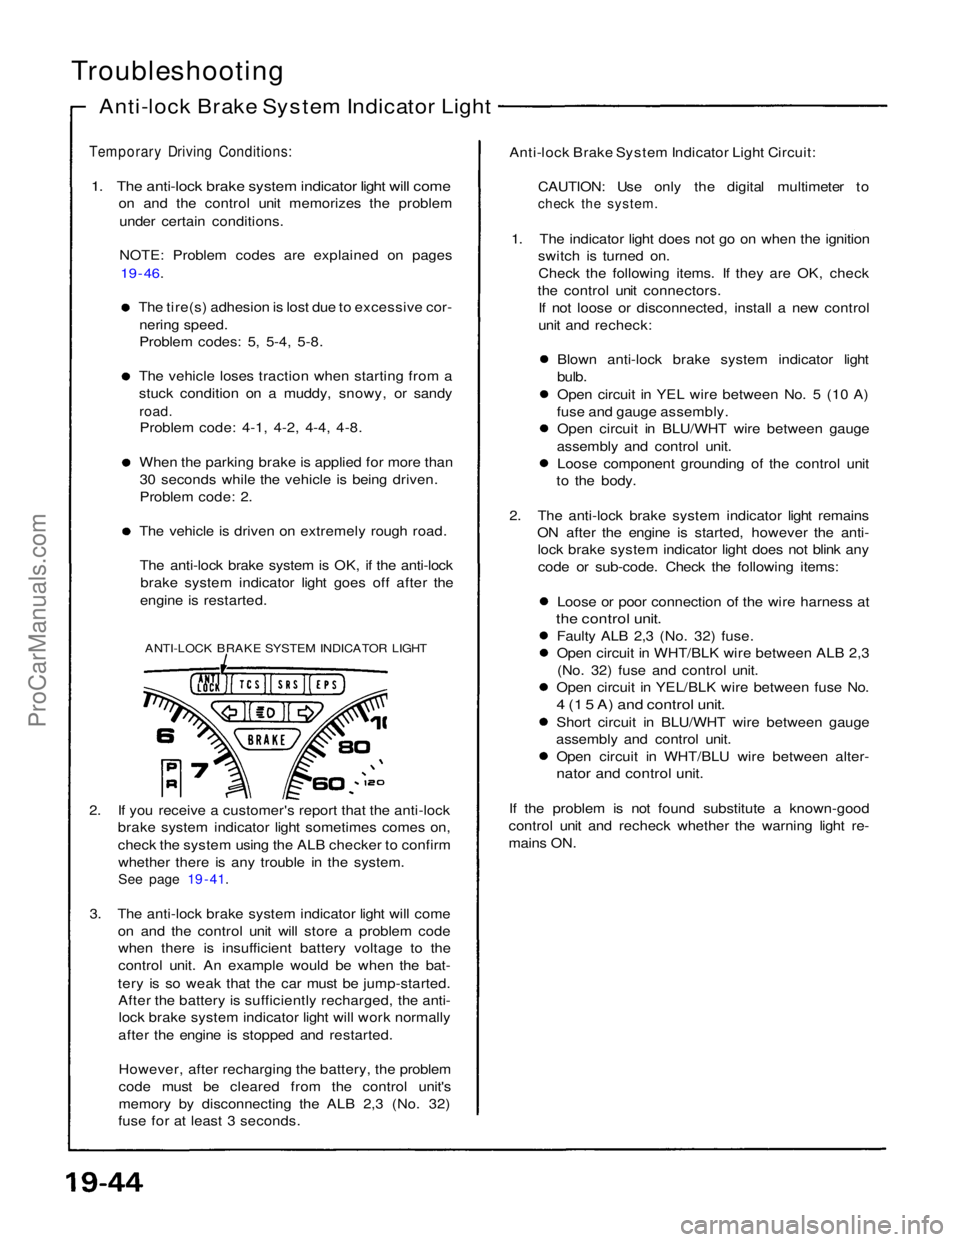
Troubleshooting
Anti-lock Brake System Indicator Light
Temporary Driving Conditions:
1. The anti-lock brake system indicator light will come
on and the control unit memorizes the problem
under certain conditions.
NOTE: Problem codes are explained on pages
19 - 46.
The tire(s) adhesion is lost due to excessive cor-
nering speed.
Problem codes: 5, 5-4, 5-8. The vehicle loses traction when starting from a
stuck condition on a muddy, snowy, or sandy
road.
Problem code: 4-1, 4-2, 4-4, 4-8. When the parking brake is applied for more than
30 seconds while the vehicle is being driven.
Problem code: 2. The vehicle is driven on extremely rough road.
The anti-lock brake system is OK, if the anti-lock brake system indicator light goes off after the
engine is restarted.
ANTI-LOCK BRAKE SYSTEM INDICATOR LIGHT
2. If you receive a customer's report that the anti-lock brake system indicator light sometimes comes on,
check the system using the ALB checker to confirm
whether there is any trouble in the system.
See page 19 - 41.
3. The anti-lock brake system indicator light will come on and the control unit will store a problem codewhen there is insufficient battery voltage to the
control unit. An example would be when the bat-
tery is so weak that the car must be jump-started. After the battery is sufficiently recharged, the anti-lock brake system indicator light will work normally
after the engine is stopped and restarted.
However, after recharging the battery, the problem
code must be cleared from the control unit's
memory by disconnecting the ALB 2,3 (No. 32)
fuse for at least 3 seconds. Anti-lock Brake System Indicator Light Circuit:
CAUTION: Use only the digital multimeter to
check the system.
1. The indicator light does not go on when the ignition switch is turned on.
Check the following items. If they are OK, check
the control unit connectors. If not loose or disconnected, install a new control
unit and recheck:
Blown anti-lock brake system indicator light
bulb.
Open circuit in YEL wire between No. 5 (10 A)
fuse and gauge assembly. Open circuit in BLU/WHT wire between gauge
assembly and control unit. Loose component grounding of the control unit
to the body.
2. The anti-lock brake system indicator light remains ON after the engine is started, however the anti-lock brake system indicator light does not blink any
code or sub-code. Check the following items:
Loose or poor connection of the wire harness at
the control unit.
Faulty ALB 2,3 (No. 32) fuse.
Open circuit in WHT/BLK wire between ALB 2,3(No. 32) fuse and control unit.
Open circuit in YEL/BLK wire between fuse No.
4 (1 5 A) and control unit.
Short circuit in BLU/WHT wire between gauge
assembly and control unit. Open circuit in WHT/BLU wire between alter-
nator and control unit.
If the problem is not found substitute a known-good
control unit and recheck whether the warning light re-
mains ON.ProCarManuals.com
Page 1570 of 1640
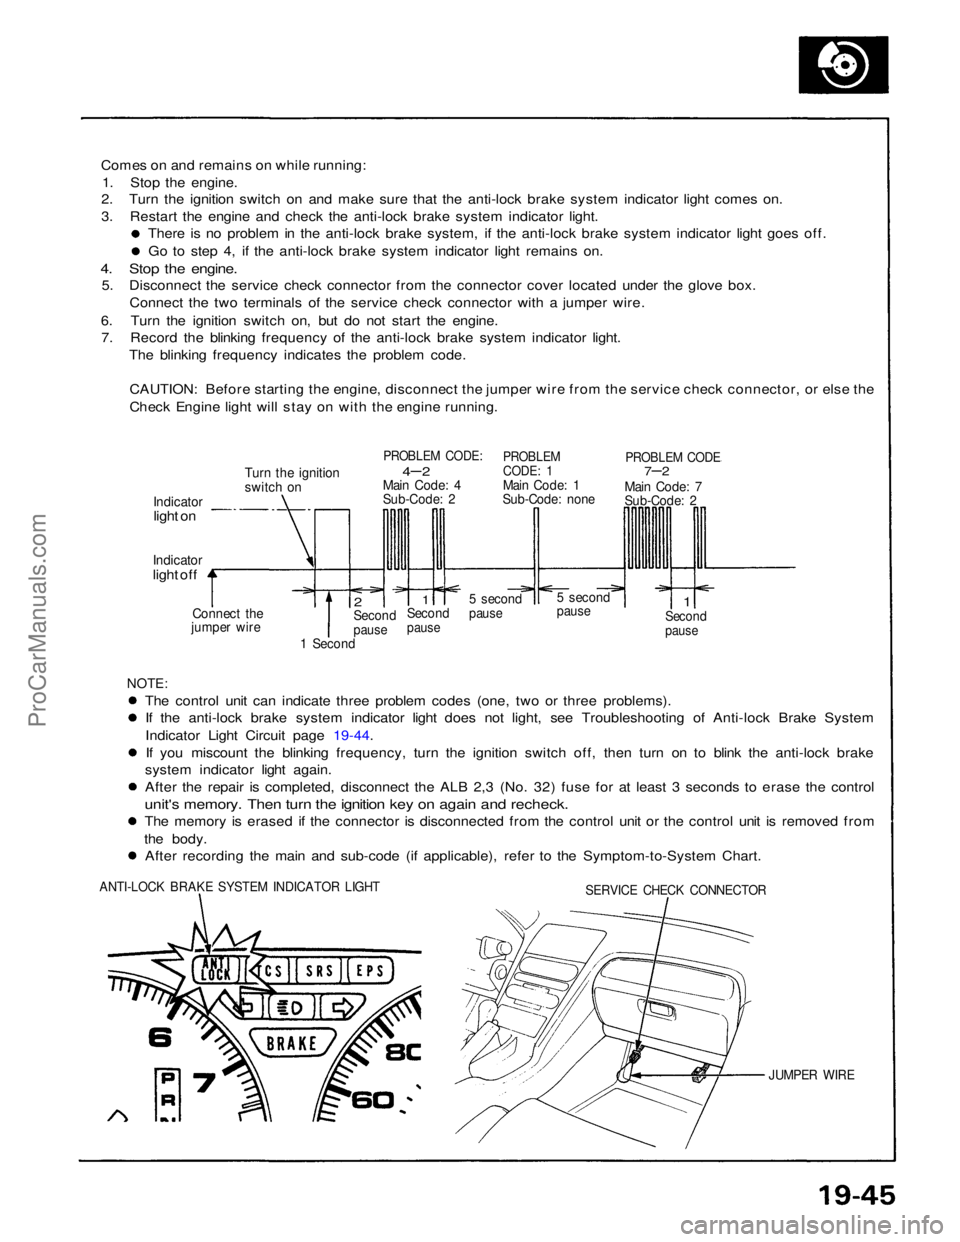
Comes on and remains on while running:
1. Stop the engine.
2. Turn the ignition switch on and make sure that the anti-lock brake system indicator light comes on.
3. Restart the engine and check the anti-lock brake system indicator light.
There is no problem in the anti-lock brake system, if the anti-lock brake system indicator light goes off. Go to step 4, if the anti-lock brake system indicator light remains on.
4. Stop the engine.
5. Disconnect the service check connector from the connector cover located under the glove box.
Connect the two terminals of the service check connector with a jumper wire.
6. Turn the ignition switch on, but do not start the engine. 7. Record the blinking frequency of the anti-lock brake system indicator light.
The blinking frequency indicates the problem code.
CAUTION: Before starting the engine, disconnect the jumper wire from the service check connector, or else the
Check Engine light will stay on with the engine running.
Turn the ignition
switch on
PROBLEM CODE:
4– 2
Main Code: 4
Sub-Code: 2
PROBLEM
CODE: 1
Main Code: 1
Sub-Code: none
PROBLEM CODE
7–2
Main Code: 7
Sub-Code: 2
Indicator
light on
Indicator
light off
Connect the
jumper wire
2
Second
pause
1
Second
pause
5 second
pause
5 second
pause
1
Second
pause
1 Second
NOTE:
The control unit can indicate three problem codes (one, two or three problems). If the anti-lock brake system indicator light does not light, see Troubleshooting of Anti-lock Brake System
Indicator Light Circuit page 19-44.
If you miscount the blinking frequency, turn the ignition switch off, then turn on to blink the anti-lock brake
system indicator light again. After the repair is completed, disconnect the ALB 2,3 (No. 32) fuse for at least 3 seconds to erase the control
unit's memory. Then turn the ignition key on again and recheck.
The memory is erased if the connector is disconnected from the control unit or the control unit is removed from
the body. After recording the main and sub-code (if applicable), refer to the Symptom-to-System Chart.
ANTI-LOCK BRAKE SYSTEM INDICATOR LIGHT
SERVICE CHECK CONNECTOR
JUMPER WIREProCarManuals.com
Page 1574 of 1640
Modulator/Solenoid Unit
Solenoid Leak Test
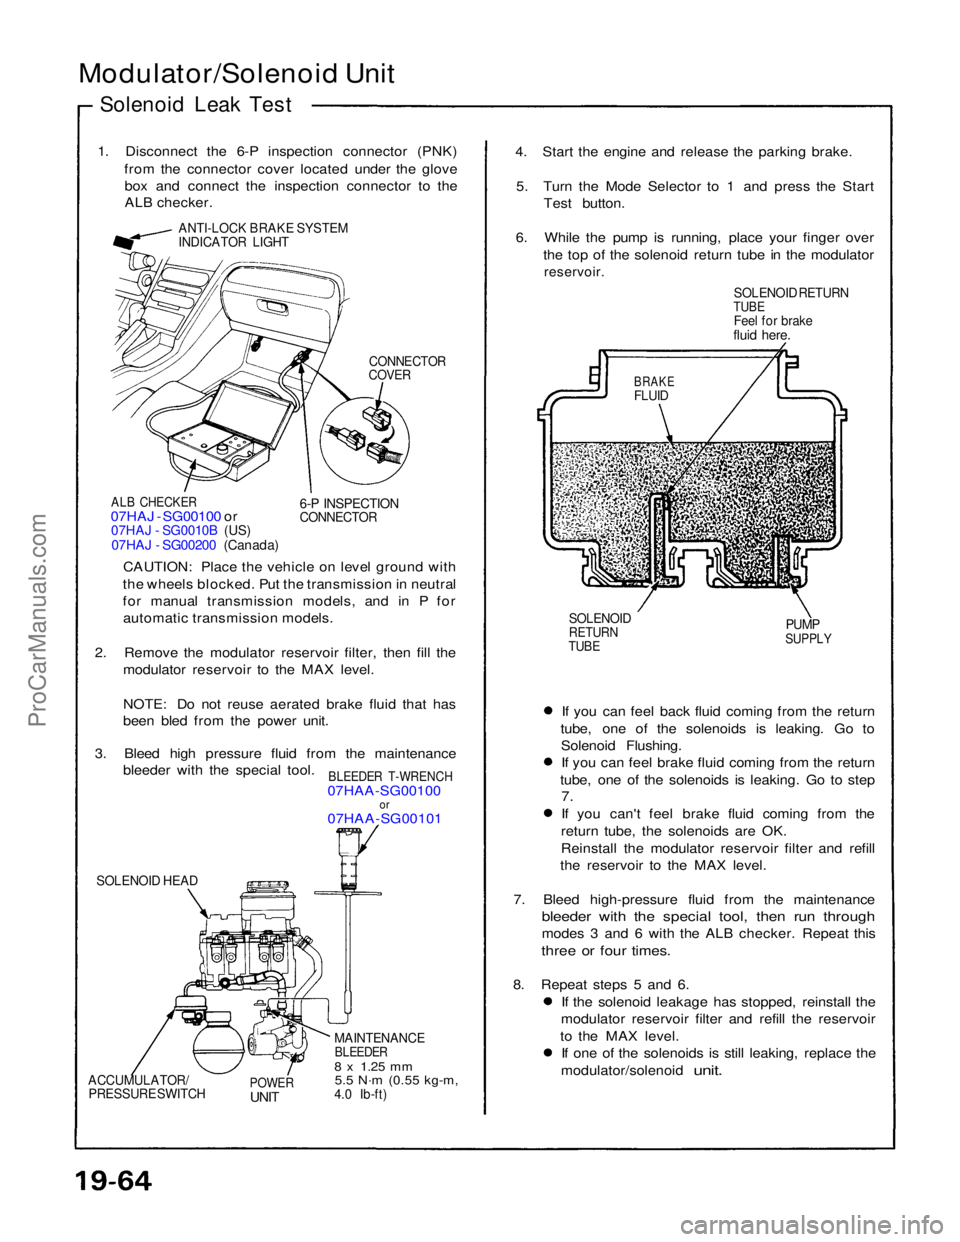
1. Disconnect the 6-P inspection connector (PNK) from the connector cover located under the glovebox and connect the inspection connector to the
ALB checker.
ANTI-LOCK BRAKE SYSTEM
INDICATOR LIGHT
CONNECTOR
COVER
ALB CHECKER
07HAJ - SG00100 or
07HAJ - SG0010B (US)
07HAJ - SG00200 (Canada)
6-P INSPECTION
CONNECTOR
CAUTION: Place the vehicle on level ground with
the wheels blocked. Put the transmission in neutral
for manual transmission models, and in P for automatic transmission models.
2. Remove the modulator reservoir filter, then fill the modulator reservoir to the MAX level.
NOTE: Do not reuse aerated brake fluid that has
been bled from the power unit.
3. Bleed high pressure fluid from the maintenance bleeder with the special tool.
BLEEDER T-WRENCH
07HAA-SG00100
or
07HAA-SG00101
SOLENOID HEAD
MAINTENANCE
BLEEDER
8 x
1.25
mm
5.5 N·m
(0.55 kg-m,
4.0 Ib-ft)
POWER
UNIT
ACCUMULATOR/
PRESSURE SWITCH
If you can feel back fluid coming from the return
tube, one of the solenoids is leaking. Go to Solenoid Flushing.If you can feel brake fluid coming from the return
tube, one of the solenoids is leaking. Go to step
7.
If you can't feel brake fluid coming from the return tube, the solenoids are OK.
Reinstall the modulator reservoir filter and refill
the reservoir to the MAX level.
7. Bleed high-pressure fluid from the maintenance
bleeder with the special tool, then run through
modes 3 and 6 with the ALB checker. Repeat this
three or four times.
8. Repeat steps 5 and 6. If the solenoid leakage has stopped, reinstall the
modulator reservoir filter and refill the reservoir
to the MAX level. If one of the solenoids is still leaking, replace the
modulator/solenoid
unit.
SOLENOID
RETURN
TUBE
PUMP
SUPPLY
BRAKE
FLUID
SOLENOID RETURN
TUBE
Feel for brake
fluid here.
4. Start the engine and release the parking brake.
5. Turn the Mode Selector to 1 and press the Start Test button.
6. While the pump is running, place your finger over the top of the solenoid return tube in the modulator
reservoir.ProCarManuals.com
Page 1576 of 1640
Bleeding
Air Bleeding with ALB Checker
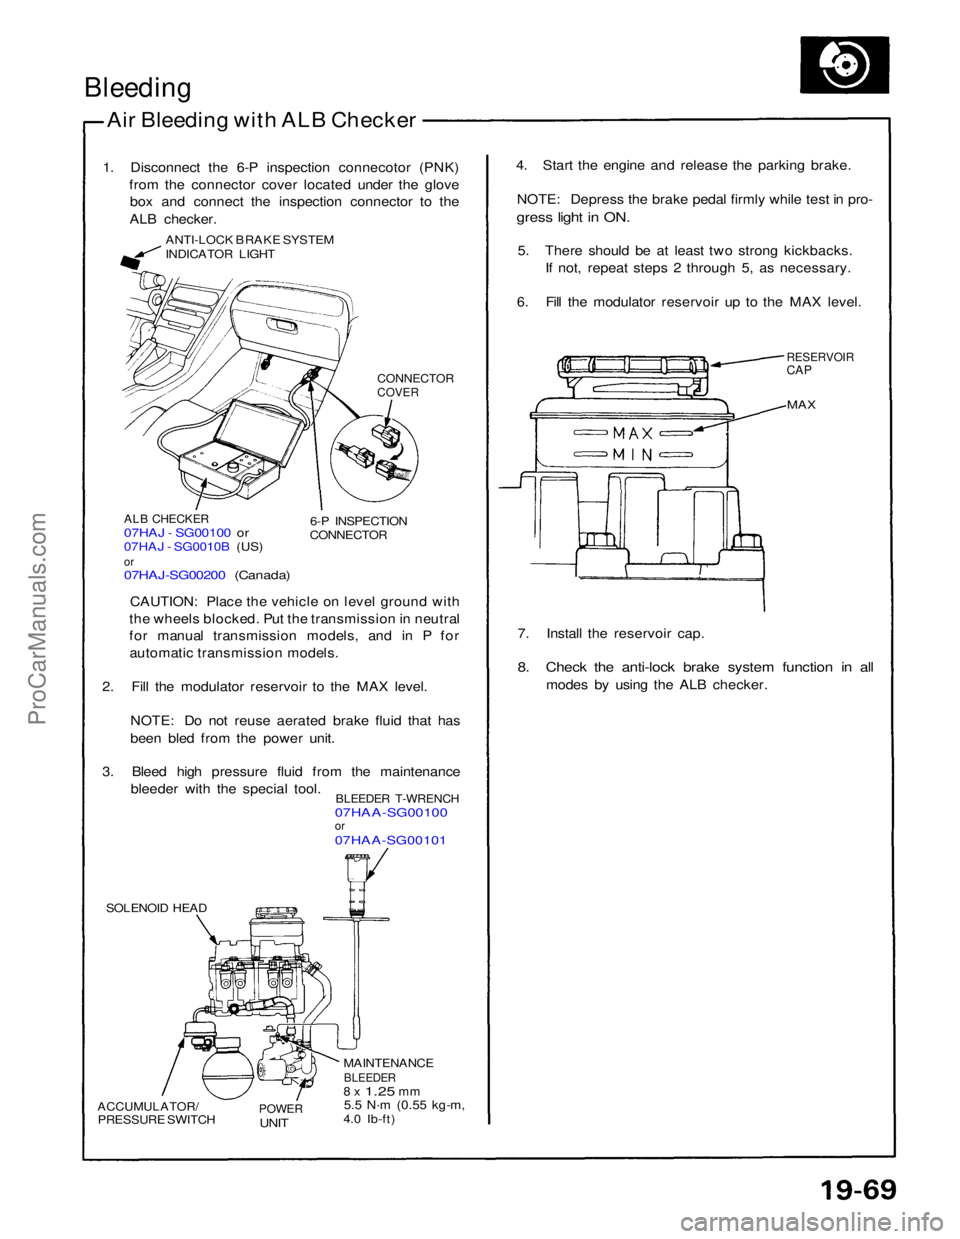
1. Disconnect the 6-P inspection connecotor (PNK) from the connector cover located under the glovebox and connect the inspection connector to the
ALB checker.
ANTI-LOCK BRAKE SYSTEM
INDICATOR LIGHT
CONNECTOR
COVER
ALB CHECKER
07HAJ - SG00100 or
07HAJ - SG0010B (US)
or
07HAJ-SG00200 (Canada)
6-P INSPECTION
CONNECTOR
CAUTION: Place the vehicle on level ground with
the wheels blocked. Put the transmission in neutral
for manual transmission models, and in P for automatic transmission models.
2. Fill the modulator reservoir to the MAX level.
NOTE: Do not reuse aerated brake fluid that has
been bled from the power unit.
3. Bleed high pressure fluid from the maintenance bleeder with the special tool.
BLEEDER T-WRENCH
07HAA-SG00100
or
07HAA-SG00101
SOLENOID HEAD
ACCUMULATOR/
PRESSURE SWITCH
POWER
UNIT
MAINTENANCE
BLEEDER
8 x
1.25
mm
5.5 N·m
(0.55 kg-m,
4.0 Ib-ft) 7. Install the reservoir cap.
8. Check the anti-lock brake system function in all
modes by using the ALB checker.
MAX
RESERVOIR
CAP
4. Start the engine and release the parking brake.
NOTE: Depress the brake pedal firmly while test in pro-
gress light in ON.
5. There should be at least two strong kickbacks. If not, repeat steps 2 through 5, as necessary.
6. Fill the modulator reservoir up to the MAX level.ProCarManuals.com