1990 MITSUBISHI SPYDER check engine
[x] Cancel search: check enginePage 160 of 2103
11ENGINE OVERHAUL Piston and
No.
Notch
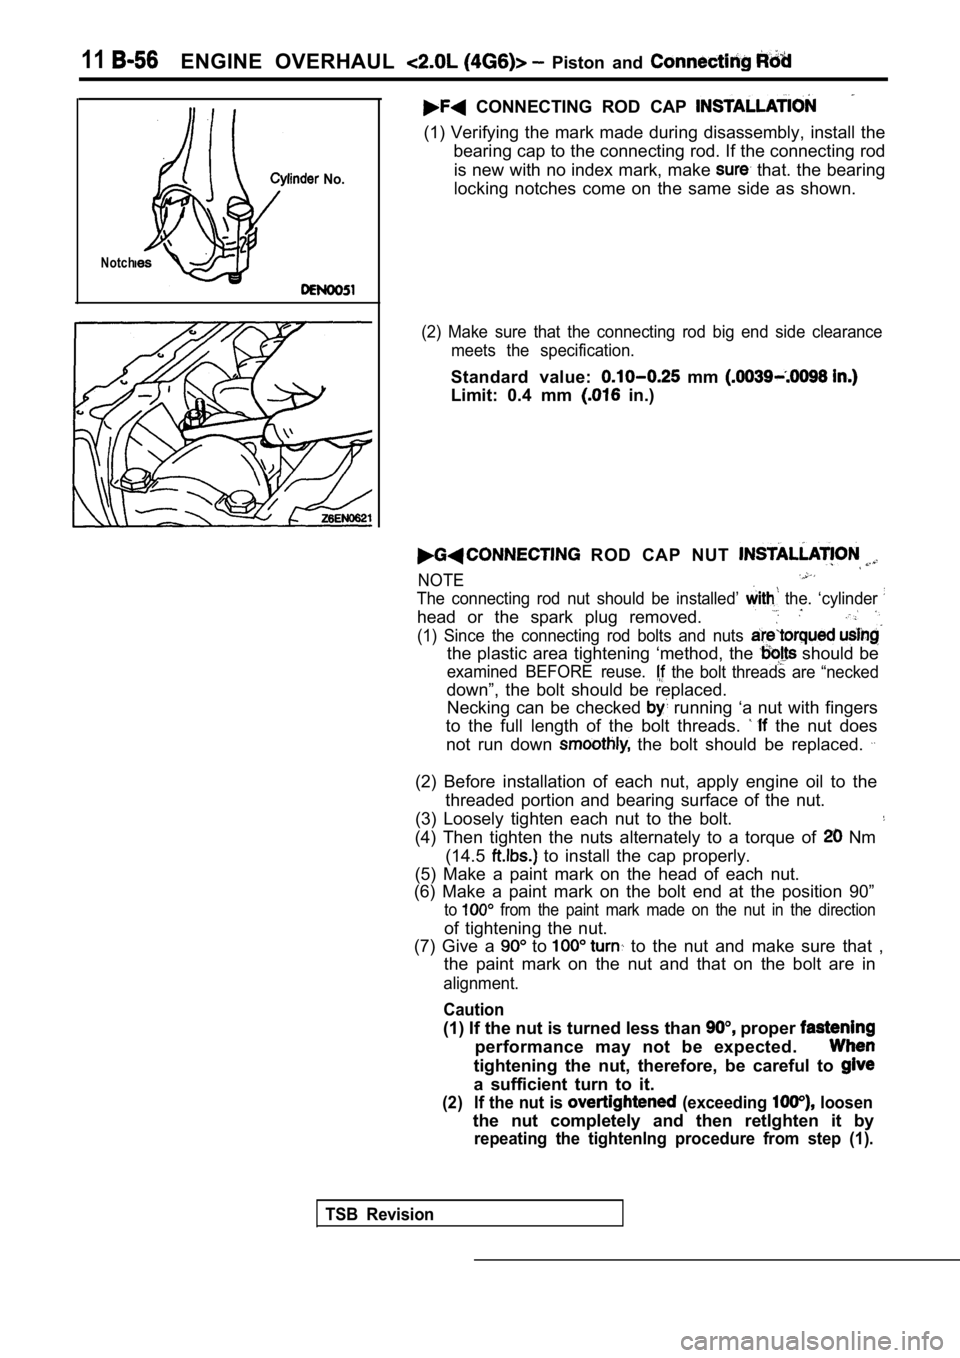
CONNECTING ROD CAP
(1) Verifying the mark made during disassembly, install the
bearing cap to the connecting rod. If the connectin g rod
is new with no index mark, make
that. the bearing
locking notches come on the same side as shown.
(2) Make sure that the connecting rod big end side clearance
meets the specification.
Standard value: mm
Limit: 0.4 mm in.)
ROD CAP NUT
NOTE
The connecting rod nut should be installed’ the. ‘cylinder
head or the spark plug removed.
(1) Since the connecting rod bolts and nuts
the plastic area tightening ‘method, the should be
examined BEFORE reuse. the bolt threads are “necked
down”, the bolt should be replaced. Necking can be checked
running ‘a nut with fingers
to the full length of the bolt threads.
the nut does
not run down
the bolt should be replaced.
(2) Before installation of each nut, apply engine o il to the
threaded portion and bearing surface of the nut.
(3) Loosely tighten each nut to the bolt.
(4) Then tighten the nuts alternately to a torque o f Nm
(14.5
to install the cap properly.
(5) Make a paint mark on the head of each nut.
(6) Make a paint mark on the bolt end at the positi on 90”
to from the paint mark made on the nut in the direction
of tightening the nut.
(7) Give a
to to the nut and make sure that ,
the paint mark on the nut and that on the bolt are in
alignment.
Caution
(1) If the nut is turned less than proper
performance may not be expected.
tightening the nut, therefore, be careful to
a sufficient turn to it.
(2) If the nut is (exceeding loosen
the nut completely and then retlghten it by
repeating the tightenlng procedure from step (1).
TSB Revision
Page 161 of 2103
ENGINE OVERHAUL
11300850104
(1) Replace piston ii or seizure is evident
its surfaces (especially surface). Replace the
piston if it is cracked.
PISTON PIN
(1) the piston pin the pin hole a
You should feel a slight resistance. the
pin if it can be easily inserted or there ‘is .
(2) The piston and piston pin must be replaced
bly.
PISTON RING
(1) Check ‘the ring for
and replace if defects are evident: piston
has been replaced with a
one, the piston
also be replaced with new ones.
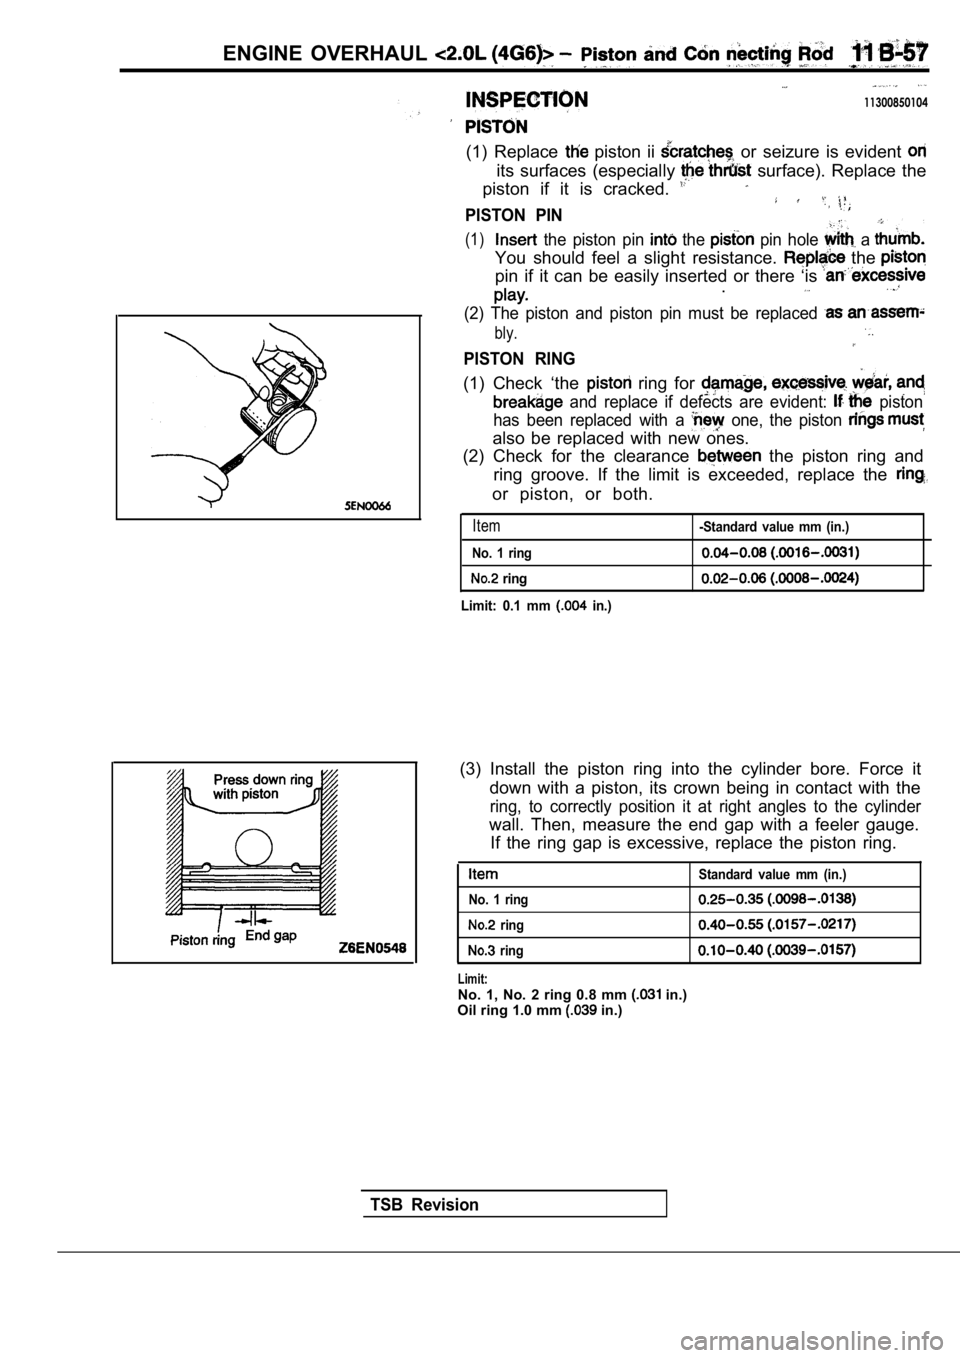
(2) Check for the clearance
the piston ring and
ring groove. If the limit is exceeded, replace the
or piston, or both.
Item
No. 1 ring
ring
Limit: 0.1 mm
in.)
-Standard value mm (in.)
(3) Install the piston ring into the cylinder bore. Force it
down with a piston, its crown being in contact with the
ring, to correctly position it at right angles to the cylinder
wall. Then, measure the end gap with a feeler gauge .
If the ring gap is excessive, replace the piston ri ng.
Standard value mm (in.)
No. 1 ring
ring
ring
Limit:No. 1, No. 2 ring 0.8 mm in.)
Oil ring 1.0 mm in.)
TSB Revision
Page 165 of 2103
![MITSUBISHI SPYDER 1990 Service Repair Manual E N G I N E O V E R H A U L
ed
(for No. tion mark
Upper and lower (for No.3)
Identification
mark
1
Shank length
[Example]
(1) If the measured value of a crankshaft
diameter is b MITSUBISHI SPYDER 1990 Service Repair Manual E N G I N E O V E R H A U L
ed
(for No. tion mark
Upper and lower (for No.3)
Identification
mark
1
Shank length
[Example]
(1) If the measured value of a crankshaft
diameter is b](/manual-img/19/57345/w960_57345-164.png)
E N G I N E O V E R H A U L
ed
(for No. tion mark
Upper and lower (for No.3)
Identification
mark
1
Shank length
[Example]
(1) If the measured value of a crankshaft
diameter is between 56.994 mm (2.2439
2.2441 in.), the journal is in the’
case the is also replaced by a
spare part, check the identification colors of the
journals painted on the
crankshaft. If the color’
is yellow, for example,.
journal is classified as
(2)
check the cylinder block bearing hole
mark stamped on the cylinder block.
If it is “O”, read the “Bearing identification column
to find the identification mark of the bearing to b e
used. In this case, it is “1”.
(4)
the bearings oil groove to the cylinder
block.
(5) Install the bearings having no oil to the bearing
caps.
CAP B E A R I N G C A P B O L T
INSTALLATION
(1) Install the bearing caps so that their arrows directed
to the timing belt side.
(2) Before installing the bearing cap bolts, check that the
shank length of each bolt meets the limit.
limit
is exceeded, replace the bolt.
(A): Max. 71.1 mm (2.79 in.)
(3) Apply engine oil to the threaded portion and be aring sur-
face of the bolt.
(4) Tighten the bolts to 25 Nm (16
in the specified
tightening sequence.
(5) Make a paint mark on the head of each bolt.
(6) Make a paint mark on the bearing cap at the pos ition
to from the paint mark made on the bolt in
the direction of tightening the bolt.
(7) According to the specified tightening sequence, give a
to turn to each bolt and make sure that the
paint mark on the bolt and that on the cap are in a lignment.
Caution
(1) If
thebolt is turned less than proper
performance may not be expected.
tightening the bolt, therefore, be careful to
a sufficient turn to it.
( 2 ) I f t h e b o l t i s
loosen the bolt completely and then retlghten
by repeating the tightening procedure from step
TSB Revision
Page 167 of 2103
ENGINE OVERHAUL and
A
INSPECTION
O I L C L E A R A N C E
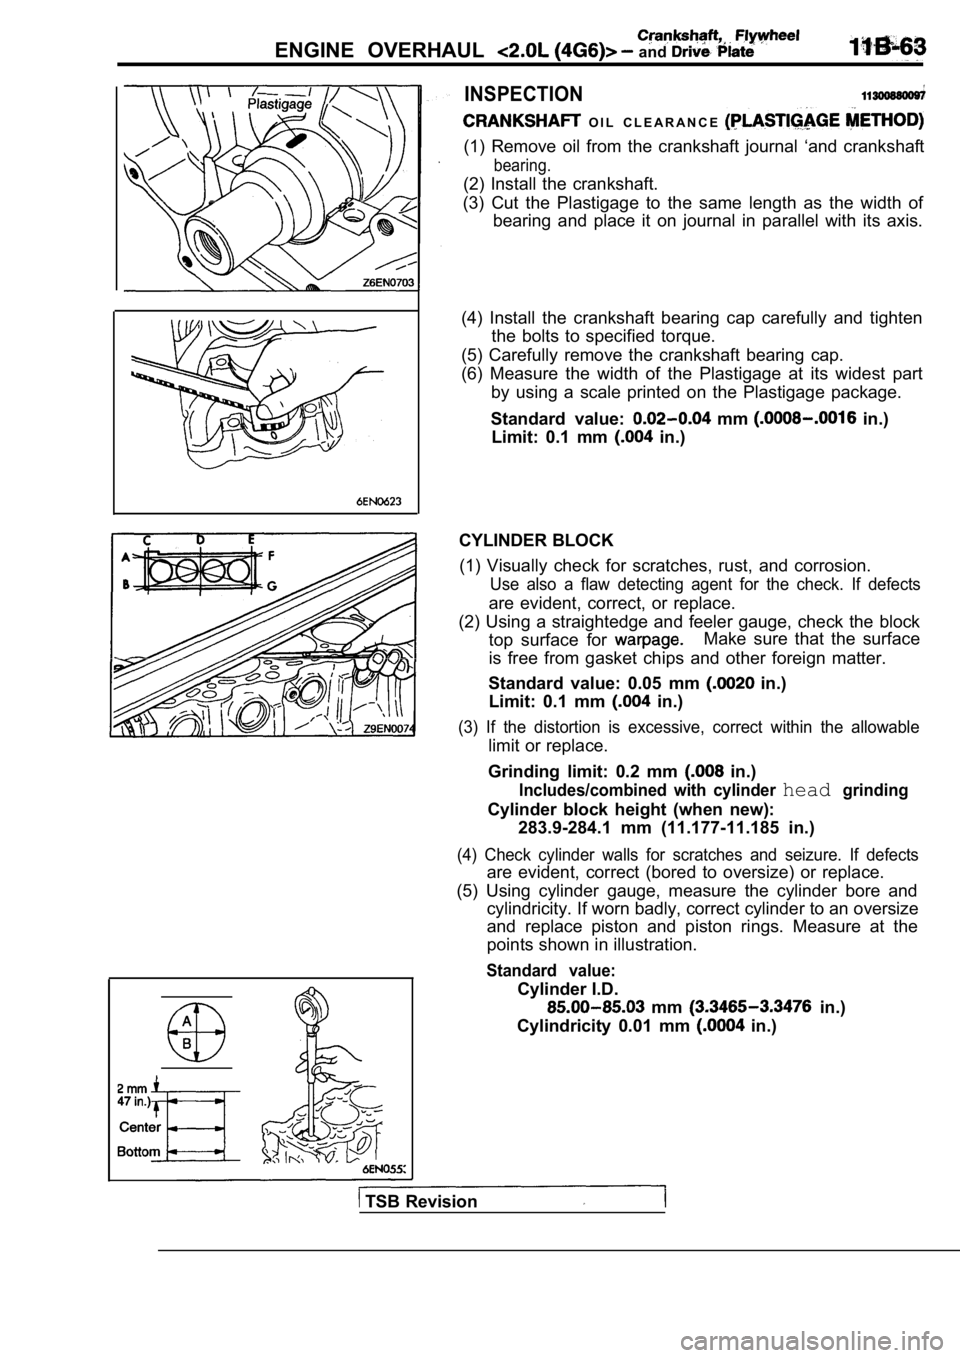
(1) Remove oil from the crankshaft journal ‘and crankshaft
bearing.
(2) Install the crankshaft.
(3) Cut the Plastigage to the same length as the wi dth of
bearing and place it on journal in parallel with it s axis.
(4) Install the crankshaft bearing cap carefully an d tighten
the bolts to specified torque.
(5) Carefully remove the crankshaft bearing cap.
(6) Measure the width of the Plastigage at its wide st part
by using a scale printed on the Plastigage package.
Standard value:
mm in.)
Limit: 0.1 mm
in.)
CYLINDER BLOCK (1) Visually check for scratches, rust, and corrosi on.
Use also a flaw detecting agent for the check. If d efects
are evident, correct, or replace.
(2) Using a straightedge and feeler gauge, check th e block
top surface for
Make sure that the surface
is free from gasket chips and other foreign matter.
Standard value: 0.05 mm
in.)
Limit: 0.1 mm
in.)
(3) If the distortion is excessive, correct within the allowable
limit or replace.
Grinding limit: 0.2 mm
in.)
Includes/combined with cylinder headgrinding
Cylinder block height (when new): 283.9-284.1 mm (11.177-11.185 in.)
(4) Check cylinder walls for scratches and seizure. If defects
are evident, correct (bored to oversize) or replace.
(5) Using cylinder gauge, measure the cylinder bore and
cylindricity. If worn badly, correct cylinder to an oversize
and replace piston and piston rings. Measure at the
points shown in illustration.
Standard value:
Cylinder I.D.
mm in.)
Cylindricity 0.01 mm
in.)
TSB Revision
Page 168 of 2103
ENGINE OVERHAUL and Drive Plate
, Flywheel
Thrustdirection
BORING CYLINDER
(1) Oversize pistons to be used should be determine d
the basis of the largest bore cylinder.
Piston size identification
Size
0.50
1
NOTE
Identification mark
1.00
Size mark is stamped on piston top,
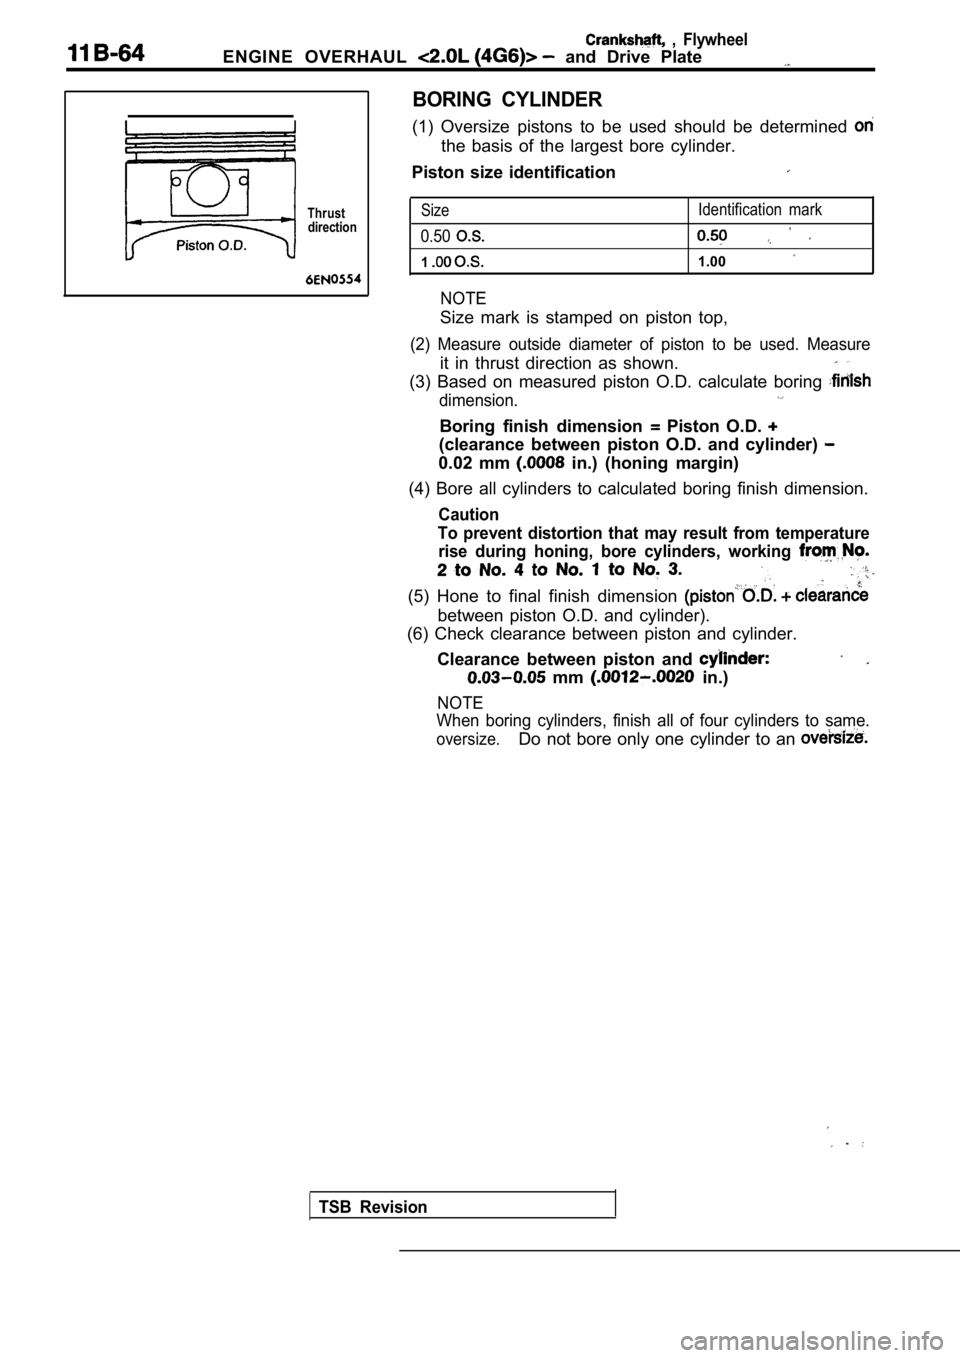
(2) Measure outside diameter of piston to be used. Measure
it in thrust direction as shown.
(3) Based on measured piston O.D. calculate boring
dimension.
Boring finish dimension Piston O.D.
(clearance between piston O.D. and cylinder)
0.02 mm in.) (honing margin)
(4) Bore all cylinders to calculated boring finish dimension.
Caution
To prevent distortion that may result from temperat ure
rise during honing, bore cylinders, working
(5) Hone to final finish dimension
between piston O.D. and cylinder).
(6) Check clearance between piston and cylinder.
Clearance between piston and
mm in.)
NOTE
When boring cylinders, finish all of four cylinders to same.
oversize.Do not bore only one cylinder to an
TSB Revision
Page 171 of 2103
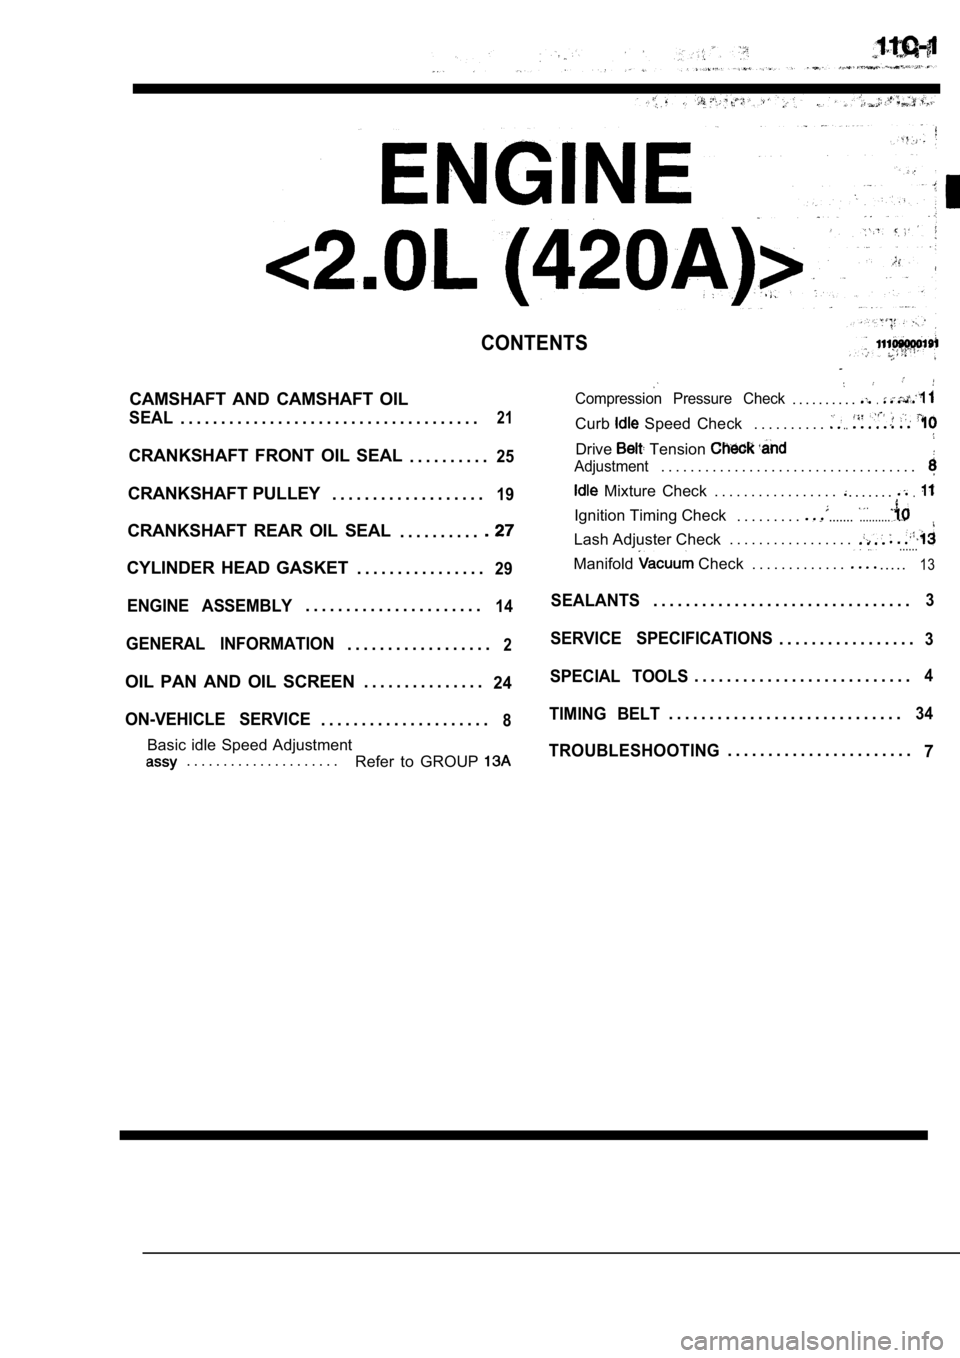
CONTENTS
CAMSHAFT AND CAMSHAFT OIL
SEAL. . . . . . . . . . . . . . . . . . . . . . . . . . . . . . . . . . . . .21
CRANKSHAFT FRONT OIL SEAL. . . . . . . . . .25
CRANKSHAFT PULLEY. . . . . . . . . . . . . . . . . . .19
CRANKSHAFT REAR OIL SEAL
. . . . . . . . . .
CYLINDER HEAD GASKET. . . . . . . . . . . . . . . .29
ENGINE ASSEMBLY. . . . . . . . . . . . . . . . . . . . . .14
GENERAL INFORMATION. . . . . . . . . . . . . . . . . .2
OIL PAN AND OIL SCREEN . . . . . . . . . . . . . . .24
ON-VEHICLE SERVICE
. . . . . . . . . . . . . . . . . . . . .8
Basic idle Speed Adjustment. . . . . . . . . . . . . . . . . . . . . Refer to GROUP
Compression Pressure Check. . . . . . . . . ..
Curb Speed Check . . . . . . . . . ...
Drive Tension
Adjustment. . . . . . . . . . . . . . . . . . . . . . . . . . . . . . . . . . .
Mixture Check . . . . . . . . . . . . . . . . .. . . . . . ..
Ignition Timing Check. . . . . . . . .....................
Lash Adjuster Check . . . . . . . . . . . . . . . . .
......
. . . . .
Manifold Check . . . . . . . . . . . . .13
SEALANTS. . . . . . . . . . . . . . . . . . . . . . . . . . . . . . . .3
SERVICE SPECIFICATIONS. . . . . . . . . . . . . . . . .3
SPECIAL TOOLS. . . . . . . . . . . . . . . . . . . . . . . . . . .4
TIMING BELT. . . . . . . . . . . . . . . . . . . . . . . . . . . . .34
TROUBLESHOOTING. . . . . . . . . . . . . . . . . . . . . . .
7
Page 173 of 2103
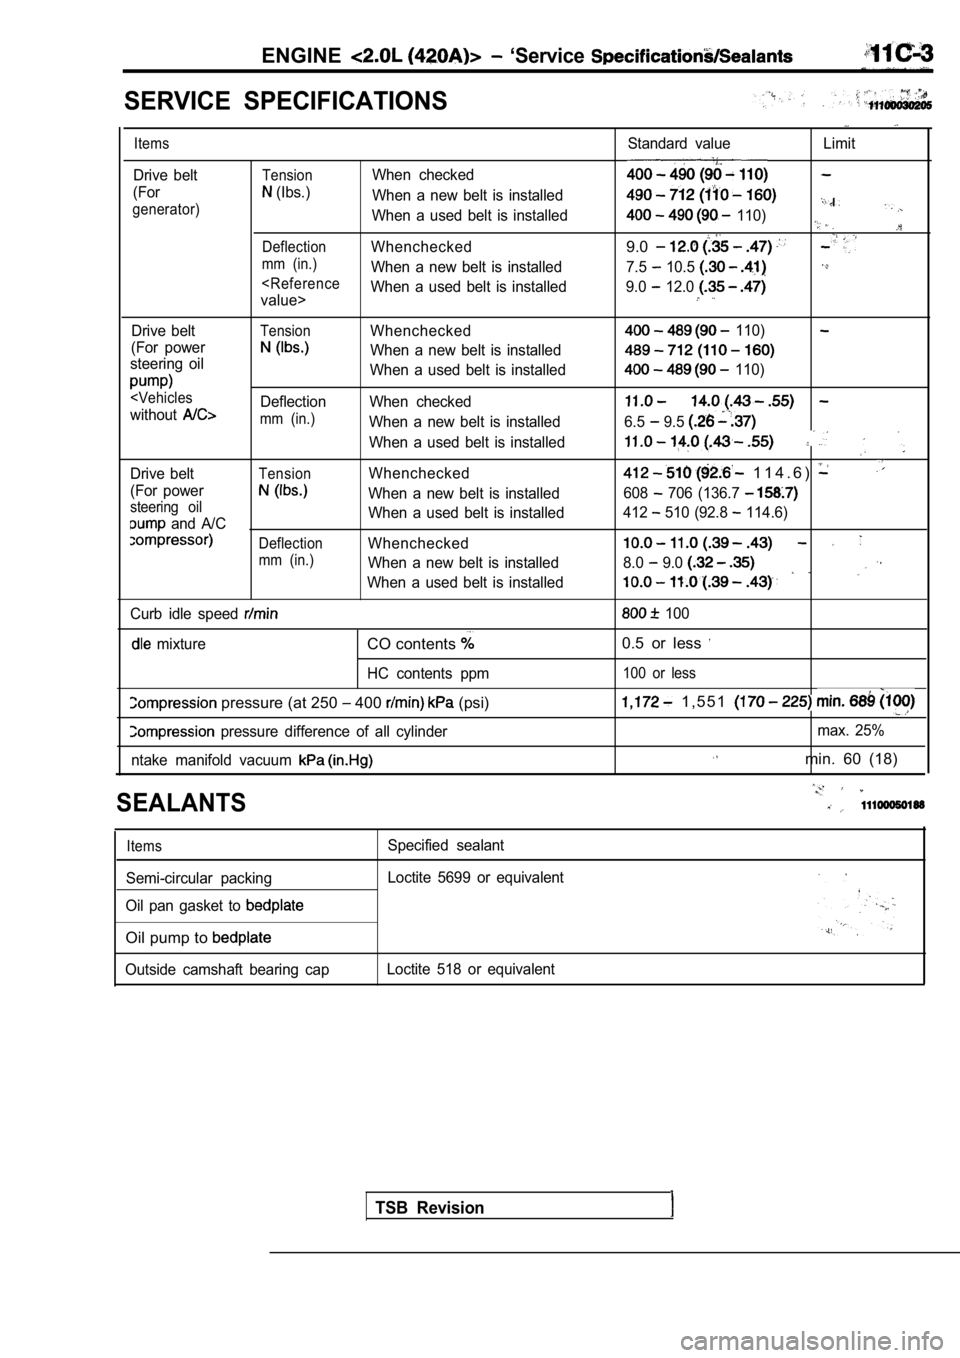
ENGINE ‘Service
SERVICE SPECIFICATIONS
Items
Drive belt
(For
generator)
Standard value Limit
TensionWhen checked
(Ibs.) When a new belt is installed
When a used belt is installed
110)
DeflectionWhenchecked9.0
mm (in.)When a new belt is installed 7.5 10.5
Drive beltTensionWhenchecked
(For power
When a new belt is installed
steering oil
When a used belt is installed
mm (in.)When a new belt is installed
When a used belt is installed
Drive belt
TensionWhenchecked
(For power
When a new belt is installedsteering oil
and A/C When a used belt is installed
DeflectionWhenchecked
mm (in.)When a new belt is installed
When a used belt is installed
Curb idle speed
mixtureCO contents
HC contents ppm
pressure (at 250 400 (psi)
pressure difference of all cylinder
ntake manifold vacuum
110)
110)
6.5 9.5
1 1 4 . 6 )
608 706 (136.7
412 510 (92.8 114.6)
8.0 9.0
100
0.5 or less
100 or less
1 , 5 5 1
max. 25%
min. 60 (18)
SEALANTS
Items
Semi-circular packing
Oil pan gasket to
Oil pump to
Outside camshaft bearing cap Specified sealant
Loctite 5699 or equivalent
Loctite 518 or equivalent
TSB Revision
Page 177 of 2103
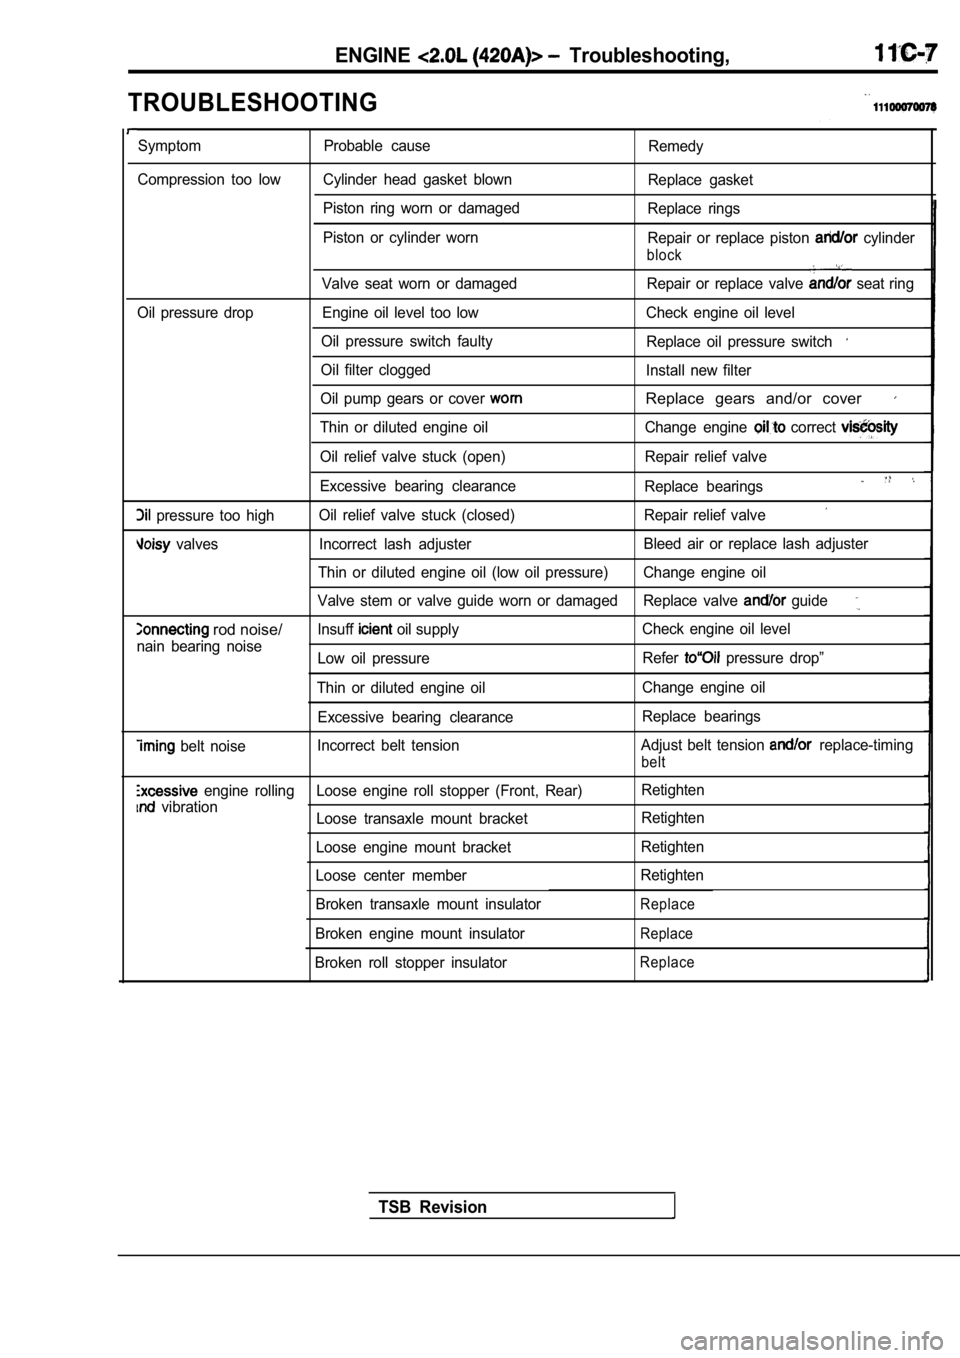
ENGINE Troubleshooting,
TROUBLESHOOTING
Symptom Probable causeRemedy
Compression too low Cylinder head gasket blown Replace gasket
Piston ring worn or damaged Replace rings
Piston or cylinder worn Repair or replace piston
cylinder
block
Valve seat worn or damaged Repair or replace valve seat ring
Oil pressure drop Engine oil level too low Check engi ne oil level
Oil pressure switch faulty Replace oil pressure switch
Oil filter clogged
Install new filter
Oil pump gears or cover
Replace gears and/or cover
Thin or diluted engine oil Change engine correct
Oil relief valve stuck (open) Repair relief valve
Excessive bearing clearance Replace bearings
pressure too highOil relief valve stuck (closed) Repair relief valve
valves Incorrect lash adjuster Bleed air or replace lash adjuster
Thin or diluted engine oil (low oil pressure) Change engine oil
Valve stem or valve guide worn or damaged Replace va lve
guide
rod noise/lnsuff oil supplyCheck engine oil level
nain bearing noise Low oil pressure Refer
pressure drop”
Thin or diluted engine oil Change engine oil
Excessive bearing clearance Replace bearings
belt noiseIncorrect belt tension
Adjust belt tension replace-timing
belt
engine rolling Loose engine roll stopper (Front, Re
ar)Retighten
vibration
Loose transaxle mount bracket Retighten
Loose engine mount bracket Retighten
Loose center member Retighten
Broken transaxle mount insulator
Replace
Broken engine mount insulatorReplace
Broken roll stopper insulatorReplace
TSB Revision