1990 MITSUBISHI SPYDER check engine
[x] Cancel search: check enginePage 382 of 2103
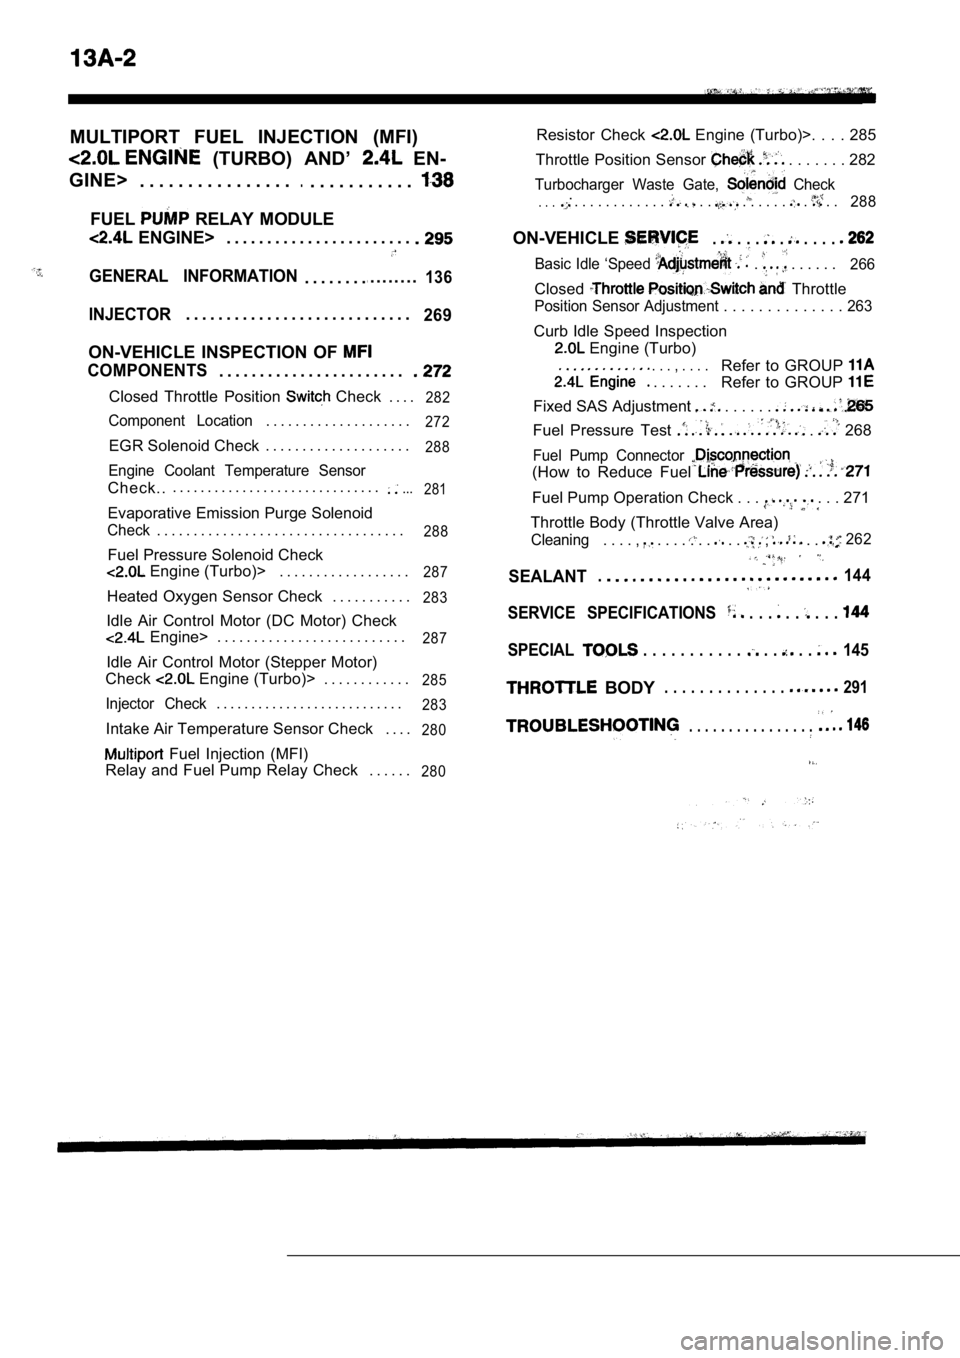
MULTIPORT FUEL INJECTION (MFI)
(TURBO) AND’ EN-
GINE> . . . . . . . . . . . . . . . .
.. . . . . . . . . . .
FUEL RELAY MODULE
ENGINE> . . . . . . . . . . . . . . . . . . . . . . .
GENERAL INFORMATION. . . . . . . ... . . . . . . .136
INJECTOR. . . . . . . . . . . . . . . . . . . . . . . . . . . .269
ON-VEHICLE INSPECTION OF
COMPONENTS. . . . . . . . . . . . . . . . . . . . . . .
Closed Throttle Position Check . . . .282
Component Location. . . . . . . . . . . . . . . . . . . .272
EGR Solenoid Check . . . . . . . . . . . . . . . . . . . .288
Engine Coolant Temperature Sensor
Check... . . . . . . . . . . . . . . . . . . . . . . . . . . . . ....
281
Evaporative Emission Purge Solenoid
Check. . . . . . . . . . . . . . . . . . . . . . . . . . . . . . . . . .288
Fuel Pressure Solenoid Check
Engine (Turbo)> . . . . . . . . . . . . . . . . . .287
Heated Oxygen Sensor Check . . . . . . . . . . .283
Idle Air Control Motor (DC Motor) Check
Engine> . . . . . . . . . . . . . . . . . . . . . . . . . .287
Idle Air Control Motor (Stepper Motor)
Check
Engine (Turbo)> . . . . . . . . . . . .285
Injector Check. . . . . . . . . . . . . . . . . . . . . . . . . . .283
Intake Air Temperature Sensor Check . . . .280
Fuel Injection (MFI)
Relay and Fuel Pump Relay Check . . . . . .
280
Resistor Check Engine (Turbo)>. . . . 285
Throttle Position Sensor
. . . . . . . 282
Turbocharger Waste Gate, Check.. . . . . . . . . . . . . . . . . . . . . . . . . .288
ON-VEHICLE. . . . . . . . .
Basic Idle ‘Speed . . . . . . . 266
Closed Throttle
Position Sensor Adjustment . . . . . . . . . . . . . . 263
Curb Idle Speed Inspection
Engine (Turbo)
. . . , . . . .
. . . . . . .
Refer to GROUP
Refer to GROUP
Fixed SAS Adjustment . . . . . .
Fuel Pressure Test . 268
Fuel Pump Connector
(How to Reduce Fuel
Fuel Pump Operation Check . . . . . . 271
Throttle Body (Throttle Valve Area)
Cleaning. . . . , . . . . . . . . . , . . 262
SEALANT.144
SERVICE SPECIFICATIONS . . . . . . . .
SPECIAL . . . . . . . . . . . . . . . 145
BODY. . . . . . . . . . . . . . 291
. . . . . . . . . . . . . . . .
Page 384 of 2103
ENGINE (NON-TURBO)>
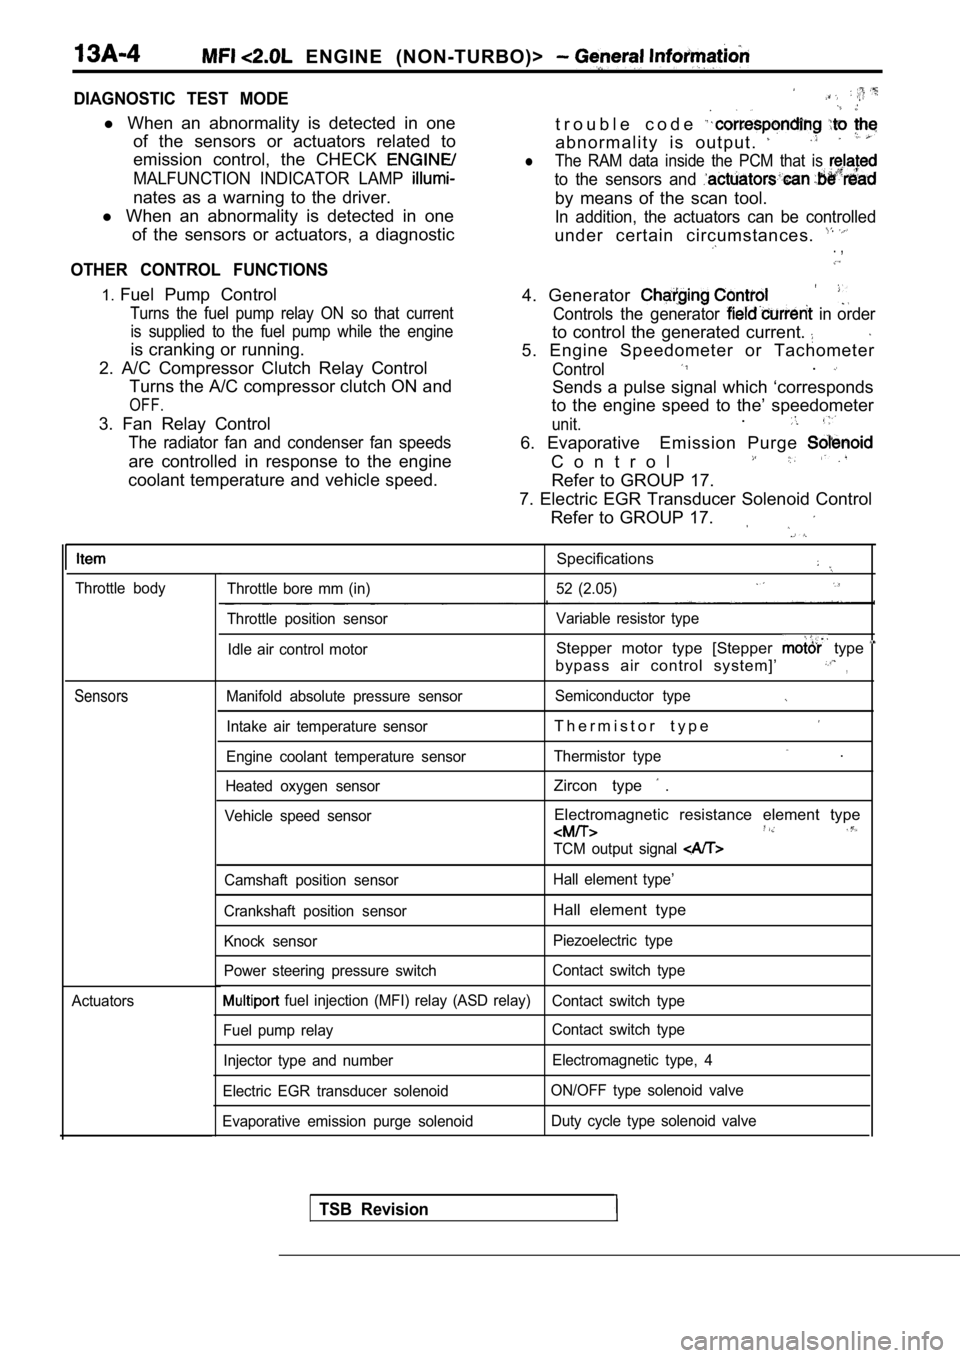
DIAGNOSTIC TEST MODE
l When an abnormality is detected in one
of the sensors or actuators related to
emission control, the CHECK
MALFUNCTION INDICATOR LAMP
nates as a warning to the driver.
l When an abnormality is detected in one
of the sensors or actuators, a diagnostic
OTHER CONTROL FUNCTIONS
t r o u b l e c o d e
a b n o r m a l i t y i s o u t p u t .
lThe RAM data inside the PCM that is
to the sensors and
by means of the scan tool.
In addition, the actuators can be controlled
under certain circumstances. . ,
1. Fuel Pump Control
Turns the fuel pump relay ON so that current
is supplied to the fuel pump while the engine
is cranking or running.
2. A/C Compressor Clutch Relay Control Turns the A/C compressor clutch ON and
OFF.
3. Fan Relay Control
The radiator fan and condenser fan speeds
are controlled in response to the engine
coolant temperature and vehicle speed. 4. Generator
Controls the generator in order
to control the generated current.
5. Engine Speedometer or Tachometer
Control.
Sends a pulse signal which ‘corresponds
to the engine speed to the’ speedometer
unit..
6. Evaporative Emission Purge
C o n t r o l
Refer to GROUP 17.
7. Electric EGR Transducer Solenoid Control Refer to GROUP 17.
Throttle body
Sensors
Actuators
Specifications
Throttle bore mm (in) 52 (2.05)
Throttle position sensor Variable resistor type
Idle air control motor
Stepper motor type [Stepper type
bypass air control system]’,
Manifold absolute pressure sensor Semiconductor type
Intake air temperature sensorT h e r m i s t o r t y p e
Engine coolant temperature sensorThermistor type .
Heated oxygen sensorZircon type .
Vehicle speed sensorElectromagnetic resistance element type
TCM output signal
Camshaft position sensor Hall element type’
Crankshaft position sensor
Hall element type
Knock sensor Piezoelectric type
Power steering pressure switch Contact switch type
fuel injection (MFI) relay (ASD relay)
Contact switch type
Fuel pump relay Contact switch type
Injector type and number Electromagnetic type, 4
Electric EGR transducer solenoid ON/OFF type solenoid valve
Evaporative emission purge solenoid Duty cycle type solenoid valve
TSB Revision
Page 388 of 2103
ENGINE (NON-TURBO)> Troubleshooting
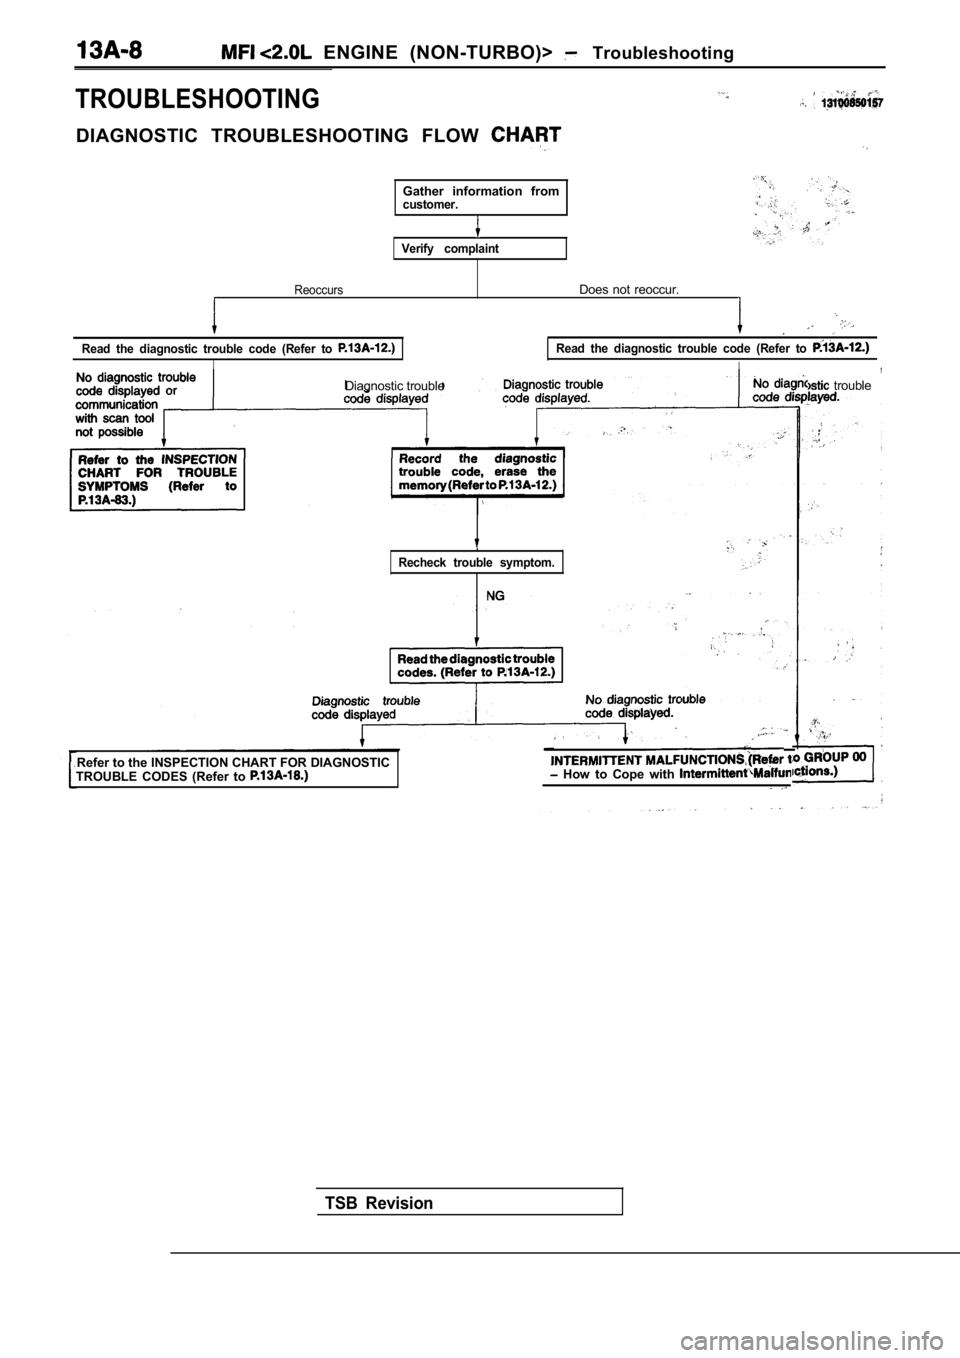
TROUBLESHOOTING
DIAGNOSTIC TROUBLESHOOTING FLOW
Gather information fromcustomer.
Verify complaint
Reoccurs
Read the diagnostic trouble code (Refer to
I
Does not reoccur.
.
Read the diagnostic trouble code (Refer to
I
Diagnostic trouble trouble
Recheck trouble symptom.
Refer to the INSPECTION CHART FOR DIAGNOSTIC
TROUBLE CODES (Refer to How to Cope with
TSB Revision
Page 389 of 2103
ENGINE (NON-TURBO)>
TEST MODE
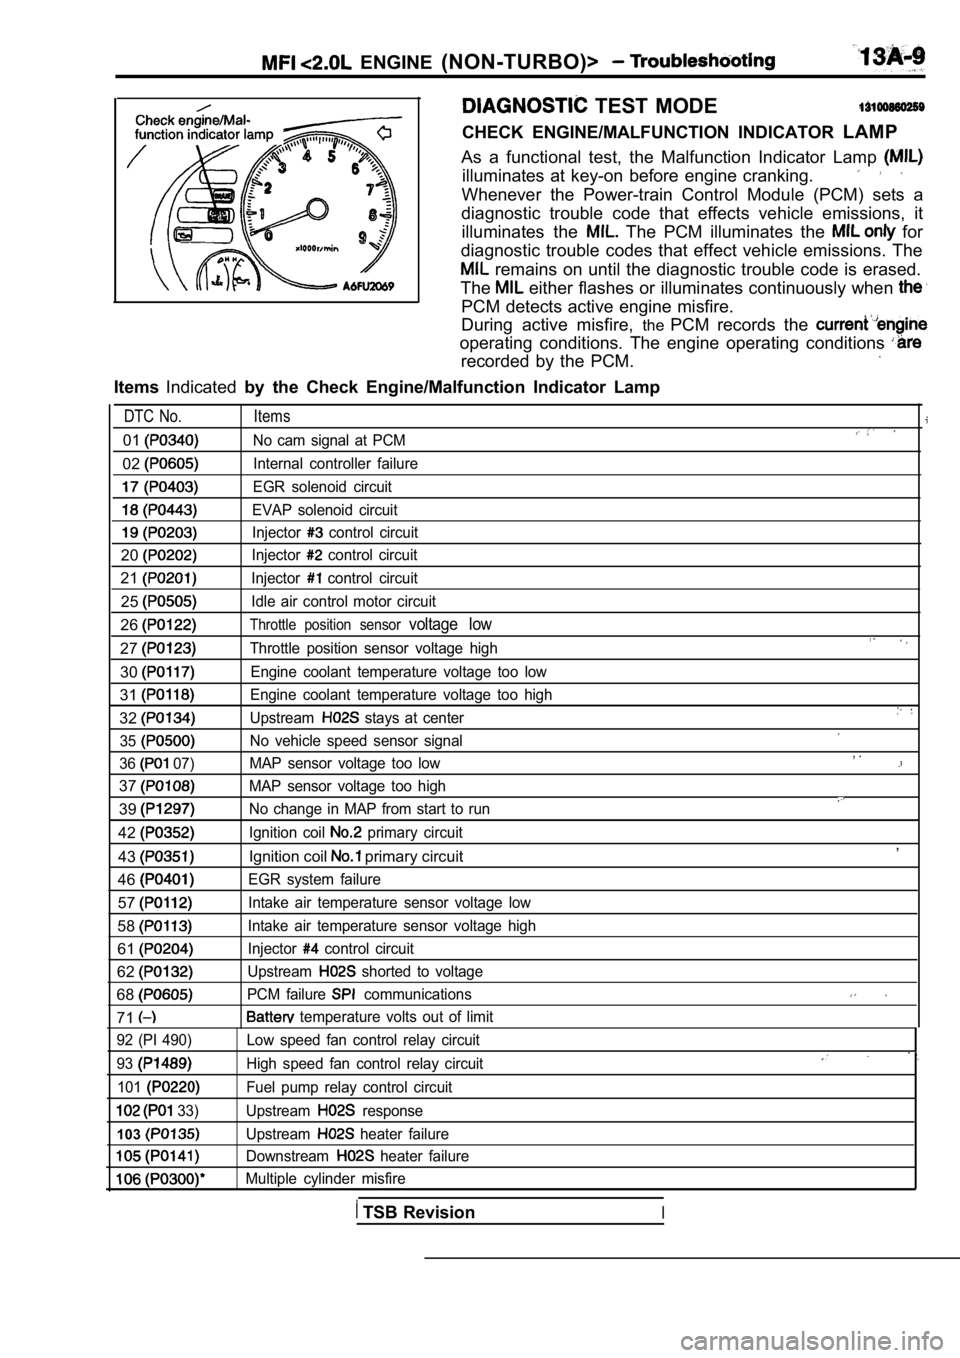
CHECK ENGINE/MALFUNCTION INDICATOR LAMP
As a functional test, the Malfunction Indicator Lam p
illuminates at key-on before engine cranking.
Whenever the Power-train Control Module (PCM) sets a
diagnostic trouble code that effects vehicle emissi ons, it
illuminates the
The PCM illuminates the for
diagnostic trouble codes that effect vehicle emissi ons. The
remains on until the diagnostic trouble code is erased.
The
either flashes or illuminates continuously when
PCM detects active engine misfire.
During active misfire, thePCM records the
operating conditions. The engine operating conditio ns
recorded by the PCM.
ItemsIndicated by the Check Engine/Malfunction Indicator Lamp
DTC No. Items
01No cam signal at PCM
02Internal controller failure
EGR solenoid circuit
EVAP solenoid circuit
Injector control circuit
20Injector control circuit
21Injector control circuit
25Idle air control motor circuit
26Throttle position sensor voltage low
27Throttle position sensor voltage high
30Engine coolant temperature voltage too low
31Engine coolant temperature voltage too high
32Upstream stays at center
35
No vehicle speed sensor signal
36
07) MAP sensor voltage too low
37MAP sensor voltage too high
39No change in MAP from start to run
42Ignition coil primary circuit
43Ignition coil primary circuit
46
EGR system failure
57Intake air temperature sensor voltage low
58Intake air temperature sensor voltage high
61Injector control circuit
62Upstream shorted to voltage
68PCM failure communications
71 temperature volts out of limit
, .
,
92 (PI 490)
93
101
33)
103
Low speed fan control relay circuit
High speed fan control relay circuit
Fuel pump relay control circuit
Upstream
response
Upstream
heater failure
Downstream
heater failure
Multiple cylinder misfire
TSB RevisionI
Page 390 of 2103
ENGINE (NON-TURBO)> Troubleshooting
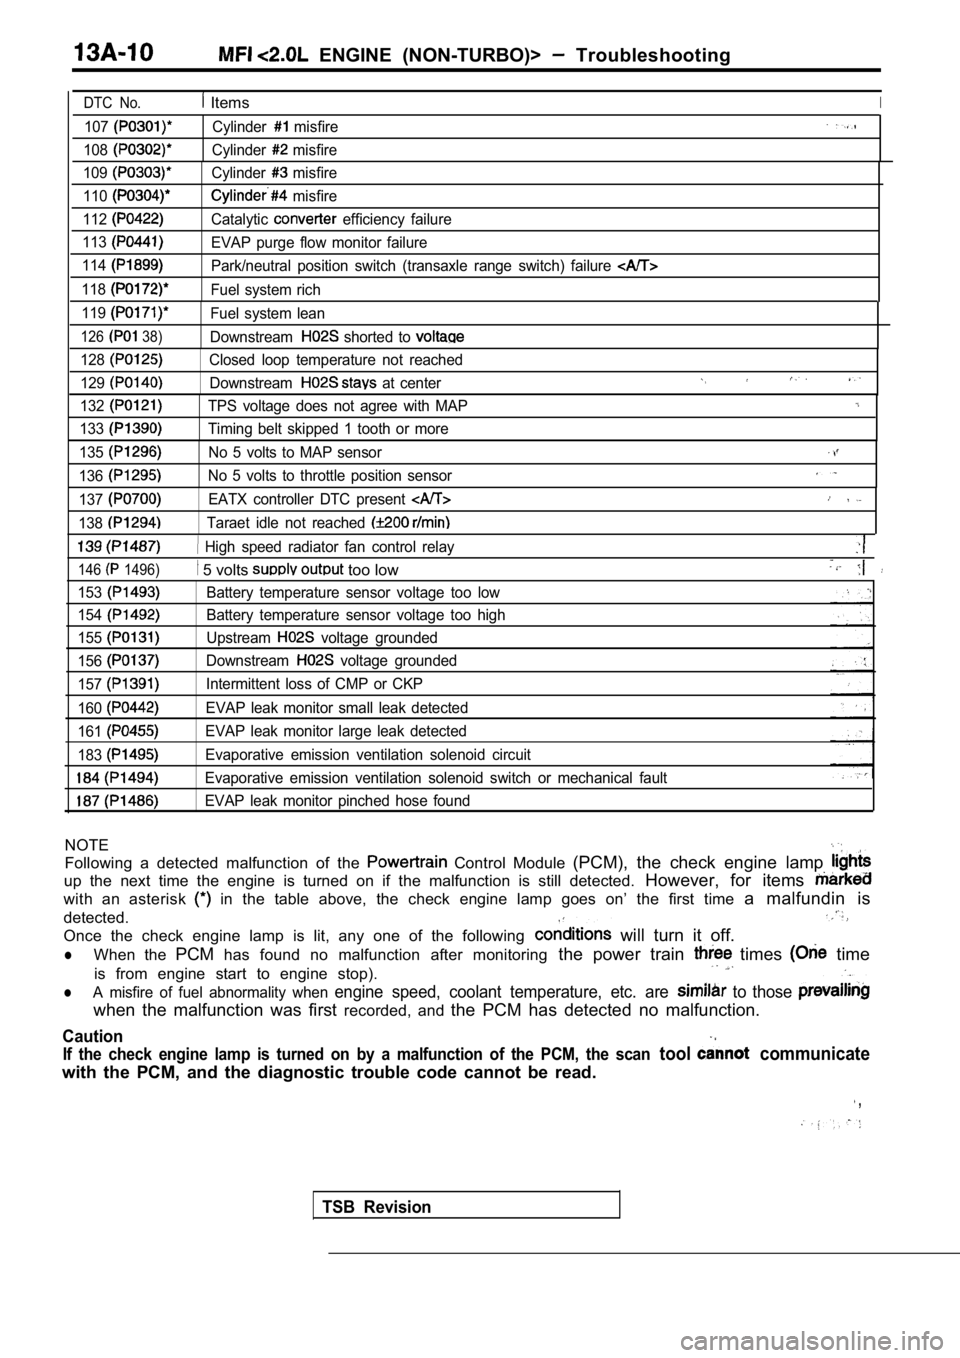
DTC No. ItemsI
107
108
109
110
112
113
114
118
119
126 38)
Cylinder misfire
Cylinder
misfire
Cylinder
misfire
misfire
Catalytic
efficiency failure
EVAP purge flow monitor failure
Park/neutral position switch (transaxle range switc h) failure
Fuel system rich
Fuel system lean
Downstream
shorted to
128Closed loop temperature not reached
129
Downstream at center
132
133
TPS voltage does not agree with MAP
Timing belt skipped 1 tooth or more
135No 5 volts to MAP sensor
136No 5 volts to throttle position sensor
137EATX controller DTC present
138Taraet idle not reached
High speed radiator fan control relay
146 1496)
153
154
155
156
157
160
161
183
5 volts too low
Battery temperature sensor voltage too low
Battery temperature sensor voltage too high
Upstream
voltage grounded
Downstream
voltage grounded
Intermittent loss of CMP or CKP
EVAP leak monitor small leak detected
EVAP leak monitor large leak detected
Evaporative emission ventilation solenoid circuit
Evaporative emission ventilation solenoid switch or mechanical fault
EVAP leak monitor pinched hose found
NOTE
Following a detected malfunction of the Control Module (PCM), the check engine lamp
up the next time the engine is turned on if the mal function is still detected. However, for items
with an asterisk in the table above, the check engine lamp goes on’ the first time a malfundin is
detected.
Once the check engine lamp is lit, any one of the f ollowing
will turn it off.
lWhen the PCMhas found no malfunction after monitoring the power train times time
is from engine start to engine stop).
lA misfire of fuel abnormality when engine speed, coolant temperature, etc. are to those
when the malfunction was first recorded, and the PCM has detected no malfunction.
Caution
If the check engine lamp is turned on by a malfunct ion of the PCM, the scan tool communicate
with the PCM, and the diagnostic trouble code canno t be read.
,
TSB Revision
Page 391 of 2103
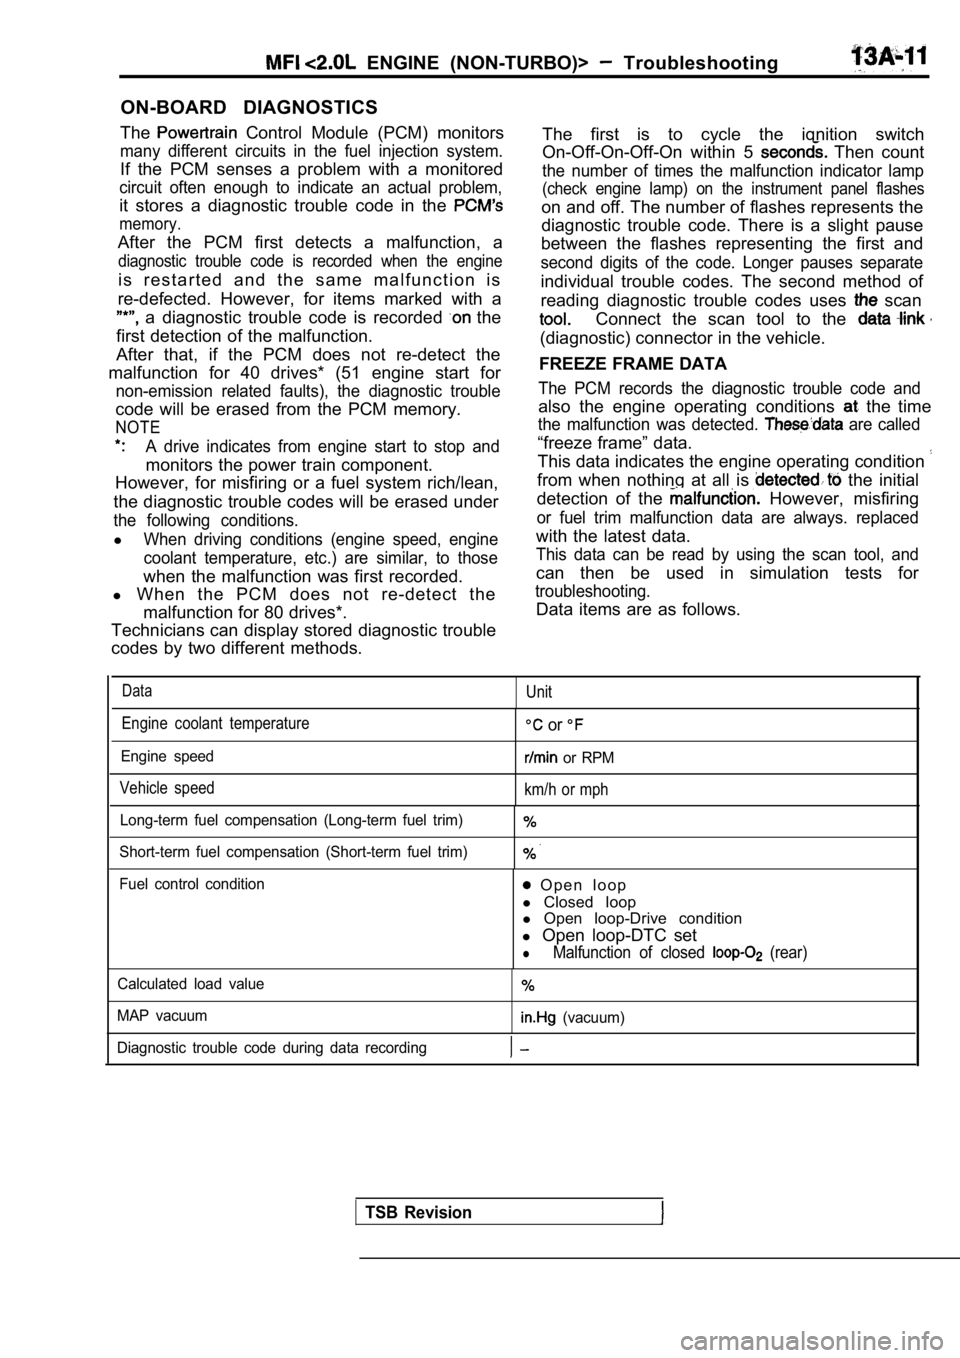
ON-BOARD DIAGNOSTICS
The
Control Module (PCM) monitors
many different circuits in the fuel injection syste m.
If the PCM senses a problem with a monitored
circuit often enough to indicate an actual problem,
it stores a diagnostic trouble code in the
memory.
After the PCM first detects a malfunction, a
diagnostic trouble code is recorded when the engine
i s r e s t a r t e d a n d t h e s a m e m a l f u n c t i o n i s
re-defected. However, for items marked with a
a diagnostic trouble code is recorded the
first detection of the malfunction.
After that, if the PCM does not re-detect the
malfunction for 40 drives* (51 engine start for
non-emission related faults), the diagnostic troubl e
code will be erased from the PCM memory.
NOTE
A drive indicates from engine start to stop and
monitors the power train component.
However, for misfiring or a fuel system rich/lean,
the diagnostic trouble codes will be erased under
the following conditions.
lWhen driving conditions (engine speed, engine
coolant temperature, etc.) are similar, to those
when the malfunction was first recorded.
l When the PCM does not re-detect the
malfunction for 80 drives*.
Technicians can display stored diagnostic trouble
codes by two different methods.
ENGINE (NON-TURBO)> Troubleshooting
The first is to cycle the ignition switch
On-Off-On-Off-On within 5
Then count
the number of times the malfunction indicator lamp
(check engine lamp) on the instrument panel flashes
on and off. The number of flashes represents the
diagnostic trouble code. There is a slight pause
between the flashes representing the first and
second digits of the code. Longer pauses separate
individual trouble codes. The second method of
reading diagnostic trouble codes uses
scan
Connect the scan tool to the
(diagnostic) connector in the vehicle.
FREEZE FRAME DATA
The PCM records the diagnostic trouble code and
also the engine operating conditions the time
the malfunction was detected. are called
“freeze frame” data.
This data indicates the engine operating condition
from when nothing at all is the initial
detection of the
However, misfiring
or fuel trim malfunction data are always. replaced
with the latest data.
This data can be read by using the scan tool, and
can then be used in simulation tests for
troubleshooting.
Data items are as follows.
DataUnit
Engine coolant temperature
Engine speed
Vehicle speed
or
or RPM
km/h or mph
Long-term fuel compensation (Long-term fuel trim)
Short-term fuel compensation (Short-term fuel trim)
Fuel control condition O p e n l o o p
l Closed loop
l Open loop-Drive condition
l Open loop-DTC set
lMalfunction of closed (rear)
Calculated load value
MAP vacuum
(vacuum)
Diagnostic trouble code during data recording
TSB Revision
Page 392 of 2103
ENGINE (NON-TURBO)> Troubleshooting.
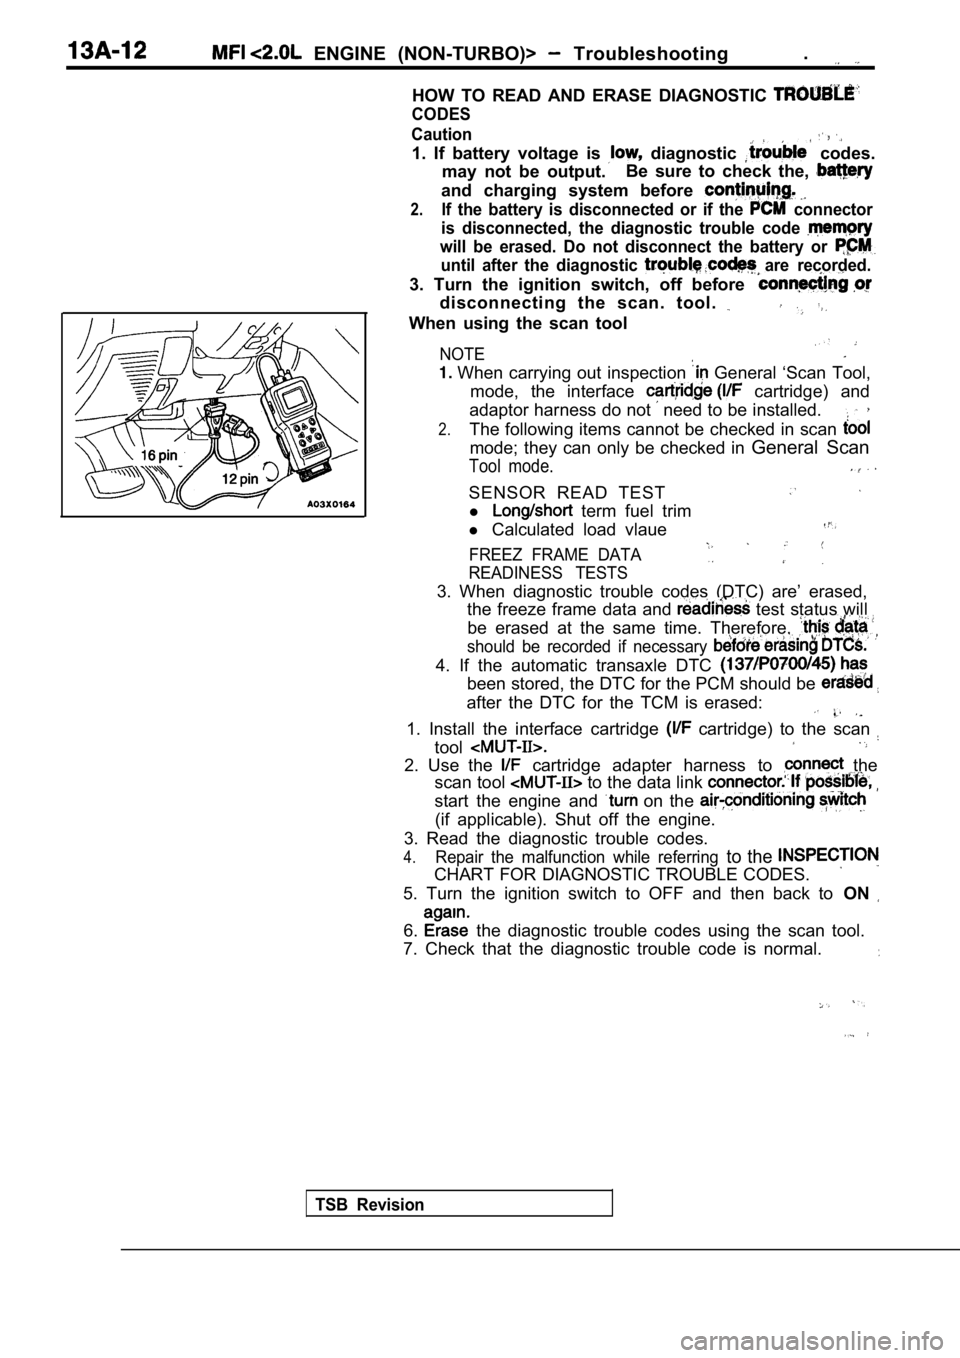
HOW TO READ AND ERASE DIAGNOSTIC
CODES
TSB Revision Caution
1. If battery voltage is diagnostic codes.
may not be output. Be sure to check the,
and charging system before
2.If the battery is disconnected or if the connector
is disconnected, the diagnostic trouble code
will be erased. Do not disconnect the battery or
until after the diagnostic are recorded.
3. Turn the ignition switch, off before
disconnecting the scan. tool.
When using the scan tool
NOTE
When carrying out inspection General ‘Scan Tool,
mode, the interface
cartridge) and
adaptor harness do not
need to be installed.
2.The following items cannot be checked in scan
mode; they can only be checked in General Scan
Tool mode.
SENSOR READ TEST
l term fuel trim
l Calculated load vlaue
FREEZ FRAME DATA
READINESS TESTS
3. When diagnostic trouble codes (DTC) are’ erased,
the freeze frame data and
test status will
be erased at the same time. Therefore,
should be recorded if necessary
4. If the automatic transaxle DTC
been stored, the DTC for the PCM should be
after the DTC for the TCM is erased:
1. Install the interface cartridge cartridge) to the scan
tool
2. Use the cartridge adapter harness to the
scan tool
to the data link
start the engine and on the
(if applicable). Shut off the engine.
3. Read the diagnostic trouble codes.
4.Repair the malfunction while referring to the
CHART FOR DIAGNOSTIC TROUBLE CODES.
5. Turn the ignition switch to OFF and then back to ON
6. the diagnostic trouble codes using the scan tool.
7. Check that the diagnostic trouble code is normal .
Page 393 of 2103
ENGINE (NON-TURBO)> Troubleshooting 3
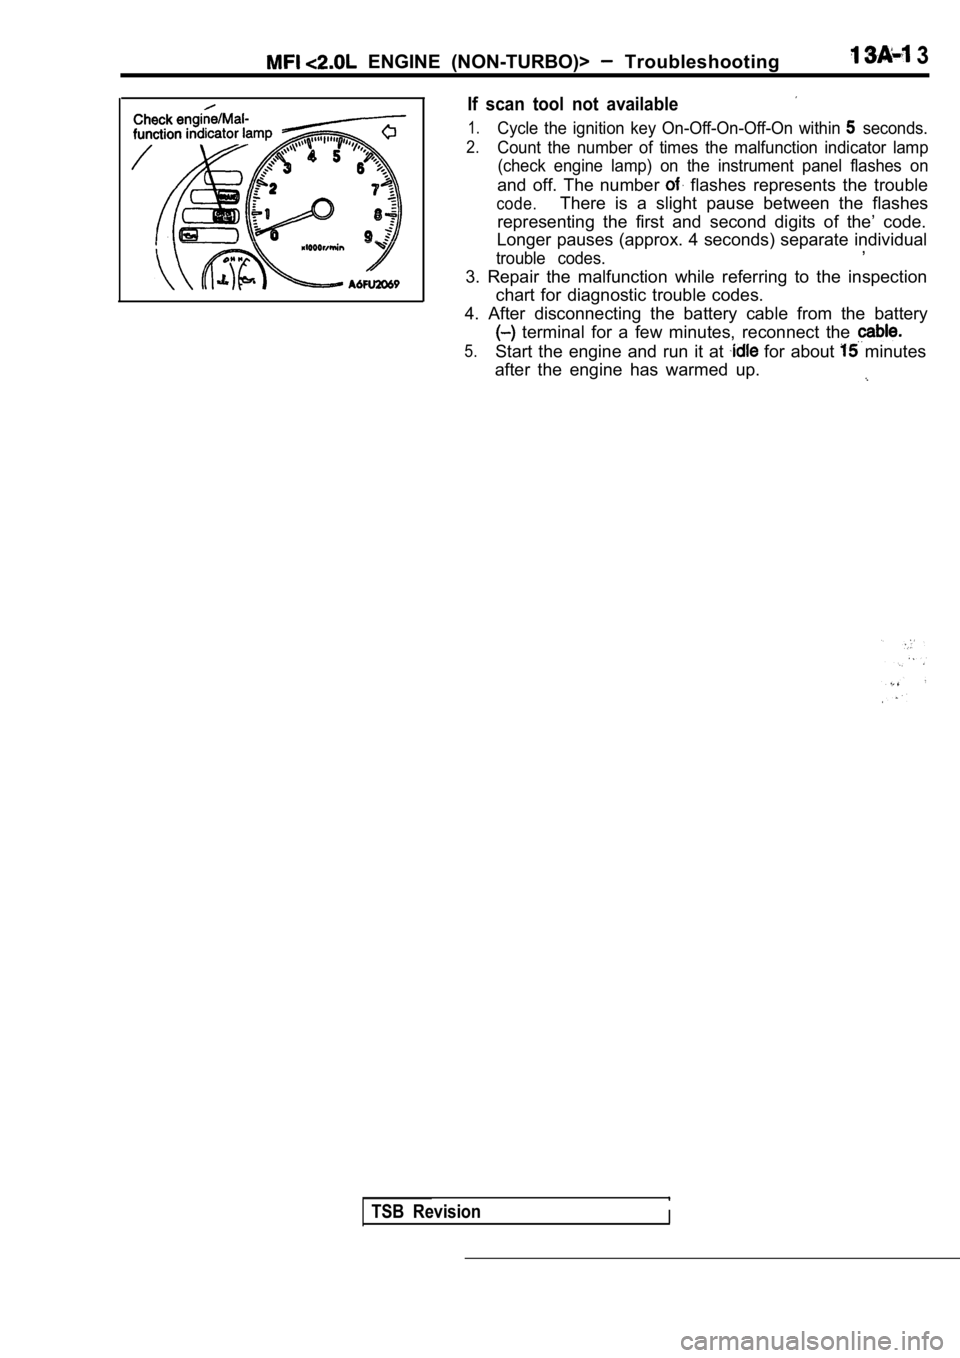
If scan tool not available
1.Cycle the ignition key On-Off-On-Off-On within seconds.
2.Count the number of times the malfunction indicator lamp
(check engine lamp) on the instrument panel flashes on
and off. The number flashes represents the trouble
code.There is a slight pause between the flashes
representing the first and second digits of the’ co de.
Longer pauses (approx. 4 seconds) separate individu al
,
trouble codes.
3. Repair the malfunction while referring to the in spection
chart for diagnostic trouble codes.
4. After disconnecting the battery cable from the b attery
terminal for a few minutes, reconnect the
5.Start the engine and run it at for about minutes
after the engine has warmed up.
TSB RevisionI