1988 PONTIAC FIERO lights
[x] Cancel search: lightsPage 1422 of 1825
INSTRUMENT PANEL: DlGlTAL CLUSTER a
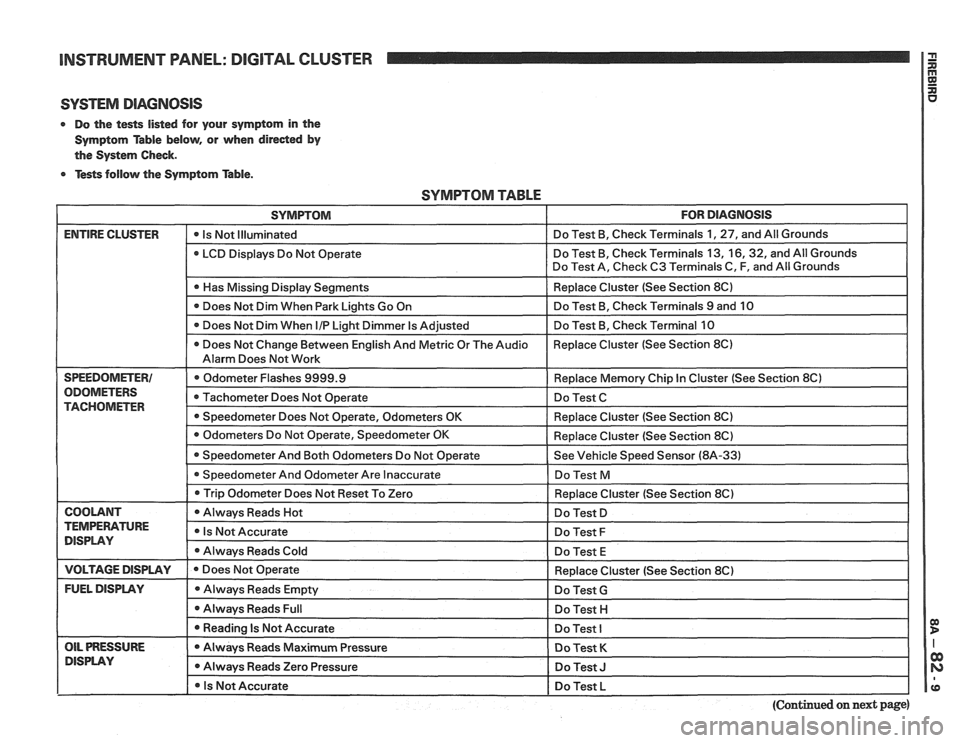
SYSTEM DIAGNOSIS
0 Do the tests listed for your symptom in the
Symptom Table below, or when
direded by
the System Check.
0 Tests follow the Symptom Table.
SYMPTOM TABLE
SYMPTOM FOR DIAGNOSIS
ENTIRE CLUSTER - -
0 Is Not Illuminated Do
Test B, Check Terminals 1, 27, and All Grounds
LCD Displays Do Not Operate Do
Test B, Check Terminals 13,
16,32, and All Grounds
Do Test A, Check C3 Terminals C, F, and All Grounds
I 0 Has Missing Display Senments I Replace Cluster (See Section 8C) I
Does Not Dim When Park Lights Go On Do
Test B, Check Terminals 9 and 10
Does Not Dim When
I/P Light Dimmer Is Adjusted Do
Test B, Check Terminal 10
0 Does Not Change Between English And Metric Or The Audio Replace
Cluster (See Section 8C)
Alarm Does Not Work
SPEEDOMETER1 Odometer Flashes 9999.9 Replace Memory Chip In Cluster (See Section 8Cl
ODOMETERS Tachometer Does Not Operate Do Test C TACHOMETER 0 Speedometer Does Not Operate, Odometers OK Replace Cluster (See Section 8C)
I 0 Trip Odometer Does ~otReset To Zero I Redace Cluster (See Section 8C) I
I COOLANT I 0 Always Reads Hot I Do Test D I
TEMPERATURE Is Not Accurate DISPLAY Do Test F
Always Reads Cold
Do Test E
I VOLTAGE DISPLAY I e Does Not Operate
FUEL DISPLAY Always Reads Empty
0 Always Reads Full
I 0 Reading Is Not Accurate - --
OIL PRESSURE Always Reads Maximum Pressure
DlSPLAV 0 Always Reads Zero Pressure
I 0 Is Not Accurate Replace
Cluster (See Section 8C)
Do Test
G
Do Test H I
Do Test I
Do Test K
Do Test J I
Do Test L I pp
(Continued on next page)
Page 1428 of 1825
INSTRUMENT PANEL: DIGITAL CLUSTER n 23 rn E
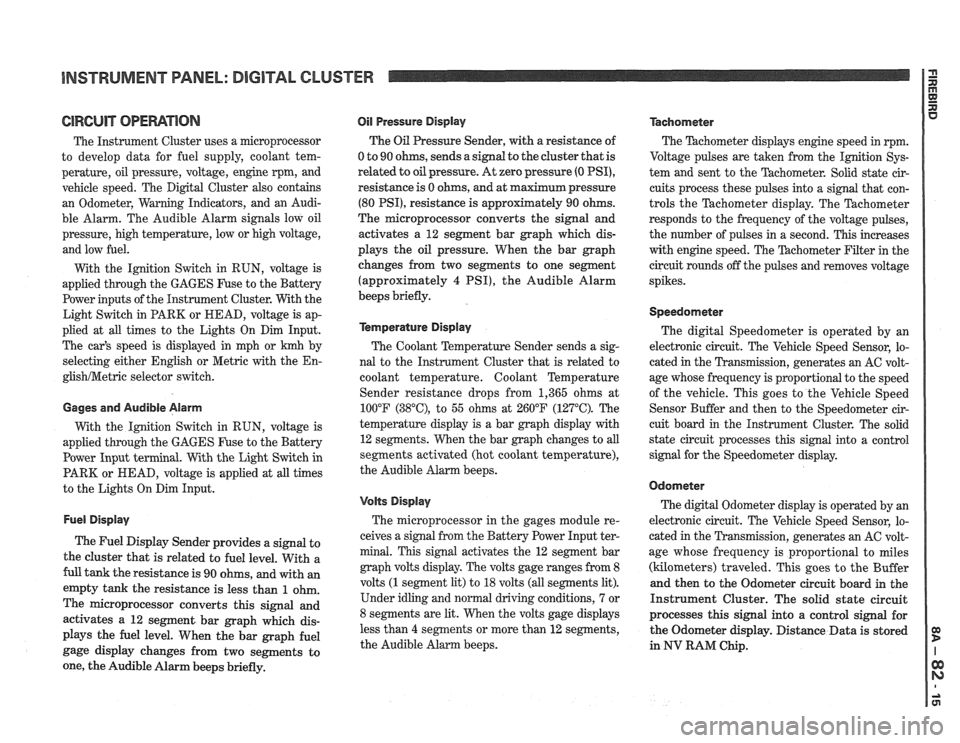
ClRCUlT OPERATION
The Instrument Cluster uses a microprocessor
to develop data for fuel supply, coolant tem-
perature, oil pressure, voltage, engine rpm, and
vehicle speed. The Digital Cluster also contains
an Odometer, Warning Indicators, and an Audi-
ble Alarm. The Audible Alarm signals low oil
pressure, high temperature, low or high voltage,
and low fuel.
With the Ignition Switch in RUN, voltage is
applied through the GAGES Fuse to the Battery
Power inputs of the Instrument Cluster. With the
Light Switch in PARK or HEAD, voltage is ap-
plied at all times to the Lights On Dim Input.
The car's speed is displayed in mph or
krnh by
selecting either English or Metric with the
En-
glishNetric selector switch.
Gages and Audible Alarm
With the Ignition Switch in RUN, voltage is
applied through the GAGES Fuse to the Battery
Power Input terminal. With the Light Switch in
PARK or HEAD, voltage is applied at all times
to the Lights On Dim Input.
Fuel Display
The Fuel Display Sender provides a signal to
the cluster that is related to fuel level. With a
full tank the resistance is 90 ohms, and with an
empty tank the resistance is less than
1 ohm.
The microprocessor converts this signal and
activates a 12 segment bar graph which dis-
plays the fuel level. When the bar graph fuel
gage display changes from two segments to
one, the Audible Alarm beeps briefly.
Oil Pressure Display
The Oil Pressure Sender, with a resistance of
0 to 90 ohms, sends a signal to the cluster that is
related
to oil pressure. At zero pressure (0 PSI),
resistance is 0 ohms, and at maximum pressure
(80 PSI), resistance is approximately 90 ohms.
The microprocessor converts the signal and
activates a 12 segment bar graph which dis-
plays the oil pressure. When the bar graph
changes from two segments to one segment
(approximately
4 PSI), the Audible Alarm
beeps briefly.
kmperature Display
The Coolant Temperature Sender sends a sig-
nal to the Instrument Cluster that is related to
coolant temperature. Coolant Temperature
Sender resistance drops from 1,365 ohms at
100°F
(38"C), to 55 ohms at 260°F (127°C). The
temperature display is a bar graph display with
12 segments. When the bar graph changes to all
segments activated (hot coolant temperature),
the Audible Alarm beeps.
Volts Display
The microprocessor in the gages module re-
ceives a signal from the Battery Power Input ter-
minal. This signal activates the 12 segment bar
graph volts display. The volts gage ranges from 8
volts
(1 segment lit) to 18 volts (all segments lit).
Under idling and normal driving conditions, 7 or
8 segments are lit. When the volts gage displays
less than
4 segments or more than 12 segments,
the Audible Alarm beeps.
Tachometer
The Thchometer displays engine speed in rpm.
Voltage pulses are taken from the
Ignition Sys-
tem and sent to the Tachometer. Solid state cir-
cuits process these pulses into a signal that con-
trols the Tachometer display. The Tachometer
responds to the frequency of the voltage pulses,
the number of pulses in a second. This increases
with engine speed. The
'Pdchometer Filter in the
circuit rounds off the pulses and removes voltage
spikes.
Speedometer
The digital Speedometer is operated by an
electronic circuit. The Vehicle Speed Sensor, lo-
cated in the Transmission, generates an AC volt-
age whose frequency is proportional to the speed
of the vehicle. This goes to the Vehicle Speed
Sensor Buffer and then to the Speedometer cir-
cuit board in the Instrument Cluster. The solid
state circuit processes this signal into a control
signal for the Speedometer display.
Odometer
The digital Odometer display is operated by an
electronic circuit. The Vehicle Speed Sensor, lo-
cated in the Transmission, generates an
AC volt-
age whose frequency is proportional to miles
(kilometers) traveled. This goes to the Buffer
and then to the Odometer circuit board in the
Instrument Cluster. The solid state circuit
processes this signal into a control signal for
the Odometer display. Distance Data is stored
in
NV RAM Chip.
Page 1429 of 1825
INSTRUMENT PANEL: GAGES CLUSTER
Indicators
See the circuit referred to for the complete op-
eration of an indicator and the other components
that work with it.
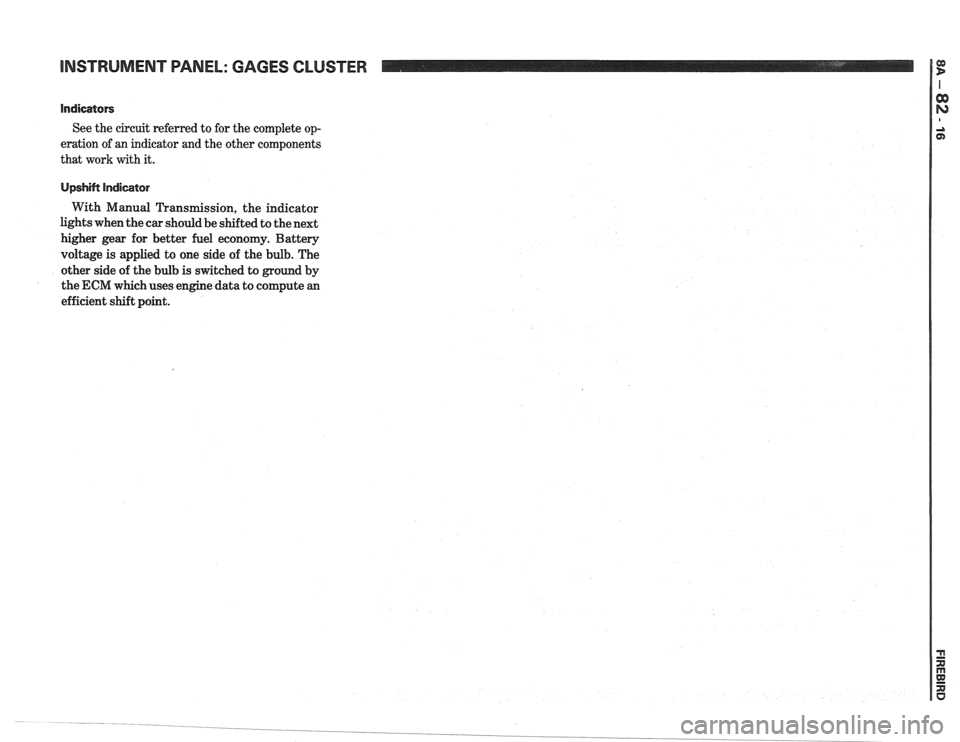
Upshift Indicator
With Manual Transmission, the indicator
lights when the car should be shifted to the next
higher gear for better fuel economy. Battery
voltage is applied to one side of the bulb. The
other side of the bulb is switched to ground by
the ECM which uses engine data to compute
an
efficient shift point.
Page 1432 of 1825
DRIVER INFORMMION CENTER (DIG) 'I" 33 m E 33 CI
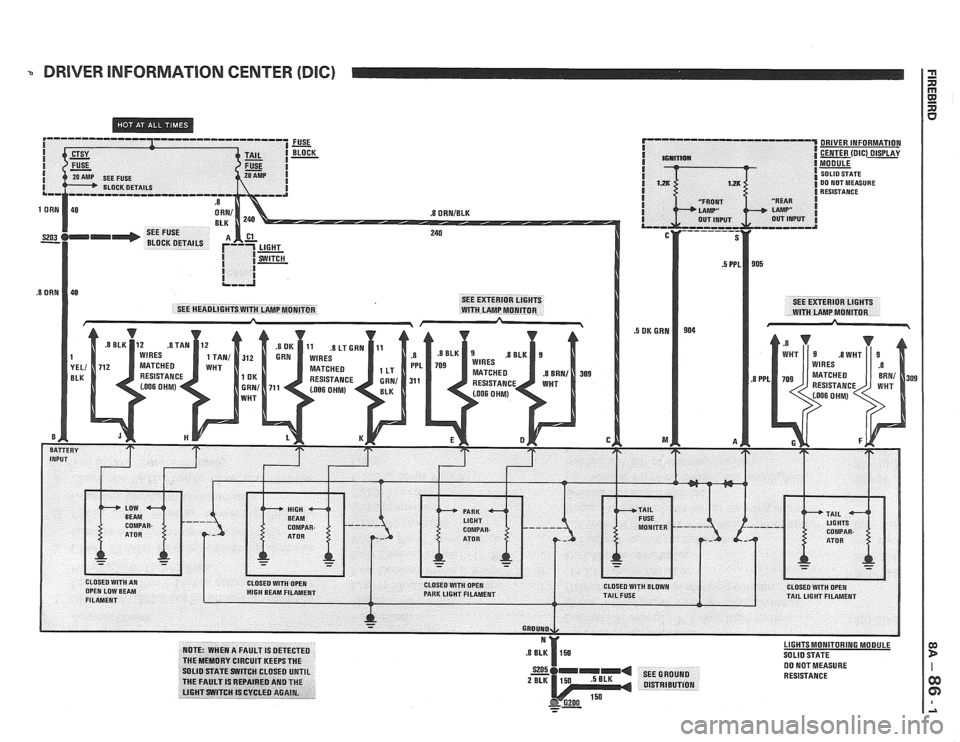
NOTE: WHEN A FAULT IS DETECTED THE MEMORY CIRCUIT KEEPS THE SOLID STATE SWITCH CLOSED UNTIL
ME FAULT IS REPAIRED AND THE
LIGHT SWITCH IS CYCLED AGAIN.
LIGHTSMONITORING MODULE
SOLID STATE
DO NOT MEASURE
RESISTANCE
Page 1433 of 1825
DRIVER INFORMATION CENTER (DDC) I $
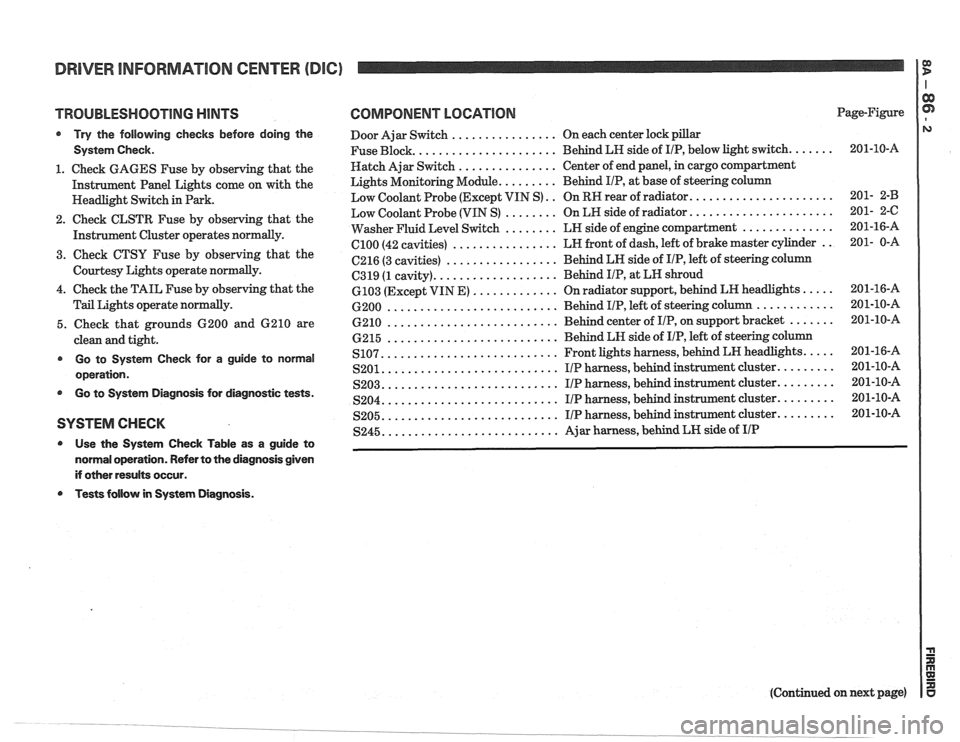
TROUBLESHOOTING HINTS
@ Try the following checks before doing the
System Check.
1. Check GAGES Fuse by observing that the
Instrument Panel Lights come on with the
Headlight Switch in Park.
2. Check CLSTR Fuse by observing that the
Instrument Cluster operates
normally.
3. Cheek CTSU Fuse by observing that the
Courtesy Lights operate normally.
4. Check the TAIL Fuse by observing that the
Tail Lights operate normally.
5. Check that grounds 6200 and 6210 are
clean and tight.
@ Go to System Check for a guide to norrnal
operation.
@ Go to System Diagnosis for diagnostic tests.
SYSTEM CHECK
@ Use the System Check Table as a guide to
normal operation. Refer to the diagnosis given
if other results occur.
Tests follow in System Diagnosis.
COMPONENT LOCATION Page-Figure
Door Ajar Switch
................ On each center lock pillar
..................... Fuse Block.
Behind LH side of IIP, below light switch. ...... 201-10-A
Hatch Ajar Switch
............... Center of end panel, in cargo compartment
Lights Monitoring Module.
........ Behind IIP, at base of steering column
..................... Low Coolant Probe (Except VIN S) .. On RR rear of radiator. 201- 2-B
..................... Low Coolant Probe (VIN S) ........ On LR side of radiator. 201- 2-C
.............. Washer Fluid Level Switch ........ LN side of engine compartment 201-16-A
................ el00 (42
cavities) LN
front of dash, left of brake master cylinder .. 201- 0-A
................. 6216 (3 cavities) Behind LN side
of IIP, left of steering column
.................. C319 (1 cavity). Behind I/P, at
LN shroud
............. 6103 (Except VIN E) On radiator support, behind LH headlights. .... 201-16-A
.......................... ............ 6200 Behind IIP, left of steering column 201-10-A
.......................... 6210 Behind center of IIP, on support bracket ....... 201-10-A
.......................... 6215 Behind
LH side of IIP, left of steering column
.......................... .... S107. Front lights harness, behind LN headlights. 201-16-A
.......................... S201. IIP harness, behind instrument cluster. ........ 201-10-A
.......................... S203. I/P harness, behind instrument cluster. ........ 201-10-A
.......................... S204. I/P harness, behind instrument cluster. ........ 201-10-A
.......................... S205. I/P harness, behind instrument cluster. ........ 201-10-A
.......................... S245. Ajar harness, behind LN side of IIP
(Continued on next page)
Page 1434 of 1825
DRIVER INFORMATION CENTER (DIC)
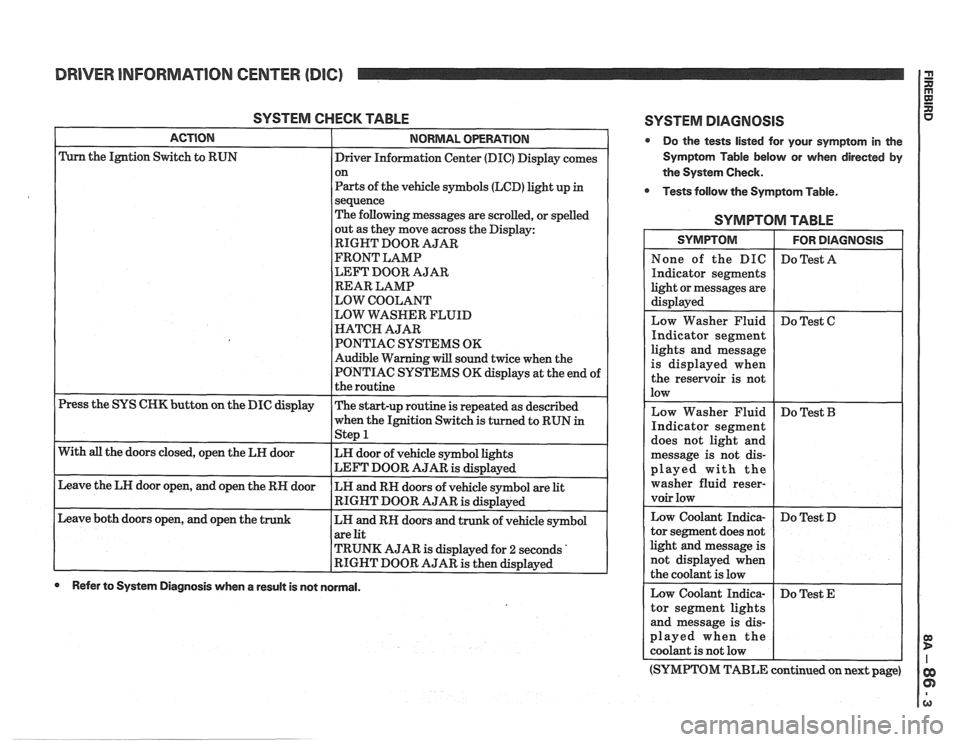
SYSTEM CHECK TABLE
ACTION NORMAL OPERATION
Press the SYS CHK button on the DIC display
With
all the doors closed, open the LH door
Leave the LH door open, and open the RH door
Leave both doors open, and open the
t
Driver Information Center (DIC) Display comes
on
Parts of the vehicle symbols (LCD) light up
in
sequence
The following messages are scrolled, or spelled
out as they move across the Display:
RIGHT DOOR AJAR
FRONT LAMP
LEFT DOOR AJAR
REAR LAMP
LOW COOLANT
LOW WASHER FLUID
HATCH AJAR
PONTIAC SYSTEMS OK
Audible Warning will sound twice when the
PONTIAC SYSTEMS OK displays at the end of
the routine
The start-up routine is repeated as described
when the Ignition Switch is turned to RUN
in - Step 1
LH door of vehicle symbol lights
LEFT DOOR AJAR
is displayed
LH and RH doors of vehicle symbol are
lit
RIGHT DOOR AJAR is displayed
LH and RH doors and trunk of vehicle symbol
are lit
TRUNK AJAR is displayed for
2 seconds '
RIGHT DOOR AJAR is then displayed
0 Refer to System Diagnosis when a result is not normal.
SYSTEM DlAGNOSlS
Do the tests listed for your symptom in the
Symptom Table below or when directed by
the System Check.
Tests follow the Symptom Table.
SYMPTOM TABLE
ights and message
s displayed when
he reservoir is not
ed with the
er fluid
reser-
(SYMPTOM TABLE continued on next page)
Page 1435 of 1825
DRIVER INFORMATION CENTER (DlC)
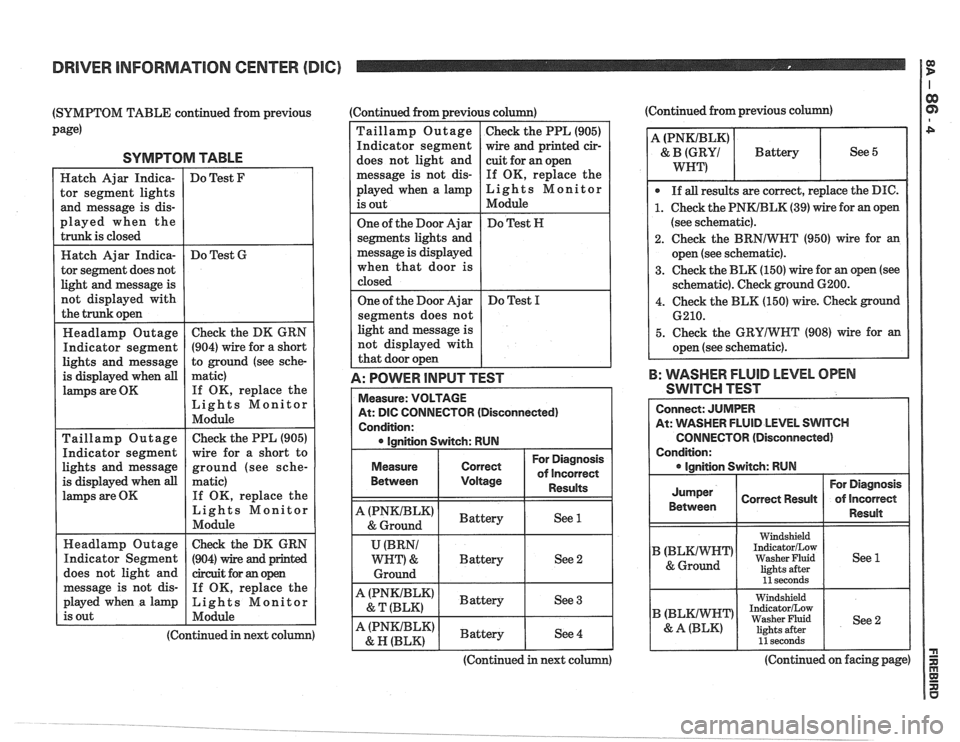
(SYMPTOM TABLE continued from previous (Continued
from previous column) (Continued from
previous column)
page) Taillamp Outage Check the PPL (905)
Indicator segment wire and printed cir-
SYMPTOM TABLE does not light and cuit for an open
message is not dis-
If OK, replace the
played when a lamp Lights Monitor
is out Module
One of the Door Ajar Do Test
N
segments lights and
message is displayed
when that door is
closed
If OK, replace the
(904) wire
and printed
(Continued in next column)
me Door Ajar I Do Test I 1
segments does not
light
and message is
not displayed with
I that door open
A: POWER lRlPUT TEST
Measure: VOLTAGE
At:
DlC CONNECTOR (Disconnected)
Condition: ignition Switch: RUN
For Diagnosis
Measure
Between
Correct of incorrect
Voltage Results
A (PNKIBLK) Battery & Ground See 1
U (BRNI
WRT) & Battery
See 2
Ground
A (PNKlBLK) Battery & T (BLK) See 3
A (PNKIBLK) Battery & R
(BLK) See 4
2. Check
the BRNlWHT (950) wire for an
open (see schematic).
3. Check the BLK (150) wire for an open (see
schematic). Check ground
G200.
4. Check the BLK (150) wire. Check ground
B: WASHER FLUID LEVEL OPEN
SWITCH TEST
Connect: JUMPER
At: WASHER FLUID LEVEL SWITCH
CONNECTOR (Disconnected)
Condition:
For Diagnosis
Jumper Correct Result of
lncorrect
1 Between 1 Resun 1 I
I Windshield 1 1 IndicatorILow
) 1 Washer Fluid 1 See1 lights after llseconds I
Washer Fluid See 2
I I 11 seconds [ I
(Continued in next co (Continued on facing page)
Page 1436 of 1825
DRIVER INFORMATION CENTER (DIC)
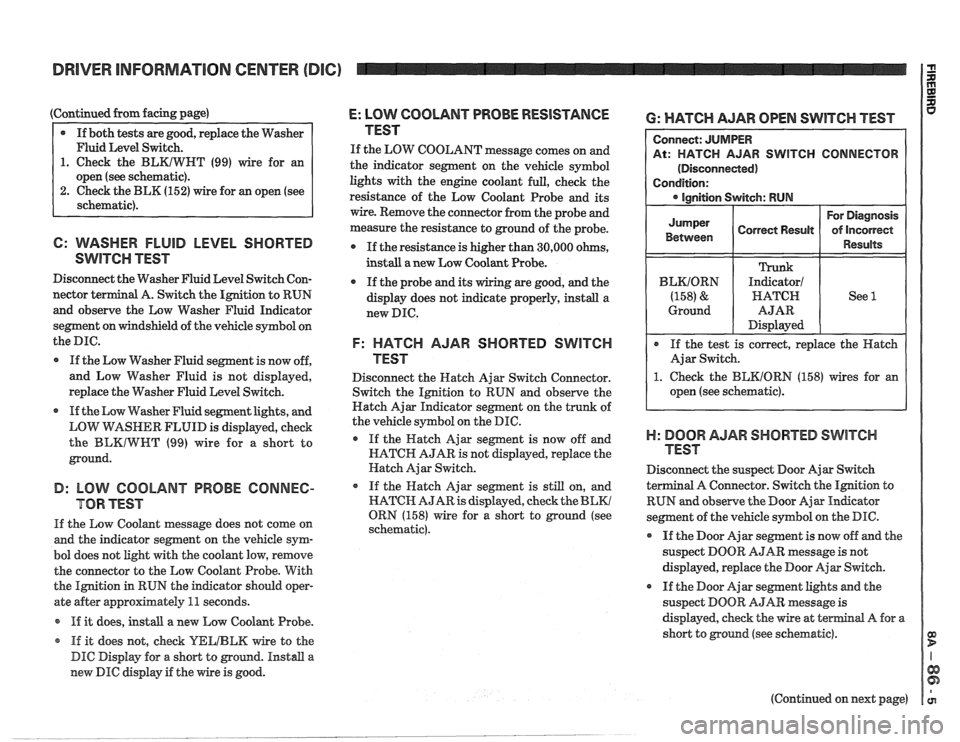
(Continued from facing page)
@ If both tests are good, replace the Washer
Fluid Level Switch.
1. Check the BLKIWHT (99) wire for an
open (see schematic).
2. Check the BLK (152) wire for an open (see
schematic).
6: WASHER FLUID LEVEL SHORTED
SwlTen TEST
Disconnect the Washer Fluid Level Switch Con-
nector
terminal A. Switch the Ignition to RUN
and observe the Low Washer Fluid Indicator
segment on windshield of the vehicle symbol on
the
me.
If the Low Washer Fluid segment is now off,
and Low Washer Fluid is not displayed,
replace the Washer Fluid Level Switch.
If the Low Washer Fluid segment lights, and
LOW
VirASHER FLUID is displayed, check
the
BLKIWWT (99) wire for a short to
ground.
B: LOW COOLANT PROBE CONNEC-
TOR TEST
If the Low Coolant message does not come on
and the indicator segment on the vehicle sym-
bol does not light with the coolant low, remove
the connector to the Low Coolant Probe. With
the Ignition in RUN the indicator
should oper-
ate after approximately
11 seconds.
If it does,
install a new Low Coolant Probe.
* If it does not, check YELIBLM wire to the
DIC Display for a short to ground. Install a
new DIC display if the wire is good.
E: LOW COOLANT PROBE RESISTANCE
TEST
If the LOW COOLANT message comes on and
the indicator segment on the vehicle symbol
lights with the engine coolant full, check the
resistance of the Low Coolant Probe and its
wire. Remove the connector from the probe and
measure the resistance to ground of the probe.
If the resistance is higher than 30,000 ohms,
instdl a new Low Coolant Probe.
If the probe
and its wiring are good, and the
display does not indicate properly, install a
new DIC.
F: HATCH AJAR SHORTED SWITCH
TEST
Disconnect the Hatch Ajar Switch Connector.
Switch the Ignition to RUN and observe the
Hatch Ajar Indicator segment on the trunk of
the vehicle symbol on the DIC.
If the Hatch Ajar segment is now off and
HATCH AJAR is not displayed, replace the
Hatch Ajar Switch.
o If the Hatch Ajar segment is still on, and
HATCH AJAR is displayed, check the
BLKl
ORN (158) wire for a short to ground (see
schematic).
6: WATCH AJAR OPEN SWITCH TEST
R SWITCH CONNECTOR
1. Check the BEKIORN (158) wires for an
open (see schematic).
)-I: BOOR AJAR SHORTED SWITCH
TEST
Disconnect the suspect Door Ajar Switch
a1 A Connector. Switch the Ignition to
RUN and observe the Door Ajar
Indieator
segment of the vehicle symbol on the DIC.
@ If the Door Ajar segment is now off and the
suspect DOOR AJAR message is not
displayed, replace the Door Ajar Switch.
If the Door Ajar segment lights and the
suspect DOOR
AJAR message is
displayed, check the wire at
terminal A for a
short to ground (see schematic).
(Continued on next page)