Page 1467 of 1825

HEADLIGHTS WITH LAMP MONITOR: FOG LIGHTS
I7
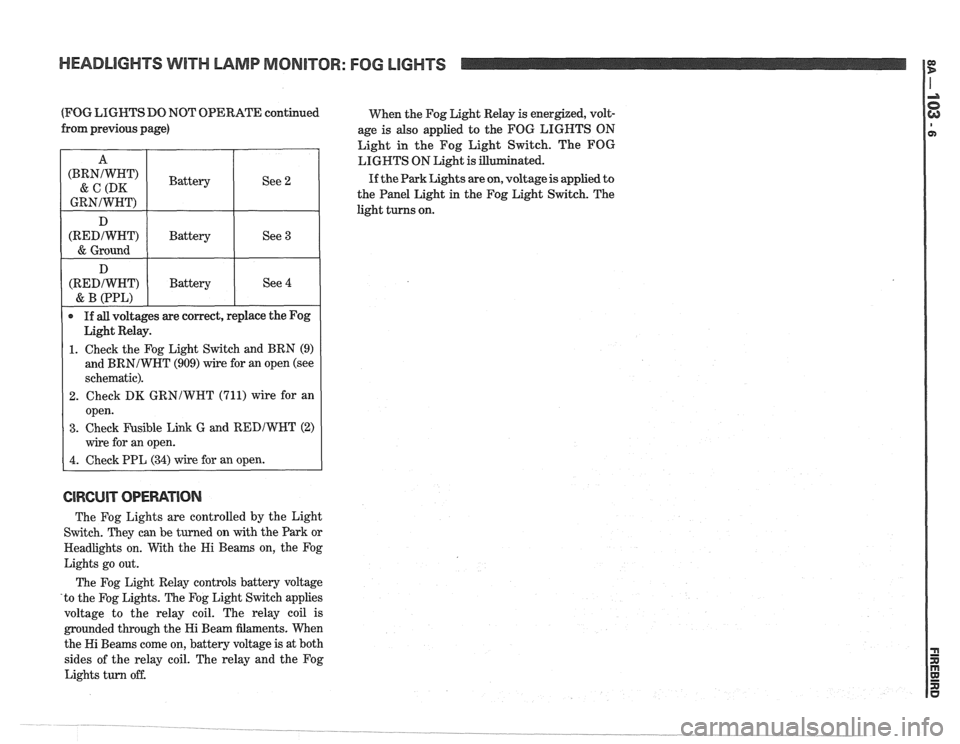
(FOG LIGHTS DO NOT OPERATE continued
When the Fog Light Relay is energized, volt-
from previous page)
age is also applied to the FOG LIGHTS ON
Light in the Fog Light Switch. The FOG
LIGHTS ON Light is ated.
If the Park Lights are on, voltage is applied to
the Panel Light in the Fog Light Switch. The
light turns on.
CIRCUIT OPEWTIOIU
The Fog Lights are controlled by the Light
Switch. They can be turned on with the Park or
Headlights on. With the Hi Beams on, the Fog
Lights go out.
The Fog Light Relay controls battery voltage
'to the Fog Lights. The Fog Light Switch applies
voltage to the relay coil. The relay coil is
grounded through the Hi Beam filaments. When
the Hi Beams come on, battery voltage is at both
sides of the relay coil. The relay and the Fog
Lights turn off.
A
(BRNJWHT)
& C (DK
GRNIWHT)
D
(REDIWHT)
& Ground
D
(REDIWHT)
& B (PPL)
If all voltages are correct, replace the Fog
Light Relay.
1. Check the Fog Light Switch and BRN (9)
and
BRNIWHT (909) wire for an open (see
schematic).
2. Check DK GRNIWNT (711) wire for an
open.
3. Check Fusible Link G and REDJWHT (2)
wire for an open.
4. Check PPL (34) wire for an open.
Battery
Battery
Battery See
2
See 3
See 4
Page 1469 of 1825
EXTERIOR LIGHTS: TURNIHAZARDIFRONT PARKIFRONT MARKERISTOPIHIGH LEVEL STOP LIGHT
Page 1470 of 1825
EXTERIOR LIGHTS: TURN/HAZARD/STOP
TRANS AM
FROM C210, PIN M PAGE 110-0 FROM
C210, PIN N
PAGE 110-0
Page 1471 of 1825
EXTERIOR LIGHTS: TURNIHAZARDISTOP I
FROM C210, PIN M
PAGE 110-0 FROM BRAKE SWITCH PAGE 110-0 FROM C210, PIN N PAGE 110-0
Page 1472 of 1825
EXTERIOR LIGHTS: TAILIREAR MARKERILICENSE
TRANS AM
Page 1473 of 1825
3 EXTERIOR LIGHTS: TAILIREAR MARKERILICENSE
.8 ERN
RH REAR
MARKER LIGHT
-
EXTERIOR LIGHTS:
I 3BLK GROUND
DISTRIBUTION
Page 1474 of 1825

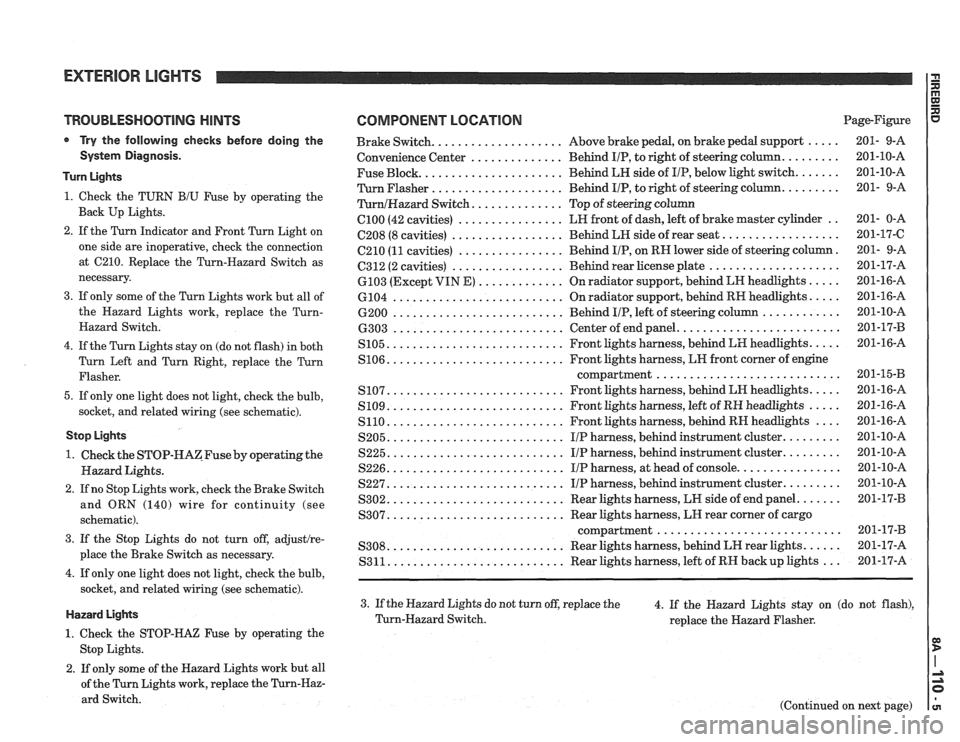
TROUBLESHOOTING HINTS
Try the following checks before doing the
System Diagnosis.
Turn Lights
1. Check the TURN B/U Fuse by operating the
Back Up Lights.
2. If the Turn Indicator and Front Turn Light on
one side are inoperative, check the connection
at
C210. Replace the Turn-Hazard Switch as
necessary.
3. If only some of the Turn Lights work but all of
the Hazard Lights work, replace the
Turn-
Hazard Switch.
4. If the Turn Lights stay on (do not flash) in both
Turn Left and Turn Right, replace the Turn
Flasher.
5. If only one light does not light, check the bulb,
socket, and related wiring (see schematic).
Stop Lights
1. Check the STOP-HAZFuse by operating the
Hazard Lights.
2. If no Stop Lights work, check the Brake Switch
and ORN (140) wire for continuity (see
schematic).
3. If the Stop Lights do not turn off, adjustlre-
place the Brake Switch as necessary.
4. If only one light does not light, check the bulb,
socket, and related wiring (see schematic).
Hazard Lights
1. Check the STOP-HAZ Fuse by operating the
Stop Lights.
2. If only some of the Hazard Lights work but all
of the Turn Lights work, replace the
Turn-Haz-
ard Switch.
COMPONENT LOCATION Page-Figure
................... ..... Brake Switch. Above
brake pedal, on brake pedal support 201- 9-A
.............. ........ Convenience
Center Behind IIP, to right of steering column. 201-10-A
Fuse Block.
..................... Behind LH side of IIP, below light switch. ...... 201-10-A
Turn Flasher
.................... Behind IIP, to right of steering column. ........ 201- 9-A
............. TurnlHazard Switch. Top of steering column
C100 (42 cavities) ................ LH front of dash, left of brake master cylinder .. 201- 0-A
................. ................. C208 (8 cavities) Behind LH side of rear seat. 201-17-C
C210
(11 cavities) ................ Behind IIP, on RN lower side of steering column. 201- 9-A
................. .................... 6312 (2 cavities) Behind rear license plate 201-17-A
............. ..... 6103 (Except VIN E) On radiator support, behind LN headlights 201-16-A
.......................... .... 6104
On radiator support, behind RH headlights. 201-16-A
.......................... ............ 6200 Behind IIP, left of steering column 201-10-A
........................ .......................... 6303 Center of end panel. 201-17-B
.......................... .... S105. Front lights harness, behind LH headlights. 201-16-A
.......................... S106. Front lights harness, LN front corner of engine
compartment..
.......................... 201-1543
.......................... .... S107. Front lights harness, behind LH headlights. 201-16-A
.......................... ..... S109. Front lights harness, left of RH headlights 201-16-A
S110. .......................... Front lights harness, behind RH headlights .... 201-16-A
S205. .......................... IIP harness, behind instrument cluster. ........ 201-10-A
S225. .......................... IIP harness, behind instrument cluster. ........ 201-10-A
S226. .......................... IIP harness, at head of console. ............... 201-10-A
S227. .......................... IIP harness, behind instrument cluster. ........ 201-10-A
S302. .......................... Rear lights harness, LW side of end panel. ...... 201-17-B
.......................... S307. Rear lights harness, LH rear corner of cargo
compartment..
.......................... 201-17-B
.......................... ..... S308. Rear lights harness, behind LH rear lights. 201-17-A
S311. .......................... Rear lights harness, left of RH backup lights ... 201-17-A
3. If the Hazard Lights do not turn off, replace the
4. If the Hazard Lights stay on (do not flash),
Turn-Hazard Switch.
replace the Hazard Flasher.
(Continued on next page)
Page 1475 of 1825

EXTERIOR LlGHTS
(Continued from previous page)
Park/MarkerflaIl/License UgMs
1. If the Park, Marker and Tail Lights do not
work, cheek the Tail Fuse, Light Switch, and
BRN (9) wires for continuity (see schematic).
2. If the Front Marker and the Park Lights dd not
work, check the connection at 6100 and re-
lated wiring (see schematic).
3. If the Park Lights do not turn off, replace the
Light Switch.
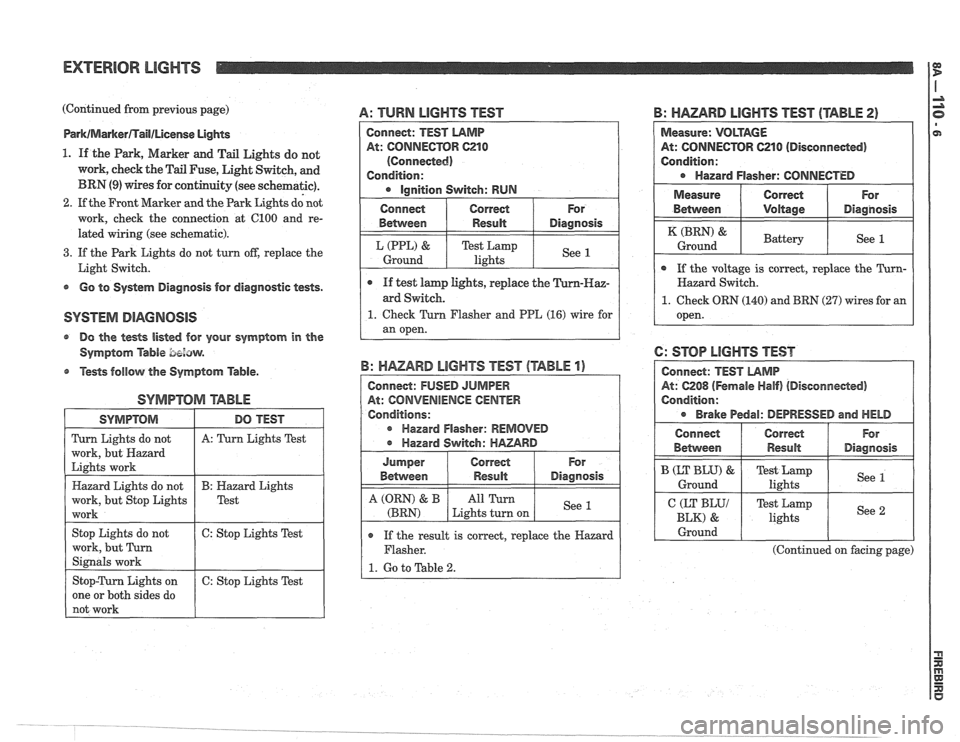
s Go to System Diagnosis for diagnostic tests.
@ Do the tests listed for your symptom in the
Symptom
Able bezaw.
@ Tests follow the Symptom Table.
SYMPTOM arABhE
A: TURN LIGHTS TEST
SYMPTOM
Turn Lights do not
work, but Hazard
Lights work
Hazard Lights do not
work, but Stop Lights
work
Stop Lights do not
work, but Turn
Signals work
Stop-Turn Lights on
one or both sides do
not work
B: HAZARD LIGHTS TEST (TABLE 2)
DO TEST
A: Turn Lights Test
B: Hazard Lights
Test
6: Stop Lights Test
6: Stop Lights Test
Connect: TEST LAMP
At: CONNECTOR C210
(Connected)
Condition:
Ignition Switch: RUN
o If the result is correct, replace the Hazard
Flasher.
1. Go to Table 2.
B: HAZARD LIGHTS TEST (TABLE 1)
Connect: FUSED JUMPER
At: CONVENIENCE
CENTER
Conditions:
r Hazard Flasher: REMOVED
Hazard Switch:
HAZARD
Measure: VOLTAGE
At: CONNECTOR 621 0 (Disconneded)
Condition:
Hazard Flasher: CONNECTED
For
Diagnosis
See 1
Connect
Between
L (PPL) &
Ground
I Measure ( Correct ( For
e If test lamp lights, replace the
ard Switch.
1. Check Turn Flasher and PPE (16) wire for
an open.
Correct
Result
Test Lamp
lights
For
Diagnosis
See 1
Jumper
Between
A (QRN) & B
(BRN)
Between I Voltage I Diagnosis
Correct Result
All Turn
Lights turn on
( If the voltage is correct, replace the Turn- I
(BRN) &
Ground
Hazard Switch.
1. Check ORN (140) and BRN (27) wires for an
open.
6: STOP LIGHTS TEST
At: 6208 (Fernale Half) (Disconnected)
Condition:
Brake Pedal: DEPRESSED and HELD
Battery See 1
Connect
Behvveen
I CEKyy 1 Test Lamp
lights I See 2 I
B (LT BLU) &
Ground
I Ground I I I
Correct
Result
(Continued on facing page)
For
Diagnosis
Test Lamp
lights See 1