Page 1036 of 1825
MODELS:
HYDRAULIC DIAGNOSIS 70O-R4-47
ERMINAL A TO
4-3 DOWNSHIFT SW
(COLOR ID-RED)
TERMINAL
B TO
4TH CLUTCH SW
(COLOR ID-WHITE)
4-3 SW TO 4TH CL SW
NORMALLY OPEN
(N.0.) (COLOR ID-WHITE) NORMALLY CLOSED (N.C.1
4-3 SHIFT TERMINAL
(COLOR ID-YELLOW)
4-3 DOWNSHIFT SW
(COLOR ID-BLACK)
2 TERMINALS
4TH CL TERMINALS
(COLOR ID-BLUE)
WITH GREEN DOT) 2 TERMINALS
3 DOWNSHIFT SW
NORMALLY OPEN
(N.0.) NORMALLY CLOSED (N.C.)
4-3 DOWNSHIFT SW
POS. SOL TERMINAL
TO 4-3 DOWNSHIFT SW
(COLOR ID-RED)
1988 MODELS
Figure
46 Wiring Diagram -Type 3
Page 1037 of 1825
700.R4-48 HYDRAULIC DIAGNOSIS
I JH0034-700R4-R1 Figure 47 Wiring Diagram - Type 4
4-3 SHIFT I
I JH0035.700R4 J Figure 48 Wiring Diagram - Type 5
Page 1038 of 1825
HYDRAULIC DIAGNOSIS 700.R4-49
T.C.C. SOL
(N.O. OIL
PATH) , --- --- ---,
T.C.C. SOLENOID
(COLOR ID-DK GREEN) 1988 MODELS: MCM, MTM,
PRM, TAM, TBM
Figure 49 Wiring Diagram -Type 8
I JH0037-700R4 I
Figure 50 Wiring Diagram - Type 7
Page 1039 of 1825
700-R4-50 HYDRAULIC DIAGNOSIS
TERMINAL A TO
SOL POS. SIDE (COLOR ID-RED)
T.C.C. SOL
(N.O. Ol L PATH)
TERMINAL
B TO
1 TERMINAL NORMALLY
OPEN (N.O.) NORMALLY CLOSED (N.C.)
NEG. SOL TERMINAL \POS. SOL TERMINAL
TO TERMINAL D (COLOR ID-RED)
(CCC GROUND)
(COLOR ID-BLACK)
Figure
5 1 Wiring Diagram - Type 9
TERMINAL A TO
4-3 DOWNSHIFT SW
(COLOR ID-RED)
TERMINAL
D TO E.C.M. 4TH CLUTCH SW
(COLOR ID-BLACK)
4-3 DOWNSHIFT SW
(COLOR ID-BLACK)
2 TERMINALS
NORMALLY OPEN (N.O.) 4-3 SW TERMINALS
NORMALLY CLOSED (N.C.) (COLOR ID-YELLOW)
4TH CL TERMINAL
(COLOR ID-BLUE)
4TH CLUTCH SW
(COLOR ID-BLACK)
1 TERMINAL
POS. SOL TERMINAL
TO 4-3 DOWNSHIFT SW
988 MODELS: PAM P
I (COLOR ID-RED)
I
Figure 52 Wiring Diagram - Type 10
Page 1040 of 1825
HYDRAULIC DIAGNOSIS 700-R4-51
OLEN NO ID AND "0" RING ASSEMBLY
(COLOR ID-PINK) 1988 MODELS
Figure
53 Wiring Diagram - Type 14
TERMINAL A TO
4-3 DOWNSHIFT SW
(COLOR ID-RED)
TERMINAL
B TO
4TH CLUTCH SWITCH
(COLOR ID-WHITE)
TEMP. SWITCH ASM.
CONNECTOR BODY
(COLOR ID-BLACK)
4-3 SHIFT TERMINAL
(COLOR ID-YELLOW)
4-3 DOWNSHIFT SW
(COLOR ID-BLACK BOD
2 TERMINALS
4TH
CL TERMINAL
(COLOR ID-BLUE)
4TH CLUTCH SW
(COLOR ID-METALLIC
OPTIONAL 4TH CL SW
POS, SO[ TERMINAL 'NEG. SOL TERMINAL (COLOR
ID-METALLIC
TO TERMINAL D 4-3 (CCC GROUND) & BLACK)
IDFRED' (COLOR ID-BLACK) NORMALLY
OPEN
(N.O.)
Y) NORMALLY CLOSED (N.C.)
TYPE 15
1988
MODELS: FAM, FMM,
MAM, MDM, MFM, MKM, MLM,
MPM, MRM, MWM, MXM, MZM,
THM, TJM, TKM, TLM, TUM,
TXM
JH0041-700R4-R1
Figure 54 Wiring Diagram - Type 15
Page 1041 of 1825
70044-52 HYDRAULIC DIAGNOSIS
r3RD CLUTCH SW
POS. SOL.' TERMINAL NEG. SOL. TERMINAL
TO TERMINAL A TO TERM. D (COLOR ID-RED) (ECM GROUND)
(COLOR ID-BLACK) T.C.C.
SOL
(N.O. OIL PATH)
NORMALLY OPEN
(N.O.) NORMALLY CLOSED (N.C.)
988 MODEL: YPM
JH0174-700R4-R 1
Figure 55 Wiring Diagram - Type 16
Page 1050 of 1825

TORQUE CONVERTER CLUTCH (TCC)
DIAGNOSIS
To properly diagnose the Torque Converter
Clutch (TCC) system, perform all electrical
testing first and then the hydraulic testing. Refer
to the Torque Converter Section
6E2-C8 for
additional information.
The TCC is applied by fluid pressure which is
controlled by a solenoid located inside the Automatic
Transmission assembly. The solenoid is energized or
released by making or breaking an electrical circuit
through a combination of switches and sensors.
TCC Electrical Diagnosis
e For electrical diagnosis of TCC, refer to the
specific vehicle section in Section
8A, Electrical
Diagnosis.
e For diagnosis of emission control related
components of TCC, Refer to the specific section
of
6E, Driveability and Emissions.
e For the diagnosis of TCC Hydraulic Controls,
refer to the Procedure and Wiring Diagrams
provided in this section.
Functional Check Procedure
rn Inspect
1. Install a tachometer
2. Operate the vehicle until proper operating
temperature is reached
3. Drive vehicle at 50-55 mph (80-88 Km/h) with
light throttle (road load)
4. Maintaining throttle lightly touch the brake
pedal and check for a slight bump when the TCC
releases and a slight increase in engine RPM.
5. Release the brake, slowly accelerate and check for
a re-apply of the converter clutch and a slight
decrease in engine RPM.
Preliminary Checking Procedure
The purpose of the preliminary checking
procedure is to isolate external (electrical) problems
from internal (electrical or mechanical) ones.
Important
e Use only a scale type ohmmeter. High impedance
type ohmmeters and those with a digital readout
will not work.
e An ALCL scanner may be used to verify the
electrical circuit. Remember, a completed circuit
does not indicate that the solenoid will apply.
e Do not bench test using an automotive type
battery. Accidentally crossed wires will damage
the internal diodes of the TCC solenoid.
HYDRAULIC DIAGNOSIS 700-R4-61
External Controls
rn Inspect
e Connect voltmeter between transmission
connector and ground.
e Turn key "ON"
e If 0 or low voltage is found, refer to Sections 6E
and 8A for electrical diagnosis.
e If 12 volts are present at the connector, refer to
the TCC hydraulic diagnosis.
TORQUE CONVERTER EVALUATION
Torque Converter Stator
The Torque Converter Stator roller clutch can
have one of two different type malfunctions:
A. Stator Assembly freewheels in both
directions.
B. Stator Assembly remains locked up at all
times.
Condition A-Poor Acceleration Low Speed
The vehicle tends to have poor acceleration from
a standstill. At speeds above 30-35 mph (50-55
km/h),
the car may act normal. If poor acceleration is noted,
it should first be determined that the exhaust system
is not blocked, the engine timing is correct and the
transmission is in first
(1st) gear when starting out.
If the engine freely accelerates to high
r.p.m. in
"NEUTRAL" (N), it can be assumed that the engine
and exhaust system are normal. Checking for poor
performance in "Drive" and Reverse will help
determine if the stator is freewheeling at all times.
Condition B-Poor Acceleration High Speed
Engine r.p.m. and car speed limited or restricted
at high speeds. Performance when accelerating from a
standstill is normal. Engine may over-heat. Visual
examination of the converter may reveal a blue color
from over-heating.
If the converter has been removed, the stator
roller clutch can be checked by inserting a finger into
the splined inner race of the roller clutch and trying to
turn the race in both directions. The inner race should
turn freely clockwise, but not turn or be very difficult
to turn counterclockwise.
The Converter Should Be Replaced If:
e Leaks externally, such as at the hub weld area.
e Converter has an imbalance which cannot be
corrected. (Refer to Converter Vibration Test
Procedure).
e Converter is contaminated with engine coolant
containing antifreeze.
The Converter Should Not Be Replaced If:
e The oil has an odor, is discolored, and there is no
evidence of metal or clutch facing particles.
e The threads in one or more of the three converter
bolt holes are damaged.
- Correct with thread insert. (Refer to Section
6A).
Page 1056 of 1825

AUTOMA"PI&: TRANSMISSION 780-R4-5
5. Case extension bolts (37)
and case extension (36)
6. Extension seal ring (35)
7. Output
shaft sleeve (690) and output shaft o-ring
seal (691)
- Not all models use an output shaft sleeve
and seal
a Remove or Disconnect (Figures 75)
Models with Mechanical Speedometer
1. Speedometer drive gear
(689) and clip (688)
- push tab of retaining clip and tap
speedometer gear off the output shaft.
- use care not to damage the speedo gear
Valve Body and Wiring Harness
Remove or Disconnect (Figures 76, 77)
1. Screws (74), oil
pan (73), and gasket (72).
2. Oil filter
(71) and filter seal (70).
- Filter seal may be stuck in the case
3. Outside
electrical connector (33) and o-ring seal
(34).
4. Electrical connections from switches.
- refer to wiring diagrams in the Hydraulic
Diagnosis Section for specific model
applications
5. Solenoid bolts
(51) and solenoid assembly (50)
with o-ring seal (49) and wiring harness.
6. Accumulator cover bolts (63) and 1-2
accumulator cover and pin assembly (62).
7. 1-2 accumulator piston (61) and seal (60).
8. Spring (59).
Remove or Disconnect (Figures 78,99,88 and 81)
1. Bolt (75) and manual detent spring assembly
(709).
2. Electrical wire clips (66) and tube clamps (97).
3. Auxiliary valve tube (96).
4. Wiring harness retaining washer (A) and the
filter retainer clips
(87).
5. Bolts (69) and T.V. lever and bracket assembly
(65)
6. T.V. link (64)
Remove or Disconnect (Figures 78,88,8'1 and 82)
1. Remaining valve body bolts (69)
2. Manual valve link (705)
3. Control valve assembly (67)
4. Bolts
(374-376), auxiliary valve body (377), and
check
ball (55)
5. Spacer plate (56) and spacer plate gaskets (88 and
89)
6. Check balls (55 and 91) spring (54), piston (52),
sea1 (53) and pin
- Three checkballs are located under the
valve body, one in the auxiliary valve body
and four are located in the case. The large
copper flash colored ball is
# 10 check ball
(9 1)
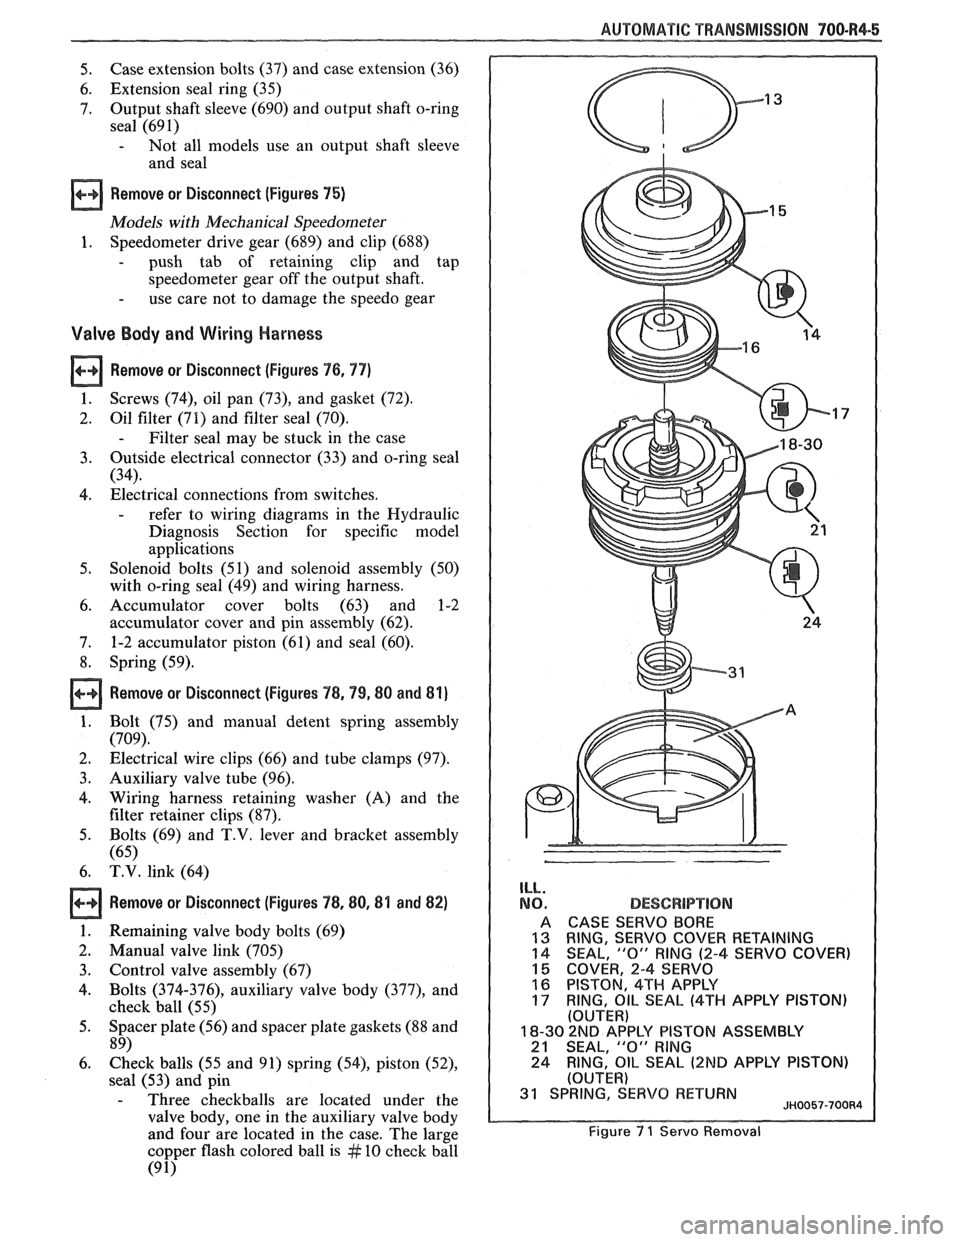
ILL.
NO.
A
13 14
15 16
17
DESCBPlPT!ON
CASE SERVO BORE
RING,
SERVO COVER RETAINING
SEAL, "0" RING (2-4 SERVO COVER)
COVER, 2-4 SERVO
PISTON, 4TH APPLY
RING,
OIL SEAL (4TH APPLY PISTON) (OUTER)
18-30 2ND AP'PLY PISTON ASSEMBLY 21 SEAL, "0" RlNG
24 RING, OIL SEAL (2ND APPLY
PISTON)
(OUTER) 31 SPRING, SERVO RETURN JH0057-700R4
Figure 7 1 Servo Removal