Page 1335 of 2389
BORING OF CYLINDERS
HINT:
wBore all the six cylinders for the oversized piston outside di-
ameter.
wReplace the piston rings with ones to match the oversized
pistons.
1. KEEP OVERSIZED PISTONS
Oversized piston diameter:
O/S 0.50 87.945 ± 87.975 mm
(3.4624 ± 3.4636 in.)
2. CALCULATE AMOUNT TO BORE CYLINDER
(a) Using a micrometer, measure the piston diameter at right
angles to the piston pin center line, 24.25 mm
(0.9547 in.) from the piston head.
(b) Calculate the amount each cylinder is to be rebored as fol-
lows:
Size to be .rebored = P + C ± H
P= Piston diameter
C = Piston oil clearance
0.045 ± 0.065 mm (0.0018 ± 0.0026 in.)
H = Allowance for honing
0.02 mm (0.0008 in.) or less
3. BORE AND HONE CYLINDERS TO CALCULATED
DIMENSIONS
Maximum honing: 0.02 mm (0.0008 in.)
NOTICE: Excess honing will destroy the finished round-
ness.
± ENGINE MECHANICALCylinder Block (2VZ±FE)EM±158
Page 1336 of 2389

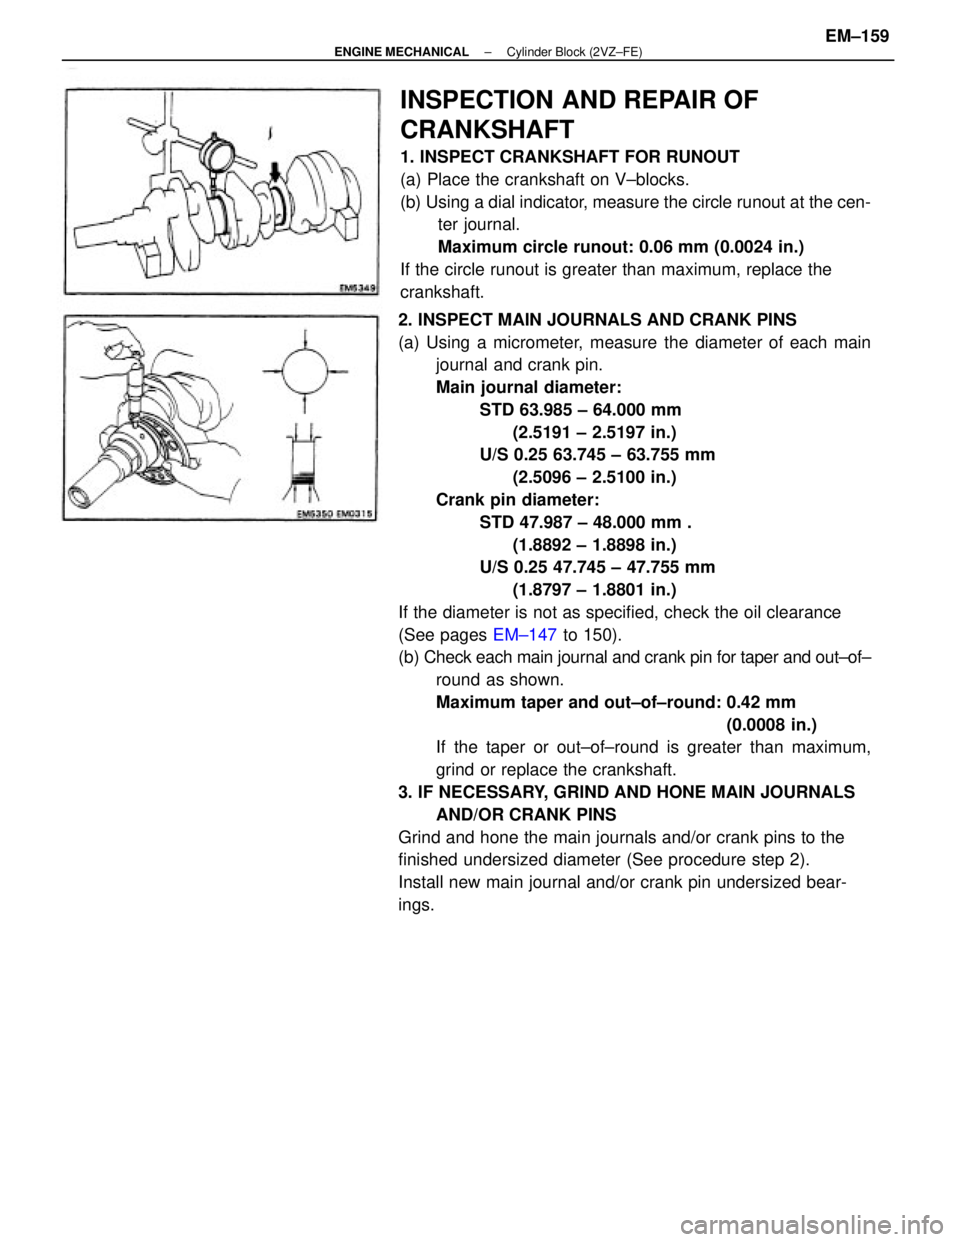
2. INSPECT MAIN JOURNALS AND CRANK PINS
(a) Using a micrometer, measure the diameter of each main
journal and crank pin.
Main journal diameter:
STD 63.985 ± 64.000 mm
(2.5191 ± 2.5197 in.)
U/S 0.25 63.745 ± 63.755 mm
(2.5096 ± 2.5100 in.)
Crank pin diameter:
STD 47.987 ± 48.000 mm .
(1.8892 ± 1.8898 in.)
U/S 0.25 47.745 ± 47.755 mm
(1.8797 ± 1.8801 in.)
If the diameter is not as specified, check the oil clearance
(See pages EM±147 to 150).
(b) Check each main journal and crank pin for taper and out±of±
round as shown.
Maximum taper and out±of±round: 0.42 mm
(0.0008 in.)
If the taper or out±of±round is greater than maximum,
grind or replace the crankshaft.
3. IF NECESSARY, GRIND AND HONE MAIN JOURNALS
AND/OR CRANK PINS
Grind and hone the main journals and/or crank pins to the
finished undersized diameter (See procedure step 2).
Install new main journal and/or crank pin undersized bear-
ings.
INSPECTION AND REPAIR OF
CRANKSHAFT
1. INSPECT CRANKSHAFT FOR RUNOUT
(a) Place the crankshaft on V±blocks.
(b) Using a dial indicator, measure the circle runout at the cen-
ter journal.
Maximum circle runout: 0.06 mm (0.0024 in.)
If the circle runout is greater than maximum, replace the
crankshaft.
± ENGINE MECHANICALCylinder Block (2VZ±FE)EM±159
Page 1337 of 2389
B. If oil pump is installed to the cylinder block:
(a) Using a knife, cut off the oil seal lip.
(b) Using a screwdriver, pry out the oil seal.
NOTICE: Be careful not to damage the crankshaft.
Tape the screwdriver tip.
(b) Using SST and a hammer, tap in a new oil seal until its
surface is flush with the oil pump case edge.
SST 09309±37010
(c) Apply MP grease to the oil seal lip.
(c) Apply IMP grease to a new oil seal lip.
(d) Using SST and a hammer, tap in the oil seal until its sur-
face is flush with the oil pump case edge.
SST 09309±37010 1. REPLACE CRANKSHAFT FRONT OIL SEAL
A. If Oil Pump 1s removed from cylinder block:
(a) Using a screwdriver and hammer, tap out the oil seal.
REPLACEMENT OF CRANKSHAFT OIL
SEALS
HINT: There are two methods (A an B) to replace the oil
seal as follows:
± ENGINE MECHANICALCylinder Block (2VZ±FE)EM±160
Page 1338 of 2389
6. If rear oil seal retainer is installed to cylinder block:
(a) Using a knife, cut off the oil seal lip.
(b) Using a screwdriver, pry out the oil seal.
NOTICE: Be careful not to damage the crankshaft.
Tape the screwdriver tip.
2. REPLACE CRANKSHAFT REAR OIL SEAL
A. If rear oil seal retainer is removed from cylinder block:
(a) Using a screwdriver and hammer, tap out the oil seal.
(b) Using SST and a hammer, tap in a new oil seal until its
surface is flush with the rear oil seal edge.
SST 09223±56010
(c) Apply MP grease to the oil seal lip.
(c) Apply MP grease to a new oil seal lip.
(d) Using SST and a hammer, tap in the oil seal until its sur-
face is flush with the rear oil seal retainer edge.
SST 09223±56010
± ENGINE MECHANICALCylinder Block (2VZ±FE)EM±161
Page 1339 of 2389
ASSEMBLY OF PISTON AND CONNECTING
ROD ASSEMBLIES
1. ASSEMBLE PISTON AND CONNECTING ROD
(a) Align the front marks of the piston and connecting rod.
Connecting rod front (mold) mark:
B6, 1 B, 8A, C3 or etc.
(b) Coat the piston pin and piston hole of the piston with
engine oil. .
(c) Using SST, press in the piston pin.
SST 09221±25024 (09221±00020, 09221±00030,
09221±00181, 09221±00190, 09221±00200)
(d) Check that the piston smoothly moves back and forth
on the piston pin.
(b) Using a piston ring expander, install the two com-
pression rings with the code mark facing upward.
Code mark: No.1 T or 1R
No.2 T2 or 2R 2. INSTALL PISTON RINGS
(a) Install the oil ring expander and two side rails by hand.
(c) Position the piston rings so that the ring ends are as
shown.
NOTICE: Do not align the ring ends.
± ENGINE MECHANICALCylinder Block (2VZ±FE)EM±162
Page 1340 of 2389

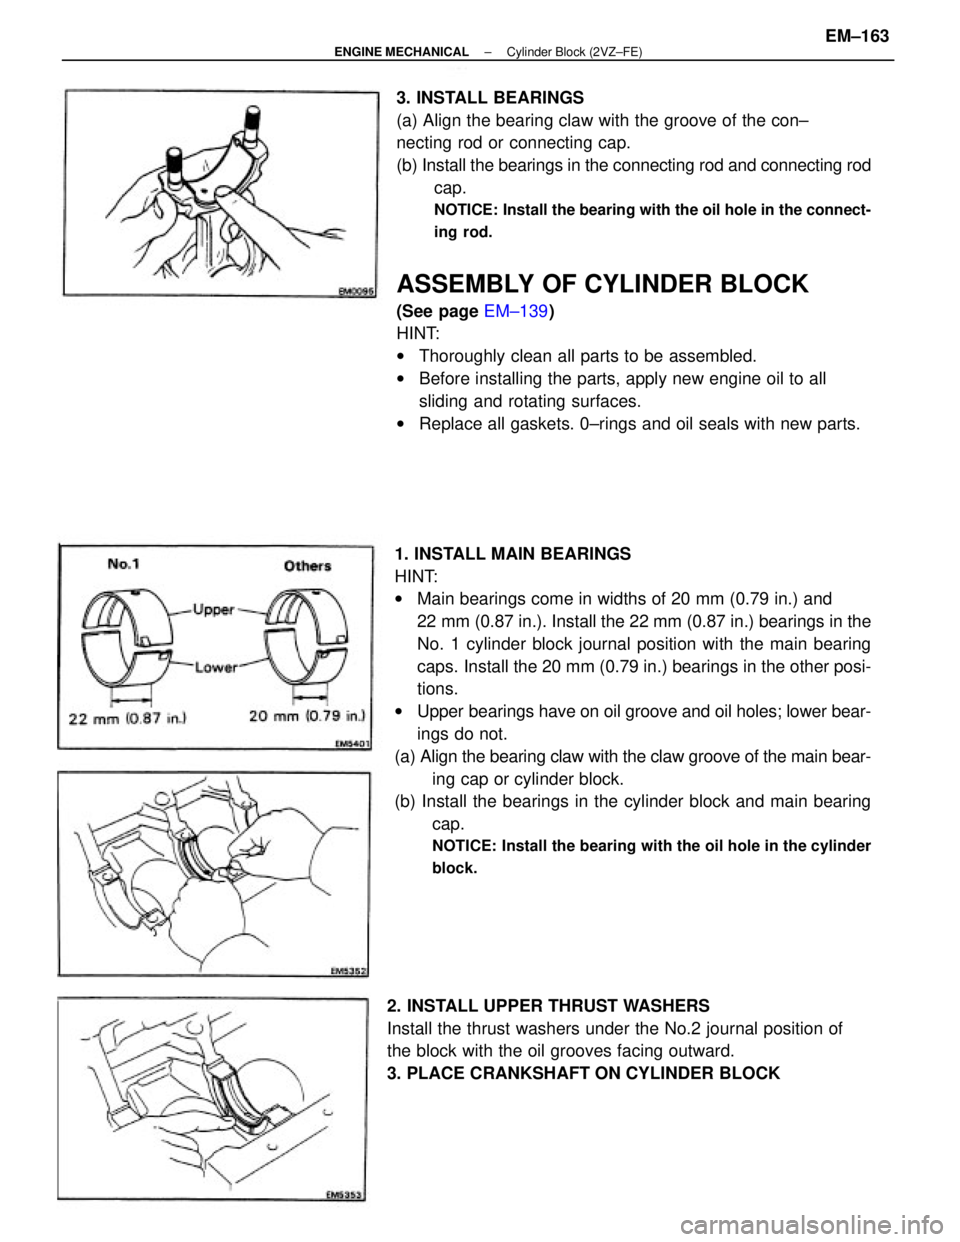
1. INSTALL MAIN BEARINGS
HINT:
wMain bearings come in widths of 20 mm (0.79 in.) and
22 mm (0.87 in.). Install the 22 mm (0.87 in.) bearings in the
No. 1 cylinder block journal position with the main bearing
caps. Install the 20 mm (0.79 in.) bearings in the other posi-
tions.
wUpper bearings have on oil groove and oil holes; lower bear-
ings do not.
(a) Align the bearing claw with the claw groove of the main bear-
ing cap or cylinder block.
(b) Install the bearings in the cylinder block and main bearing
cap.
NOTICE: Install the bearing with the oil hole in the cylinder
block.
3. INSTALL BEARINGS
(a) Align the bearing claw with the groove of the con±
necting rod or connecting cap.
(b) Install the bearings in the connecting rod and connecting rod
cap.
NOTICE: Install the bearing with the oil hole in the connect-
ing rod.
ASSEMBLY OF CYLINDER BLOCK
(See page EM±139)
HINT:
wThoroughly clean all parts to be assembled.
wBefore installing the parts, apply new engine oil to all
sliding and rotating surfaces.
wReplace all gaskets. 0±rings and oil seals with new parts.
2. INSTALL UPPER THRUST WASHERS
Install the thrust washers under the No.2 journal position of
the block with the oil grooves facing outward.
3. PLACE CRANKSHAFT ON CYLINDER BLOCK
± ENGINE MECHANICALCylinder Block (2VZ±FE)EM±163
Page 1341 of 2389

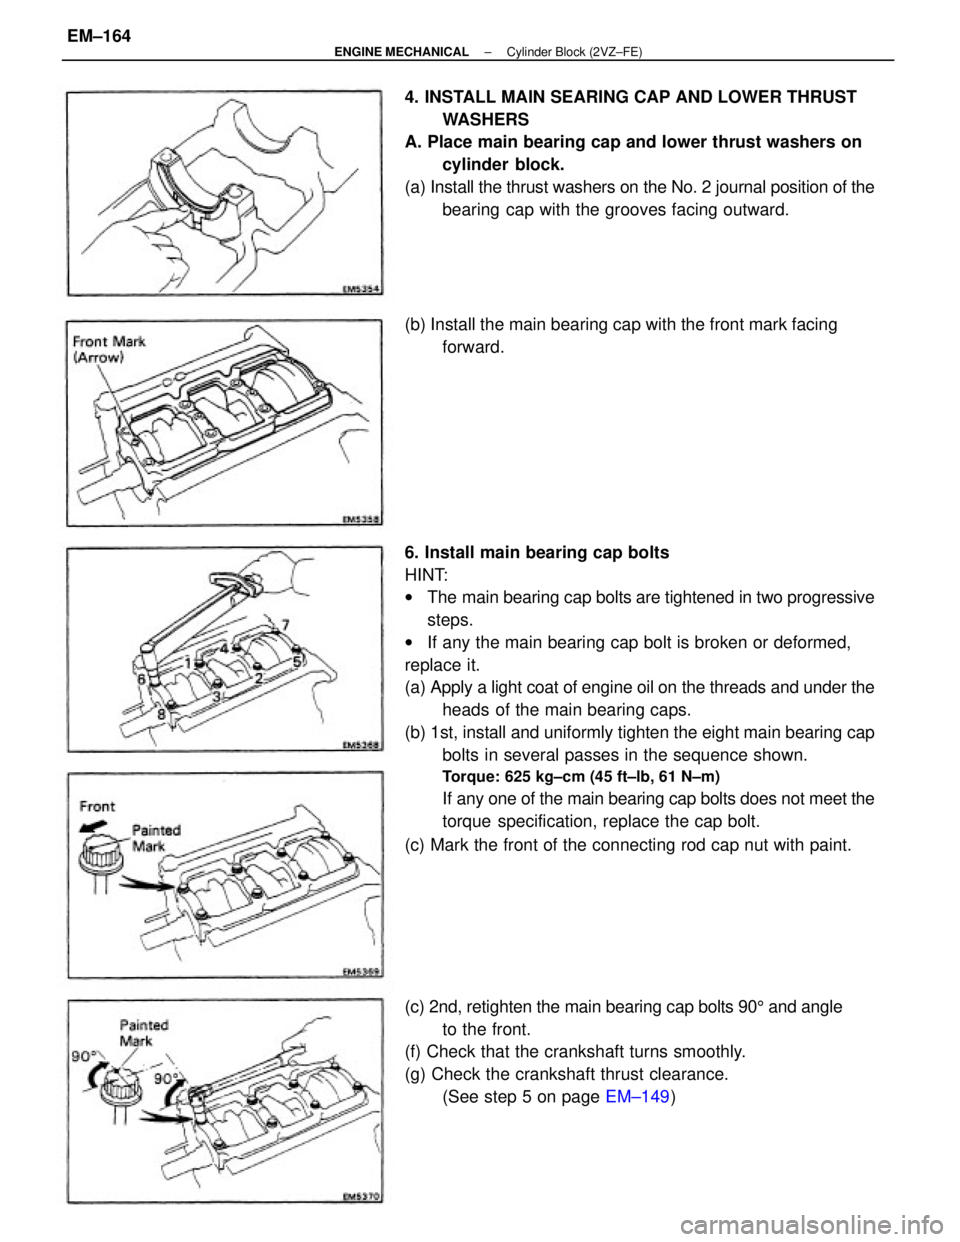
6. Install main bearing cap bolts
HINT:
wThe main bearing cap bolts are tightened in two progressive
steps.
wIf any the main bearing cap bolt is broken or deformed,
replace it.
(a) Apply a light coat of engine oil on the threads and under the
heads of the main bearing caps.
(b) 1st, install and uniformly tighten the eight main bearing cap
bolts in several passes in the sequence shown.
Torque: 625 kg±cm (45 ft±lb, 61 N±m)
If any one of the main bearing cap bolts does not meet the
torque specification, replace the cap bolt.
(c) Mark the front of the connecting rod cap nut with paint. 4. INSTALL MAIN SEARING CAP AND LOWER THRUST
WASHERS
A. Place main bearing cap and lower thrust washers on
cylinder block.
(a) Install the thrust washers on the No. 2 journal position of the
bearing cap with the grooves facing outward.
(c) 2nd, retighten the main bearing cap bolts 905 and angle
to the front.
(f) Check that the crankshaft turns smoothly.
(g) Check the crankshaft thrust clearance.
(See step 5 on page EM±149) (b) Install the main bearing cap with the front mark facing
forward.
± ENGINE MECHANICALCylinder Block (2VZ±FE)EM±164
Page 1342 of 2389

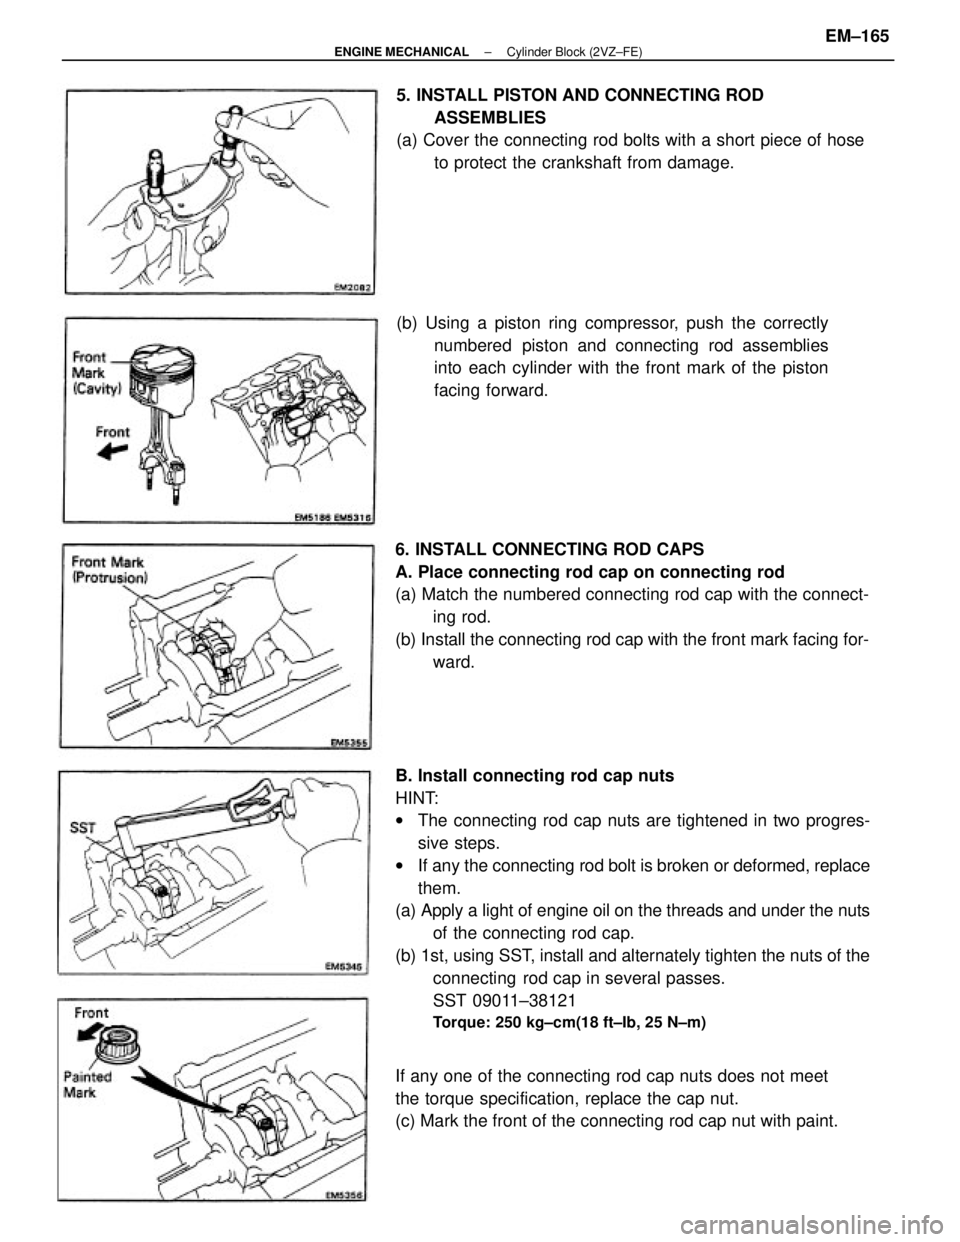
B. Install connecting rod cap nuts
HINT:
wThe connecting rod cap nuts are tightened in two progres-
sive steps.
wIf any the connecting rod bolt is broken or deformed, replace
them.
(a) Apply a light of engine oil on the threads and under the nuts
of the connecting rod cap.
(b) 1st, using SST, install and alternately tighten the nuts of the
connecting rod cap in several passes.
SST 09011±38121
Torque: 250 kg±cm(18 ft±Ib, 25 N±m)
6. INSTALL CONNECTING ROD CAPS
A. Place connecting rod cap on connecting rod
(a) Match the numbered connecting rod cap with the connect-
ing rod.
(b) Install the connecting rod cap with the front mark facing for-
ward. 5. INSTALL PISTON AND CONNECTING ROD
ASSEMBLIES
(a) Cover the connecting rod bolts with a short piece of hose
to protect the crankshaft from damage.
If any one of the connecting rod cap nuts does not meet
the torque specification, replace the cap nut.
(c) Mark the front of the connecting rod cap nut with paint.(b) Using a piston ring compressor, push the correctly
numbered piston and connecting rod assemblies
into each cylinder with the front mark of the piston
facing forward.
± ENGINE MECHANICALCylinder Block (2VZ±FE)EM±165