Page 137 of 171
inter
lliJ
i
@
j2J
c
Arrow
m
lrk
J
II
J
Fig
A
13
Installing
the
gudgeon
pin
circlip
Fig
A
12
Assembling
11
piston
and
connecting
rod
Fig
A
14
Installing
the
cylinder
block
oil
se
l
Apply
liquid
packing
he
e
Fig
A
IS
Rear
be
ring
cap
9
3
6
8
r
r
Q
i
ig
JtJl
f
it
I
1
f
l
O
2
1
lJ@O
j
0
i4i
Front
o
7
5
2
4
10
Fig
A
16
Connecting
rod
caps
and
lock
wIshers
Fig
A
18
Cylinder
head
boils
lightening
sequence
Fig
A
19
Imta1ling
the
ignition
distn1
utOT
note
the
position
of
rotOf
56
Fig
A
20
Tensioning
the
oil
pump
drive
dlain
Page 138 of 171

CAMSHAFT
AND
CAMSHAFT
BEARINGS
Check
the
camshaft
bearing
and
journals
for
signs
of
wear
Plastigage
should
be
used
to
check
the
clearance
between
bear
ing
and
journal
which
should
be
0
025
0
075
mm
O
OOl
0
0030
in
The
cylinder
head
assembly
must
be
renewed
if
the
wear
limit
of
0
mm
0
0039
in
is
exceeded
Place
the
camshaft
in
V
blocks
and
apply
a
dial
gauge
to
the
centre
journal
to
check
the
amount
of
camshaft
bend
The
run
out
of
the
camshaft
must
not
exceed
0
03
mm
0
0012
in
It
should
be
noted
that
the
actual
run
out
will
be
half
the
value
indicated
on
the
dial
gauge
when
the
camshaft
is
turned
one
full
revolution
Check
the
camshaft
end
play
which
should
be
within
0
07
0
148
mm
0
0028
0
0058
in
Check
the
earn
contacting
surfaces
of
the
valve
rocker
and
the
earn
heels
of
the
camshaft
Slight
damage
can
be
corrected
using
a
fine
oil
stone
It
is
advisable
at
this
stage
to
check
the
clearance
of
the
rocker
shaft
and
rocker
bushes
which
should
be
0
016
0
052
mm
0
0006
0
0020
in
The
parts
must
be
renewed
if
the
wear
limit
of
0
07
mm
0
0028
in
is
exceeded
CYLINDER
BLOCK
Inspection
and
Overhaul
Check
the
block
for
signs
of
cracks
or
flaws
Measure
the
joint
face
for
distortion
using
a
straight
edge
and
feeler
gauge
as
described
for
the
L14
Ll6
and
L18
engines
The
surface
must
be
reground
if
the
maximum
limit
of
0
10
mm
0
0039
in
is
exceeded
Check
the
cylinder
bores
for
wear
out
of
round
and
excessive
taper
Use
a
bore
gauge
to
take
readings
at
the
top
middle
and
bottom
positions
of
the
bore
as
previously
described
The
standard
bore
diameters
are
85
000
mm
0
035
0
mm
3
347
0
0014
0
in
with
a
wear
limit
of
0
2
mm
0
0079
in
Out
of
round
and
taper
must
not
exceed
0
02
mm
0
0008
in
If
any
of
the
bores
are
worn
or
in
excess
of
the
specified
limi
t
then
all
bores
must
be
rebored
at
the
same
time
Pistons
are
available
in
five
oversizes
and
should
be
selected
in
accordance
with
the
amount
of
wear
of
the
cylinder
Refer
to
the
instructions
given
for
the
Ll4
L16
and
L18
engines
and
select
pistons
from
the
table
below
PISTON
SIZE
Standard
250
5
500
5
750
S
1000
S
1250
S
OUTER
DIAMETER
84
958
84
990
mm
3
345
3
346
in
85
220
85
240
mm
3
355
3
356
in
85
470
85
490
mm
3
365
3
366
in
85720
85
740
mm
3
375
3
376
in
85
970
85
990
mm
3
3846
3
3854
in
86
220
86
240
mm
3
394
3
395
in
Cylinder
liners
can
be
fitted
if
the
bores
areworn
beyond
the
maximum
limit
Undersize
liners
are
available
with
outer
diam
ters
of
89
091
89
126
mm
3
507
3
509
in
and
inner
diameters
of
83
5
84
5
mm
3
287
3
327
in
The
liners
are
an
interference
fit
in
the
block
and
must
be
rebored
after
fitting
PISTONS
Checking
Oteck
the
pistons
for
signs
of
seizure
and
wear
measure
the
side
clearance
of
the
rings
in
the
ring
grooves
and
check
the
piston
ring
gaps
as
previously
described
for
the
L14
Ll6
and
Ll8
engines
Compare
the
figures
obtained
with
those
given
in
the
tables
opposite
Side
clearance
in
grooves
Top
ring
Second
ring
Oil
ring
Standard
0
04
0
08
mm
0
0016
0031
in
0
02
0
06
mm
0
0008
0
0024
in
0
02
0
06
mm
0
0008
0
0024
in
Limit
LO
mm
0
0039
in
LO
mm
0
0039
in
LO
mm
0
0039
in
Piston
ring
gap
Top
ring
Second
ring
Oil
ring
Top
ring
Second
ring
Oil
ring
Standard
0
35
0
55
mm
0
01
38
D
021
7
in
0
3
5
mm
0
0138
0
0197
in
0
35
55
mm
O
oJ38
0217
in
Limit
LO
mm
0
0394
in
LO
mm
0
0394
in
LO
mm
0
0394
in
Top
ring
Second
ring
Oil
ring
Measure
the
outer
diameter
of
the
gudgeon
pin
in
relation
to
the
hole
diameter
in
the
piston
Compare
the
figures
obtained
with
those
given
in
Technical
Data
and
replace
the
piston
and
pin
if
the
wear
limit
is
exceeded
CONNECTING
RODS
Checking
Check
the
connecting
rods
for
bends
or
twists
using
a
suit
able
connecting
rod
aligner
The
maximum
deviation
should
not
exceed
0
05
mm
0
0020
in
per
100
mm
3
94
in
of
rod
Straighten
or
replace
any
rod
which
does
not
comply
with
the
specified
limit
When
renewing
a
rod
make
sure
that
the
weight
difference
between
new
and
old
rods
in
within
6
gr
212
oz
Install
the
connecting
rods
with
bearings
to
the
correspond
ing
crank
pins
and
check
that
the
end
play
of
the
big
ends
is
between
0
10
0
246
mm
0
0043
0
0097
in
Replace
the
appropriate
rod
if
the
maximum
limit
of
0
3
mm
0
0118
in
is
exceeded
CRANKSHAFT
Inspection
and
Overhaul
Clean
the
crankshaft
thoroughly
and
check
the
journals
and
crank
pins
for
taper
and
out
of
round
Use
a
micrometer
to
measure
the
journals
and
crankpins
at
the
positions
shown
in
Fig
A
7
It
will
be
necessary
to
regrind
the
crankshaft
if
the
specified
limit
of
0
03
mm
0
0012
in
is
exceeded
and
then
fit
the
appropriate
undersize
bearings
Place
the
crankshaft
in
V
blocks
as
described
for
the
L14
L16
and
LIB
engines
and
apply
a
dial
gauge
to
the
centre
journal
to
check
that
the
bend
limit
of
0
05
mm
0
0020
in
is
not
exceeded
The
actual
bend
value
will
be
half
the
reading
obtained
on
the
gauge
Install
the
crankshaft
in
the
cylinder
block
and
check
the
crankshaft
end
float
which
should
be
0
060
0
192
mm
0
0024
0
0076
in
Replace
the
centre
shims
if
the
specified
figure
is
exceeded
Make
sure
that
the
main
drive
shaft
pilot
bearing
at
the
rear
of
the
crankshaft
is
not
worn
or
damaged
in
any
way
Remove
the
bearing
if
necessary
using
the
special
tool
ST49700000
as
shown
in
Fig
A
8
Clean
the
bearing
hole
oil
the
outer
side
of
the
new
bearing
and
use
a
drift
as
shown
in
Fig
A
9
to
drive
it
into
the
hole
Insert
2
grams
0
07
oz
of
multi
purpose
grease
into
the
hole
as
illustrated
Main
bearing
clearance
Check
the
main
bearing
clearances
as
described
for
the
Ll4
Ll6
and
Ll8
engines
The
Plastigage
should
be
placed
so
57
Page 139 of 171
inter
ill
j
@
j2
J
CHAIN
TENSIONER
CA
SPROCKET
TIMING
MARK
AOJUSTING
SCREW
OIL
JET
CHA
N
GU
DE
CRANK
SPROCKET
Fi3
A
17
TiminS
Jsm
Ai
m
I
Jjr
c
rtIuNtor
t
1
I
I
II
I
Y
uum
ing
Ii
Antl
b
cktire
ChedC
s
p
cialellibnt8d
AI
llJ
ion
nOzzle
Fig
A
23
Details
of
the
exhaust
emission
control
system
58
Page 140 of 171

that
it
is
clear
of
the
oil
hole
Install
the
bearing
caps
and
tighten
the
bolts
to
a
torque
reading
of
10
0
1
LO
kgm
72
3
79
51b
ft
The
standard
main
bearing
clearance
is
0
03
0
06
mm
0
0012
0
0024
in
with
a
wear
limit
of
0
1
mm
0
0039
in
If
the
specified
limit
is
exceeded
an
undersize
bearing
must
be
fitted
and
the
crankshaft
journal
ground
accordingly
Bearings
are
available
in
four
undersizes
See
Technical
Data
Connecting
rod
bearing
clearance
Check
the
connecting
rod
bearing
clearances
in
a
similar
manner
to
the
main
bearing
clearances
The
standard
clearance
is
0
03
0
06
mm
0
0012
0
0024
in
with
a
wear
limit
of
0
1
mm
0
0039
in
Undersize
bearings
must
be
fitted
and
the
crankpins
reground
if
the
specified
limit
is
exceeded
Bearings
are
available
in
four
undersizes
See
Technical
Data
Fitting
the
crankshaft
bearings
Check
the
fit
of
the
bearing
shells
in
the
following
manner
Install
the
bearings
on
the
main
bearing
caps
and
cylinder
block
bearing
recess
and
tighten
the
cap
bolts
to
the
specified
torque
reading
of
10
0
11
0
kgm
72
3
79
5
Ib
ft
Slacken
one
of
the
cap
baits
and
check
the
clearance
between
the
cap
and
cylinder
block
with
a
feeler
gauge
as
described
for
the
L14
Ll6
and
LIS
engines
The
bearing
crush
should
be
from
0
to
0
04
mm
0
to
0
0016
in
Replace
the
bearing
if
the
clearance
is
not
correct
Check
the
connecting
rod
bearings
in
a
similar
manner
after
tightening
the
rod
cap
bolts
to
a
torque
reading
of
4
5
5
0
kgm
32
6
36
2
Ib
ft
ENGINE
Assembling
Make
sure
that
all
components
are
perfectly
clean
before
starting
to
assemble
the
engine
Refer
to
the
instructions
given
for
the
L14
U6
and
LIS
engines
Cylinder
Head
Install
the
valve
spring
seats
and
valves
Fit
the
oil
seal
rings
on
the
valve
stems
and
place
the
seal
ring
covers
over
the
oil
seal
rings
Note
that
a
gap
of
from
0
3
to
0
7
mm
0
0118
to
0
0276
in
should
be
present
between
the
seal
ring
cover
and
spring
seat
If
the
gap
is
less
than
0
3
mm
0
0118
in
the
oil
seal
ring
or
the
cover
must
be
replaced
Assemble
the
valve
springs
and
retainers
Compress
the
valve
springs
and
install
the
cotters
See
instructions
for
the
LI4
U6
and
Ll8
engines
Assemble
the
camshaft
brackets
valve
rockers
seats
spacers
and
springs
on
the
rocker
shafts
in
the
order
shown
in
Fig
A
l
O
Note
that
the
exhaust
rocker
shaft
has
identification
marks
but
the
intake
rocker
shaft
has
not
Make
sure
that
the
oil
holes
point
in
the
direction
shown
It
may
be
advisable
to
insert
any
convenient
bolts
into
the
bolt
holes
of
the
front
and
rear
cam
shaft
brackets
to
prevent
the
assembly
from
being
displaced
Mount
the
camshaft
on
the
head
fit
the
rocker
assembly
and
tighten
the
nuts
Make
sure
that
the
mark
on
the
flange
of
the
camshaft
is
aligned
with
the
arrow
mark
on
the
No
I
earn
shaft
bracket
as
shown
in
Fig
A
II
Pistons
and
connecting
rods
Assemble
the
pistons
gudgeon
pins
and
connecting
rods
in
accordance
with
the
cylinder
numbers
Heat
the
piston
to
a
temperature
of
500
to
600
1220
to
1400F
and
press
the
gudgeon
pin
in
by
hand
The
pistons
and
connecting
rods
must
be
assembled
as
shown
in
Fig
A
12
with
the
arrow
mark
on
the
head
of
the
piston
pointing
to
the
front
of
the
engine
Fit
new
clips
to
both
ends
of
the
gudgeon
pins
as
indicated
in
Fig
A
13
Fit
the
piston
rings
with
the
marks
facing
upwards
Place
the
bearings
on
the
connecting
rods
and
caps
making
sure
that
the
backs
of
the
bearing
shells
are
perfectly
clean
Assembling
the
engine
Insert
the
oilscal
into
the
grooves
of
the
cylinder
block
and
rear
bearing
cap
Fit
the
seal
down
with
the
speCial
tool
ST49750000
if
available
as
shown
in
Fig
A
14
and
trim
off
the
excess
with
a
knife
Apply
sealing
agent
to
the
oil
plug
and
install
it
in
the
cylinder
block
Fit
the
main
bearings
lubricate
with
clean
engine
oil
and
install
the
crankshaft
Fit
the
bearing
caps
and
tighten
the
bolts
to
a
torque
reading
of
10
0
to
I
LO
kgm
72
3
to
79
5
Ib
ft
Note
that
liquid
packing
should
be
applied
to
the
rear
bear
ing
cap
surfaces
as
shown
in
Fig
A
15
Fit
the
thrust
washers
at
both
sides
of
the
No
2
bearing
with
the
oil
channel
in
the
washers
facing
the
thrust
face
of
the
crankshaft
Install
the
rear
bearing
cap
side
seal
so
that
is
projects
0
2
to
0
6
mm
0
008
to
0
024
in
from
the
lower
surface
of
the
cylind
r
block
then
apply
liquid
packing
to
the
projecting
tip
Install
the
engine
rear
plate
Fit
the
flywheel
and
tighten
the
bolts
to
a
lorque
reading
of
10
0
to
11
0
kgm
72
3
to
79
5
ib
ft
using
new
lock
washers
Lubricate
the
crankshaft
journals
pistons
and
cylinder
bores
with
clean
engine
oil
and
install
the
piston
and
connecting
rod
assemblies
The
pistons
should
be
arranged
so
that
the
arrow
marks
face
towards
the
front
and
with
the
piston
ring
gaps
at
1800
to
each
other
Make
sure
the
gaps
do
not
face
to
the
thrust
side
of
the
piston
or
in
the
same
axial
direction
as
the
gudgeon
pin
Install
the
connecting
rod
caps
o
that
the
marks
face
the
same
way
and
tighten
the
bolts
to
a
torque
reading
of
4
5
to
5
0
kgm
32
6
to
36
2
Ib
ft
Bend
the
lock
washers
as
shown
in
FigA16
Fit
the
oil
jet
to
the
front
of
the
cylinder
block
Install
the
chain
tensioner
and
stopper
crankshaft
sprocket
and
timing
chain
Note
that
the
timing
mark
on
the
chain
must
be
aligned
with
the
mark
on
the
sprocket
as
shown
in
Fig
A
17
Smear
the
mounting
face
of
the
oil
pump
with
sealing
agent
Three
Bond
No
4
or
equivalent
install
the
pump
and
tempora
rily
tighten
the
mounting
bolts
Adjust
the
tension
of
the
oil
pump
chain
using
the
pin
as
the
central
point
then
tighten
the
mounting
bolts
Install
the
oil
thrower
Fit
the
chain
cover
into
position
after
coating
the
new
cover
gasket
with
sealing
compound
Cut
off
the
projecting
parts
of
the
gasket
Fit
the
crankshaft
pulley
and
tighten
the
pulley
nut
to
a
torque
reading
of
15
0
to
20
0
kgm
108
5
to
144
61b
ft
Bend
the
lock
washer
Install
the
oil
strainer
and
oil
pump
Invert
the
engine
and
set
the
No
I
piston
to
T
D
C
of
the
compression
stroke
Note
that
the
notch
on
the
crankshaft
S9
Page 141 of 171
inter
lliJ
@
jll
Air
njection
noule
Air
gallery
pipe
Fig
A
24
Sectional
view
of
air
injection
nozzle
and
exhaust
port
J
I
F
J
Oil
pan
CarbUretor
ir
cleaner
I
7
Control
aln
Ialiable
orifice
alve
Fig
A
21
Section
through
the
pressure
relief
valve
DiIIchqe
w
Fig
A
22
Details
of
the
positive
crankcase
ventilation
system
I
Bal
Ifttrk
ion
orif
c
Fig
A
2S
Sectional
view
of
anti
backCue
valve
Fig
A
26
Adjusting
the
ignition
timing
and
idling
speed
mixture
emission
control
system
510
Page 142 of 171

pulley
should
be
aligned
with
the
T
mark
on
the
chain
cover
Install
the
cylinder
head
assembly
Coat
the
cylinder
block
side
of
the
head
gasket
with
sealing
agent
Three
Bond
No
4
or
equivalent
but
take
care
that
the
scaling
agent
does
not
enter
the
cylinders
Tighten
the
head
bolts
in
several
stages
to
a
torque
reading
of
8
0
to
9
0
kgrn
58
to
65
lb
ft
Tighten
the
bolts
to
the
sequence
shown
in
Fig
A
IB
Pull
the
timing
chain
out
of
the
chain
cover
and
set
it
on
the
camshaft
sprocket
so
that
the
timing
marks
are
aligned
then
place
the
sprocket
and
chain
on
the
camshaft
Install
the
distributor
drive
gear
on
the
camshaft
and
tighten
the
bolt
to
a
torque
reading
of
4
5
to
5
5
kgrn
32
6
to
39
8
lb
ft
Note
that
the
camshaft
bolt
has
a
left
hand
thread
Adjust
the
valve
clearances
as
described
under
the
appro
priate
heading
Fit
the
rubber
plugs
at
the
front
and
rear
of
the
cylinder
head
taking
care
to
apply
sealing
agent
to
the
rear
plug
Install
the
chain
adjusting
screw
and
adjust
the
tension
of
the
chain
in
the
following
manner
Rotate
the
crankshaft
clockwise
to
establish
the
correct
chain
tension
screw
the
adjusting
screw
fully
home
then
back
it
off
by
half
a
turn
and
secure
with
the
locknut
Install
the
valve
rocker
cover
and
fit
the
water
pump
Note
that
one
of
the
water
pump
mounting
bolts
also
secures
the
generator
adjusting
arm
Install
the
bracket
and
alternator
water
pump
pulley
fan
blades
and
fan
belt
Tighten
the
fan
bolts
and
lock
each
pair
of
bolts
together
using
wire
inserted
through
the
holes
provided
in
the
bolts
Install
the
oil
filter
and
fit
the
rocker
cover
hose
Install
the
distributor
so
that
the
vacuum
control
unit
and
rotor
arc
positioned
as
shown
in
Fig
A
19
Oil
the
distributor
driven
gear
Fit
the
breather
assembly
the
clamp
of
the
pipe
is
tightened
together
with
the
exhaust
manifold
Install
the
spark
plugs
and
connect
the
high
tension
leads
Install
the
exhaust
manifold
Fit
the
head
shield
plate
and
engine
slinger
and
tighten
them
together
Note
that
the
exhaust
manifold
gasket
must
be
fitted
with
the
steel
plate
facing
the
manifold
Install
the
clutch
as
described
in
the
section
CLUTCH
Remove
the
engine
from
the
mounting
stand
and
install
the
gearbox
intake
manifold
and
carburettor
stater
motor
engine
mounting
oil
pressure
warning
switch
etc
Fill
the
engine
and
gearbox
to
the
correct
levels
with
recommended
oils
and
refill
the
cooling
system
Adjust
the
ignition
timing
and
carburettor
as
described
in
the
appropriate
sections
VALVE
CLEARANCES
Adjusting
The
valves
clearances
can
be
adjusted
in
a
similar
manner
to
the
instructions
given
for
the
L14
LI6
L18
engines
Initially
adjust
the
clearances
with
the
engine
switched
off
and
cold
to
0
2
mm
0
0079
in
for
both
intake
and
exhaust
valves
Set
the
final
clearances
to
0
28
mm
0
011
in
for
both
intake
and
exhaust
valves
with
the
engine
warmed
up
to
its
normal
operating
temperature
OIL
PUMP
The
gear
type
oil
pump
is
chain
driven
from
a
sprocket
on
the
crankshaft
The
pump
can
be
removed
in
the
following
manner
1
Remove
the
sump
plug
and
drain
the
engine
oil
Remove
the
distributor
as
described
in
the
section
IGNITION
2
Remove
the
cylinder
head
assembly
fan
belt
crankshaft
pulley
and
oil
sump
3
Take
off
the
chain
cover
with
oil
fl
inger
4
Remove
the
oil
pump
and
crankshaft
sprockets
with
the
drive
chain
then
withdraw
the
pump
after
removing
the
four
mounting
bolts
Separate
the
cover
from
the
body
by
unscrewing
the
four
securing
bolts
and
withdraw
the
drive
and
idler
gear
assemblies
Unscrew
the
threaded
plug
and
take
out
the
relief
valve
and
spring
Clean
the
parts
thoroughly
and
inspect
them
four
signs
of
wear
or
damage
Check
the
following
clearances
Gear
backlash
0
1
to
0
5
mm
0
0039
to
0
0195
in
Side
clearance
between
gear
and
body
0
016
to
0
15
mm
0
0006
to
0
0059
in
Clearance
between
drive
shaft
and
body
0
016
to
0
1
mm
0
0006
to
0
0039
in
Clearance
between
drive
shaft
and
cover
0
02
to
0
1
mm
0
00078
to
0
0039
in
Clearance
between
idler
gear
and
idler
shaft
0
016
to
0
1
mm
0
0006
to
0
0039
in
Assembly
is
a
reversal
of
the
dismantling
procedures
taking
care
to
position
the
gears
so
that
the
dotted
mark
is
towards
the
cover
Install
the
pump
and
adjust
the
tension
of
the
drive
chain
by
ph
otting
the
pump
body
as
shown
in
Fig
A
20
When
the
chain
is
correctly
tensioned
it
should
be
capable
of
a
deflection
of
2
0
to
3
0
mm
0
079
to
0
118
in
as
indicated
OIL
PRESSURE
RELIEF
VALVE
The
pressure
relief
valve
shown
in
Fig
A
21
is
not
adjustable
This
valve
regulates
the
oil
pressure
to
4
55
4
85
kg
sq
cm
64
7
69
0
lb
sq
in
and
when
opened
allows
the
oil
to
by
pass
through
a
passage
in
the
pump
body
and
return
to
the
sump
Check
the
free
length
of
the
spring
which
should
be
64
0
to
66
0
mm
2
51
to
2
60
in
The
compressed
length
should
be
50
mm
at
7
8
to
9
7
kg
1
96
in
at
17
2
to
21
4Ibs
Renew
the
spring
if
necessary
OIL
FILTER
The
oil
filter
is
of
the
full
flow
type
with
a
replaceable
element
and
incorporates
a
by
pass
valve
in
the
cover
Oil
leaks
can
be
corrected
by
replacing
the
body
centre
shaft
or
cover
gaskets
The
body
and
centre
shaft
gaskets
should
always
be
renewed
after
dismantling
the
filter
S
1
Page 143 of 171

Renew
the
ruter
element
at
10
000
km
6000
miles
inter
vals
Dismantling
is
a
straight
forward
operation
Remove
the
plug
from
the
cover
and
withdraw
the
washer
spring
and
by
pass
valve
Check
the
free
length
and
compressed
length
of
the
by
pass
valve
spring
and
renew
if
necessary
The
free
length
of
the
spring
should
be
54
5
to
56
0
mm
2
14
to
2
20
in
and
the
compressed
length
49
0
mm
1
93
in
EMISSION
CONTROL
SYSTEM
Crankcase
and
exhaust
gas
emissions
are
controlled
by
two
systems
The
crankcase
emissions
by
a
Positive
Crankcase
Ventila
tion
System
and
the
exhaust
emissions
by
a
Nissan
Air
Injection
System
Brief
descriptions
of
the
systems
together
with
the
test
ing
and
servicing
procedures
are
given
below
Positive
Crankcase
Ventilation
System
lbis
system
returns
the
blow
by
gases
to
the
intake
mani
fold
and
the
carburettor
air
cleaner
see
Fig
A
22
Under
part
throttle
conditions
the
intake
manifold
draws
the
gases
through
a
variable
orifice
valve
Control
valve
into
the
combustion
chambers
Ventilating
air
is
then
drawn
from
the
carburettor
air
cleaner
and
passes
throy
gh
a
tube
in
to
the
crankcase
With
the
throttle
fully
open
the
manifold
vacuum
is
insuf
ficient
to
draw
the
gases
through
the
valve
Under
these
conditions
the
gases
flow
tluough
the
tube
to
the
air
cleaner
in
the
reverse
direction
The
gases
are
therefore
retained
or
burnt
to
lessen
the
risk
of
air
pollution
Servicing
and
testing
Once
a
year
or
every
20
000
km
12
000
miles
the
Posi
tive
Crankcase
Ventilation
System
should
be
serviced
as
follows
Check
all
hoses
and
connectors
for
signs
or
leakage
Discon
nect
the
hoses
and
blow
through
them
with
compressed
air
to
make
sure
they
are
not
blocked
Fit
a
new
hose
if
air
cannot
be
forced
through
Check
the
ventilation
control
valve
for
servicability
and
renew
it
if
defective
To
test
the
valve
run
the
engine
at
idling
speed
see
under
IGNITION
TIMING
AND
IDLING
SPEED
and
disconnect
the
ventilation
hose
from
the
rocker
cover
If
the
valve
is
working
correctly
a
hissing
noise
will
be
heard
as
air
passes
through
the
valve
and
a
strong
vacuum
should
be
felt
immediately
a
fInger
is
placed
over
the
valve
inlet
The
valve
cannot
be
serviced
and
must
be
renewed
if
unsatisfactory
Exhaust
emission
control
system
The
Nissan
Air
Injection
System
comprises
an
air
cleaner
belt
driven
air
injection
pump
check
valve
anti
backfIre
valve
and
the
related
connecting
tubes
and
hoses
The
sealed
pump
is
driven
by
the
engine
and
injects
clean
mtered
air
into
the
exhaust
port
of
each
cylinder
The
clean
air
combines
with
unbumt
gases
as
they
are
expelled
into
the
exhaust
manifolds
and
reduces
the
emissions
to
below
the
permissible
level
required
by
air
pollution
laws
A
modified
carburettor
and
distributor
is
fitted
with
this
type
of
system
The
air
injection
system
is
shown
in
Fig
A
23
The
anti
backfrre
valve
is
controlled
by
intake
manifoLd
vacuum
and
is
fitted
to
prevent
the
exhaust
system
from
back
fIring
during
deceleration
When
decelerating
the
mixture
in
the
intake
manifold
is
too
rich
to
bum
and
ignites
as
it
combines
with
air
injected
by
the
pump
The
valve
shuts
off
the
air
delivered
SI2
to
the
exhaust
system
during
the
flrstpredetennined
period
of
dCl
cleration
and
prevents
back
firing
from
occuring
To
check
valve
is
located
between
the
air
pump
and
air
injection
nozzle
and
is
fitted
to
prevent
a
backflow
of
exhaust
gases
from
entering
the
system
The
valve
doses
when
the
exhaust
manifold
pressure
exceeds
air
injection
pressure
as
It
will
at
high
speed
or
if
the
pump
drive
belt
fails
A
relief
valve
is
mounted
in
the
discharge
cavity
of
the
air
pump
and
is
incorporated
to
hold
the
exhaust
gas
temperatures
to
a
minimum
to
minimize
any
loss
of
power
caused
by
the
air
injection
system
and
to
protect
the
pump
from
excessive
back
pressures
Testing
The
following
tests
should
be
carried
out
to
make
sure
that
the
exhaust
emission
control
system
is
operating
correctly
The
engine
must
be
at
normal
operating
temperature
to
perfonn
the
tests
Before
the
system
can
be
tested
the
engine
itself
must
be
checked
to
ensure
that
It
is
functioning
correctly
Disconnect
the
ant
backflTe
valve
sensing
hose
and
insert
a
plug
into
the
hose
to
close
the
passage
to
the
intake
manifold
Make
sure
that
the
engine
operates
normally
and
then
reconnect
the
parts
Testing
the
check
valve
Run
the
engine
until
it
reaches
its
nonnal
operating
tem
pemture
and
check
all
hoses
and
connectors
for
signs
of
leakage
Disconnect
the
air
supply
hose
from
the
check
valve
and
check
the
position
of
the
plate
inside
the
valve
body
The
plate
should
be
lightly
positioned
against
the
valve
seat
and
away
from
the
air
distributor
manifold
Insert
a
suitable
probe
into
the
valve
and
depress
the
plate
When
released
the
plate
should
return
freely
to
its
position
against
the
valve
seat
Leave
the
hose
disconnected
and
start
the
engine
Slowly
increase
the
engine
speed
to
1500
r
p
m
and
examine
the
valve
to
make
sure
that
the
exhaust
gases
are
not
leaking
The
valve
may
flutter
or
vibrate
at
idling
speed
but
this
is
quite
nonnal
Renew
the
valve
if
necessary
Testing
the
ant
backftre
valve
Run
the
engine
until
it
reaches
its
normal
operating
tem
perature
Check
the
hoses
and
connections
for
signs
of
leakage
Rectify
any
leakage
before
testing
the
vaNe
Accelerate
the
engine
in
neutral
and
allow
the
throttle
to
close
quickly
The
valve
is
operating
correctly
if
the
exhaust
system
does
not
backfire
Further
test
can
be
made
with
the
by
pass
hose
to
the
air
pump
suction
line
disconnected
from
the
valve
Open
and
close
the
throttle
valve
rapidly
Hold
a
fInger
over
the
valve
outlet
and
check
that
air
flows
for
between
a
half
and
one
second
If
air
does
not
flow
or
alternatively
if
it
flows
continuously
for
more
than
two
seconds
the
valve
is
faulty
and
must
be
renewed
Disconnect
the
vacuum
sensing
hose
from
the
valve
Insert
a
suitable
plug
securely
into
the
hose
The
valve
is
not
functioning
correctly
if
the
idling
speed
now
differs
excessively
from
the
speed
at
which
the
engine
operated
with
the
hose
connected
Testing
the
air
pump
Special
tools
are
required
to
test
the
air
pump
The
vehicle
should
therefore
be
taken
to
an
Approved
Agent
capable
of
Page 144 of 171

carrying
out
extensive
tests
with
the
necessary
equipment
The
hoses
and
connectors
can
of
course
be
checked
for
signs
of
leakage
and
corrected
as
necessary
Also
the
tension
of
the
air
pump
belt
IGNITION
TIMING
AND
IDLING
SPEED
Emission
control
system
The
ignition
timing
should
be
set
and
the
idling
speed
mixture
adjusted
in
the
folloWing
manner
Run
the
engine
until
it
reaches
its
normal
operating
tem
perature
Connect
an
ignition
tachometer
and
timing
light
observ
ing
the
manufacturers
instructions
NOTE
If
the
vehicle
is
equipped
with
automatic
transmission
make
sure
that
the
dashpot
does
not
prevent
the
throttle
from
closing
Turn
the
throttle
shaft
arm
adjusting
screw
anti
clock
wise
so
that
the
tip
of
the
screw
is
clear
of
the
throttle
shaft
arm
see
Fig
A
26
Turn
the
throttle
adjusting
screw
to
set
the
idling
speed
to
700
r
p
m
650
rpm
for
automatic
transmission
Adjust
the
ignition
timing
to
5
A
T
D
C
Refererence
should
be
made
to
the
instructions
given
in
the
section
IGNITION
SYSTEM
for
the
L14
L16
and
LI8
engines
for
ignition
timing
details
Turn
the
idling
adjustment
screw
and
throttle
adjusting
screw
until
the
engine
runs
smoothly
a
t
the
correct
idling
speed
Turn
the
idling
adjustment
screw
clockwise
until
the
engine
speed
starts
to
drop
as
a
weaker
mix
ture
is
obtained
Now
turn
the
idling
adjustment
screw
anti
clockwise
by
one
turn
one
and
a
half
turns
for
automatic
transmission
to
obtain
a
richer
mix
ture
Adjust
the
idling
speed
to
700
rpm
650
rpm
for
automatic
transmission
by
turning
the
throttle
adjusting
screw
Make
sure
that
the
ignition
timing
remains
at
50
A
T
D
C
Turn
the
throttle
shaft
ann
adjusting
screw
clockwise
until
the
tip
of
the
screw
just
contacts
the
throttle
shaft
ann
The
screw
must
not
exert
pressure
on
the
throttle
shaft
arm
EMISSION
CONTROL
SYSTEM
Maintenance
The
system
should
be
inspected
and
serviced
every
I
2
months
or
20
000
km
12
000
miles
whichever
comes
fIrst
to
make
sure
that
the
exhaust
emissions
are
maintained
at
the
minimum
level
Check
the
carburettor
choke
setting
and
adjust
as
described
in
the
section
FUEL
SYSTEM
Check
the
carburettor
idling
speed
mixture
and
adjust
if
necessary
as
described
under
the
heading
IGNITION
TIMING
AND
IDLING
SPEED
in
this
section
2
Check
the
distributor
earn
dwell
angle
and
also
the
condi
tion
of
the
contact
breaker
points
Check
the
ignition
timing
and
adjust
if
necessary
The
distributor
dwell
angle
should
be
adjusted
to
49
55
degrees
and
the
points
gap
to
0
45
0
55
mm
0
0177
0
0217
in
3
Remove
and
clean
the
sparking
plugs
Renew
any
plug
with
badly
worn
electrodes
Set
the
plug
gaps
to
0
80
0
90
mm
0
0315
0
0355
in
by
adjusting
the
earth
electrode
IGNITION
SYSTEM
The
maintenance
and
servicing
procedures
for
the
compo
nents
of
the
ignition
system
on
vehicles
fitted
with
the
GIS
engine
are
basically
similar
to
the
instructions
previously
given
for
the
Ll4
LI6
and
LIS
engines
The
distributor
is
however
of
a
different
type
Either
an
Hitachi
0416
57
distributor
being
fitted
or
an
Hitachi
0423
53
if
the
vehicle
is
equipped
with
an
emission
control
system
The
distributors
have
different
advance
curve
characteristics
as
shown
in
Technical
Data
IGNITION
TIMING
Check
the
ignition
timing
with
a
timing
light
as
previously
described
for
the
LI4
L16
and
L
8
engines
Disconnect
the
distributor
vacuum
line
and
run
engine
at
idling
speed
or
slightly
below
The
timing
should
be
set
at
8
BTDCj600
rpm
for
the
D416
57
distributor
or
at
5
ATDCj600
rpm
for
the
D423
53
distributor
fItted
to
engines
with
emission
control
systems
IGNITION
DISTRIBUTOR
Maintenance
Maintenance
instructions
are
similar
to
those
given
for
the
L14
LI6
and
L18
engines
Set
the
contact
breaker
points
gap
to
0
45
0
55
mm
0
0177
0
0217
in
as
previously
described
SPARKING
PLUGS
The
sparking
plugs
should
be
inspected
and
cleaned
at
regular
intervals
and
renewed
at
approximately
20
000
kIn
12
000
miles
Clean
the
plugs
thoroughly
and
make
sure
they
are
of
the
same
type
and
heat
range
File
the
centre
electrode
nat
before
adjusting
the
gap
Set
the
gap
to
0
8
0
9mm
0
031
0
035
in
if
the
engine
is
fItted
with
emission
control
system
or
to
0
7
0
8
mm
0
028
0
031
in
if
emission
control
is
not
fitted
Adjustment
must
always
be
made
by
bending
the
earth
electrode
TechnIcal
Data
GENERAL
SPECIFICATION
GI8
Engine
Cylinders
Bore
and
stroke
Displacemen
t
Valve
arrangemen
t
Firing
order
Engine
idler
speed
Compression
ratio
Oil
pressure
at
3000
r
p
m
4
in
line
85x80
mm
3
346x3
150
in
1
815
cc
110
8
cu
in
OHC
134
2
600
r
p
m
STD
8
3
I
4
7
to
5
5
kgjsq
cm
66
8
to
78
2
Ibjsq
in
LIQUID
PACKING
APPLICATION
Cylinder
block
2
Cylinder
head
Oil
gallery
blind
plug
Expansion
plug
Gas
breather
guide
Rear
bearing
cap
fitting
surface
Rear
bearing
cap
side
seal
both
ends
Expansion
plug
Rubber
plug
Rea
Manifold
heat
pipe
3
Chain
cover
gasket
both
sides
S13
 1
1 2
2 3
3 4
4 5
5 6
6 7
7 8
8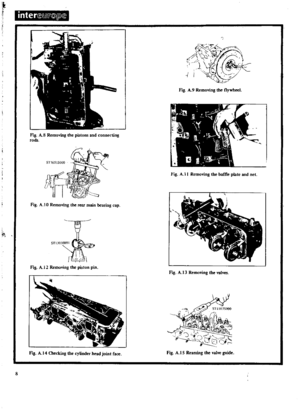 9
9 10
10 11
11 12
12 13
13 14
14 15
15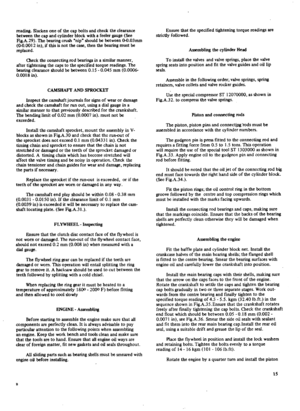 16
16 17
17 18
18 19
19 20
20 21
21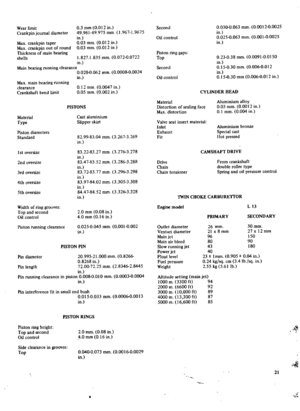 22
22 23
23 24
24 25
25 26
26 27
27 28
28 29
29 30
30 31
31 32
32 33
33 34
34 35
35 36
36 37
37 38
38 39
39 40
40 41
41 42
42 43
43 44
44 45
45 46
46 47
47 48
48 49
49 50
50 51
51 52
52 53
53 54
54 55
55 56
56 57
57 58
58 59
59 60
60 61
61 62
62 63
63 64
64 65
65 66
66 67
67 68
68 69
69 70
70 71
71 72
72 73
73 74
74 75
75 76
76 77
77 78
78 79
79 80
80 81
81 82
82 83
83 84
84 85
85 86
86 87
87 88
88 89
89 90
90 91
91 92
92 93
93 94
94 95
95 96
96 97
97 98
98 99
99 100
100 101
101 102
102 103
103 104
104 105
105 106
106 107
107 108
108 109
109 110
110 111
111 112
112 113
113 114
114 115
115 116
116 117
117 118
118 119
119 120
120 121
121 122
122 123
123 124
124 125
125 126
126 127
127 128
128 129
129 130
130 131
131 132
132 133
133 134
134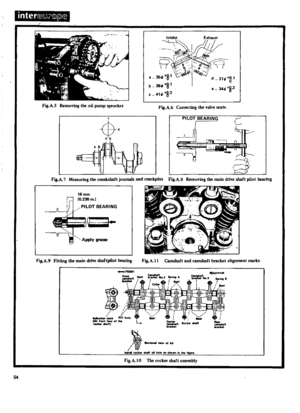 135
135 136
136 137
137 138
138 139
139 140
140 141
141 142
142 143
143 144
144 145
145 146
146 147
147 148
148 149
149 150
150 151
151 152
152 153
153 154
154 155
155 156
156 157
157 158
158 159
159 160
160 161
161 162
162 163
163 164
164 165
165 166
166 167
167 168
168 169
169 170
170

