Page 65 of 171
inteN
Il1l
j
@
QI
t
J
v
Fig
G
3
Removing
the
differential
mounting
member
Fig
G
4
Removing
the
side
flange
Fig
G
S
Removing
the
side
retainer
Fig
G
6
Removing
the
differential
cage
snl530000
r
f
Fig
G
7
Removing
the
driye
pinion
nut
Fig
G
B
Removing
the
differential
side
bearing
Fig
G
9
Removing
the
drive
flange
FIg
G
IO
Removing
the
gear
canier
side
flange
64
Page 66 of 171

Check
the
run
out
at
the
ceac
of
the
crownwheel
if
the
back
lash
or
tooth
contact
pattern
is
incorrect
The
run
out
should
not
exceed
0
08mm
0
003
in
Measure
the
turning
torque
of
the
drive
pinion
which
should
be
within
7
IOkg
cm
6
9Ib
in
Shims
and
adjusting
washers
must
be
changed
if
the
tooth
contact
pattern
and
backlash
is
incorrect
the
necessary
details
for
these
operations
can
be
found
towacds
the
end
of
this
section
under
the
heading
TOOTH
CONTACT
PATTERN
To
dismantle
the
differential
remove
the
flange
clamp
bolt
and
extract
the
side
flange
as
shown
in
Fig
GA
using
the
special
stand
ST
33730000
and
sliding
hammec
ST
36230000
Remove
the
bearing
caps
with
a
suitable
puller
as
shown
in
Fig
G
5
Remove
the
left
hand
cap
first
followed
by
the
right
hand
cap
The
caps
should
be
marked
to
ensure
that
they
are
refitted
in
their
original
positions
Withdraw
the
differential
cage
from
the
carrier
Fig
G
6
Slacken
the
drive
pinion
and
hold
the
flange
with
a
suitable
wrench
as
shown
in
Fig
G
7
Withdraw
the
flange
with
a
standard
puller
Press
the
drive
pinion
out
of
the
differential
carrier
together
with
the
rear
bearing
inner
races
the
spacers
and
the
shims
Place
a
press
plate
between
the
drive
pinion
head
and
rear
bearing
and
press
out
the
pinion
shaft
The
inner
races
need
not
be
removed
if
the
tooth
contact
pattern
is
correct
and
the
crownwheel
drive
pinion
carrier
rear
bearing
and
shims
etc
are
to
be
re
used
The
front
and
rear
outer
races
of
the
pinion
bearings
can
be
removed
with
the
special
tool
ST
30610000
or
with
a
suitable
drift
To
dismantle
the
differential
cage
remove
the
right
hand
bearing
cone
as
shown
in
Fig
G
8
The
special
puller
ST
3306
0000
and
adaptor
ST
33052000
should
be
used
for
this
pur
pose
taking
care
not
to
damage
the
edge
of
the
bearing
innec
race
Flatten
the
lock
straps
slacken
the
crownwheel
bolts
in
a
diagonal
pattern
and
remove
the
crownwheeL
Remove
the
left
hand
bearing
cone
in
a
similar
manner
to
the
right
hand
bearing
cone
Make
sure
that
the
parts
do
not
become
mixed
and
can
be
assembled
in
their
original
positions
Punch
out
the
differential
shaft
lock
pin
from
the
crownwheel
side
using
a
suitable
drift
Great
care
must
be
taken
when
carrying
out
this
operation
as
the
pin
is
caulked
into
the
hole
in
the
differential
cage
Remove
the
shaft
the
differential
pinion
gears
and
the
side
gears
and
thrust
washers
Separate
the
left
and
right
hand
gears
and
washers
so
that
they
can
be
reassembled
in
their
original
positions
Replacing
oil
seals
with
the
differential
installed
The
oil
seals
can
be
replaced
if
necessary
with
the
differ
ential
fitted
to
the
vehicle
Front
oil
seal
Drain
the
oil
from
the
differential
unit
and
jack
up
the
vehicle
at
the
rear
Remove
the
propeller
shaft
from
the
differential
flange
Disconnect
the
handbrake
left
hand
rear
cable
Slacken
and
remove
the
drive
pinion
nuts
whilst
holding
the
drive
flange
with
a
suitable
wrench
or
special
tool
ST
31530000
Withdraw
the
drive
flange
with
a
conventional
two
l
arm
puller
as
shown
in
Fig
G
9
Use
the
oil
seal
puller
ST
33290000
to
withdraw
the
oil
seal
from
the
retainer
Replace
the
oil
seal
using
a
suitable
drift
or
special
tool
ST
33270000
Fill
the
oil
seal
lips
with
grease
when
installing
Fit
the
oil
seal
retainer
and
replace
the
various
parts
in
reverse
order
to
the
removal
procedure
Side
oil
seal
Detach
the
drive
shaft
from
the
side
flange
of
the
differ
ential
carrier
Extract
the
side
flange
with
the
slide
hammer
ST
36230000
and
adaptor
ST
33730000
as
shown
in
Fig
G
lO
Remove
and
replace
the
oil
seal
in
a
similar
manner
to
that
previously
described
for
the
front
oil
seal
taking
care
to
apply
grease
between
the
oil
seal
lips
DIFFERENTIAL
Inspection
Clean
the
parts
thoroughly
and
inspect
them
for
signs
of
wear
or
damage
Check
the
gear
teeth
for
scores
cracks
or
excessive
wear
Check
the
tooth
contact
pattern
of
the
crownwheel
and
pinion
for
correct
meshing
depth
The
crownwheel
and
pinion
are
supplied
as
a
set
and
should
either
part
be
damaged
it
will
be
necessary
to
renew
the
complete
set
2
Check
the
pinion
shaft
and
gear
mating
faces
for
scores
or
wear
Inspect
the
inner
faces
of
the
side
gears
and
their
seating
faces
on
the
differential
cage
3
Any
small
defects
on
the
faces
of
the
thrust
washers
can
be
corrected
using
emery
cloth
The
thrust
washers
must
be
replaced
however
if
the
backlash
between
the
side
gear
and
pinion
exceeds
0
2mm
0
008
in
and
the
clearance
between
the
side
gear
and
thrust
washer
exceeds
O
3mm
0
012
in
Three
sizes
of
washers
are
available
and
the
thicknesses
are
detailed
in
Technical
Data
at
the
end
of
this
section
4
Measure
the
run
out
of
the
crownwheel
at
the
rear
with
a
dial
gauge
Replace
the
crownwheel
and
drive
pinion
as
a
set
if
the
run
out
exceeds
the
permissible
value
of
O
08mm
0
003
in
5
Examine
the
differential
carrier
and
cage
for
cracks
or
distortion
Renew
any
part
found
to
be
defective
It
is
advisable
to
renew
all
oil
seals
DIFFERENTIAL
Assembly
and
Adjustment
Assembly
is
a
reversal
of
the
removal
procedure
noting
the
following
points
Arrange
the
shims
and
washers
etc
in
their
correct
order
and
thoroughly
clean
the
surfaces
to
which
the
shims
washers
bearings
and
bearing
retainecs
are
to
be
installed
Differential
cage
Fit
the
differential
side
gear
and
bevel
gear
in
the
cage
using
the
correct
thrust
washers
Insert
the
pinion
shaft
so
that
the
lock
pin
hole
corresponds
with
the
hole
in
the
differential
65
Page 67 of 171
inter
M
j
@
jJ
2
t
1
5c
t
J
i
3
jp
7
i
r
4
Ilc
d
I
l
@
l
lb
r
s
ril
1
iF
C
Q
Fig
G
12
Section
through
the
drive
pinion
1
Pinion
height
adjusting
kUsher
4
Fte
Ioad
for
pinion
bearing
2
Pinion
height
ad
usting
shims
without
oil
mlI
and
drive
7
to
3
Tightening
torque
of
nut
dril
e
10
kgt1L
5a
6
to
72
3
lb
jl
pinion
17
to
20kg1n
22
9
to
ffnion
bearing
adjusting
w
uher
44
6Ib
ft
J
6
Pillion
bt
flrillgadjusti
lg
s
Jtu
er
fl
i
Ji
l
I
I
J
lJ
i
V
r
IHei
t
giluge
I
lST31210c
0
l
B
I
0
QJ
DUrnmYPinlOn
Drive
pinion
collar
lST3121QOCX
f
1
L
r
IST315000001
Dummvspacer
ST318500001
I
Fig
G
ll
Measuring
the
clearance
between
the
differential
side
gear
and
thrust
washer
Fig
G
t3
Drive
pinion
markings
Fig
G
14
Adjusting
the
pinion
height
1
Fig
G
t
5
Adjustment
diagram
for
the
dif
feren
tiaI
side
covers
Fig
G
16lnstalling
the
differential
side
covers
fig
G
Checking
the
backlash
of
crownwheel
and
pinion
Fig
G
tS
Fining
the
differential
mounting
member
bb
Page 68 of 171

cage
Mcasure
the
clearance
between
the
rear
face
of
thc
side
gear
and
the
differential
cage
as
shown
in
Fig
G
ll
and
if
necessary
use
a
tluust
washer
which
will
given
a
clearance
of
0
1
0
2mm
0
004
0
008
in
Fit
the
pinion
shaft
lock
pin
and
secure
it
by
caulking
with
a
punch
Lubricate
the
gear
teeth
and
check
the
gear
for
freedom
of
rotation
Install
the
crown
wheel
in
the
differential
cage
and
insert
the
bolts
with
new
lock
straps
Tap
the
head
of
each
bolt
lightly
and
tighten
the
bolts
in
a
diagonal
pattern
to
a
torque
reading
of
7
0
8
0
kgm
51
58Ib
ft
Measure
the
width
of
the
side
bearings
before
installing
them
Place
a
weight
of
2
5
kg
5
5
1b
on
the
bearings
and
check
the
nominal
width
which
should
be
20mm
0
787
in
Press
the
side
bearings
into
the
differential
cage
Adjustment
of
drive
pinion
preload
This
adjustment
is
carried
out
without
fitting
the
oil
seal
Press
the
front
and
rear
bearing
outer
races
into
the
gear
carrier
and
fit
the
pinion
height
adjusting
washer
Fig
G
12
the
shims
and
the
rear
bearing
inner
race
onto
a
dummy
shaft
special
tool
ST
31
120000
The
old
washers
and
shims
can
be
re
used
if
the
tooth
contact
pattern
was
found
to
be
correct
on
the
pre
dismantling
check
Fit
the
drive
pinion
bearing
spacer
the
washer
ans
special
collar
5T
312140000
or
5T
31500000
and
the
drive
flange
on
to
the
dummy
shaft
Tighten
the
drive
pinion
nut
to
a
torque
reading
of
17
20
kgm
123
145
Ib
ft
Measure
the
drive
pinion
bearing
pre
load
and
select
washers
and
spacers
to
give
a
pre
load
of
7
1
0
kg
cm
6
9Ib
in
with
new
bearings
or
3
6
kg
cm
2
6
5
Ib
in
with
used
bearings
Adjusting
spacers
are
available
in
lengths
of
56
2
57
2
mm
2
2126
2
2520
in
and
adjusting
washers
in
thicknesses
of
59
2
31
mm
0
1020
0
0909
in
Adjustment
of
pinion
height
The
pinion
height
or
distance
of
the
face
of
the
pinion
to
the
axis
of
the
crownwheel
is
adjusted
by
the
thickness
of
the
adjusting
washer
behind
the
drive
pinion
gcar
The
drive
pinion
has
a
tolerance
mark
etched
on
its
face
this
tokrance
is
accompanied
by
a
or
sign
to
show
the
deviation
from
the
nominal
dimension
Thc
plus
sign
indicates
that
the
nominal
distance
must
be
increased
and
the
minus
sign
that
it
mllst
be
decreased
The
tolerances
are
shown
in
Fig
G
I3
The
pinion
height
can
be
adjusted
using
the
original
adjusting
washer
and
shims
between
the
rear
bearing
cone
and
the
drive
pinion
Install
the
setting
gauge
5T
31210000
on
the
carrier
with
the
dummy
pinion
installed
Sce
Fig
G
14
Measure
the
clearance
between
the
head
of
the
dummy
shaft
and
the
tip
of
the
setting
g
wge
using
a
feeler
gauge
as
shown
in
Fig
G
15
The
clearance
is
also
shown
at
the
point
T
in
Fig
G
14
The
required
thickness
of
the
adj
lsting
washer
can
be
obtained
using
the
following
formula
S
W
T
H
x
0
01
0
20
Where
W
thickness
of
inserted
shims
and
washers
T
Measured
thickness
H
Figure
engraved
on
pinion
head
o
S
Required
thickn
ss
of
washers
and
shims
A
typical
example
is
given
below
w
20
1
20
T
H
S
340
0
24
2
x
0
01
0
20
3
40
mm
0
24
mm
3
46
mm
An
adjusting
washer
rrlust
be
selected
which
is
nearest
in
thickness
to
the
value
of
3
46mm
Adjusting
washers
are
available
in
thicknesses
of
3
09mm
0
01217
in
to
3
66m
0
1441
in
for
the
l800cc
models
and
in
thicknesses
of
O
2
and
2
4mm
0
787
0
866
and
0
945
in
for
the
1400
and
1600
cc
models
Fit
the
selected
adjusting
washer
and
shims
to
the
drive
pinion
and
press
on
the
rear
bearing
inner
race
Install
the
drive
pinion
into
the
differential
carrier
together
with
the
bearing
spacer
and
washer
the
front
bearing
inner
race
and
the
front
bearing
pilot
spacer
Fit
the
drive
flange
and
washer
on
the
drive
pinion
and
secure
them
with
the
pinion
nut
Tighten
the
nut
to
a
torque
reading
of
17
20
kgm
123
145Ib
ft
SIDE
BEARING
SHIMS
Selecting
The
side
bearing
pre
load
must
be
adjusted
with
selected
shims
if
the
differential
carrier
the
cage
the
side
bearings
or
the
bearing
covers
have
been
renewed
The
required
thickness
of
the
shims
can
be
obtained
using
the
following
formula
and
referring
to
Fig
G
l
5
T1
left
side
bearing
A
C
GI
D
E
H
x
0
01
0
76
T2
right
side
bearing
B
D
G2
F
H
x
0
01
0
76
Where
A
B
C
D
E
F
The
figure
on
the
differential
carrier
The
figure
on
the
differential
cage
The
differences
in
width
of
the
left
or
right
hand
bearings
against
the
nominal
width
of
20
0mm
0
7874
in
given
in
units
of
1
100
mm
Gl
G2
H
The
figure
on
the
side
cover
The
figure
on
the
crownwheel
The
A
B
C
D
G
and
H
figures
indicate
the
dimensional
variations
in
units
of
1
100
mm
fr
Jm
the
standard
measurement
An
example
of
the
calculations
to
decide
the
thickness
of
shim
required
is
given
below
Where
A
I
B
2
C
2
D
1
GI
3
G2
1
E
O
Olmm
F
O
02mm
H
Left
side
bearing
Tl
A
C
G
1
D
H
x
0
01
0
76
E
I
3
1
2
x
0
01
0
76
0
01
0
8mm
Right
side
bearing
T2
B
D
G2
H
x
0
01
0
76
F
2
I
I
2
x
0
01
0
76
0
02
0
8mm
67
Page 69 of 171
inter
lJIi
@
pl
J
J
Y
e
c
J
r
c
A
Ir
f
1
r
i
ST06J60000
0
i
J
estate
car
r
I
f
o
t
t
iJ
J
I
l
G
L
i
f1
v
f
P
r
5T0631110UO
I
sr
s
s
r
u
h
van
Fig
G
20
Removing
the
side
bearing
Fig
G
19
Mounting
the
differential
carriers
V
1
tj
l
fl4j
P
ff
P
tffST23510000
f
S
I
l
1
rig
G
22
Punching
out
the
pinion
shaft
lock
pin
j
Fig
C
21
Removing
the
crownwheel
bolts
Fig
C
23
Removing
the
drive
pinion
nut
t
1
Fig
G
24
Removing
the
pinion
rear
bearing
inner
race
rig
G
25
Checking
the
crownwheel
for
run
out
I
u
l
o
F
Ice
idth
Ol
1
lction
Ibvr
ti
3
3S6
L
i
1
Fig
G
26
Drive
pinion
markings
Estate
cars
Fig
G
27
Standard
pinion
height
dimension
68
Page 70 of 171

The
standard
width
of
the
side
bearings
is
20
0mm
0
7874
this
width
must
be
measured
before
attempting
to
calculate
the
thickness
of
the
adjusting
shims
Use
a
dial
gauge
and
surface
plate
to
ohtain
the
measurement
Place
a
weight
of
approximately
2
5
kg
5
5
lb
on
the
bearing
to
obtain
steady
readings
Install
the
differential
cage
assembly
in
the
carrier
Fit
the
sckcted
shims
and
O
rings
into
both
differential
side
bearing
covers
and
install
the
covers
in
the
carrier
using
the
special
tool
ST
33720000
Fig
G
16
l
Make
sure
that
the
side
bearing
outer
races
are
not
damaged
by
the
roller
Measure
the
backlash
between
the
teeth
of
the
crown
wheel
and
drive
pinion
with
a
dial
gauge
as
shown
in
Fig
G
I
Sct
the
dial
gauge
to
0
10
f
O
mm
0
004
0
008
in
I
If
the
backlash
is
less
than
the
specifIed
value
move
he
left
side
adjusting
shim
to
the
right
side
and
vice
versa
if
the
backlash
exceeds
the
specified
figure
Check
that
the
run
out
at
the
rear
of
the
crownwheel
does
not
excecd
O
OSmm
0
002
in
for
the
1800ce
model
or
O
08mm
0
003
in
for
the
1400
Check
the
drive
pinion
turning
torque
Thc
turning
torque
should
be
higher
by
I
3
kg
em
compared
with
the
turning
torque
obtained
before
fitting
the
differential
cage
in
the
carrier
The
higher
value
can
be
provided
if
necessary
by
dmnging
the
jde
cover
shims
Note
howcver
that
any
decrease
or
increase
in
the
thickncss
of
shims
wjJl
alter
tht
budlush
between
the
teeth
of
the
crownwhee1
and
pinion
Check
the
tooth
contact
pat
tern
of
the
crown
wheel
and
pinion
as
described
under
the
appropriate
heading
DIFFERENTIAL
Installation
Secure
the
differential
carrier
on
the
rear
suspension
mem
ber
using
the
four
bolts
and
washers
Fit
the
differential
mounting
member
to
thc
mounting
holes
by
pushing
it
forwards
with
a
suitable
lever
Fig
G
18
Tighten
the
nuts
to
a
torque
reading
of
8
5
kgm
61
5
Ib
ft
Tighten
the
bolts
attaching
the
gear
carrier
to
the
suspension
member
to
a
torque
reading
of
6
7
kg
36
5Ilb
ft
t
The
rcmainder
of
the
installation
operations
are
a
reversal
of
thc
removal
procedure
Fill
the
differential
with
the
correct
quantity
of
recommended
oil
DIFFERENTIAL
CARRIER
Removal
and
Dismantling
Estate
car
alld
Vanl
To
remove
the
differential
carrier
disconnect
and
remove
rhe
propeller
shaft
as
previously
described
and
remove
the
two
rear
axle
shafts
as
described
in
the
section
REAR
AXLL
With
draw
the
nuts
securing
the
differential
and
remove
the
carrier
from
the
rear
axle
Mount
the
unit
on
the
special
attachment
as
shown
in
Fig
G
19
and
carry
out
a
preliminary
check
before
dismantling
Oleck
the
tooth
contact
of
the
crownwheel
and
pinion
by
applying
lead
oxide
to
three
or
four
teeth
of
the
crownwheel
Turn
the
crown
wheel
several
times
to
obtain
an
impression
of
the
tooth
contact
pattern
Check
the
backlash
between
the
teeth
of
the
crownwheel
and
pinion
with
a
dial
gauge
Hold
the
drive
pinion
with
one
hand
and
move
the
crown
wheel
backwards
and
forwards
to
check
that
the
backlash
is
Io
ithin
thL
speL
ified
limits
Shims
and
adjusting
washers
must
bL
altered
if
the
tooth
con
tact
pattern
and
backlash
is
incorre
L
the
neL
cssary
details
for
these
operations
can
be
found
towards
the
end
of
this
section
under
the
appropriate
he
Jdjn
s
Fil1JJly
mark
the
bearing
caps
with
a
hammer
and
punch
to
ensure
correct
t1ignment
on
re
assembly
Remove
the
bearing
caps
nd
withdraw
the
differ
ntial
cage
make
a
note
of
the
left
and
right
hand
positions
so
h
Jt
the
bearing
caps
and
outer
race
can
be
re
assembled
in
their
original
positions
Withdraw
the
side
beJrings
with
the
s
cjal
puller
as
shown
in
Fig
G
20
taking
care
not
to
catch
the
edge
of
the
bearing
inner
races
Place
the
assembly
in
a
vice
and
detach
the
crownwheel
by
slackening
the
retaining
bolts
in
a
diagonal
patter
Fig
G
lf
Drive
out
th
pinion
shaft
lock
pin
from
left
to
right
using
a
suitable
punch
or
special
tool
ST
23520000
Fig
C
22
With
draw
the
pinion
shaft
and
take
out
the
pinions
side
gears
and
thrust
washers
Store
the
gears
and
thrust
washers
so
that
they
can
be
assembled
in
their
original
positions
Check
the
initial
turning
torque
of
the
drive
pinion
with
the
preload
gauge
ST
3190000
and
measure
the
height
of
the
drive
pinion
with
the
special
gauge
ST
31941000
Compare
the
figures
obtained
with
those
givcn
in
Technical
Data
at
the
end
of
this
section
Hold
the
drive
pinion
with
the
speciaJ
wrench
ST
3
J
530000
as
shown
in
Fig
C
23
and
unscrew
the
drivc
pinion
nut
then
pull
out
the
drive
pjnion
flange
Tap
the
drive
pinion
assembly
to
the
rear
with
a
plastic
mallet
and
withdraw
it
together
with
the
rear
bearing
inner
race
bearing
spacer
and
adjusting
washer
Remove
and
discard
the
oil
seal
and
withdraw
thc
front
bearing
inner
race
Drive
out
the
outer
races
of
the
front
and
rear
bearings
with
a
suitable
drift
Fig
G
25
The
drive
pinion
rear
bearing
inncr
race
can
be
removed
with
the
special
tool
ST
300310000
as
shown
in
Fig
G
24
DIFFE
l
ENTlAL
Inspection
Clean
all
components
thoroughly
and
examine
for
signs
of
wear
or
damage
Check
the
teeth
of
the
crownwhcel
and
pinion
for
scoring
and
hipping
Ii
should
be
noted
that
the
crownwhecl
and
pinion
are
supplied
as
a
matched
set
and
if
either
part
is
damaged
the
complete
set
must
be
replaced
Examine
the
inner
faces
of
the
side
gears
and
seats
on
the
differential
case
Inspect
the
bearing
races
and
rollers
and
replace
them
if
necessary
Small
defects
on
the
faces
of
the
thrust
washers
can
be
corrected
using
emery
cloth
however
if
the
clearance
between
side
gear
and
thrust
washer
exceeds
0
1
O
2mm
0
0039
0
0079
in
it
ill
be
necessary
to
replace
the
washer
Various
sizes
of
washers
are
available
and
the
thicknesses
arc
detailed
under
the
heading
DIFFERENTIA
L
GEAR
CAGE
Assembling
69
Page 71 of 171

Check
the
run
out
of
the
crownwheel
as
shown
in
Fig
G
15
Position
the
dial
gauge
to
the
rear
of
the
crownwheel
and
check
that
the
run
out
does
not
ceed
0
0
mm
0
0020
10
I
It
the
run
out
limit
is
exceeded
replace
the
crownwheel
and
pinion
as
a
t
Inspect
the
differenti
l
L
arrier
nd
case
for
cracks
or
distortion
and
replace
them
if
necessary
DIFFERENTIAL
GEAR
CAGE
Assembli
g
V
Install
the
differential
side
geaI
5
pinions
and
original
thrust
washers
into
the
cage
and
check
the
clearance
between
side
gears
and
thrust
washers
The
clearance
must
be
adjusted
to
within
0
05
0
20
mm
0
002
0
008
in
for
the
1400
and
1600
cc
models
and
to
within
0
10
0
20
mIT
0
004
0
008
in
for
the
1800
cc
models
Correction
can
be
made
if
necessary
by
replacing
the
thrust
washers
which
are
available
in
the
following
sizes
t
SIDE
GEAR
THRUST
WASHERS
f
1400
and
1600
cc
Estate
car
0
78
0
83
0
88
1
03
1
23
mm
0
0030
0
0327
0
0346
0
0406
0
0484
in
l800cc
Estate
car
0
785
0
835
0
885
1
035
I
185
mm
0
0309
0
0329
0
0348
0
0408
0
0467
in
1800
cc
Van
0
75
0
80
mm
0
80
0
85
mm
0
85
0
90
mm
0
90
0
95
mm
0
0295
0
0315
in
0
0315
0
0335
in
0
0335
in
0
0354
in
0
0354
0
0374
in
Drive
in
the
differential
pinion
lock
pin
from
the
right
hand
side
of
the
case
and
peen
the
rim
of
the
hole
to
prevent
the
pin
from
working
loose
Fit
the
crownwheel
to
the
differential
cage
and
install
the
bolts
and
new
lock
plates
Tap
the
head
of
each
bolt
lightly
and
tighten
the
bolts
in
a
diagonal
pattern
to
the
specified
torque
readings
Press
in
the
side
bearing
inner
race
with
a
suitable
drift
The
crown
wheel
adjusting
shims
must
be
placed
behind
the
bearings
to
obtain
the
correct
pre
load
Press
the
drive
pinion
rear
bearing
outer
race
and
front
bearing
outer
race
into
the
carrier
The
shim
at
the
rear
of
the
outer
race
must
be
increased
or
decreased
to
adjust
the
pinion
height
as
described
below
Adjusting
the
drive
pinion
The
pinion
height
or
distance
from
the
face
of
the
pinion
to
the
axis
of
the
crownwheel
is
adjusted
by
altering
the
thick
ness
of
the
adjusting
shim
between
the
drive
pinion
gear
and
the
rear
bearing
cone
The
drive
pinion
ha
a
tolerance
mark
etched
on
its
face
as
shown
in
Fig
G
26
This
tolerance
is
accompanied
by
a
or
sign
to
show
the
deviation
from
the
nominal
dimension
of
86mm
0
386
in
see
Fig
C
n
The
plus
sign
indicates
that
the
nominal
dimension
must
be
increased
by
the
figure
on
the
pinion
and
the
minus
sign
that
it
must
b
decreased
To
determine
the
thickness
of
the
drive
pinion
shim
press
the
front
and
rear
bearing
outer
races
into
the
carrier
fit
the
70
rear
be
ring
and
dummy
shafr
and
place
the
Ippropriatt
ettil1g
gauge
on
the
carrier
See
Fig
C
2S
l
The
fOllowing
setting
gaUges
and
dUlllmy
shaft
houlJ
bt
llsed
for
th
various
modds
I
OO
and
1600
Estate
c
r
Setting
g
3uge
ST
1941000
Dummy
shaftST
31942000
ISOOce
Estate
car
Setting
gauge
ST
31141000
Dummy
shaftST
1941000
1800cc
V
n
Setting
gauge
5T
3
I
Y41
000
Dummy
sh
ftST
31941000
Measure
the
clearance
N
Fig
C
l8
berween
the
tip
of
the
setting
gauge
and
the
face
of
the
dummy
shaft
with
a
feeler
gauge
Determine
the
thickness
of
shim
required
using
the
following
formula
T
N
H
D
S
x
0
01
0
28
station
wagon
T
N
H
D
S
x
0
01
2
18
Van
Whe
rc
T
The
required
thickness
of
adjusting
shim
mrn
N
The
measured
clearance
mm
H
The
plus
or
minus
figure
on
the
pinion
head
D
The
figure
on
the
dummy
shaft
S
The
figure
on
the
setting
gauge
As
an
example
for
the
Estate
car
N
0
30mm
H
1
D
I
S
O
T
0
30
2
1
0
x
0
01
0
28
0
59
mm
Shims
are
available
in
thicknesses
of
0
050
0
070
0
10
0
20
and
0
50
mID
0
0019
0
0027
0
0039
0
0078
and
0
0196
in
for
the
Estate
cars
and
in
thicknesses
of
2
37
2
97mm
0
0933
0
1169
in
for
the
1800cc
Van
Take
off
the
drive
pinion
and
the
rear
bearing
outer
race
and
adjust
the
position
of
the
drive
pinion
by
installing
shims
of
selected
thicknesses
Fit
the
drive
pinion
and
bearing
spacer
in
the
pinion
housing
and
tighten
the
drive
pinion
nut
to
a
torque
reading
of
14
17
kgm
101
130
Ib
fl
for
the
Estate
cars
or
13
20
kgm
94
145Ib
ft
for
the
1800
cc
Van
Adjusting
the
drive
pinion
preload
The
drive
pinion
preload
on
Estate
car
models
is
adjusted
by
meam
of
the
adjusting
spacer
and
the
shims
between
the
spacer
and
the
front
bearing
inner
race
On
the
1800
cc
van
a
collapsible
pacer
is
u
sed
to
adjust
the
preload
Estate
car
O1eck
the
preload
by
attaching
a
preload
gauge
to
the
pinion
flange
and
adjust
by
selecting
spacers
and
shims
from
the
sizes
given
in
Technical
Data
The
initial
turning
torque
without
the
oil
seal
and
with
the
drive
pinion
nut
tightened
to
a
torque
reading
of
14
17
kgm
101
130
Ib
ft
should
be
10
13
kg
m
138
9
180
5
in
oz
for
new
bearings
If
used
bearings
are
fiued
the
initial
torque
must
be
reduced
by
20
to
40
Cneck
the
pinion
height
as
previously
described
and
re
adjust
if
necessary
Remove
the
pinion
nut
and
nange
Press
the
new
oil
seal
into
the
carrier
ensuring
that
the
lips
of
the
seal
are
thoroughly
Page 72 of 171

greased
Install
the
flange
washer
and
pinion
nut
Tighten
the
nut
to
a
torque
reading
of
14
17
kgm
101
130
Ib
fL
If
the
cotter
pin
hole
is
not
correctly
aligned
a
suitable
washer
should
be
fitted
Do
NOT
adjust
by
overtightening
the
pinion
nul
Van
Lubricate
the
front
bearing
with
oil
and
place
it
in
the
carrier
Grease
the
lip
of
the
oil
seal
and
install
it
to
the
final
drive
housing
Install
the
drive
pinion
the
new
collapsible
spacer
and
the
drive
flange
Fit
the
drive
pinion
nut
and
tighten
temporarily
until
all
slackness
is
eliminated
from
the
front
and
rear
of
the
drive
pinion
NOTE
Ensure
that
oil
and
grease
have
been
completely
removed
from
the
threads
of
the
pinion
gear
the
pinion
nut
and
the
washer
Tighten
the
pinion
nut
and
check
the
preload
with
a
preload
gauge
As
the
nut
is
tightened
to
the
specified
torque
reading
of
13
20
kgm
94
0
144
6Ib
fL
the
preload
must
be
measured
at
every
five
to
ten
degrees
turn
of
the
pinion
nut
As
the
pinion
nut
is
tightened
the
stepped
portion
of
the
spacer
is
deformed
See
Fig
G
29
J
and
the
length
between
the
bearings
adjusted
The
drive
pinion
bearing
preload
with
oil
seal
and
new
bearing
is
7
15
kg
cm
6
1
13
0
lb
in
Turn
the
drive
pinion
to
settle
the
bearing
and
re
check
the
preload
and
tightening
torque
If
the
preload
rate
is
exceeded
it
will
be
necessry
to
fit
a
new
spacer
the
old
spa
cr
cannot
be
reused
and
the
preload
must
not
be
adjusted
by
loosening
the
pinion
nul
Side
bearing
pre
load
adjusting
If
the
original
side
bearings
arc
to
be
used
the
shims
must
be
of
the
same
thickness
as
those
previously
fitted
To
select
shims
for
new
side
bearings
proceed
as
follows
The
standard
width
of
the
side
bearings
is
given
in
Technical
Data
This
width
must
be
measured
before
attempting
to
calculate
the
required
thickness
of
the
adjusting
shims
Place
a
weight
of
approximately
5
kg
5
5
lb
and
of
predetermined
height
onto
the
side
bearing
as
shown
in
Fig
G
30
Mcasure
the
width
of
the
bearing
with
a
dial
gauge
as
illustrated
turning
the
bearing
two
or
three
times
to
gain
an
accurate
meaSurement
Dimensional
variations
from
the
standard
measurements
are
marked
on
the
left
side
bearing
housing
of
the
gear
carrier
on
the
right
side
bearing
housing
of
the
gear
carrier
and
on
the
differential
case
These
variations
are
marked
in
units
of
l
lOOmm
and
are
used
for
the
f
rmula
to
calculate
t1H
thickness
of
the
adjusting
shims
in
the
following
manner
Where
TI
equals
the
left
side
bearing
shim
crownwhecl
side
T2
equals
the
right
side
bearing
shim
pinion
gear
A
equals
the
figure
marked
on
the
left
side
bearing
housing
B
equals
the
figure
marked
on
the
right
side
bearing
housing
C
and
0
equals
the
figure
marked
on
the
differential
case
and
E
and
F
is
the
difference
bctween
the
width
of
the
side
bearings
and
the
standard
bearing
width
H
the
figure
marked
on
the
crownwhcel
Fig
G
31
The
following
formulae
can
now
be
used
to
deter
mine
the
required
shim
thicknessl
s
for
both
side
bearings
I
OOcc
Estate
car
Left
side
bearing
TI
A
C
D
H
x
0
01
0
100
E
Right
side
bearingT2
B
D
H
x
0
01
0
090
F
I800cc
Van
Left
side
bearingTI
A
C
D
H
xO
OI
0
175
E
Right
side
bcaringT2
8
D
H
x
0
01
0
150
F
As
an
example
where
A
1
B
C
2
D
3
E
0
02mm
H
I
The
formula
for
the
left
side
bearing
is
T
I
I
1
3
1
x
0
01
0
175
0
02
0
205mm
1400
and
1600cc
Estate
car
The
required
thickness
of
shim
can
be
found
using
the
following
formula
in
a
similar
manner
to
that
previously
described
for
the
1800cc
models
Left
side
bearing
T
I
A
C
D
E
7
Right
side
bearing
T2
B
D
F
6
Shims
are
available
in
five
thicknesses
of
0
05
0
07
0
10
0
20
and
0
50
mm
0
002
0
0028
0
0039
0
0079
and
0
0197
in
Fit
the
selected
side
bearing
adjusting
shims
on
the
differential
cage
and
press
in
the
side
bearing
inner
races
using
a
suitable
ddfL
nstall
the
differential
cage
into
the
carrier
and
fit
the
bearing
caps
Ensure
that
the
marks
on
the
caps
coincide
with
the
marks
on
the
carrier
Tighten
the
bearing
cap
bolts
to
the
specified
torque
reading
See
Tighte
ing
torques
Measure
the
dimension
between
the
outer
edges
of
the
left
and
right
hand
caps
using
a
large
micrometer
as
shown
in
Fig
G
32
This
dimension
should
be
198
40
198
55
mm
7
8110
7
8169
in
for
the
1400
and
1600
ce
Estate
cars
and
1800
ce
Van
and
173
23
17329
mm
6
8201
6
8244
inl
for
the
1800
cc
Estate
cars
Measure
the
backlash
of
the
crownwhcel
and
pinion
with
a
dial
gauge
The
backlash
must
be
adjusted
to
0
13
0
18
mm
0
005
0
007
in
on
the
1800
CC
models
and
to
0
15
0
20mm
0
006
0
008
in
on
the
1400
and
1600
cc
models
Adjustment
can
be
carried
out
by
moving
side
bearing
shims
from
the
right
hand
side
to
the
left
hand
side
if
the
backlash
is
too
high
or
vice
verca
if
the
backlash
is
too
low
Tighten
the
bearing
cap
bolts
to
the
specified
torque
reading
after
adjusting
Ensure
that
the
run
out
at
the
rear
of
the
crown
wheel
does
not
exceed
O
05mm
0
002
in
Finally
heck
the
tooth
contact
pattern
as
described
below
TOOTH
CONTACT
PATTERN
Checking
The
final
check
on
reassembly
is
an
inspection
of
the
tooth
contact
markings
of
the
crownwhed
and
pinion
Apply
a
coal
of
red
lead
in
oil
to
4
or
5
teeth
of
the
crown
wheel
Turn
the
crownwheel
backwards
and
forwards
several
times
to
obtain
a
clear
impression
of
the
contact
areas
Heel
contact
Fig
G
3
1
71
 1
1 2
2 3
3 4
4 5
5 6
6 7
7 8
8 9
9 10
10 11
11 12
12 13
13 14
14 15
15 16
16 17
17 18
18 19
19 20
20 21
21 22
22 23
23 24
24 25
25 26
26 27
27 28
28 29
29 30
30 31
31 32
32 33
33 34
34 35
35 36
36 37
37 38
38 39
39 40
40 41
41 42
42 43
43 44
44 45
45 46
46 47
47 48
48 49
49 50
50 51
51 52
52 53
53 54
54 55
55 56
56 57
57 58
58 59
59 60
60 61
61 62
62 63
63 64
64 65
65 66
66 67
67 68
68 69
69 70
70 71
71 72
72 73
73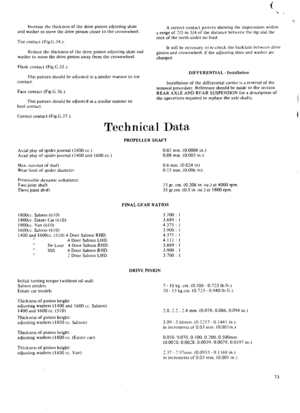 74
74 75
75 76
76 77
77 78
78 79
79 80
80 81
81 82
82 83
83 84
84 85
85 86
86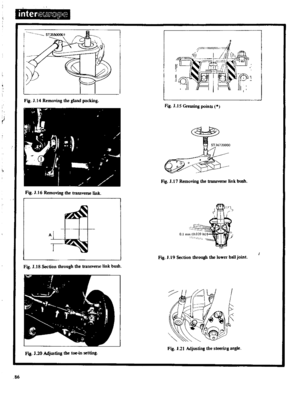 87
87 88
88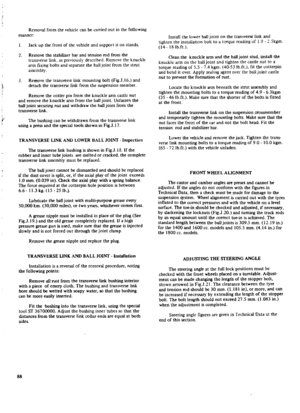 89
89 90
90 91
91 92
92 93
93 94
94 95
95 96
96 97
97 98
98 99
99 100
100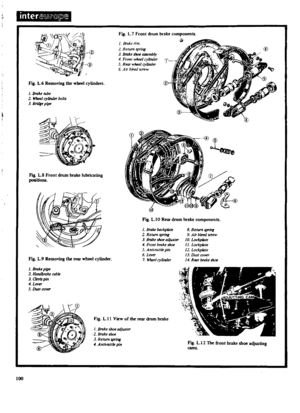 101
101 102
102 103
103 104
104 105
105 106
106 107
107 108
108 109
109 110
110 111
111 112
112 113
113 114
114 115
115 116
116 117
117 118
118 119
119 120
120 121
121 122
122 123
123 124
124 125
125 126
126 127
127 128
128 129
129 130
130 131
131 132
132 133
133 134
134 135
135 136
136 137
137 138
138 139
139 140
140 141
141 142
142 143
143 144
144 145
145 146
146 147
147 148
148 149
149 150
150 151
151 152
152 153
153 154
154 155
155 156
156 157
157 158
158 159
159 160
160 161
161 162
162 163
163 164
164 165
165 166
166 167
167 168
168 169
169 170
170

