2021 RAM PROMASTER CITY lock
[x] Cancel search: lockPage 76 of 280
74STARTING AND OPERATING
When displayed, static grid lines will illustrate
the width of the vehicle and will show separate
zones that will help indicate the distance to the
rear of the vehicle. The following table shows
the approximate distances for each zone:
NOTE:
If snow, ice, mud, or any foreign substance
builds up on the camera lens, clean the lens,
rinse with water, and dry with a soft cloth. Do
not cover the lens.
REFUELING THE VEHICLE
The gas cap is located on the left side of the
vehicle. If the gas cap is lost or damaged, be
sure the replacement cap is for use with this
vehicle.
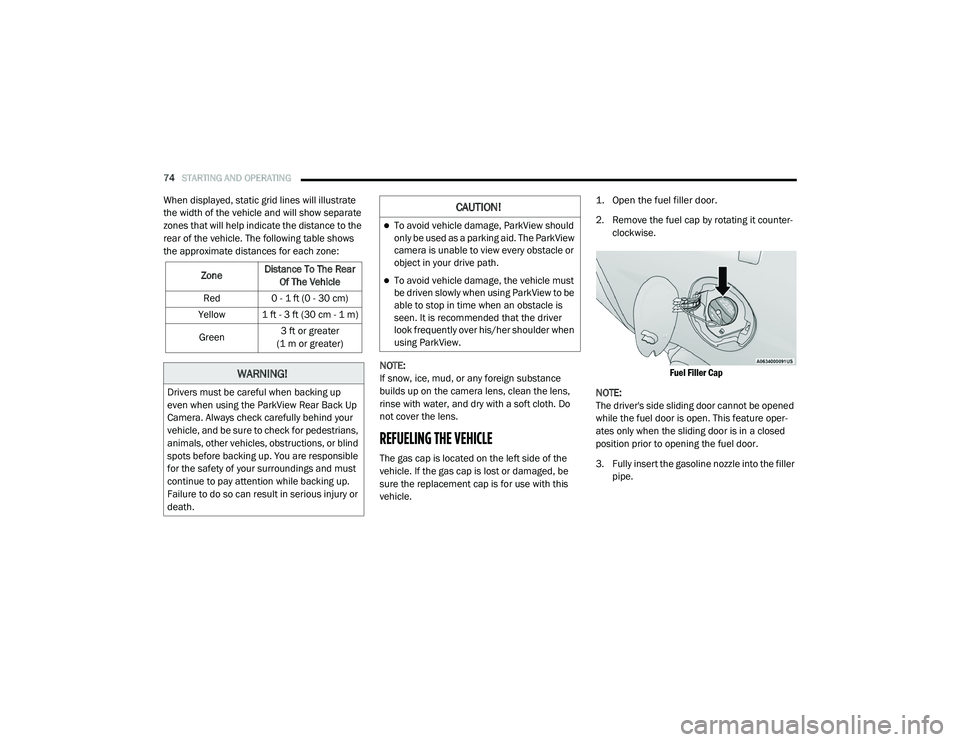
1. Open the fuel filler door.
2. Remove the fuel cap by rotating it counter
-
clockwise.
Fuel Filler Cap
NOTE:
The driver's side sliding door cannot be opened
while the fuel door is open. This feature oper -
ates only when the sliding door is in a closed
position prior to opening the fuel door.
3. Fully insert the gasoline nozzle into the filler pipe.
Zone
Distance To The Rear
Of The Vehicle
Red 0 - 1 ft (0 - 30 cm)
Yellow 1 ft - 3 ft (30 cm - 1 m)
Green 3 ft or greater
(1 m or greater)
WARNING!
Drivers must be careful when backing up
even when using the ParkView Rear Back Up
Camera. Always check carefully behind your
vehicle, and be sure to check for pedestrians,
animals, other vehicles, obstructions, or blind
spots before backing up. You are responsible
for the safety of your surroundings and must
continue to pay attention while backing up.
Failure to do so can result in serious injury or
death.
CAUTION!
To avoid vehicle damage, ParkView should
only be used as a parking aid. The ParkView
camera is unable to view every obstacle or
object in your drive path.
To avoid vehicle damage, the vehicle must
be driven slowly when using ParkView to be
able to stop in time when an obstacle is
seen. It is recommended that the driver
look frequently over his/her shoulder when
using ParkView.
21_VM_OM_EN_USC_t.book Page 74
Page 82 of 280
80STARTING AND OPERATING
(Continued)
Towing Requirements — Tires
Do not attempt to tow a trailer while using a
compact spare tire.
Do not drive more than 50 mph (80 km/h) when towing while using a full size spare tire.
Proper tire inflation pressures are essential
to the safe and satisfactory operation of your
vehicle.
Check the trailer tires for proper tire inflation
pressures before trailer usage.
Check for signs of tire wear or visible tire
damage before towing a trailer.
When replacing tires with a higher load
carrying capacity they will not increase the
vehicle's GVWR and GAWR limits.
For further information Ú page 234.
WARNING!
Make certain that the load is secured in the
trailer and will not shift during travel. When
trailering cargo that is not fully secured,
dynamic load shifts can occur that may be
difficult for the driver to control. You could
lose control of your vehicle and have a colli -
sion.
When hauling cargo or towing a trailer, do
not overload your vehicle or trailer. Over -
loading can cause a loss of control, poor
performance or damage to brakes, axle,
engine, transmission, steering, suspension,
chassis structure or tires.
Safety chains must always be used
between your vehicle and trailer. Always
connect the chains to the hook retainers of
the vehicle hitch. Cross the chains under
the trailer tongue and allow enough slack
for turning corners.
Vehicles with trailers should not be parked
on a grade. When parking, apply the
parking brake on the tow vehicle. Put the
tow vehicle transmission in PARK. For
four-wheel drive vehicles, make sure the
transfer case is not in NEUTRAL. Always,
block or "chock" the trailer wheels.
GCWR must not be exceeded.
Total weight must be distributed between
the tow vehicle and the trailer such that the
following four ratings are not exceeded :
GVWR
GTW
GAWR
Tongue weight rating for the trailer
hitch utilized.
WARNING! (Continued)
21_VM_OM_EN_USC_t.book Page 80
Page 87 of 280

STARTING AND OPERATING85
(Continued)
Shallow Standing Water
Although your vehicle is capable of driving
through shallow standing water, consider the
following Cautions and Warnings before doing
so.
WARNING!
Driving through standing water limits your
vehicle’s traction capabilities. Do not
exceed 5 mph (8 km/h) when driving
through standing water.
Driving through standing water limits your
vehicle’s braking capabilities, which
increases stopping distances. Therefore,
after driving through standing water, drive
slowly and lightly press on the brake pedal
several times to dry the brakes.
Failure to follow these warnings may result
in injuries that are serious or fatal to you,
your passengers, and others around you.
CAUTION!
Always check the depth of the standing
water before driving through it. Never drive
through standing water that is deeper than
the bottom of the tire rims mounted on the
vehicle.
Determine the condition of the road or the
path that is under water and if there are any
obstacles in the way before driving through
the standing water.
Do not exceed 5 mph (8 km/h) when
driving through standing water. This will
minimize wave effects.
Driving through standing water may cause
damage to your vehicle’s drivetrain compo -
nents. Always inspect your vehicle’s fluids
(i.e., engine oil, transmission, axle, etc.) for
signs of contamination (i.e., fluid that is
milky or foamy in appearance) after driving
through standing water. Do not continue to
operate the vehicle if any fluid appears
contaminated, as this may result in further
damage. Such damage is not covered by
the New Vehicle Limited Warranty.
Getting water inside your vehicle’s engine
can cause it to lock up and stall out, and
cause serious internal damage to the
engine. Such damage is not covered by the
New Vehicle Limited Warranty.
CAUTION! (Continued)
4
21_VM_OM_EN_USC_t.book Page 85
Page 93 of 280
MULTIMEDIA91
Clock & Date
When the Clock & Date button is pressed on the touchscreen, the system displays the different options related to the vehicle’s internal clock.
Setting Name Description
Sync Time This setting will sync the time to the system’s GPS receiver. The system
will control the time via GPS location.
Set Time And Format/Time Format This setting will allow you to set the time format (AM/PM). “Sync Time”
must be off for this setting to be available. The “12 hrs” setting will set
the time to a 12-hour format. The “24 hrs” setting will set the time to a
24-hour format.
Set Date This setting will allow you to set the date. The selectable options are
“Date”, “Month”, and “Year”. You can also change the clock settings as
well.
Show Time Status This setting will place the time in the radio’s status bar.
5
21_VM_OM_EN_USC_t.book Page 91
Page 95 of 280
MULTIMEDIA93
Doors & Locks
When the Doors & Locks button is pressed on the touchscreen, the system displays the options related to locking and unlocking the vehicle’s doors.
Key Off Options
When the Key Off Option button is pressed on the touchscreen, the system displays the options related to vehicle shut off. These settings will only
activate when the ignition is set to OFF.
Setting Name Description
Sound Horn With Lock This setting will sound the horn when the key fob’s Lock button is pushed.
The “Off” setting will not sound the horn. The “1st Press” setting will
sound the horn when the Lock button is pushed once. The “2nd Press”
setting will sound the horn when the Lock button is pushed twice.
Auto Door Locks This setting will allow you to change if the doors lock automatically when
the vehicle reaches speeds of 12 mph (20 km/h).
Setting Name
Description
Radio Off Delay This setting will allow you to set the amount of time the radio remains on
after the vehicle has been turned off. The “0 min” setting will shut the
radio off the moment the vehicle is turned off. The “20 min” setting will
leave the radio on for 20 minutes after the vehicle has been turned off or
until one of the doors has been opened.
5
21_VM_OM_EN_USC_t.book Page 93
Page 100 of 280
98MULTIMEDIA
Feature Description
Settings Press the Settings button to access the Uconnect Settings.
Back Press the Back button to return to a previous page.
Enter/Browse & Tune/Scroll Knob Push the Enter/Browse button to accept a highlighted selection on the
screen. Rotate the Tune/Scroll rotary knob to scroll through a list or tune
a radio station.
More Push the More button to access additional options such as: Trip, Clock,
and Camera.
Phone Press the Phone button to enter Phone Mode and access the hands-free
phone system.
NAV/Camera Press the Camera button (if equipped) to access the vehicle’s rear
backup camera. Press the NAV button (if equipped) to access Navigation
Mode, the system’s build-in navigation feature.
Media Press the Media button to enter Media Mode and access controls for
external audio sources.
Radio Press the Radio button to enter Radio Mode and access the system’s
radio functions.
Volume & On/Off Rotate the rotary knob to adjust the volume. Push the Volume & On/Off
button to turn the system on and off.
Mute Push the Mute button to turn the audio of the radio system off. Press it
again to turn the audio on.
Screen Off Push the Screen Off button to turn the screen on or off.
21_VM_OM_EN_USC_t.book Page 98
Page 102 of 280
100MULTIMEDIA
UCONNECT MODES
Radio Mode
Operating Radio Mode
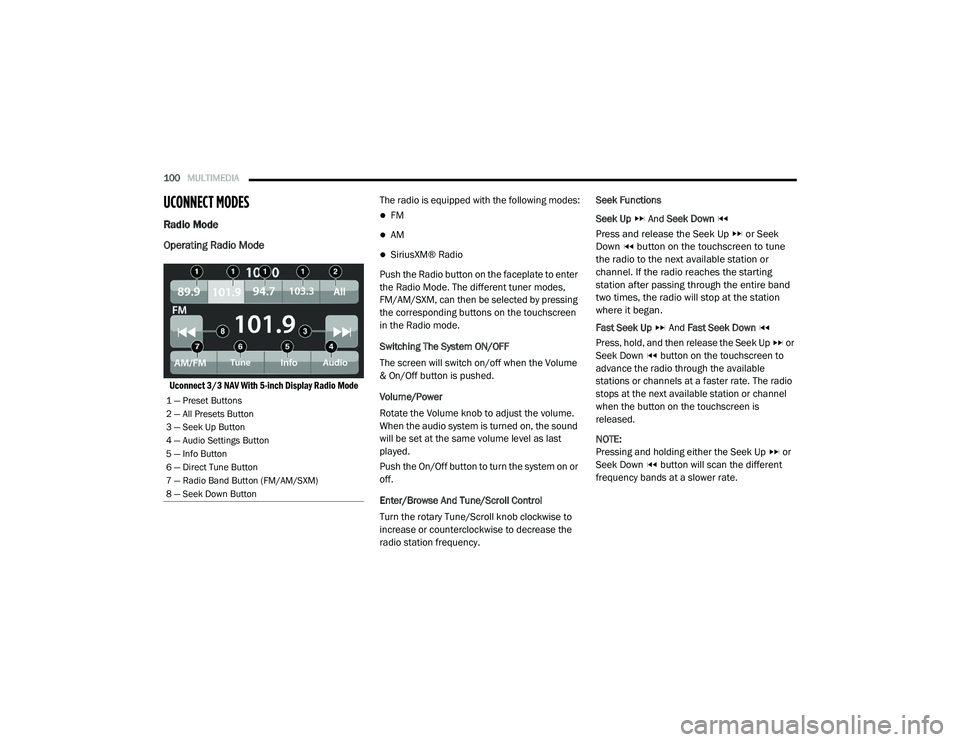
Uconnect 3/3 NAV With 5-inch Display Radio Mode
The radio is equipped with the following modes:
FM
AM
SiriusXM® Radio
Push the Radio button on the faceplate to enter
the Radio Mode. The different tuner modes,
FM/AM/SXM, can then be selected by pressing
the corresponding buttons on the touchscreen
in the Radio mode.
Switching The System ON/OFF
The screen will switch on/off when the Volume
& On/Off button is pushed.
Volume/Power
Rotate the Volume knob to adjust the volume.
When the audio system is turned on, the sound
will be set at the same volume level as last
played.
Push the On/Off button to turn the system on or
off.
Enter/Browse And Tune/Scroll Control
Turn the rotary Tune/Scroll knob clockwise to
increase or counterclockwise to decrease the
radio station frequency. Seek Functions
Seek Up
And Seek Down
Press and release the Seek Up or Seek
Down button on the touchscreen to tune
the radio to the next available station or
channel. If the radio reaches the starting
station after passing through the entire band
two times, the radio will stop at the station
where it began.
Fast Seek Up And Fast Seek Down
Press, hold, and then release the Seek Up or
Seek Down button on the touchscreen to
advance the radio through the available
stations or channels at a faster rate. The radio
stops at the next available station or channel
when the button on the touchscreen is
released.
NOTE:
Pressing and holding either the Seek Up or
Seek Down button will scan the different
frequency bands at a slower rate.
1 — Preset Buttons
2 — All Presets Button
3 — Seek Up Button
4 — Audio Settings Button
5 — Info Button
6 — Direct Tune Button
7 — Radio Band Button (FM/AM/SXM)
8 — Seek Down Button
21_VM_OM_EN_USC_t.book Page 100
Page 129 of 280
MULTIMEDIA127
Avoid Blocked Road Press the button to avoid an unexpected obstacle that is blocking the
road on the route. A new route will be found that avoids blocked roads.
You may be shown a maximum of two alternatives depending on the road
network between you and your destination.
The new route is shown on the map view with the difference in travel time
in a pop-up.
Select the new route by pressing the time pop-up. Guidance to your
destination will resume avoiding blocked roads, and the guidance view
will appear automatically as you begin driving.
NOTE:
It may not be possible to find an alternative route around the blocked road
if none exists.
Avoid Part Of Road Press the button to avoid part of the current route.
You are shown a list of the sections that make up your current route.
Select the section of the route you want to avoid. A pop-up menu will
appear on the map showing the location of the instruction.
To avoid the chosen section of the route, select “Avoid”. A new route is
planned that will avoid the chosen route sections, and the new route will
appear in map view.
NOTE:
To avoid more sections of the route, repeat the steps above. It may not be
possible to find an alternative route around the section if none exists.
Route Option
Description
5
21_VM_OM_EN_USC_t.book Page 127