2021 RAM PROMASTER CITY buttons
[x] Cancel search: buttonsPage 25 of 280
GETTING TO KNOW YOUR VEHICLE23
Rear Removal — If Equipped
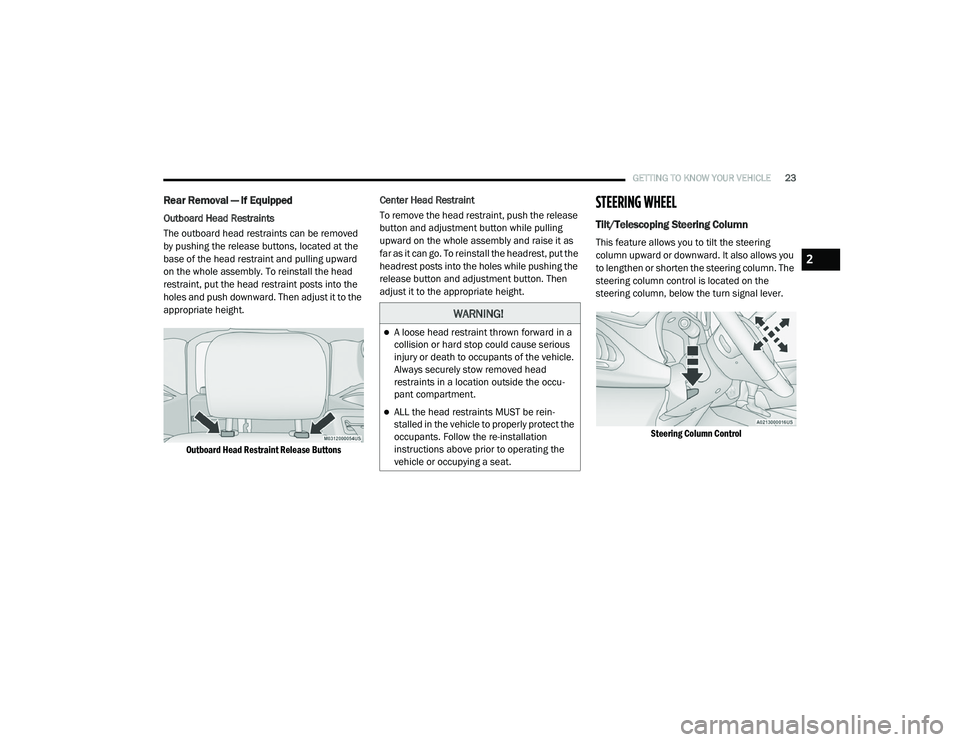
Outboard Head Restraints
The outboard head restraints can be removed
by pushing the release buttons, located at the
base of the head restraint and pulling upward
on the whole assembly. To reinstall the head
restraint, put the head restraint posts into the
holes and push downward. Then adjust it to the
appropriate height.
Outboard Head Restraint Release Buttons
Center Head Restraint
To remove the head restraint, push the release
button and adjustment button while pulling
upward on the whole assembly and raise it as
far as it can go. To reinstall the headrest, put the
headrest posts into the holes while pushing the
release button and adjustment button. Then
adjust it to the appropriate height.
STEERING WHEEL
Tilt/Telescoping Steering Column
This feature allows you to tilt the steering
column upward or downward. It also allows you
to lengthen or shorten the steering column. The
steering column control is located on the
steering column, below the turn signal lever.
Steering Column Control
WARNING!
A loose head restraint thrown forward in a
collision or hard stop could cause serious
injury or death to occupants of the vehicle.
Always securely stow removed head
restraints in a location outside the occu -
pant compartment.
ALL the head restraints MUST be rein -
stalled in the vehicle to properly protect the
occupants. Follow the re-installation
instructions above prior to operating the
vehicle or occupying a seat.
2
21_VM_OM_EN_USC_t.book Page 23
Page 37 of 280
GETTING TO KNOW YOUR VEHICLE35
WINDOWS
Power Window Controls — If Equipped
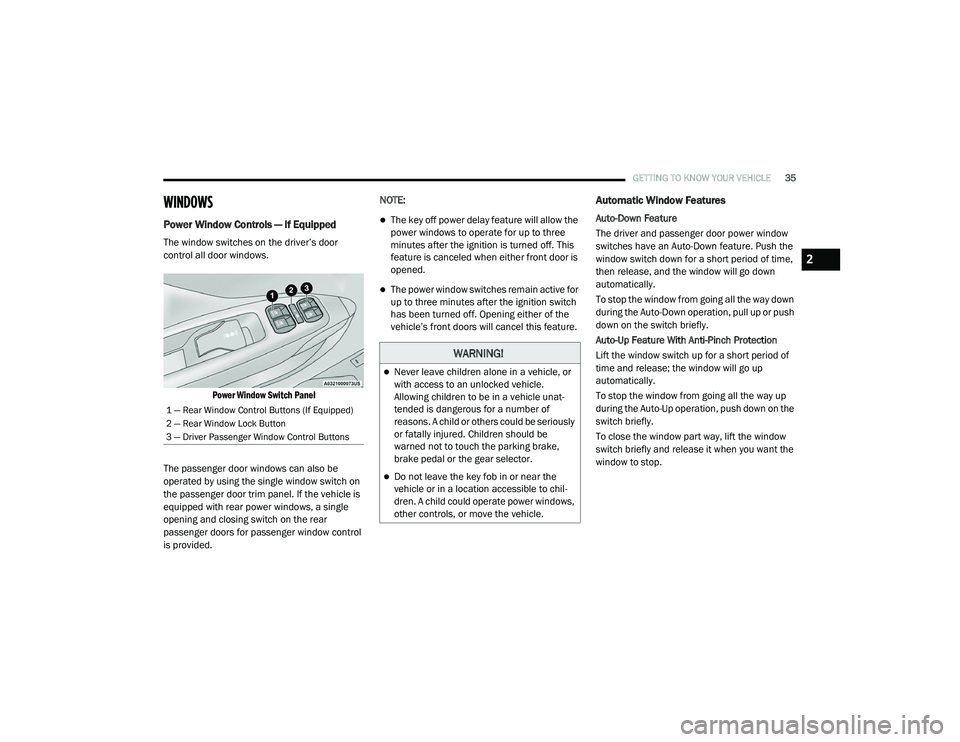
The window switches on the driver’s door
control all door windows.
Power Window Switch Panel
The passenger door windows can also be
operated by using the single window switch on
the passenger door trim panel. If the vehicle is
equipped with rear power windows, a single
opening and closing switch on the rear
passenger doors for passenger window control
is provided. NOTE:
The key off power delay feature will allow the
power windows to operate for up to three
minutes after the ignition is turned off. This
feature is canceled when either front door is
opened.
The power window switches remain active for
up to three minutes after the ignition switch
has been turned off. Opening either of the
vehicle’s front doors will cancel this feature.
Automatic Window Features
Auto-Down Feature
The driver and passenger door power window
switches have an Auto-Down feature. Push the
window switch down for a short period of time,
then release, and the window will go down
automatically.
To stop the window from going all the way down
during the Auto-Down operation, pull up or push
down on the switch briefly.
Auto-Up Feature With Anti-Pinch Protection
Lift the window switch up for a short period of
time and release; the window will go up
automatically.
To stop the window from going all the way up
during the Auto-Up operation, push down on the
switch briefly.
To close the window part way, lift the window
switch briefly and release it when you want the
window to stop.
1 — Rear Window Control Buttons (If Equipped)
2 — Rear Window Lock Button
3 — Driver Passenger Window Control Buttons
WARNING!
Never leave children alone in a vehicle, or
with access to an unlocked vehicle.
Allowing children to be in a vehicle unat
-
tended is dangerous for a number of
reasons. A child or others could be seriously
or fatally injured. Children should be
warned not to touch the parking brake,
brake pedal or the gear selector.
Do not leave the key fob in or near the
vehicle or in a location accessible to chil -
dren. A child could operate power windows,
other controls, or move the vehicle.
2
21_VM_OM_EN_USC_t.book Page 35
Page 47 of 280
GETTING TO KNOW YOUR INSTRUMENT PANEL45
Location And Controls
The instrument cluster display features a driver
interactive display that is located in the
instrument cluster.
Instrument Cluster Display Location
The menu items described below are an
example of what can be found in the vehicle's
menu:
Dimmer
Speed Beep
Trip A / B (options are selectable through the
steering wheel stalk)
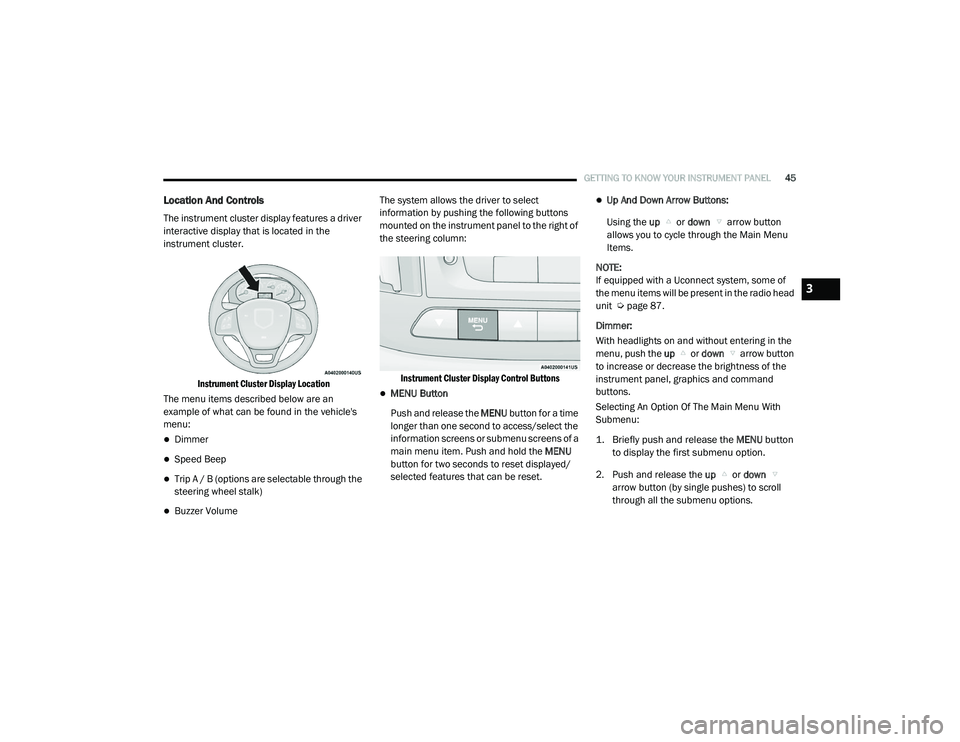
Buzzer Volume The system allows the driver to select
information by pushing the following buttons
mounted on the instrument panel to the right of
the steering column:
Instrument Cluster Display Control Buttons
MENU Button
Push and release the MENU button for a time
longer than one second to access/select the
information screens or submenu screens of a
main menu item. Push and hold the MENU
button for two seconds to reset displayed/
selected features that can be reset.
Up And Down Arrow Buttons:
Using the up or down arrow button
allows you to cycle through the Main Menu
Items.
NOTE:
If equipped with a Uconnect system, some of
the menu items will be present in the radio head
unit Ú page 87.
Dimmer:
With headlights on and without entering in the
menu, push the up or down arrow button
to increase or decrease the brightness of the
instrument panel, graphics and command
buttons.
Selecting An Option Of The Main Menu With
Submenu:
1. Briefly push and release the
MENU
button
to display the first submenu option.
2. Push and release the up or down
arrow button (by single pushes) to scroll
through all the submenu options.
3
21_VM_OM_EN_USC_t.book Page 45
Page 70 of 280
68STARTING AND OPERATING
NOTE:
Increased noise levels at the end of the
steering wheel travel are considered normal
and do not indicate that there is a problem
with the power steering system.
Upon initial start-up in cold weather, the
power steering pump may make noise for a
short amount of time. This is due to the cold,
thick fluid in the steering system. This noise
should be considered normal, and it does not
in any way damage the steering system.
Power Steering Fluid Check
Checking the power steering fluid level at a
defined service interval is not required. The fluid
should only be checked if a leak is suspected,
abnormal noises are apparent, and/or the
system is not functioning as anticipated. Coordinate inspection efforts through an
authorized dealer.
If necessary, add fluid to restore to the proper
indicated level. With a clean cloth, wipe any
spilled fluid from all surfaces Ú
page 261.
CRUISE CONTROL — IF EQUIPPED
When engaged, the Cruise Control takes over
accelerator operations at speeds greater than
25 mph (40 km/h).
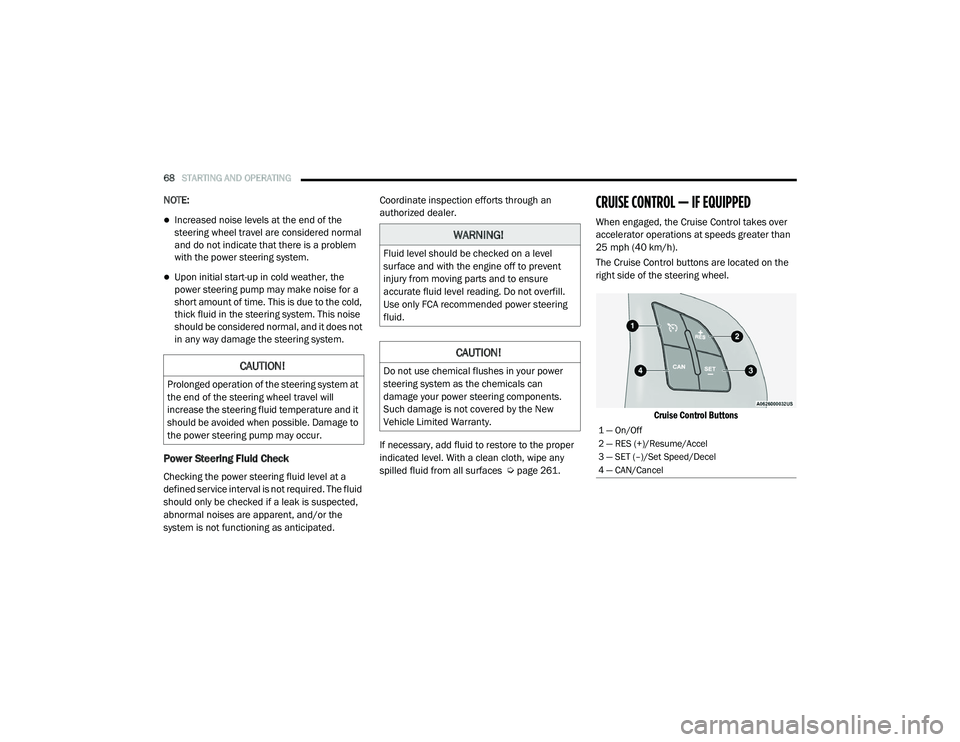
The Cruise Control buttons are located on the
right side of the steering wheel.
Cruise Control Buttons
CAUTION!
Prolonged operation of the steering system at
the end of the steering wheel travel will
increase the steering fluid temperature and it
should be avoided when possible. Damage to
the power steering pump may occur.
WARNING!
Fluid level should be checked on a level
surface and with the engine off to prevent
injury from moving parts and to ensure
accurate fluid level reading. Do not overfill.
Use only FCA recommended power steering
fluid.
CAUTION!
Do not use chemical flushes in your power
steering system as the chemicals can
damage your power steering components.
Such damage is not covered by the New
Vehicle Limited Warranty.
1 — On/Off
2 — RES (+)/Resume/Accel
3 — SET (–)/Set Speed/Decel
4 — CAN/Cancel
21_VM_OM_EN_USC_t.book Page 68
Page 89 of 280
MULTIMEDIA87
NOTE:
FCA US LLC or your dealer may contact you
directly regarding software updates.
To help further improve vehicle security and
minimize the potential risk of a security
breach, vehicle owners should:
Routinely check www.driveucon -
nect.com/support/soft -
ware-update.html (US Residents) or
www.driveuconnect.ca (Canadian Resi -
dents) to learn about available Uconnect
software updates.
Only connect and use trusted media
devices (e.g. personal mobile phones,
USBs, CDs).
Privacy of any wireless and wired
communications cannot be assured. Third
parties may unlawfully intercept information
and private communications without your
consent Ú page 56.
UCONNECT SETTINGS
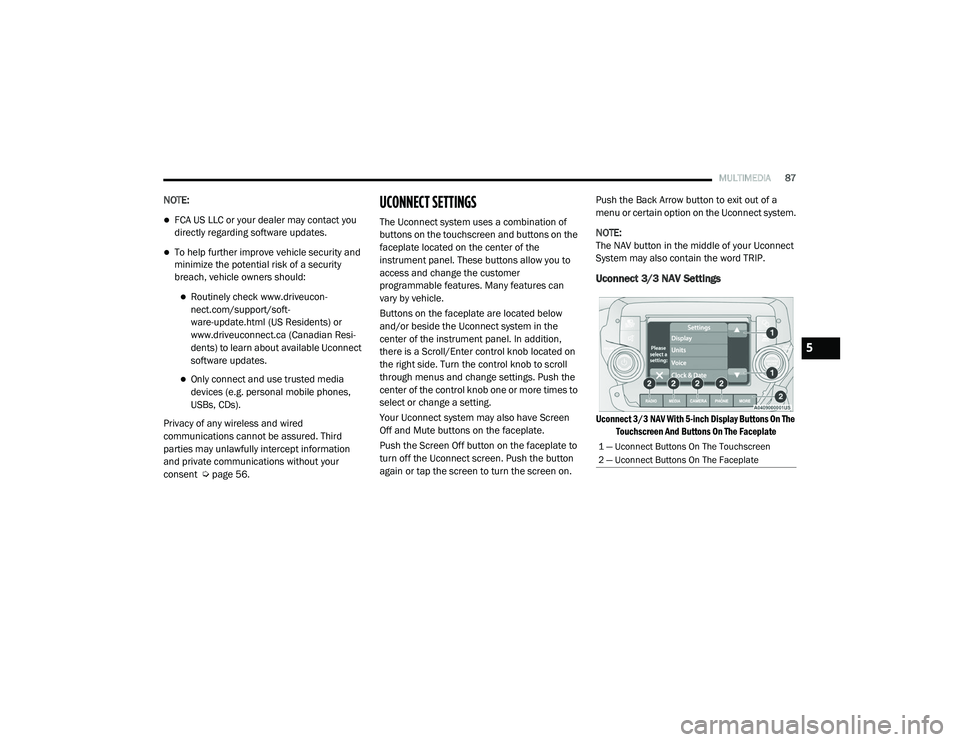
The Uconnect system uses a combination of
buttons on the touchscreen and buttons on the
faceplate located on the center of the
instrument panel. These buttons allow you to
access and change the customer
programmable features. Many features can
vary by vehicle.
Buttons on the faceplate are located below
and/or beside the Uconnect system in the
center of the instrument panel. In addition,
there is a Scroll/Enter control knob located on
the right side. Turn the control knob to scroll
through menus and change settings. Push the
center of the control knob one or more times to
select or change a setting.
Your Uconnect system may also have Screen
Off and Mute buttons on the faceplate.
Push the Screen Off button on the faceplate to
turn off the Uconnect screen. Push the button
again or tap the screen to turn the screen on. Push the Back Arrow button to exit out of a
menu or certain option on the Uconnect system.
NOTE:
The NAV button in the middle of your Uconnect
System may also contain the word TRIP.
Uconnect 3/3 NAV Settings
Uconnect 3/3 NAV With 5-inch Display Buttons On The
Touchscreen And Buttons On The Faceplate
1 — Uconnect Buttons On The Touchscreen
2 — Uconnect Buttons On The Faceplate
5
21_VM_OM_EN_USC_t.book Page 87
Page 90 of 280
88MULTIMEDIA
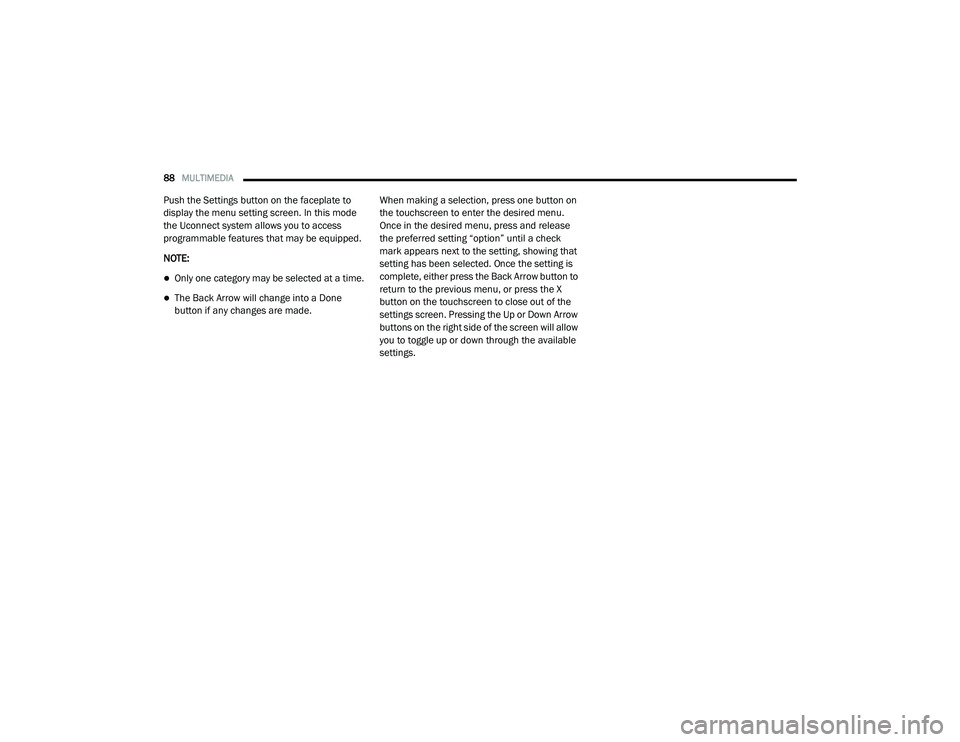
Push the Settings button on the faceplate to
display the menu setting screen. In this mode
the Uconnect system allows you to access
programmable features that may be equipped.
NOTE:
Only one category may be selected at a time.
The Back Arrow will change into a Done
button if any changes are made. When making a selection, press one button on
the touchscreen to enter the desired menu.
Once in the desired menu, press and release
the preferred setting “option” until a check
mark appears next to the setting, showing that
setting has been selected. Once the setting is
complete, either press the Back Arrow button to
return to the previous menu, or press the X
button on the touchscreen to close out of the
settings screen. Pressing the Up or Down Arrow
buttons on the right side of the screen will allow
you to toggle up or down through the available
settings.
21_VM_OM_EN_USC_t.book Page 88
Page 102 of 280
100MULTIMEDIA
UCONNECT MODES
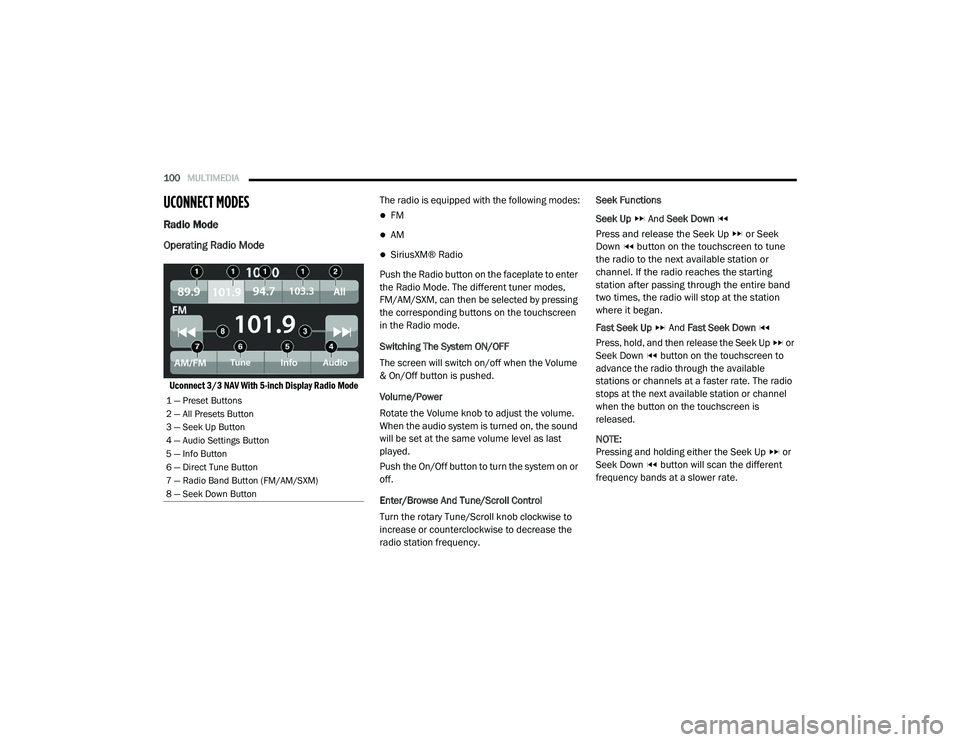
Radio Mode
Operating Radio Mode
Uconnect 3/3 NAV With 5-inch Display Radio Mode
The radio is equipped with the following modes:
FM
AM
SiriusXM® Radio
Push the Radio button on the faceplate to enter
the Radio Mode. The different tuner modes,
FM/AM/SXM, can then be selected by pressing
the corresponding buttons on the touchscreen
in the Radio mode.
Switching The System ON/OFF
The screen will switch on/off when the Volume
& On/Off button is pushed.
Volume/Power
Rotate the Volume knob to adjust the volume.
When the audio system is turned on, the sound
will be set at the same volume level as last
played.
Push the On/Off button to turn the system on or
off.
Enter/Browse And Tune/Scroll Control
Turn the rotary Tune/Scroll knob clockwise to
increase or counterclockwise to decrease the
radio station frequency. Seek Functions
Seek Up
And Seek Down
Press and release the Seek Up or Seek
Down button on the touchscreen to tune
the radio to the next available station or
channel. If the radio reaches the starting
station after passing through the entire band
two times, the radio will stop at the station
where it began.
Fast Seek Up And Fast Seek Down
Press, hold, and then release the Seek Up or
Seek Down button on the touchscreen to
advance the radio through the available
stations or channels at a faster rate. The radio
stops at the next available station or channel
when the button on the touchscreen is
released.
NOTE:
Pressing and holding either the Seek Up or
Seek Down button will scan the different
frequency bands at a slower rate.
1 — Preset Buttons
2 — All Presets Button
3 — Seek Up Button
4 — Audio Settings Button
5 — Info Button
6 — Direct Tune Button
7 — Radio Band Button (FM/AM/SXM)
8 — Seek Down Button
21_VM_OM_EN_USC_t.book Page 100
Page 103 of 280

MULTIMEDIA101
Direct Tune
Direct Tune
Press the Tune button located at the bottom of
the radio screen to directly tune to a desired
radio station or channel.
Press the available number button on the
touchscreen to begin selecting a desired
station. Once a number has been entered, any
numbers that are no longer possible (stations
that cannot be reached) will become
deactivated/grayed out.
Info
Press the Info button to display the current
track information. Press the X button to cancel
this feature. Setting The Presets
The Presets are available for all Radio Modes,
and are activated by pressing any of the four
Preset buttons, located at the top of the screen.
When you are receiving a station that you wish
to commit into memory, press and hold the
desired numbered button for more that two
seconds or until you hear a confirmation beep.
The Radio stores up to 12 presets in each of the
Radio modes. Four presets are visible at the top
of the radio screen.
Pressing the All button on the radio home
screen will display all of the preset stations for
that mode.
SiriusXM® Satellite Radio Mode
Uconnect 3/3 NAV With 5-inch Display Changing To SiriusXM®
SiriusXM® Satellite Radio uses direct
satellite-to-receiver broadcasting technology to
provide clear, coast to coast radio content.
SiriusXM® is a subscription-based service.
Visit siriusxm.com/getallaccess or review your
SiriusXM® Radio pamphlet in your Owner’s
Manual kit.
SiriusXM® services require subscriptions sold
separately after the trial included with the new
vehicle purchase. If you decide to continue your
service at the end of your trial subscription, the
plan you choose will automatically renew and
bill at then-current rates until you call
SiriusXM® at 866-635-2349 to cancel. See
SiriusXM® Customer Agreement for complete
terms at www.siriusxm.com (US) or
www.siriusxm.ca (Canada). All fees and
programming subject to change. Our satellite
service is available to those at least 18 and
older in the 48 contiguous USA and D.C. Our
SiriusXM® satellite service is also available in
Canada and Puerto Rico (with coverage
limitations). Our Internet radio service is
available throughout our satellite service area
and in AK. © 2020 SiriusXM® Radio Inc.
SiriusXM® and all related marks and logos are
trademarks of SiriusXM® Radio Inc.
5
21_VM_OM_EN_USC_t.book Page 101