2021 RAM PROMASTER CITY diagram
[x] Cancel search: diagramPage 184 of 280

182SAFETY
(Continued)
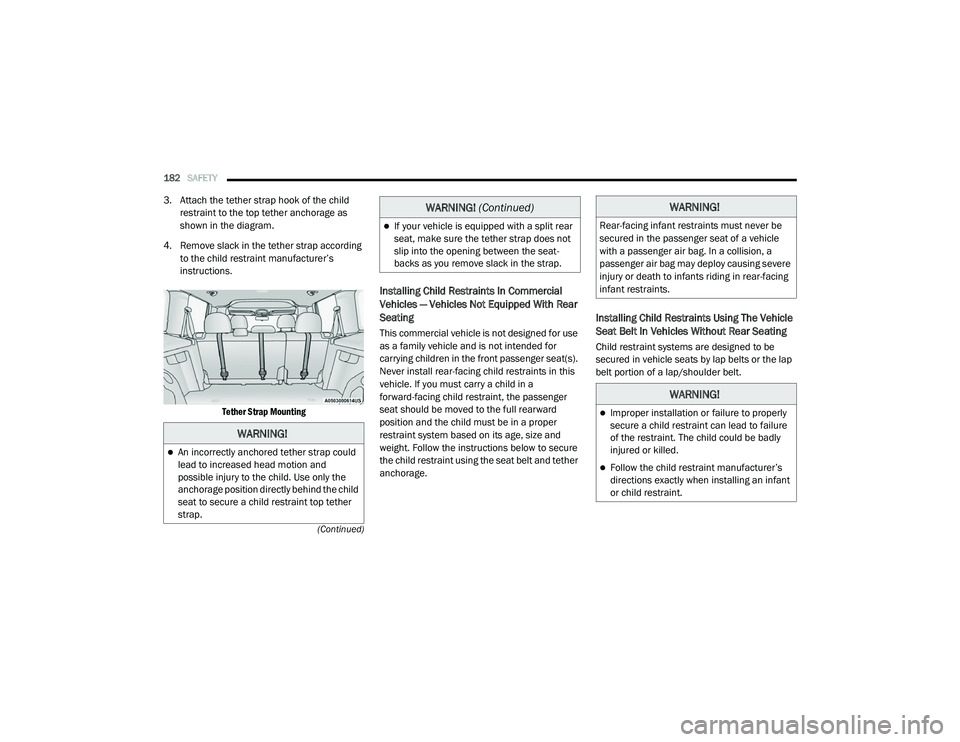
3. Attach the tether strap hook of the child restraint to the top tether anchorage as
shown in the diagram.
4. Remove slack in the tether strap according to the child restraint manufacturer’s
instructions.
Tether Strap Mounting
Installing Child Restraints In Commercial
Vehicles — Vehicles Not Equipped With Rear
Seating
This commercial vehicle is not designed for use
as a family vehicle and is not intended for
carrying children in the front passenger seat(s).
Never install rear-facing child restraints in this
vehicle. If you must carry a child in a
forward-facing child restraint, the passenger
seat should be moved to the full rearward
position and the child must be in a proper
restraint system based on its age, size and
weight. Follow the instructions below to secure
the child restraint using the seat belt and tether
anchorage.
Installing Child Restraints Using The Vehicle
Seat Belt In Vehicles Without Rear Seating
Child restraint systems are designed to be
secured in vehicle seats by lap belts or the lap
belt portion of a lap/shoulder belt.
WARNING!
An incorrectly anchored tether strap could
lead to increased head motion and
possible injury to the child. Use only the
anchorage position directly behind the child
seat to secure a child restraint top tether
strap.
If your vehicle is equipped with a split rear
seat, make sure the tether strap does not
slip into the opening between the seat -
backs as you remove slack in the strap.
WARNING! (Continued)WARNING!
Rear-facing infant restraints must never be
secured in the passenger seat of a vehicle
with a passenger air bag. In a collision, a
passenger air bag may deploy causing severe
injury or death to infants riding in rear-facing
infant restraints.
WARNING!
Improper installation or failure to properly
secure a child restraint can lead to failure
of the restraint. The child could be badly
injured or killed.
Follow the child restraint manufacturer’s
directions exactly when installing an infant
or child restraint.
21_VM_OM_EN_USC_t.book Page 182
Page 186 of 280

184SAFETY
8. If the child restraint has a top tether strap
and the seating position has a top tether
anchorage, connect the tether strap to the
anchorage and tighten the tether strap. See
Úpage 181 for directions to attach a tether
anchor.
9. Test that the child restraint is installed tightly by pulling back and forth on the child
seat at the belt path. It should not move
more than 1 inch (25.4 mm) in any
direction.
Any seat belt system will loosen with time, so
check the belt occasionally, and pull it tight if
necessary.
Installing Child Restraints Using The Top
Tether Anchorage (Commercial Vehicle)
This vehicle is equipped with a tether strap
anchorage located behind the front passenger
seatback, near the floor. When installing a
forward-facing child restraint, always secure the
top tether strap to the tether anchorage.
1. Look behind the front passenger seat to find the tether anchorage. You may need to
move the seat forward to provide better
access to the tether anchorage.
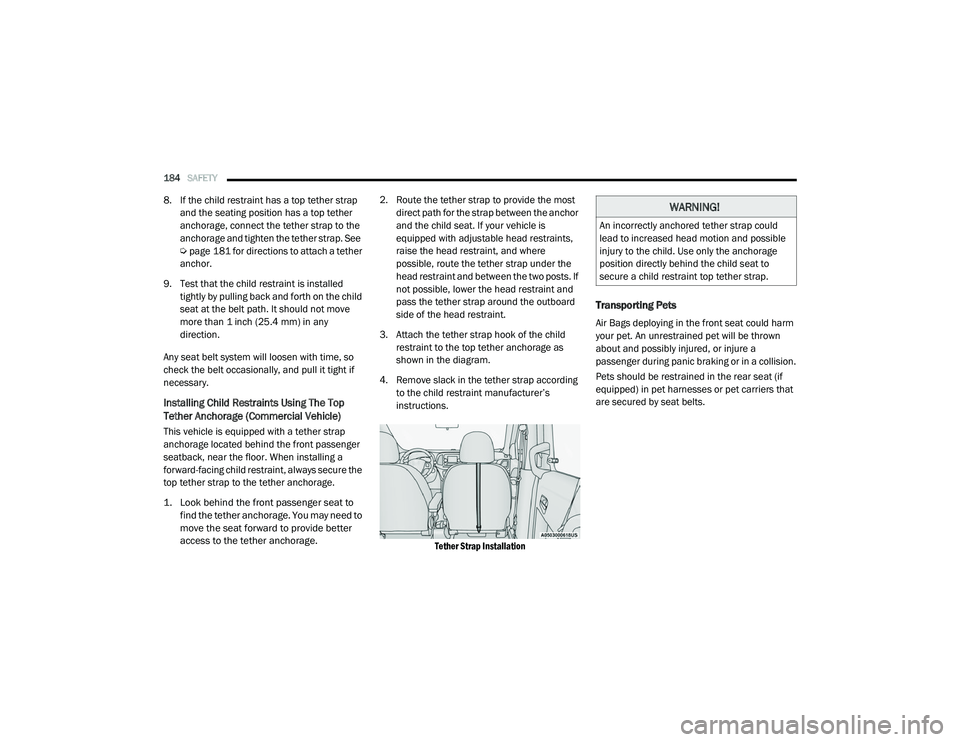
2. Route the tether strap to provide the most
direct path for the strap between the anchor
and the child seat. If your vehicle is
equipped with adjustable head restraints,
raise the head restraint, and where
possible, route the tether strap under the
head restraint and between the two posts. If
not possible, lower the head restraint and
pass the tether strap around the outboard
side of the head restraint.
3. Attach the tether strap hook of the child restraint to the top tether anchorage as
shown in the diagram.
4. Remove slack in the tether strap according to the child restraint manufacturer’s
instructions.
Tether Strap Installation
Transporting Pets
Air Bags deploying in the front seat could harm
your pet. An unrestrained pet will be thrown
about and possibly injured, or injure a
passenger during panic braking or in a collision.
Pets should be restrained in the rear seat (if
equipped) in pet harnesses or pet carriers that
are secured by seat belts.
WARNING!
An incorrectly anchored tether strap could
lead to increased head motion and possible
injury to the child. Use only the anchorage
position directly behind the child seat to
secure a child restraint top tether strap.
21_VM_OM_EN_USC_t.book Page 184
Page 252 of 280

250SERVICING AND MAINTENANCE
Tire Rotation Recommendations
The tires on the front and rear of your vehicle
operate at different loads and perform different
steering, driving, and braking functions. For
these reasons, they wear at unequal rates.
These effects can be reduced by timely rotation
of tires. The benefits of rotation are especially
worthwhile with aggressive tread designs such
as those on all season type tires. Rotation will
increase tread life, help to maintain mud, snow
and wet traction levels, and contribute to a
smooth, quiet ride.
For the proper maintenance intervals
Úpage 217. The reasons for any rapid or
unusual wear should be corrected prior to
rotation being performed.
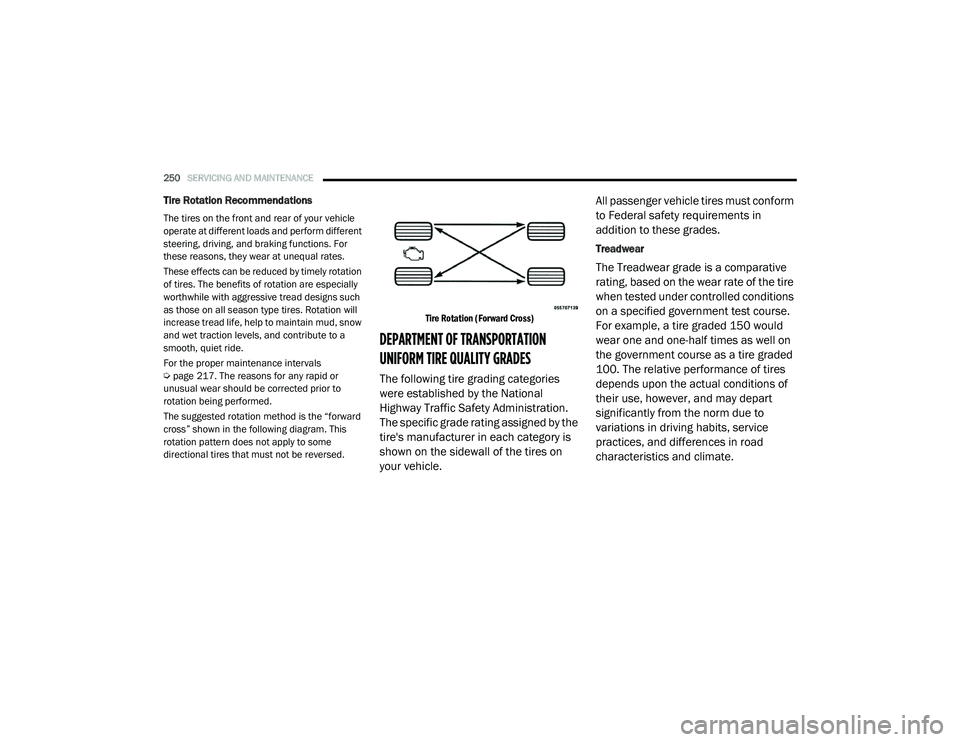
The suggested rotation method is the “forward
cross” shown in the following diagram. This
rotation pattern does not apply to some
directional tires that must not be reversed.
Tire Rotation (Forward Cross)
DEPARTMENT OF TRANSPORTATION
UNIFORM TIRE QUALITY GRADES
The following tire grading categories
were established by the National
Highway Traffic Safety Administration.
The specific grade rating assigned by the
tire's manufacturer in each category is
shown on the sidewall of the tires on
your vehicle.All passenger vehicle tires must conform
to Federal safety requirements in
addition to these grades.
Treadwear
The Treadwear grade is a comparative
rating, based on the wear rate of the tire
when tested under controlled conditions
on a specified government test course.
For example, a tire graded 150 would
wear one and one-half times as well on
the government course as a tire graded
100. The relative performance of tires
depends upon the actual conditions of
their use, however, and may depart
significantly from the norm due to
variations in driving habits, service
practices, and differences in road
characteristics and climate.
21_VM_OM_EN_USC_t.book Page 250
Page 266 of 280

264CUSTOMER ASSISTANCE
WARRANTY INFORMATION
See the Warranty Information for the terms and
provisions of FCA US LLC warranties applicable
to this vehicle and market. Refer to
www.mopar.com/om for further information.
MOPAR PARTS
Mopar® original equipment parts &
accessories and factory filled fluids are
available from an authorized dealer. They are
recommended for your vehicle to keep it
operating at its best and maintain its original
condition.
REPORTING SAFETY DEFECTS
In The 50 United States And Washington,
D.C.
If you believe that your vehicle has a
defect that could cause a crash or cause
injury or death, you should immediately
inform the National Highway Traffic
Safety Administration (NHTSA) in
addition to notifying FCA US LLC.
If NHTSA receives similar complaints, it
may open an investigation, and if it finds that a safety defect exists in a group of
vehicles, it may order a recall and
remedy campaign. However, NHTSA
cannot become involved in individual
problems between you, an authorized
dealer or FCA US LLC.
To contact NHTSA, you may call the
Vehicle Safety Hotline toll free at
1-888-327-4236 (TTY:
1-800-424-9153); or go to http://
www.safercar.gov; or write to:
Administrator, NHTSA, 1200 New Jersey
Avenue, SE., West Building, Washington,
D.C. 20590. You can also obtain other
information about motor vehicle safety
from http://www.safercar.gov.In Canada
If you believe that your vehicle has a
safety defect, you should contact the
Customer Service Department
immediately. Canadian customers who
wish to report a safety defect to the
Canadian government should contact
Transport Canada, Motor Vehicle Defect Investigations and Recalls at
1-800-333-0510 or go to
wwwapps.tc.gc.ca/Saf-Sec-Sur/7/
PCDB-BDPP.
PUBLICATION ORDER FORMS
To order the following manuals, you may use
either the website or the phone numbers listed
below.
Service Manuals
These comprehensive Service Manuals provide
a complete working knowledge of the vehicle,
system, and/or components and is written in
straightforward language with illustrations,
diagrams, and charts.
Diagnostic Procedure Manuals
Diagnostic Procedure Manuals are filled with
diagrams, charts and detailed illustrations.
These manuals make it easy to find and fix
problems on computer-controlled vehicle
systems and features. They show exactly how to
find and correct problems, using step-by-step
troubleshooting and drivability procedures,
proven diagnostic tests and a complete list of all
tools and equipment.
21_VM_OM_EN_USC_t.book Page 264