2021 RAM PROMASTER CITY service reset
[x] Cancel search: service resetPage 51 of 280

GETTING TO KNOW YOUR INSTRUMENT PANEL49
Values Displayed
Range
This indicates the distance which may be
traveled with the fuel remaining in the tank,
assuming that driving conditions will not
change. The message “----” will appear on the
display in the following cases:
Distance less than 30 miles (or 50 km).
The vehicle is parked for a long time with the
engine running.
NOTE:
The range depends on several factors: driving
style, type of route (freeway, residential, moun -
tain roads, etc.), conditions of use of the vehicle
(load, tire pressure, etc.). Trip planning must
take into account the above notes.
Travel Distance
This value shows the distance covered since the
last reset.
Average Fuel Consumption
This value shows the approximate average
consumption since the last reset.
Current Fuel Consumption
This indicates the fuel consumption. The value
is constantly updated. The message “----” will
appear on the display if the vehicle is parked
with the engine running.
Average Speed
This value shows the vehicle's average speed as
a function of the overall time elapsed since the
last reset.
Travel Time
This value shows the time elapsed since the last
reset.
WARNING LIGHTS AND MESSAGES
The warning/indicator lights will illuminate in
the instrument panel together with a dedicated
message and/or acoustic signal when
applicable. These indications are indicative and
precautionary and as such must not be
considered as exhaustive and/or alternative to
the information contained in the Owner’s
Manual, which you are advised to read carefully
in all cases. Always refer to the information in
this chapter in the event of a failure indication.
All active telltales will display first if applicable.
The system check menu may appear different based upon equipment options and current
vehicle status. Some telltales are optional and
may not appear.
Red Warning Lights
Air Bag Warning Light
This light will turn on for four to eight
seconds as a bulb check when the
ignition is placed in the ON/RUN or
MAR/ON/RUN position. If the light is
either not on during startup, stays on, or turns
on while driving, have the system inspected by
an authorized dealer as soon as possible. This
light will illuminate with a single chime when a
fault with the Air Bag Warning Light has been
detected, it will stay on until the fault is cleared.
If the light comes on intermittently or remains
on while driving, have an authorized dealer
service the vehicle immediately.
Brake Warning Light
This warning light monitors various
brake functions, including brake fluid
level and parking brake application. If
the brake light turns on it may
indicate that the parking brake is applied, that
the brake fluid level is low, or that there is a
problem with the Anti-Lock Brake System
reservoir.
3
21_VM_OM_EN_USC_t.book Page 49
Page 68 of 280

66STARTING AND OPERATING
DRIVE (D)
This range should be used for most city and
highway driving. It provides the smoothest
upshifts and downshifts, and the best fuel
economy. The transmission automatically
upshifts through all forward gears.
When frequent transmission shifting occurs
(such as when operating the vehicle under
heavy loading conditions, in hilly terrain,
traveling into strong head winds, or while towing
a heavy trailer), use the Electronic Range Select
(ERS) shift control to select a lower gear range
Úpage 67. Under these conditions, using a
lower gear range will improve performance and
extend transmission life by reducing excessive
shifting and heat buildup.
If the transmission temperature exceeds
normal operating limits, the transmission
controller may modify the transmission shift
schedule, reduce engine torque, and/or expand
the range of torque converter clutch
engagement. This is done to prevent
transmission damage due to overheating.
If the transmission becomes extremely hot, the
“Transmission Temperature Warning Light” may
illuminate and the transmission may operate
differently until the transmission cools down. During cold temperatures, transmission
operation may be modified depending on
engine and transmission temperature as well
as vehicle speed. This feature improves warm
up time of the engine and transmission to
achieve maximum efficiency. Engagement of
the torque converter clutch, and shifts into
8th or 9th gear, are inhibited until the
transmission fluid is warm Ú
page 67. Normal
operation will resume once the transmission
temperature has risen to a suitable level.
Transmission Limp Home Mode
Transmission function is monitored
electronically for abnormal conditions. If a
condition is detected that could result in
transmission damage, Transmission Limp
Home Mode is activated. In this mode, the
transmission may operate only in a fixed gear,
or may remain in NEUTRAL. The Malfunction
Indicator Light (MIL) may be illuminated. Limp
Home Mode may allow the vehicle to be driven
to an authorized dealer for service without
damaging the transmission. In the event of a momentary problem, the
transmission can be reset to regain all forward
gears by performing the following steps:
1. Stop the vehicle.
2. Shift the transmission into PARK.
3. Turn the ignition OFF.
4. Wait approximately 10 seconds.
5. Restart the engine.
6. Shift into the desired gear range. If the
problem is no longer detected, the
transmission will return to normal
operation.
NOTE:
Even if the transmission can be reset, we
recommend that you visit an authorized dealer
at your earliest possible convenience. An autho -
rized dealer has diagnostic equipment to
assess the condition of your transmission. If the
transmission cannot be reset, authorized dealer
service is required.
21_VM_OM_EN_USC_t.book Page 66
Page 103 of 280

MULTIMEDIA101
Direct Tune
Direct Tune
Press the Tune button located at the bottom of
the radio screen to directly tune to a desired
radio station or channel.
Press the available number button on the
touchscreen to begin selecting a desired
station. Once a number has been entered, any
numbers that are no longer possible (stations
that cannot be reached) will become
deactivated/grayed out.
Info
Press the Info button to display the current
track information. Press the X button to cancel
this feature. Setting The Presets
The Presets are available for all Radio Modes,
and are activated by pressing any of the four
Preset buttons, located at the top of the screen.
When you are receiving a station that you wish
to commit into memory, press and hold the
desired numbered button for more that two
seconds or until you hear a confirmation beep.
The Radio stores up to 12 presets in each of the
Radio modes. Four presets are visible at the top
of the radio screen.
Pressing the All button on the radio home
screen will display all of the preset stations for
that mode.
SiriusXM® Satellite Radio Mode
Uconnect 3/3 NAV With 5-inch Display Changing To SiriusXM®
SiriusXM® Satellite Radio uses direct
satellite-to-receiver broadcasting technology to
provide clear, coast to coast radio content.
SiriusXM® is a subscription-based service.
Visit siriusxm.com/getallaccess or review your
SiriusXM® Radio pamphlet in your Owner’s
Manual kit.
SiriusXM® services require subscriptions sold
separately after the trial included with the new
vehicle purchase. If you decide to continue your
service at the end of your trial subscription, the
plan you choose will automatically renew and
bill at then-current rates until you call
SiriusXM® at 866-635-2349 to cancel. See
SiriusXM® Customer Agreement for complete
terms at www.siriusxm.com (US) or
www.siriusxm.ca (Canada). All fees and
programming subject to change. Our satellite
service is available to those at least 18 and
older in the 48 contiguous USA and D.C. Our
SiriusXM® satellite service is also available in
Canada and Puerto Rico (with coverage
limitations). Our Internet radio service is
available throughout our satellite service area
and in AK. © 2020 SiriusXM® Radio Inc.
SiriusXM® and all related marks and logos are
trademarks of SiriusXM® Radio Inc.
5
21_VM_OM_EN_USC_t.book Page 101
Page 104 of 280

102MULTIMEDIA
This functionality is only available for radios
equipped with a Satellite receiver. In order to
receive satellite radio, the vehicle needs to be
outside with a clear view to the sky.
If the screen shows Acquiring Signal, you might
have to change the vehicle’s position in order to
receive a signal. In most cases, the satellite
radio does not receive a signal in underground
parking garages or tunnels.
No Subscription
Radios equipped with a Satellite receiver
require a subscription to the SiriusXM® Service.
When the Radio does not have the necessary
subscription, the Radio is able to receive the
Preview channel only.
Acquiring SiriusXM® Subscription
To activate the SiriusXM® Satellite Radio
subscription, US visit www.UconnectPhone.com
or call:
1-800-643-2112
Canada visit www.UconnectPhone.com or call:
1-800-465-2001 (English)1-800-387-9983
(French) NOTE:
You will need to provide the SiriusXM® ID (RID)
located at the bottom of the Channel 0 screen.
The Satellite Mode is activated by a press of the
SXM button on the touchscreen.
When in Satellite mode:
The SXM button on the touchscreen is high
-
lighted.
The SiriusXM® Presets are displayed at the
top of the screen.
The SiriusXM® Channel Number is displayed
in the center.
The Program Information is displayed at the
bottom of the Channel Number.
The SiriusXM® function buttons are
displayed below the Program Information.
Tuning is done by operating the Tune Knob or by
Direct Tune, similar to other Radio Bands.
In addition to the tuning operation functions
common to all radio modes, the replay, Traffic/
Weather button, and Favorite button functions
are available in SiriusXM® Mode.
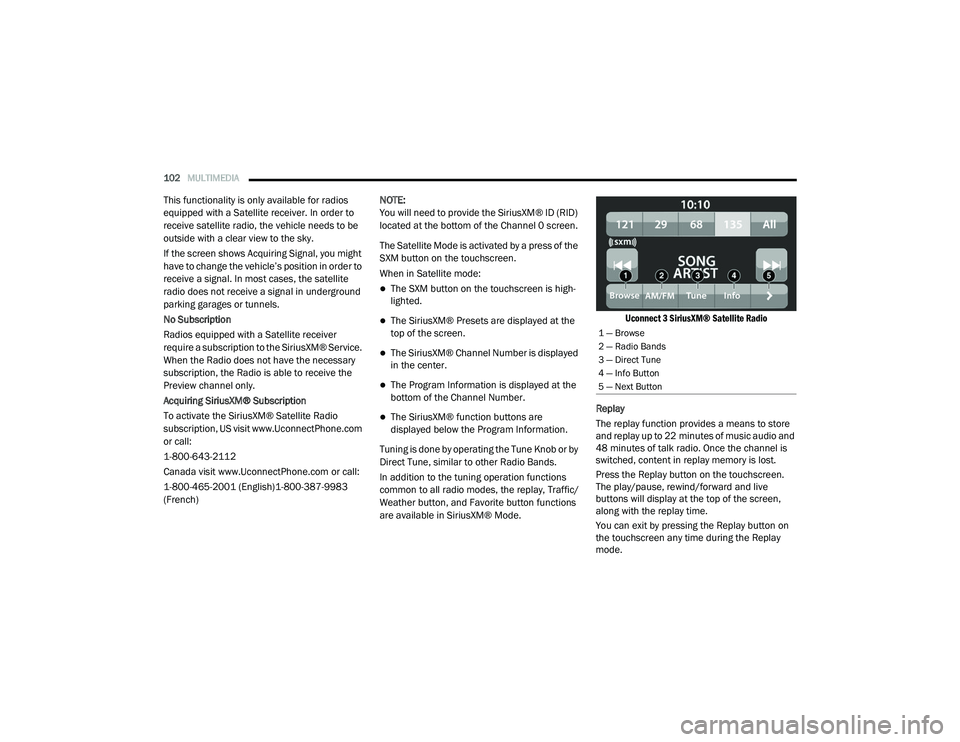
Uconnect 3 SiriusXM® Satellite Radio
Replay
The replay function provides a means to store
and replay up to 22 minutes of music audio and
48 minutes of talk radio. Once the channel is
switched, content in replay memory is lost.
Press the Replay button on the touchscreen.
The play/pause, rewind/forward and live
buttons will display at the top of the screen,
along with the replay time.
You can exit by pressing the Replay button on
the touchscreen any time during the Replay
mode.
1 — Browse
2 — Radio Bands
3 — Direct Tune
4 — Info Button
5 — Next Button
21_VM_OM_EN_USC_t.book Page 102
Page 219 of 280

217
SERVICING AND MAINTENANCE
SCHEDULED SERVICING
Your vehicle is equipped with an automatic oil
change indicator system. The oil change
indicator system will remind you that it is time to
take your vehicle in for scheduled maintenance.
Based on engine operation conditions, the oil
change indicator message will illuminate. This
means that service is required for your vehicle.
Operating conditions such as frequent
short-trips, trailer tow, extended engine idle
time, extremely hot or cold ambient
temperatures will influence when the “Oil
Change Required” message is displayed.
Severe Operating Conditions can cause the
change oil message to illuminate as early as
3,500 miles (5,600 km) since last reset. Have
your vehicle serviced as soon as possible,
within the next 500 miles (805 km).
An authorized dealer will reset the oil change
indicator message after completing the
scheduled oil change. If a scheduled oil change
is performed by someone other than an
authorized dealer, to reset the message
Úpage 46. NOTE:
Under no circumstances should oil change
intervals exceed 10,000 miles (16,000 km),
350 hours of engine run time or 12 months,
whichever comes first. The 350 hours of engine
run or idle time is generally only a concern for
fleet customers.
Severe Duty All Models
Vehicles that are operated in a dusty and
off-road environment, or predominately at idle
or very low engine RPM are known as Severe
Duty vehicles. It is recommended that you
change Engine Oil at 4,000 miles (6,500 km) or
350 hours of engine run time.
Once A Month Or Before A Long Trip:
Check engine oil level.
Check windshield washer fluid level.
Check tire pressure and look for unusual
wear or damage. Rotate tires at the first sign
of irregular wear, even if it occurs before the
oil indicator system turns on.
Check the fluid levels of the coolant reservoir
and brake master cylinder, fill as needed.
Check function of all interior and exterior
lights.
Maintenance Plan
Refer to the maintenance schedule for the
required maintenance intervals. More frequent
maintenance may be needed in severe
conditions, such as dusty areas and very short
trip driving. In some extreme conditions,
additional maintenance not specified in the
maintenance schedule may be required.
8
21_VM_OM_EN_USC_t.book Page 217
Page 234 of 280

232SERVICING AND MAINTENANCE
Special Additives
It is strongly recommended against using any
special additives in the transmission. Automatic
Transmission Fluid (ATF) is an engineered
product and its performance may be impaired
by supplemental additives. Therefore, do not
add any fluid additives to the transmission.
Avoid using transmission sealers as they may
adversely affect seals.
Fluid Level Check
The fluid level is preset at the factory and does
not require adjustment under normal operating
conditions. Routine fluid level checks are not
required; therefore the transmission has no
dipstick. An authorized dealer can check your
transmission fluid level using special service
tools. If you notice fluid leakage or transmission
malfunction, visit an authorized dealer immediately to have the transmission fluid level
checked. Operating the vehicle with an
improper fluid level can cause severe
transmission damage.
Fluid And Filter Changes
Under normal operating conditions, the fluid
installed at the factory will provide satisfactory
lubrication for the life of the vehicle.
Routine fluid and filter changes are not
required. However, change the fluid and filter if
the fluid becomes contaminated (with water,
etc.), or if the transmission is disassembled for
any reason.
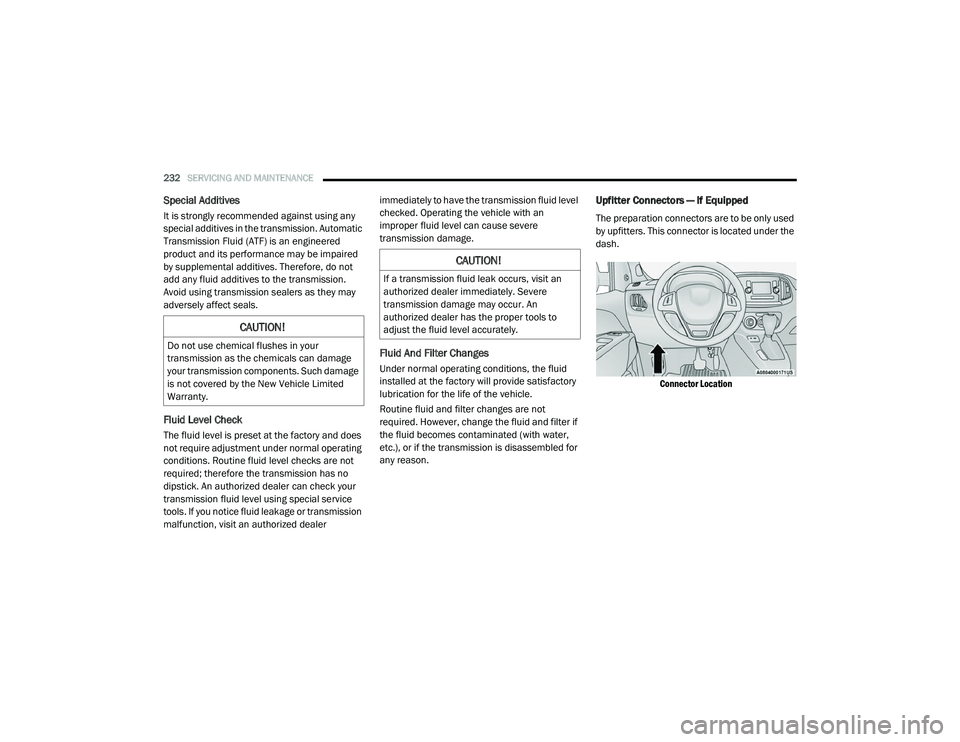
Upfitter Connectors — If Equipped
The preparation connectors are to be only used
by upfitters. This connector is located under the
dash.
Connector Location
CAUTION!
Do not use chemical flushes in your
transmission as the chemicals can damage
your transmission components. Such damage
is not covered by the New Vehicle Limited
Warranty.
CAUTION!
If a transmission fluid leak occurs, visit an
authorized dealer immediately. Severe
transmission damage may occur. An
authorized dealer has the proper tools to
adjust the fluid level accurately.
21_VM_OM_EN_USC_t.book Page 232
Page 271 of 280

269
Heated Seats
................................................... 20Heater, Engine Block....................................... 59Hill Start Assist.............................................. 148Hitches Trailer Towing.............................................. 78Hood Prop........................................................ 37Hood Release.................................................. 37
I
Ignition............................................................ 12Key....................................................... 10, 12Switch......................................................... 12Ignition Key Removal....................................... 12Immobilizer (Sentry Key).................................. 12Inside Rearview Mirror..................................... 25Instrument Cluster.................................... 43, 44Descriptions................................................ 55Display........................................................ 44Display Controls.......................................... 45Engine Oil Reset.......................................... 46Instrument Panel Lens Cleaning.................... 253Interior And Instrument Lights......................... 29Interior Appearance Care............................... 253Interior Lights.................................................. 29iPod Control..................................................... 40iPod/USB/MP3 Control................................... 40Bluetooth Streaming Audio......................... 40
J
Jack Location................................................ 194Jack Operation.............................................. 194Jacking And Tire Changing............................ 194Jump Starting............................................... 204
K
Key FobProgramming Additional Key Fobs
............... 11Key Fob Battery Service (Remote Keyless
Entry)............................................................... 11Key Fob Programming (Remote Keyless
Entry)............................................................... 11Keys................................................................. 10Replacement............................................... 11Sentry (Immobilizer).................................... 12
L
Lane Change Assist......................................... 28Lap/Shoulder Belts....................................... 155Latches......................................................... 187Hood............................................................ 37Leaks, Fluid.................................................. 187Life Of Tires................................................... 245Light Bulbs........................................... 187, 213Lights............................................................ 187Air Bag................................................49, 186Brake Assist Warning............................... 147
Brake Warning.............................................49Bulb Replacement.................................... 213Cruise..........................................................55Daytime Running.........................................27Engine Temperature Warning......................51Exterior.............................................. 27, 187Hazard Warning Flasher........................... 188Headlights...................................................27Interior.........................................................29Malfunction Indicator (Check Engine)..........54Park......................................................28, 55Passing........................................................28Seat Belt Reminder.....................................52Service...................................................... 213Tire Pressure Monitoring (TPMS).............. 149Traction Control........................................ 147Turn Signals....................................... 55, 187Warning Instrument Cluster Descriptions.....................................51, 55Loading Vehicle......................................... 75, 76Capacities....................................................76Tires.......................................................... 239LocksPower Door..................................................14Low Tire Pressure System............................. 149Lubrication, Body.......................................... 225Lug Nuts/Bolts.............................................. 25511
21_VM_OM_EN_USC_t.book Page 269
Page 272 of 280

270
M
Maintenance Free Battery
............................. 222Maintenance Schedule.................................. 217Malfunction Indicator Light (Check
Engine)..................................................... 54, 57Manual Service...................................................... 264Master CylinderBrakes....................................................... 231Methanol....................................................... 257Mirrors............................................................. 25Electric Powered......................................... 26Electric Remote........................................... 26Exterior Folding........................................... 25Outside........................................................ 25Rearview..................................................... 25Modifications/AlterationsVehicle.......................................................... 8Monitor, Tire Pressure System....................... 149Mopar Parts................................................... 264
N
New Vehicle Break-In Period............................ 60
O
Occupant Restraints...................................... 153Octane Rating, Gasoline (Fuel)............ 256, 259Oil Change Indicator........................................ 46Reset........................................................... 46
Oil Filter, Change.......................................... 224Oil Filter, Selection........................................ 224Oil Pressure Light............................................. 51Oil Reset.......................................................... 46Oil, Engine............................................ 223, 259Capacity.................................................... 259Checking................................................... 222Dipstick.................................................... 222Disposal................................................... 224Filter................................................ 224, 259Filter Disposal........................................... 224Identification Logo.................................... 223Materials Added To.................................. 224Pressure Warning Light............................... 51Recommendation............................ 223, 259Synthetic.................................................. 224Viscosity................................................... 259Onboard Diagnostic System............................. 56Operating Precautions..................................... 56Operator ManualOwner's Manual........................................ 264Outside Rearview Mirrors................................ 25Overheating, Engine...................................... 207
P
Paint Care..................................................... 252Parking Brake.................................................. 60ParkSense System, Rear................................. 70Passing Light................................................... 28
Personal Settings.............................................87Pets............................................................... 184Phone Mode.................................................. 109Placard, Tire And Loading Information.......... 239PowerMirrors.........................................................26Steering................................................67, 68Windows......................................................35Power Steering Fluid..................................... 261Pregnant Women And Seat Belts.................. 159Preparation For Jacking....................... 194, 196PretensionersSeat Belts................................................. 159
R
Radial Ply Tires.............................................. 243Radiator Cap (Coolant Pressure Cap)............ 229Radio Operation............................................ 143Rear Camera....................................................73Rear ParkSense System...................................70Recreational Towing.........................................83Reformulated Gasoline................................. 256Refrigerant.................................................... 225Release, Hood..................................................37Reminder, Seat Belt...................................... 154Remote Keyless EntryProgramming Additional Key Fobs...............11Remote Sound System (Radio) Controls....... 142Replacement Bulbs....................................... 213
21_VM_OM_EN_USC_t.book Page 270