2021 RAM PROMASTER CITY height
[x] Cancel search: heightPage 20 of 280
18GETTING TO KNOW YOUR VEHICLE
Manual Adjustment (Front Seats)
The front driver and passenger seats can be
adjusted forward and rearward, and (if
equipped), may be reclined and the height and
lumbar can be adjusted.
Forward And Rearward Adjustment
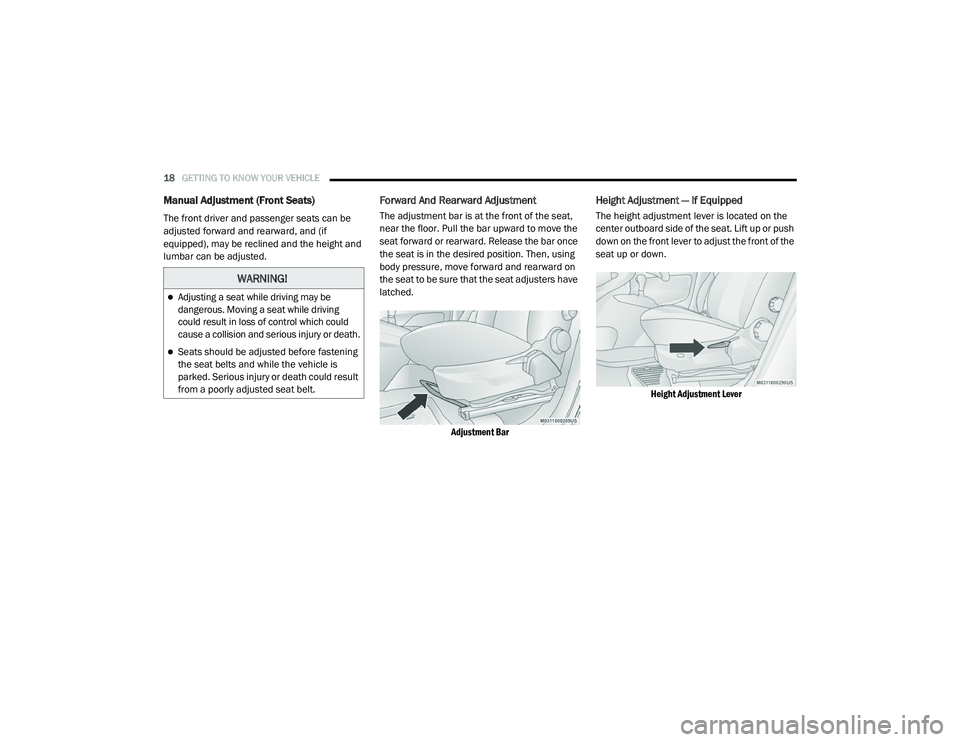
The adjustment bar is at the front of the seat,
near the floor. Pull the bar upward to move the
seat forward or rearward. Release the bar once
the seat is in the desired position. Then, using
body pressure, move forward and rearward on
the seat to be sure that the seat adjusters have
latched.
Adjustment Bar
Height Adjustment — If Equipped
The height adjustment lever is located on the
center outboard side of the seat. Lift up or push
down on the front lever to adjust the front of the
seat up or down.
Height Adjustment Lever
WARNING!
Adjusting a seat while driving may be
dangerous. Moving a seat while driving
could result in loss of control which could
cause a collision and serious injury or death.
Seats should be adjusted before fastening
the seat belts and while the vehicle is
parked. Serious injury or death could result
from a poorly adjusted seat belt.
21_VM_OM_EN_USC_t.book Page 18
Page 24 of 280
22GETTING TO KNOW YOUR VEHICLE
Rear Adjustment — If Equipped
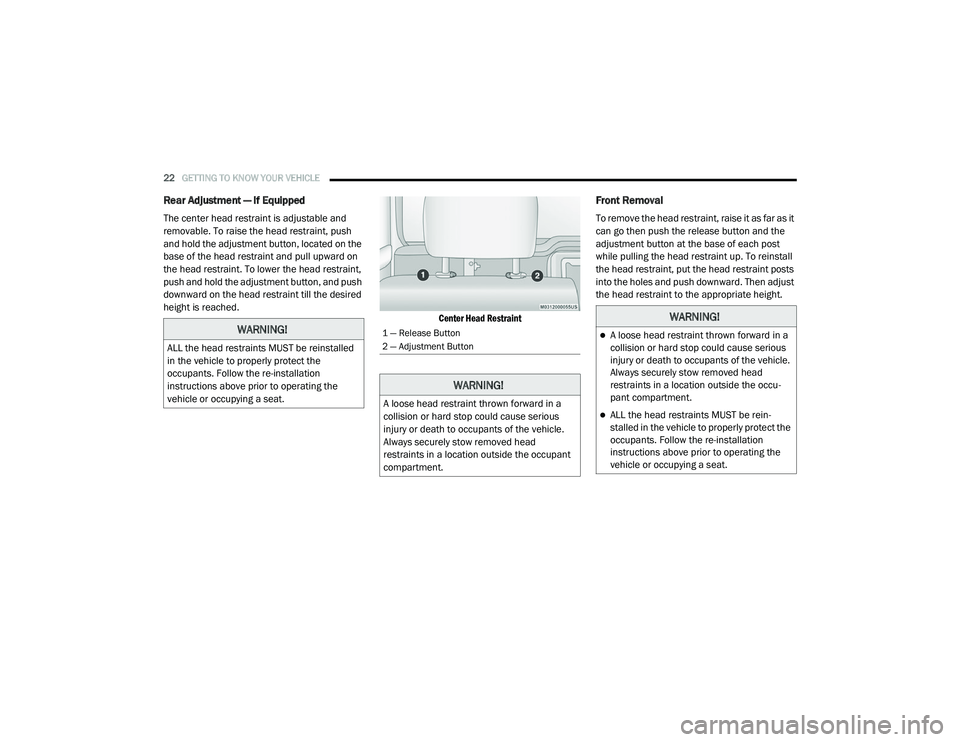
The center head restraint is adjustable and
removable. To raise the head restraint, push
and hold the adjustment button, located on the
base of the head restraint and pull upward on
the head restraint. To lower the head restraint,
push and hold the adjustment button, and push
downward on the head restraint till the desired
height is reached.
Center Head Restraint
Front Removal
To remove the head restraint, raise it as far as it
can go then push the release button and the
adjustment button at the base of each post
while pulling the head restraint up. To reinstall
the head restraint, put the head restraint posts
into the holes and push downward. Then adjust
the head restraint to the appropriate height.
WARNING!
ALL the head restraints MUST be reinstalled
in the vehicle to properly protect the
occupants. Follow the re-installation
instructions above prior to operating the
vehicle or occupying a seat.
1 — Release Button
2 — Adjustment Button
WARNING!
A loose head restraint thrown forward in a
collision or hard stop could cause serious
injury or death to occupants of the vehicle.
Always securely stow removed head
restraints in a location outside the occupant
compartment.
WARNING!
A loose head restraint thrown forward in a
collision or hard stop could cause serious
injury or death to occupants of the vehicle.
Always securely stow removed head
restraints in a location outside the occu-
pant compartment.
ALL the head restraints MUST be rein -
stalled in the vehicle to properly protect the
occupants. Follow the re-installation
instructions above prior to operating the
vehicle or occupying a seat.
21_VM_OM_EN_USC_t.book Page 22
Page 25 of 280
GETTING TO KNOW YOUR VEHICLE23
Rear Removal — If Equipped
Outboard Head Restraints
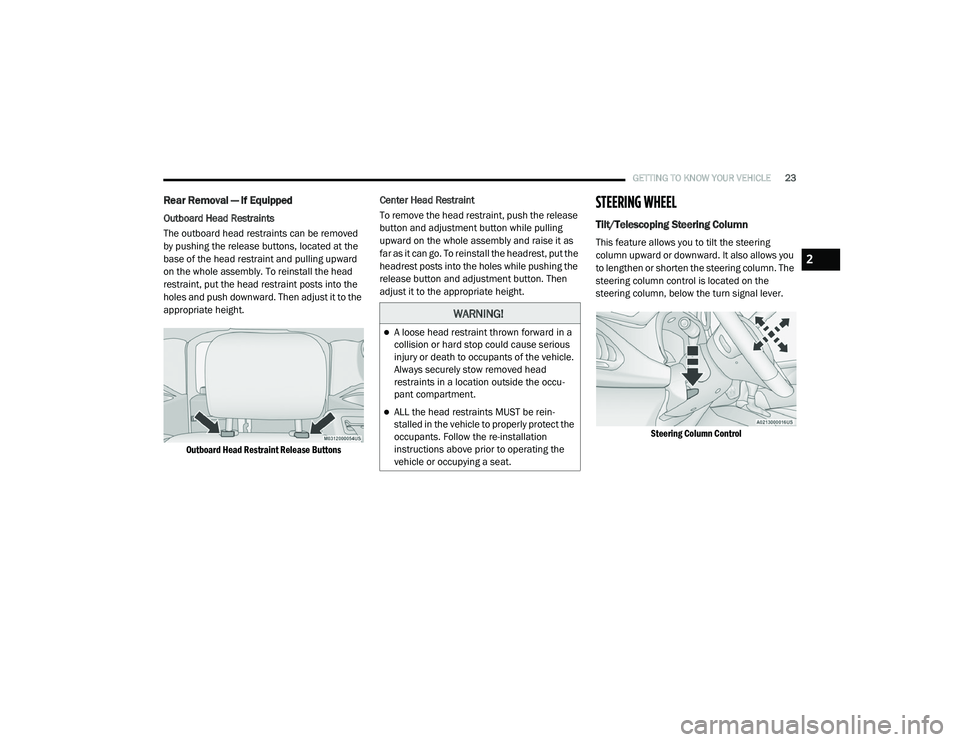
The outboard head restraints can be removed
by pushing the release buttons, located at the
base of the head restraint and pulling upward
on the whole assembly. To reinstall the head
restraint, put the head restraint posts into the
holes and push downward. Then adjust it to the
appropriate height.
Outboard Head Restraint Release Buttons
Center Head Restraint
To remove the head restraint, push the release
button and adjustment button while pulling
upward on the whole assembly and raise it as
far as it can go. To reinstall the headrest, put the
headrest posts into the holes while pushing the
release button and adjustment button. Then
adjust it to the appropriate height.
STEERING WHEEL
Tilt/Telescoping Steering Column
This feature allows you to tilt the steering
column upward or downward. It also allows you
to lengthen or shorten the steering column. The
steering column control is located on the
steering column, below the turn signal lever.
Steering Column Control
WARNING!
A loose head restraint thrown forward in a
collision or hard stop could cause serious
injury or death to occupants of the vehicle.
Always securely stow removed head
restraints in a location outside the occu -
pant compartment.
ALL the head restraints MUST be rein -
stalled in the vehicle to properly protect the
occupants. Follow the re-installation
instructions above prior to operating the
vehicle or occupying a seat.
2
21_VM_OM_EN_USC_t.book Page 23
Page 72 of 280

70STARTING AND OPERATING
To Resume Speed
To resume a previously set speed, push the
RES (+) button and release. Resume can be used
at any speed above 20 mph (32 km/h) up to the maximum speed of 100 mph (160 km/h).
To Deactivate
A tap on the brake pedal, pushing the CAN
button, or normal brake pressure will deactivate
the Cruise Control system without erasing the
set speed from memory.
Pushing the on/off button or turning the ignition
switch off erases the set speed from memory.
PARKSENSE REAR PARK ASSIST — IF
EQUIPPED
The ParkSense system provides an audible
indication of the distance between the rear
fascia/bumper and a detected obstacle when
backing up (e.g. during a parking maneuver)
Ú page 72.
The ParkSense system is automatically
activated when the transmission is placed into
REVERSE. As the distance from an obstacle
behind the vehicle decreases, the audible alert
becomes more frequent. Interaction With Trailer Towing
The ParkSense system is automatically
deactivated when a trailer equipped by Mopar is
hitched to the vehicle. The system will be
automatically activated as soon as the trailer is
removed. If it does not happen, turning the key
ignition switch to OFF and then to ON again
would be needed. If a non-Mopar trailer hitch is
mounted, the sensor deactivation cannot be
guaranteed.
ParkSense Rear Park Assist Sensors
The four ParkSense sensors, located in the rear
fascia/bumper, monitor the area behind the
vehicle that is within the sensors’ field of view.
The sensors can detect obstacles, in the
horizontal direction, from approximately
12 inches (30 cm) up to 55 inches (140 cm)
from the center of the rear fascia/bumper and
up to 24 inches (60 cm) from the corners of the
rear fascia/bumper, depending on the location,
type and orientation of the obstacle.
ParkSense Rear Park Assist Sensors Locations
If several obstacles are detected, the
ParkSense system indicates the nearest
obstacle.
The minimum height of a detectable obstacle
corresponds to the maximum height of an
obstacle that would clear the underside of the
vehicle during the parking maneuver.
21_VM_OM_EN_USC_t.book Page 70
Page 79 of 280
STARTING AND OPERATING77
TRAILER TOWING
In this section you will find safety tips and
information on limits to the type of towing you
can reasonably do with your vehicle. Before
towing a trailer, carefully review this information
to tow your load as efficiently and safely as
possible.
To maintain the New Vehicle Limited Warranty
coverage, follow the requirements and
recommendations in this manual concerning
vehicles used for trailer towing.
Common Towing Definitions
The following trailer towing related definitions
will assist you in understanding the following
information:
Gross Vehicle Weight Rating (GVWR)
The GVWR is the total allowable weight of your
vehicle. This includes driver, passengers, cargo
and tongue weight. The total load must be
limited so that you do not exceed the GVWR
Úpage 75.
Gross Combination Weight Rating (GCWR)
The GCWR is the total allowable weight of your
vehicle and trailer when weighed in
combination.
Gross Trailer Weight (GTW)
The GTW is the weight of the trailer plus the
weight of all cargo, consumables and
equipment (permanent or temporary) loaded in
or on the trailer in its "loaded and ready for
operation" condition.
The recommended way to measure GTW is to
put your fully loaded trailer on a vehicle scale.
The entire weight of the trailer must be
supported by the scale.
Gross Axle Weight Rating (GAWR)
The GAWR is the maximum capacity of the front
and rear axles. Distribute the load over the front
and rear axles evenly. Make sure that you do
not exceed either front or rear GAWR
Úpage 75.
Tongue Weight (TW)
The TW is the downward force exerted on the
hitch ball by the trailer. You must consider this
as part of the load on your vehicle.
Trailer Frontal Area
The frontal area is the maximum height
multiplied by the maximum width of the front of
a trailer.
Trailer Sway Control (TSC)
The TSC can be a mechanical telescoping link
that can be installed between the hitch receiver
and the trailer tongue that typically provides
adjustable friction associated with the
telescoping motion to dampen any unwanted
trailer swaying motions while traveling.
If equipped, the electronic TSC recognizes a
swaying trailer and automatically applies
individual wheel brakes and/or reduces engine
power to attempt to eliminate the trailer sway.
Weight-Carrying Hitch
A weight-carrying hitch supports the trailer
tongue weight, just as if it were luggage located
at a hitch ball or some other connecting point of
the vehicle. These kinds of hitches are commonly
used to tow small and medium sized trailers.
WARNING!
It is important that you do not exceed the
maximum front or rear GAWR. A dangerous
driving condition can result if either rating is
exceeded. You could lose control of the
vehicle and have a collision.
4
21_VM_OM_EN_USC_t.book Page 77
Page 160 of 280
158SAFETY
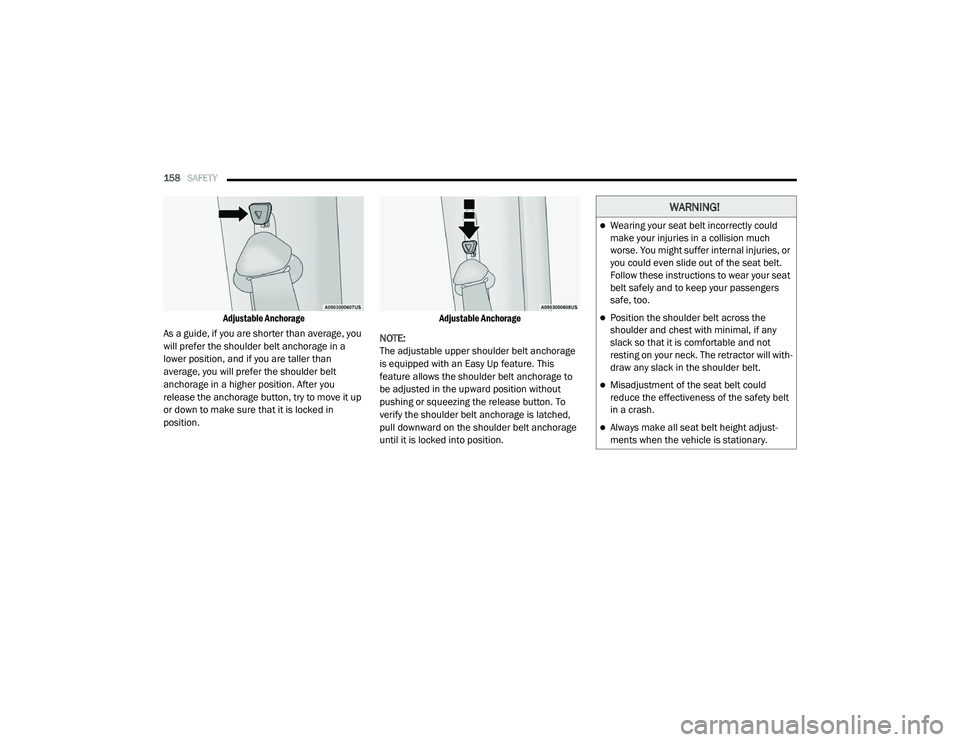
Adjustable Anchorage
As a guide, if you are shorter than average, you
will prefer the shoulder belt anchorage in a
lower position, and if you are taller than
average, you will prefer the shoulder belt
anchorage in a higher position. After you
release the anchorage button, try to move it up
or down to make sure that it is locked in
position.
Adjustable Anchorage
NOTE:
The adjustable upper shoulder belt anchorage
is equipped with an Easy Up feature. This
feature allows the shoulder belt anchorage to
be adjusted in the upward position without
pushing or squeezing the release button. To
verify the shoulder belt anchorage is latched,
pull downward on the shoulder belt anchorage
until it is locked into position.
WARNING!
Wearing your seat belt incorrectly could
make your injuries in a collision much
worse. You might suffer internal injuries, or
you could even slide out of the seat belt.
Follow these instructions to wear your seat
belt safely and to keep your passengers
safe, too.
Position the shoulder belt across the
shoulder and chest with minimal, if any
slack so that it is comfortable and not
resting on your neck. The retractor will with -
draw any slack in the shoulder belt.
Misadjustment of the seat belt could
reduce the effectiveness of the safety belt
in a crash.
Always make all seat belt height adjust -
ments when the vehicle is stationary.
21_VM_OM_EN_USC_t.book Page 158
Page 173 of 280
SAFETY171
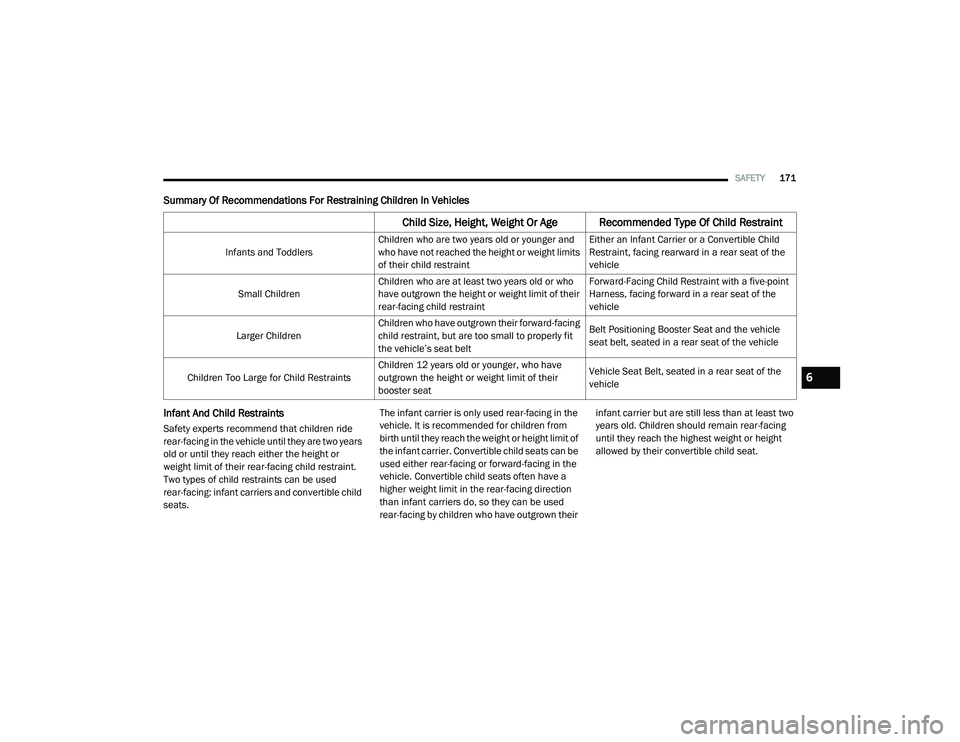
Summary Of Recommendations For Restraining Children In Vehicles
Infant And Child Restraints
Safety experts recommend that children ride
rear-facing in the vehicle until they are two years
old or until they reach either the height or
weight limit of their rear-facing child restraint.
Two types of child restraints can be used
rear-facing: infant carriers and convertible child
seats. The infant carrier is only used rear-facing in the
vehicle. It is recommended for children from
birth until they reach the weight or height limit of
the infant carrier. Convertible child seats can be
used either rear-facing or forward-facing in the
vehicle. Convertible child seats often have a
higher weight limit in the rear-facing direction
than infant carriers do, so they can be used
rear-facing by children who have outgrown their infant carrier but are still less than at least two
years old. Children should remain rear-facing
until they reach the highest weight or height
allowed by their convertible child seat.
Child Size, Height, Weight Or Age Recommended Type Of Child Restraint
Infants and Toddlers
Children who are two years old or younger and
who have not reached the height or weight limits
of their child restraint Either an Infant Carrier or a Convertible Child
Restraint, facing rearward in a rear seat of the
vehicle
Small Children Children who are at least two years old or who
have outgrown the height or weight limit of their
rear-facing child restraint Forward-Facing Child Restraint with a five-point
Harness, facing forward in a rear seat of the
vehicle
Larger Children Children who have outgrown their forward-facing
child restraint, but are too small to properly fit
the vehicle’s seat belt Belt Positioning Booster Seat and the vehicle
seat belt, seated in a rear seat of the vehicle
Children Too Large for Child Restraints Children 12 years old or younger, who have
outgrown the height or weight limit of their
booster seat Vehicle Seat Belt, seated in a rear seat of the
vehicle
6
21_VM_OM_EN_USC_t.book Page 171
Page 174 of 280
172SAFETY
(Continued)
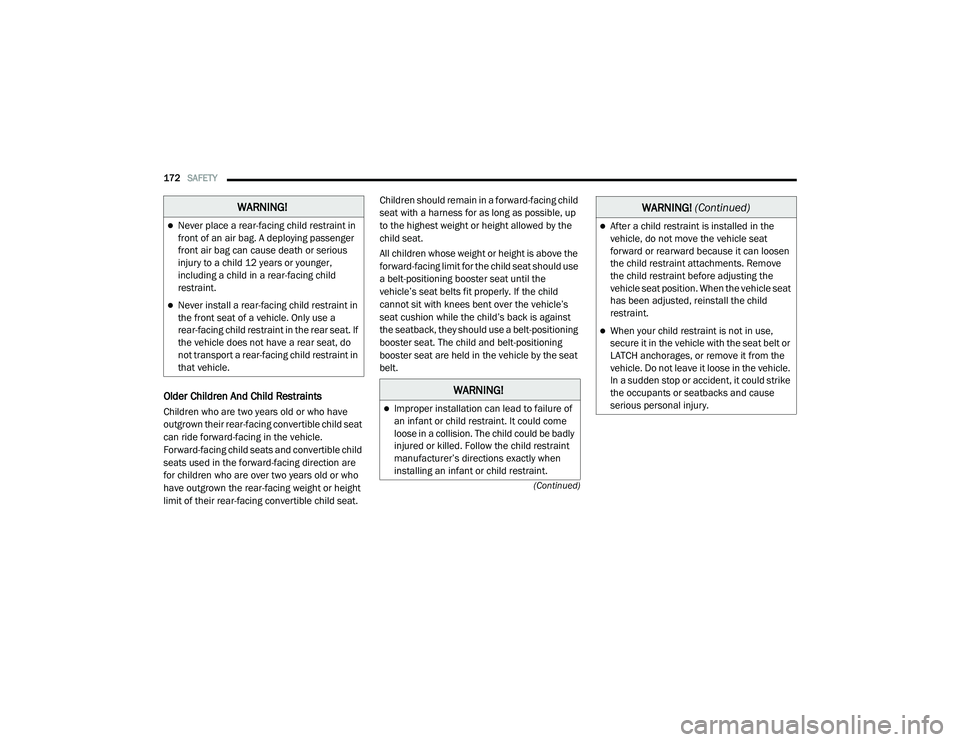
Older Children And Child Restraints
Children who are two years old or who have
outgrown their rear-facing convertible child seat
can ride forward-facing in the vehicle.
Forward-facing child seats and convertible child
seats used in the forward-facing direction are
for children who are over two years old or who
have outgrown the rear-facing weight or height
limit of their rear-facing convertible child seat. Children should remain in a forward-facing child
seat with a harness for as long as possible, up
to the highest weight or height allowed by the
child seat.
All children whose weight or height is above the
forward-facing limit for the child seat should use
a belt-positioning booster seat until the
vehicle’s seat belts fit properly. If the child
cannot sit with knees bent over the vehicle’s
seat cushion while the child’s back is against
the seatback, they should use a belt-positioning
booster seat. The child and belt-positioning
booster seat are held in the vehicle by the seat
belt.
WARNING!
Never place a rear-facing child restraint in
front of an air bag. A deploying passenger
front air bag can cause death or serious
injury to a child 12 years or younger,
including a child in a rear-facing child
restraint.
Never install a rear-facing child restraint in
the front seat of a vehicle. Only use a
rear-facing child restraint in the rear seat. If
the vehicle does not have a rear seat, do
not transport a rear-facing child restraint in
that vehicle.
WARNING!
Improper installation can lead to failure of
an infant or child restraint. It could come
loose in a collision. The child could be badly
injured or killed. Follow the child restraint
manufacturer’s directions exactly when
installing an infant or child restraint.
After a child restraint is installed in the
vehicle, do not move the vehicle seat
forward or rearward because it can loosen
the child restraint attachments. Remove
the child restraint before adjusting the
vehicle seat position. When the vehicle seat
has been adjusted, reinstall the child
restraint.
When your child restraint is not in use,
secure it in the vehicle with the seat belt or
LATCH anchorages, or remove it from the
vehicle. Do not leave it loose in the vehicle.
In a sudden stop or accident, it could strike
the occupants or seatbacks and cause
serious personal injury.
WARNING!
(Continued)
21_VM_OM_EN_USC_t.book Page 172