2021 RAM PROMASTER CITY buttons
[x] Cancel search: buttonsPage 104 of 280
102MULTIMEDIA
This functionality is only available for radios
equipped with a Satellite receiver. In order to
receive satellite radio, the vehicle needs to be
outside with a clear view to the sky.
If the screen shows Acquiring Signal, you might
have to change the vehicle’s position in order to
receive a signal. In most cases, the satellite
radio does not receive a signal in underground
parking garages or tunnels.
No Subscription
Radios equipped with a Satellite receiver
require a subscription to the SiriusXM® Service.
When the Radio does not have the necessary
subscription, the Radio is able to receive the
Preview channel only.
Acquiring SiriusXM® Subscription
To activate the SiriusXM® Satellite Radio
subscription, US visit www.UconnectPhone.com
or call:
1-800-643-2112
Canada visit www.UconnectPhone.com or call:
1-800-465-2001 (English)1-800-387-9983
(French) NOTE:
You will need to provide the SiriusXM® ID (RID)
located at the bottom of the Channel 0 screen.
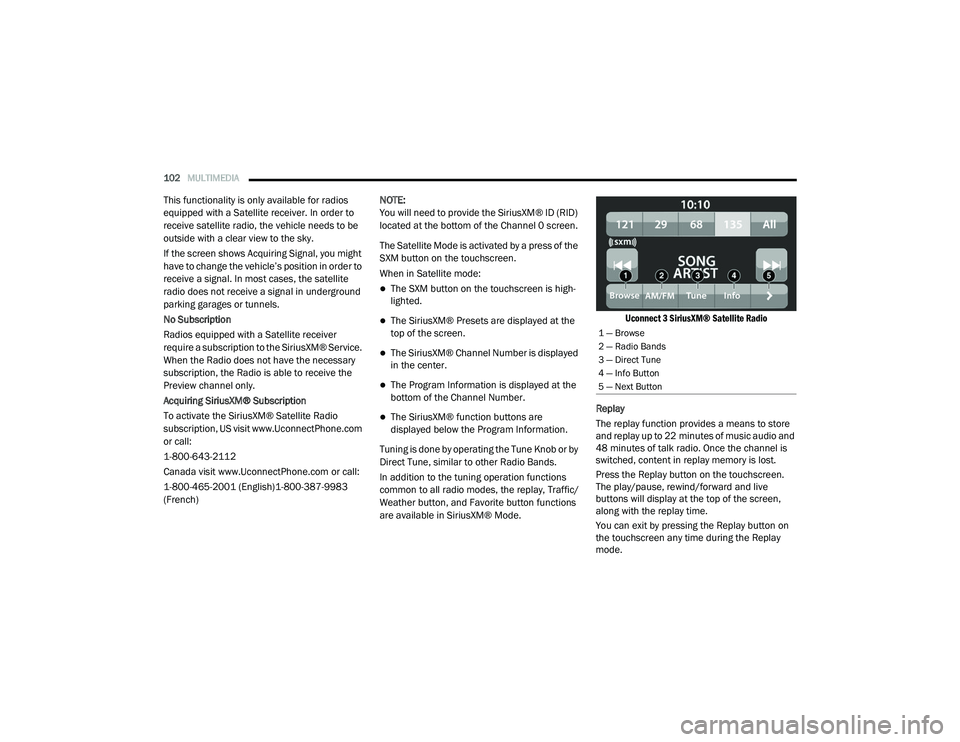
The Satellite Mode is activated by a press of the
SXM button on the touchscreen.
When in Satellite mode:
The SXM button on the touchscreen is high
-
lighted.
The SiriusXM® Presets are displayed at the
top of the screen.
The SiriusXM® Channel Number is displayed
in the center.
The Program Information is displayed at the
bottom of the Channel Number.
The SiriusXM® function buttons are
displayed below the Program Information.
Tuning is done by operating the Tune Knob or by
Direct Tune, similar to other Radio Bands.
In addition to the tuning operation functions
common to all radio modes, the replay, Traffic/
Weather button, and Favorite button functions
are available in SiriusXM® Mode.
Uconnect 3 SiriusXM® Satellite Radio
Replay
The replay function provides a means to store
and replay up to 22 minutes of music audio and
48 minutes of talk radio. Once the channel is
switched, content in replay memory is lost.
Press the Replay button on the touchscreen.
The play/pause, rewind/forward and live
buttons will display at the top of the screen,
along with the replay time.
You can exit by pressing the Replay button on
the touchscreen any time during the Replay
mode.
1 — Browse
2 — Radio Bands
3 — Direct Tune
4 — Info Button
5 — Next Button
21_VM_OM_EN_USC_t.book Page 102
Page 108 of 280
106MULTIMEDIA
Audio Setting Description
Balance/Fade Press the Balance/Fade button on the touchscreen to balance audio
between the front speakers or fade the audio between the rear and front
speakers. Press the Front, Rear, Left or Right buttons or press and drag
the red Speaker icon to adjust the Balance/Fade.
Equalizer Press the + or – buttons or press and drag the level bar to increase or
decrease each of the equalizer bands. The level value, which spans
between plus or minus nine, is displayed at the top of each of the bands.
Speed Adjusted Volume The Speed Adjusted Volume is adjusted by selecting from Off, 1, 2, or 3.
This alters the automatic adjustment of the audio volume with variation
to vehicle speed. Volume increases automatically as speed increases to
compensate for normal road noise.
Surround Sound — If Equipped When Surround Sound is on, you can hear audio coming from every
direction as in a movie theatre or home theatre system.
Loudness — If Equipped When Loudness is on, the sound quality at lower volumes improves.
Auto Play The Auto Play feature begins playing music as soon as a USB Media
device is connected to one of the vehicle’s Media USB ports, when it is
turned on. Press Off to turn the setting off.
Radio Off With Door The Radio Off With Door feature, when activated, keeps the radio on until
the driver or passenger door is opened or when the Radio Off Delay
selected time has expired.
21_VM_OM_EN_USC_t.book Page 106
Page 116 of 280
114MULTIMEDIA
NOTE:
For devices which are not made a favorite, the
device priority is determined by the order in
which it was paired. The latest device paired will
have the higher priority.
You can also use a following VR command to
bring up a list of paired audio devices:
“Show Paired Phones”
Connecting To A Particular Mobile Phone Or
Audio Device After Pairing
Uconnect Phone will automatically connect to
the highest priority paired phone and/or Audio
Device within range. If you need to choose a
particular phone or audio device follow these
steps:
1. Press the
Settings
button on the
touchscreen.
2. Press the Paired Phones/Audio Sources buttons.
3. Press to select the particular phone or the particular audio device. A pop-up menu will
appear; press “Connect Phone”.
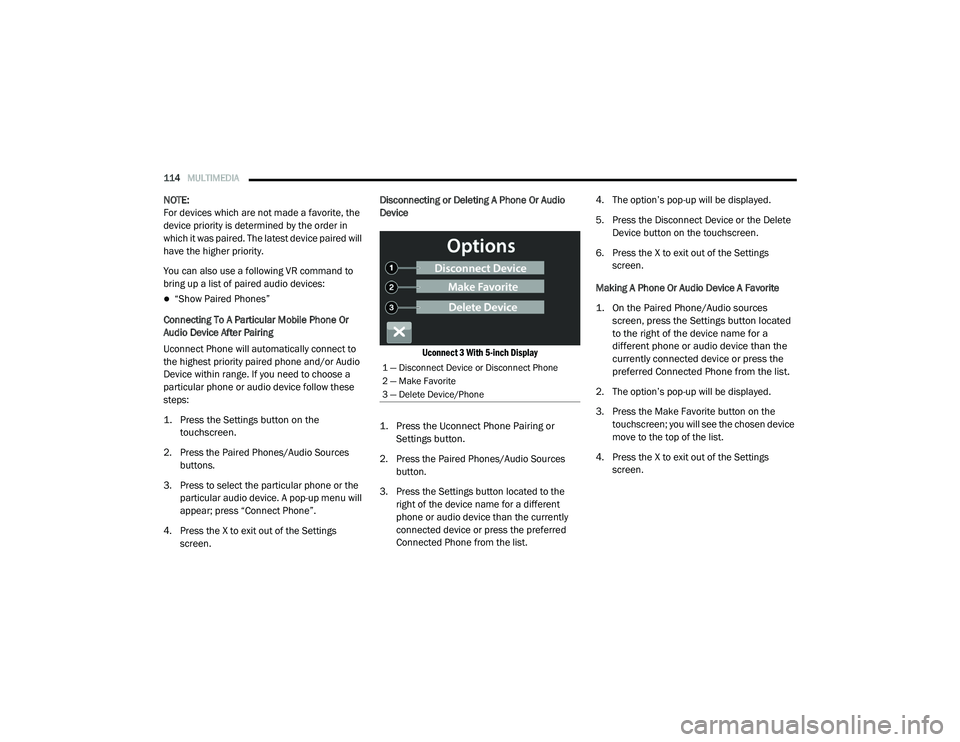
4. Press the X to exit out of the Settings screen. Disconnecting or Deleting A Phone Or Audio
Device
Uconnect 3 With 5-inch Display
1. Press the Uconnect Phone Pairing or Settings button.
2. Press the Paired Phones/Audio Sources button.
3. Press the Settings button located to the right of the device name for a different
phone or audio device than the currently
connected device or press the preferred
Connected Phone from the list. 4. The option’s pop-up will be displayed.
5. Press the Disconnect Device or the Delete
Device button on the touchscreen.
6. Press the X to exit out of the Settings screen.
Making A Phone Or Audio Device A Favorite
1. On the Paired Phone/Audio sources screen, press the Settings button located
to the right of the device name for a
different phone or audio device than the
currently connected device or press the
preferred Connected Phone from the list.
2. The option’s pop-up will be displayed.
3. Press the Make Favorite button on the touchscreen; you will see the chosen device
move to the top of the list.
4. Press the X to exit out of the Settings screen.
1 — Disconnect Device or Disconnect Phone
2 — Make Favorite
3 — Delete Device/Phone
21_VM_OM_EN_USC_t.book Page 114
Page 117 of 280
MULTIMEDIA115
Phonebook Download (Automatic Phonebook
Transfer From Mobile Phone) — If Equipped
If supported by your phone, Uconnect Phone
has the ability to download contact names and
number entries from the mobile phone’s
phonebook. Specific Bluetooth® Phones with
Phonebook Access Profile may support this
feature. Your mobile phone may receive a
pop-up asking for permission for the Uconnect
System to access your messages and contacts.
Selecting “Ok” or “Allow” will sync your contacts
with the Uconnect System.
See the Uconnect website,
UconnectPhone.com, for supported phones.
To call a name from a downloaded mobile
phonebook, follow the procedure in the
“Voice Command” in this section.
Automatic download and update of a phone -
book, if supported, begins as soon as the
Bluetooth® wireless phone connection is
made to the Uconnect Phone, for example,
after you start the vehicle.
A maximum of 5,000 contact names with
four numbers per contact will be downloaded
and updated every time a phone is
connected to the Uconnect Phone.
Depending on the maximum number of
entries downloaded, there may be a short
delay before the latest downloaded names
can be used. Until then, if available, the previ -
ously downloaded phonebook is available for
use.
Only the phonebook of the currently
connected mobile phone is accessible.
This downloaded phonebook cannot be
edited or deleted on the Uconnect Phone.
These can only be edited on the mobile
phone. The changes are transferred and
updated to Uconnect Phone on the next
phone connection. Managing Your Favorites — If Equipped
There are two ways you can add an entry to your
favorites:
1. After loading the mobile phonebook, press
the Favorites button on the touchscreen,
and then press one of the +Add Favorite
Contact buttons that appears on the list.
2. After loading the mobile phonebook, select Contacts from the Phone main screen, and
then select the appropriate number. Press
the Down Arrow button next to the selected
number to display the option’s pop-up. In
the pop-up, select “Add to Favorites”.
NOTE:
If the Favorites list is full, you will be asked to
remove an existing favorite.
5
21_VM_OM_EN_USC_t.book Page 115
Page 118 of 280
116MULTIMEDIA
To Remove A Favorite — If Equipped
1. To remove a Favorite, select “Favorites”
from the Phone main screen.
2. Next, select the Down Arrow icon next to the contact you want to remove from your
favorites. This will bring up the options for
that Favorite contact.
3. Deselect the Star icon to delete the Favorite.
Phone Call Features
The following features can be accessed through
the Uconnect Phone if the feature(s) are
available and supported by Bluetooth® on your
mobile service plan. For example, if your mobile
service plan provides three-way calling, this
feature can be accessed through the Uconnect
Phone. Check with your mobile service provider
for the features that you have.
Listed below are the phone options with
Uconnect Phone:
Redial
Dial by pressing in the number
Voice Commands (Dial by Saying a Name,
Call by Saying a Phonebook Name, Redial or
Call Back)
Favorites
Mobile Phonebook
Recent Call Log
SMS Message Viewer
Call Controls
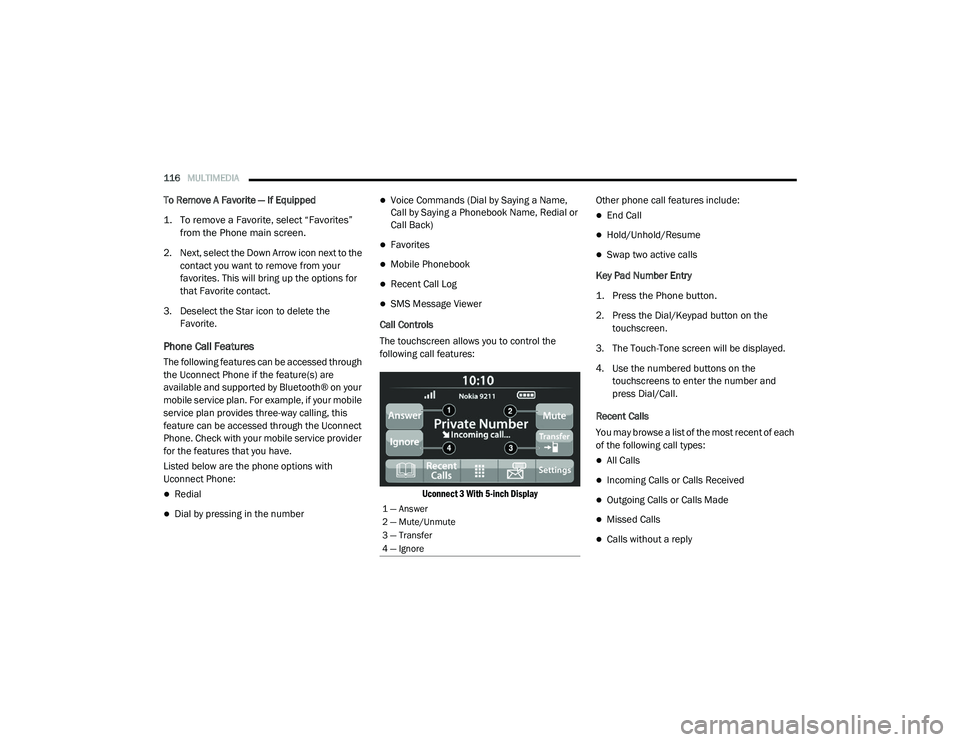
The touchscreen allows you to control the
following call features:
Uconnect 3 With 5-inch Display
Other phone call features include:
End Call
Hold/Unhold/Resume
Swap two active calls
Key Pad Number Entry
1. Press the Phone button.
2. Press the Dial/Keypad button on the touchscreen.
3. The Touch-Tone screen will be displayed.
4. Use the numbered buttons on the touchscreens to enter the number and
press Dial/Call.
Recent Calls
You may browse a list of the most recent of each
of the following call types:
All Calls
Incoming Calls or Calls Received
Outgoing Calls or Calls Made
Missed Calls
Calls without a reply
1 — Answer
2 — Mute/Unmute
3 — Transfer
4 — Ignore
21_VM_OM_EN_USC_t.book Page 116
Page 123 of 280
MULTIMEDIA121
Siri® Eyes Free — If Equipped
When used with your Apple® iPhone®
connected to your vehicle, Siri lets you use your
voice to send text messages, select media,
place phone calls and much more. Siri uses
your natural language to understand what you
mean and responds back to confirm your
requests. The system is designed to keep your
eyes on the road and your hands on the wheel
by letting Siri help you perform useful tasks.
To enable Siri, push and hold, then release the
Uconnect Voice Recognition (VR) button on the
steering wheel. After you hear a double beep,
you can ask Siri to play podcasts and music, get
directions, read text messages, and many other
useful requests.
Bluetooth® Communication Link
Mobile phones may lose connection to the
Uconnect Phone. When this happens, the
connection can generally be re-established by
restarting the mobile phone. Your mobile phone
is recommended to remain in Bluetooth® ON
mode. Power-Up
After switching the ignition key from OFF to
either the ON/RUN or ACC position, or after a
language change, you must wait at least
15 seconds prior to using the system
Ú
page 265.
NAVIGATION MODE — IF EQUIPPED
Operating Navigation Mode — If Equipped
Planning A Route
Using the search bar provides a wide range of
ways to find places and then navigate to them.
You can search for your destination in different
ways:
A specific address
A partial address
A type of place
A zip code
A city to navigate to a city center
A Point of Interest (POI) near your current
location
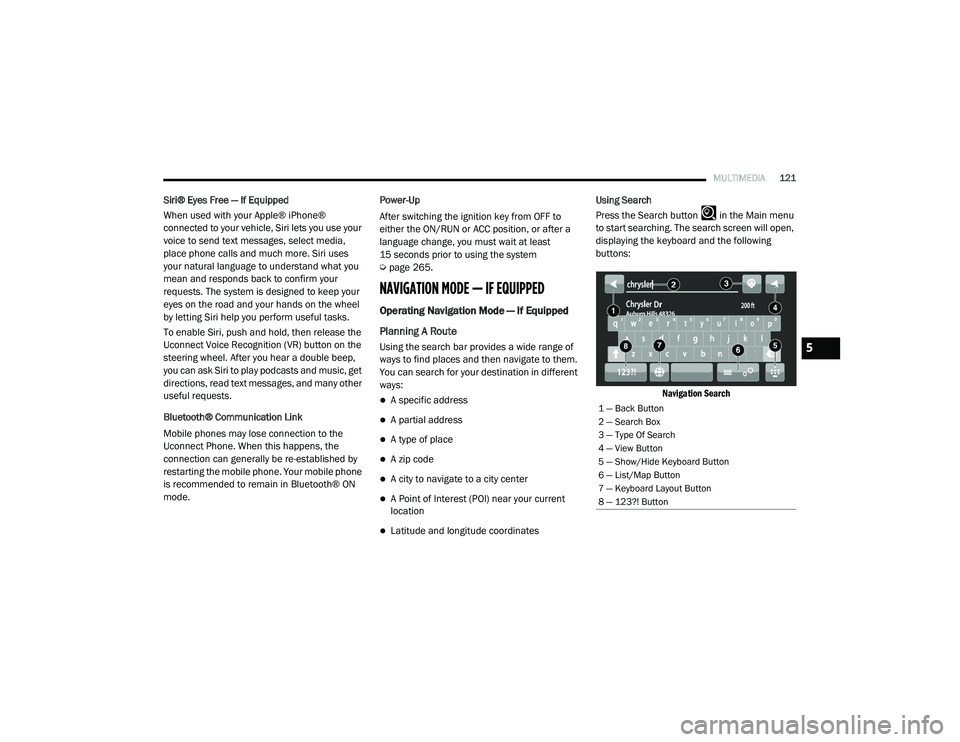
Latitude and longitude coordinates Using Search
Press the Search button in the Main menu
to start searching. The search screen will open,
displaying the keyboard and the following
buttons:
Navigation Search
1 — Back Button
2 — Search Box
3 — Type Of Search
4 — View Button
5 — Show/Hide Keyboard Button
6 — List/Map Button
7 — Keyboard Layout Button
8 — 123?! Button
5
21_VM_OM_EN_USC_t.book Page 121
Page 135 of 280
MULTIMEDIA133
Advanced Lane Guidance
NOTE:
Lane guidance is not available for all intersec -
tions or in all countries.
Your navigation system helps you prepare for
highway exits and junctions by showing the
correct driving lane for your planned route.
As you approach an exit or junction, the lane you
need is shown on the screen and in the
instruction panel.
There are two types of lane guidance:
Lane images
Instructions in the status bar
Advanced Lane Guidance
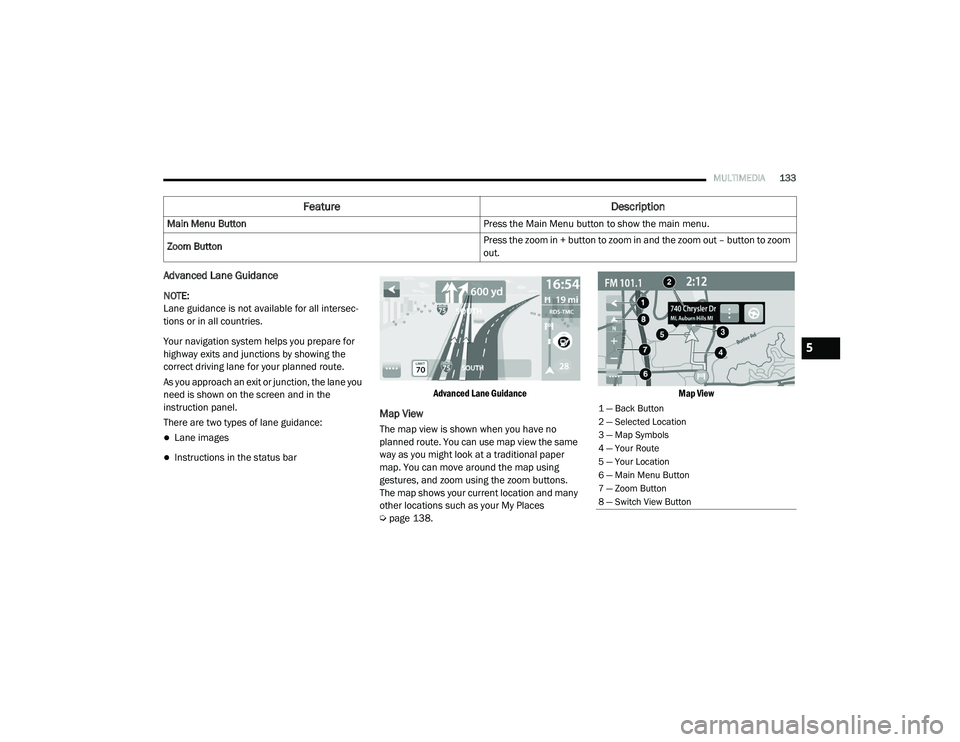
Map View
The map view is shown when you have no
planned route. You can use map view the same
way as you might look at a traditional paper
map. You can move around the map using
gestures, and zoom using the zoom buttons.
The map shows your current location and many
other locations such as your My Places
Ú
page 138.
Map View
Main Menu Button
Press the Main Menu button to show the main menu.
Zoom Button Press the zoom in + button to zoom in and the zoom out – button to zoom
out.
Feature
Description
1 — Back Button
2 — Selected Location
3 — Map Symbols
4 — Your Route
5 — Your Location
6 — Main Menu Button
7 — Zoom Button
8 — Switch View Button
5
21_VM_OM_EN_USC_t.book Page 133