2018 MERCEDES-BENZ CLA COUPE brake light
[x] Cancel search: brake lightPage 125 of 326
operates independently of the ECO start/stop
automatic engine switch-off function.
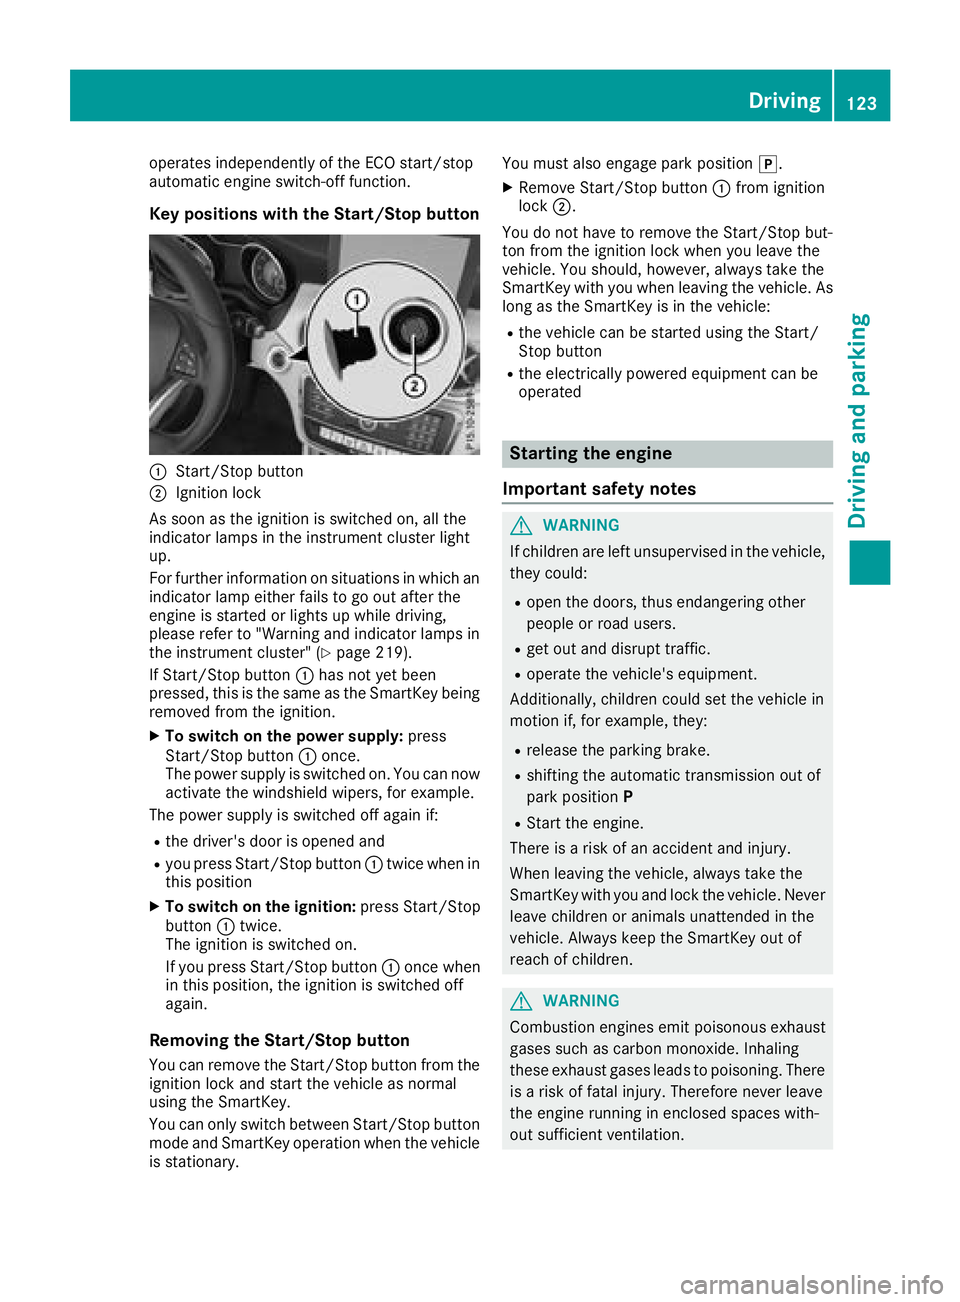
Key positions with the Start/Stop button
:Start/Stop button
;Ignition lock
As soon as the ignition is switched on, all the
indicator lamps in the instrument cluster light
up.
For further information on situations in which an indicator lamp either fails to go out after the
engine is started or lights up while driving,
please refer to "Warning and indicator lamps in
the instrument cluster" (
Ypage 219).
If Start/Stop button :has not yet been
pressed, this is the same as the SmartKey being
removed from the ignition.
XTo switch on the power supply: press
Start/Stop button :once.
The power supply is switched on. You can now
activate the windshield wipers, for example.
The power supply is switched off again if:
Rthe driver's door is opened and
Ryou press Start/Stop button :twice when in
this position
XTo switch on the ignition: press Start/Stop
button :twice.
The ignition is switched on.
If you press Start/Stop button :once when
in this position, the ignition is switched off
again.
Removing the Start/Stop button
You can remove the Start/Stop button from the ignition lock and start the vehicle as normal
using the SmartKey.
You can only switch between Start/Stop button
mode and SmartKey operation when the vehicle
is stationary. You must also engage park position
j.
XRemove Start/Stop button:from ignition
lock ;.
You do not have to remove the Start/Stop but-
ton from the ignition lock when you leave the
vehicle. You should, however, alwayst ake the
SmartKey with you when leaving the vehicle. As
long as the SmartKey is in the vehicle:
Rthe vehicle can be started using the Start/
Stop button
Rthe electrically powered equipment can be
operated
Starting the engine
Important safety notes
GWARNING
If children are left unsupervised in the vehicle,
they could:
Ropen the doors, thus endangering other
people or road users.
Rget out and disrupt traffic.
Roperate the vehicle's equipment.
Additionally, children could set the vehicle in
motion if, for example, they:
Rrelease the parking brake.
Rshifting the automatic transmission out of
park position P
RStart the engine.
There is arisk of an accident and injury.
When leaving the vehicle, alwayst ake the
SmartKey with you and lock the vehicle. Never
leave children or animals unattended in the
vehicle. Always keep the SmartKey out of
reach of children.
GWARNING
Combustion engines emit poisonous exhaust
gases such as carbon monoxide. Inhaling
these exhaust gases leads to poisoning. There
is ar isk of fatal injury. Therefore never leave
the engine runningine nclosed spaces with-
out sufficient ventilation.
Driving123
Driving and parking
Z
Page 142 of 326
XTurn the fuel filler cap counterclockwise and
remove it.
XInsert the fuel filler cap into the holder on theinside of fuel filler flap =.
XCompletely insert the filler neck of the fuel
pump nozzle into the tank ,hook in place and
refuel.
XOnly fill the tank until the pump nozzle
switches off.
Do not add any more fuel after the pump stops
filling for the first time. Otherwise, fuel may leak
out.
Closing the fuel filler flap
XReplace the cap on the filler neck and turn
clockwise until it engages audibly.
XClose the fuel filler flap. Close the fuel filler flap before lockingt
he vehi-
cle.
If you are driving with the fuel filler cap open, the
8 reserve fuel warning lamp flashes. Ames-
sage appears in the multifunction display
(
Ypage 206).
In addition, the ;Check Engine warning
lamp may light up (
Ypage 224).
For further information on warning and indicator
lamps in the instrument cluster, see
(
Ypage 224).
Problems with fuel and the fuel tank
ProblemPossible causes/consequences and MSolutions
Fuel is leaking from the
vehicle.The fuel line or the fuel tank is faulty.
GWARNING
Risk of explosion or fire.
XApply the electric parking brake.
XSwitch off the engine.
XRemove the SmartKey from the ignition lock.
or, in vehicles with KEYLESS-GO start-function or KEYLESS ‑GO
XOpen the driver's door.
The vehicle electronics are now in positiong.This is the same as
the SmartKey being removed from the ignition.
XDo not restart the engine under any circumstances.
XConsult aqualified specialist workshop.
The fuel filler flap cannot
be opened.The fuel filler flap is not unlocked.
XUnlock the vehicle (Ypage 70).
The SmartKey battery is discharged or nearly discharged.
XUnlock the vehicle using the mechanical key (Ypage 77).
The fuel filler flap is unlocked, but the opening mechanism is jammed.
XConsult aqualified specialist workshop.
140Refueling
Driving and parking
Page 144 of 326
the SmartKeyfromthe ignition, the automatic
transmission shifts to jautomatically.
With the Start/Stopb utton:if youtheno pen
the driver's door or the front-passenge rdoor,
the automatic transmission shifts to jauto-
matically.
If yo uwantthe automatic transmission to
remai ninneutral i,e.g.w henh avingt he vehi-
cle cleane dinanautomatic car wash with a
towing system:
XVehicle switht he Start-Stopb utton:
remove the Start-Stop button fromt he igni-
tio nlock.
XInsert the SmartKeyi nto the ignition lock.
XAllv eh icles: switch the ignition on.
XDepres sthe brake peda land kee pit
depressed.
XEngage neutral i.
XReleasethe brake pedal.
XReleas ethe electri cparking brake.
XSwitch off the ignition and leav ethe SmartKey
in the ignition lock.
Electric parking brake
General notes
GWARNING
If yo uleave children unsupervised in the vehi-
cle ,theyc ould setitinm otion by,for example:
Rrelease the parking brake.
Rshift the automatic transmission ou tofthe
parking position P.
Rstart the engine.
In addition, theym ayoperate vehicl eequip-
ment and become trapped .There is arisko f
an accident and injury.
When leaving the vehicle, always take the
SmartKeyw ithy ou and lock the vehicle. Never
leav echildren unsupervised in the vehicle. The functio
nofthe electric parking brake is
dependent on the on-board voltage. If the on-
boar dvoltag eislowor there is amalfunctio nin
the system, it mayn ot be possibletoapplythe
releasedp arking brake.
XIf thisist he case, onl yparkt he vehicl eon
level ground and secur eittoprevent it rolling
away.
XShift the automatic transmission to position
j.
It mayn ot be possibl etorelease an applied
parking brake if the on-board voltag eislowor
there is amalfunctio ninthe system. Contact a
qualified specialis tworkshop.
The electric parking brake performs afunction
tes tatr egular intervals whil ethe engine is
switched off .The sound sthatc an be he ar
dw hile
th
isiso ccurring ar enormal.
Applyin gorreleasing manually
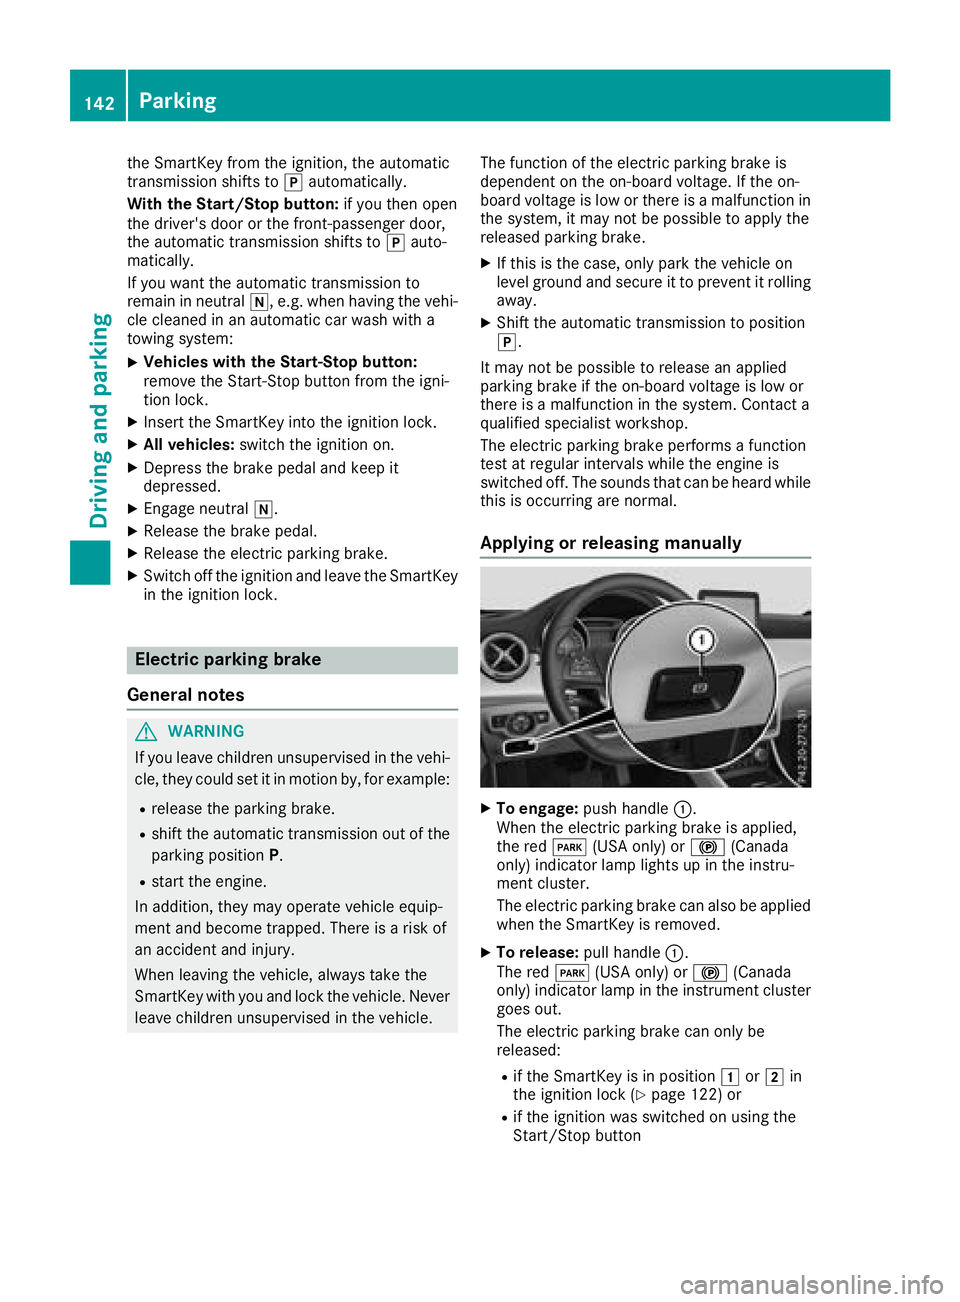
XTo engage: push handle :.
When the electric parking brake is applied,
the red F(USA only) or !(Canada
only) indicator lamp lights up in the instru-
ment cluster.
Th ee lectric parking brake can also be applied
when the SmartKeyisr emoved.
XTo release:pull handle:.
The red F(USA only) or !(Canada
only) indicator lamp in the instrument cluster
goes out.
Th ee lectric parking brake can onl ybe
released:
Rif the SmartKeyisinp osition 1or2 in
the ignition lock (Ypage 122 )or
Rif the ignition wa sswitched on using the
Start/Stop button
142Parking
Driving an dparking
Page 147 of 326
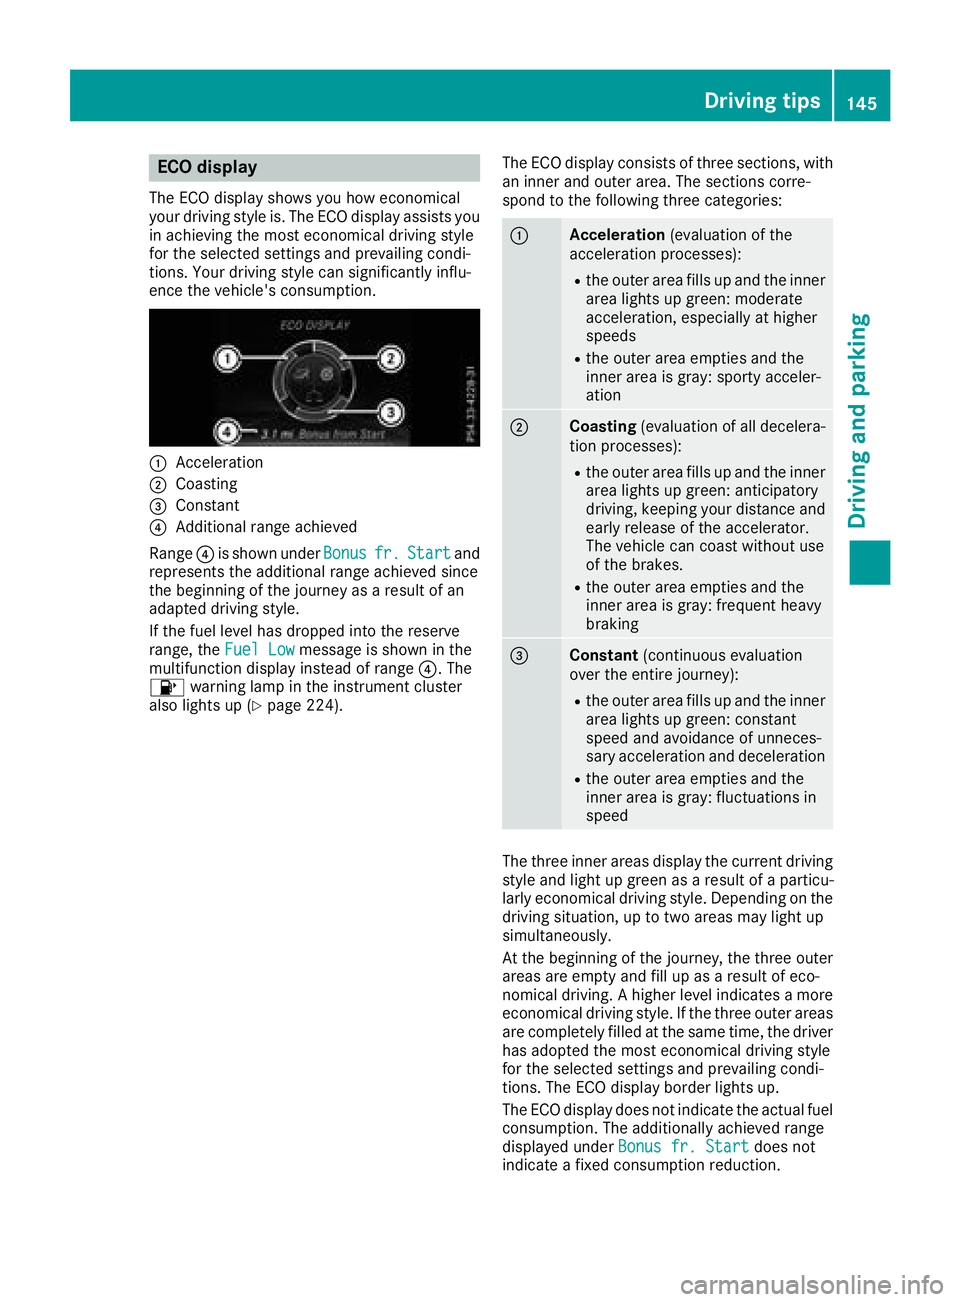
ECO display
The ECO display showsyou how economical
your driving style is. The ECO display assists you
in achievin gthe mos teconomical driving style
for th eselecte dsettings and prevailingc ondi-
tions .Your driving style can significantly influ-
enc ethe vehicle's consumption.
:Acceleration
;Coasting
=Constant
?Additional range achieved
Range ?is shownu nderBonus
fr.Startand
represents th eadditional range achieve dsince
th eb eginnin gofthejourney as aresult of an
adapted driving style.
If th efuel leve lhas dropped int othe reserve
range, the FuelLow
message is shownint he
multifunction display instead of range ?.The
8 warning lamp in th einstrumen tcluster
also lightsup(
Ypage 224). The ECO display consistsoft
hree sections ,with
an inner and outer area. The sections corre-
spondtot hefollowingt hree categories:
:Acceleration (evaluationofthe
acceleratio nprocesses):
Rtheo uter area fills up and th einner
area lightsupg reen: moderate
acceleration, especiall yathigher
speeds
Rth eo uter area empties and the
inner area is gray: sporty acceler-
ation
;Coasting (evaluationofall decelera-
tio np rocesses):
Rtheo uter area fills up and th einner
area lightsupg reen: anticipatory
driving ,kee pingy our distanc eand
early release of th eaccelerator.
The vehicle can coas twithout use
of th ebrakes.
Rtheo uter area empties and the
inner area is gray: frequenth eavy
braking
=Constant (continuous evaluation
ove rthe entire journey):
Rtheo uter area fills up and th einner
area lightsupg reen: constant
speeda nd avoidanc eofunneces-
sary acceleratio nand deceleration
Rtheo uter area empties and the
inner area is gray: fluctuationsi n
speed
The three inner areas display th ecurren tdriving
style and light up green as aresult of aparticu-
larly economical driving style. Dependingont he
driving situation, up to two areas may light up
simultaneously.
At th ebeginnin gofthejourney, th ethree outer
areas are emptya nd fill up asaresult of eco-
nomical driving .Ahigher leve lindicates amore
economical driving style. If th ethree outer areas
are completely fille datthesame time, th edriver
has adopted th emoste conomical driving style
for th eselecte dsettings and prevailingc ondi-
tions .The ECO display border lightsu p.
The ECO display does no tindicat ethe actual fuel
consumption. The additionally achieve drange
displayed under Bonus fr. Start
does not
indicat eafixed consumptio nreduction.
Driving tips145
Driving and parking
Z
Page 148 of 326
In addition to driving style, the actual consump-
tion is affected by other factors, such as:
RLoad
RTire pressure
RCold start
RChoice of route
RActive electrical consumers
These factors are not includedint he ECO dis-
play.
An economical driving style specially requires
driving at moderate engine speeds.
Achieving ahigher valu einthe categories
"Acceleration" and "Constant":
Robserve the gearshift recommendations.
Rdrive the vehicle in drive program Cor E
(vehicles with aDYNAMIC SELECT button).
On long journeys at aconstant speed,e .g. on the
highway, only the outer area for "constant" will
change.
The ECO display summarizes the driving style
from the start of the journey to its completion.
Therefore, there are more marked changes in
the outer areasatt he start ofajourney. On lon-
ger journeys, there are fewer changes. For more
marked changes, perform amanua lrest
(
Ypage 181).
For more information on the ECO display, see
(
Ypage 180).
Braking
Important safety notes
GWARNING
If you shift down on aslippery road surface in
an attempt to increase the engine's braking
effect, the drive wheelsc ould lose their grip.
There is an increased danger of skidding and
accidents.
Do not shift down for additional engine brak-
ing on aslippery road surface.
Downhill gradients
!On long and steep gradients, you must
reduce the load on the brakes by shifting to a
lowerg ear in good time. This allows you to
take advantage of engine braking. For this you
must first activate manua lgearshifting. This helps you to avoid overheating the brakes and
wearing them out excessively.
When you take advantage of engine braking, it
is possible that
adrive wheel willn ot rotate for
some time, e.g. on aslippery road surface.
This could cause damage to the drive train.
This type of damage is not covered by the
Mercedes-Benz warranty.
Briefly depressing the accelerator pedalo n
downhill gradients whilet he manualdrive pro-
gram Mis temporarilya ctivated: the automatic
transmission may switch to the last active auto-
matic drive program Eor S.T he automatic trans-
missionm ay shift to ahigherg ear. This can
reduce the engine's braking effect.
Heavy and light loads
GWARNING
If you rest you rfoot on the brake pedalw hile
driving, the braking system can overheat. This increases the stopping distance and can even
cause the braking system to fail.T here is a
risk of an accident.
Never use the brake pedalasaf ootrest. Never
depresst he brake pedala nd the accelerator
pedalatt he same time.
!Depressing the brake pedalc onstantly
results in excessive and premature weart o
the brake pads.
If the brakes have been subjected to aheavy
load,don ot stop the vehicle immediately.D rive
on for ashort while. This allows the airflow to
cool the brakes more quickly.
Wet roads
If you have driven for along time in heavy rain
withoutb raking, there may be adelayed reac-
tion from the brakes when braking for the first
time. This may also occur after the vehicle has
been washed or driven through deep water.
You have to depresst he brake pedalmore
firmly.M aintainagreater distance from the
vehicle in front.
After driving on awet road or having the vehicle
washed, brake firmly whilep aying attention to
the traffic conditions. This willw arm up the
brake discs, thereby drying them more quickly
and protecting them against corrosion.
146Driving tips
Driving and parking
Page 149 of 326
Limited braking performance on salt-
treated roads
If you driveonsalted roads,alayer of salt resi-
due may for monthebraked iscsand brake
pads. This can result in asignificantly longer
braking distance.
RIn ordertop revent any salt build-up, apply the
brakes occasionally while paying attention to th et raffic conditions.
RCarefully depress th ebrakep edal and the
beginnin gand end of ajou rney.
RMaintain agreater distanc etothevehicle
ahead.
Servicing th ebrakes
!The brakef luid level may be to olow, if:
Rif th ered brakew arning lamp lightsupi n
th ei nstrumentc luster and
Ryou hearawarning tone while th eengine is
running
Observe additional warning messages in the
multifunction display.
The brakef luid level may be to olow due to
brak epad wear or leaking brak elines.
Hav ethe brakes ystem checked immediately.
Consult aqualifie dspecialist workshop to
arrange this.
!Af unction or performanc etests hould only
be carried out on a2-axle dynamometer. If
you wish to operate th evehicle on such a
dynamometer, please consult aqualifie dspe-
cialis tworkshop in advance. You could oth-
erwis edamage th edrivet rain or th ebrake
system.
!As th eESP®system operates automatically,
th ee ngine and th eignitio nmust be switched
off (th eSmartKey must be in position uor
1 in th eignitio nlock), if th eelectric parking
brakeist ested onabraking dynamometer
(maximum 10 seconds).
Brakin gtriggered automatically by ESP
®may
cause severe damage to th ebrakes ystem.
All check sand maintenanc ework on th ebrake
system must be carried out at aqualifie dspe-
cialis tworkshop.
Hav ebrakep ads installe dand brakef luid
replaced at aqualifie dspecialist workshop. If th
ebrakes ystem has onl ybeen subject to
moderatel oads, you should tes tthe functional-
ity of your brakes at regular intervals.
You can fin dadescription of Brake Assist (BAS
)
on (Ypage 61).
Mercedes-Ben zrecommend stha tyou onl yhave
brak epads/linings installe donyour vehicle
whichh ave been approved for Mercedes-Benz
vehicle sorwhichcorrespondtoane quivalent
qualitys tandard. Brake pads/linings whichh ave
not been approved for Mercedes-Ben zvehicles
or whicha re not of an equivalent qualityc ould
affect your vehicle's operatin gsafety.
Mercedes-Ben zrecommend sthaty ou onl yuse
brakef luid that has been specially approved for
your vehicle by Mercedes-Benz, or whichc orre-
sponds to an equivalent qualitys tandard. Brake
fluid whichh as not been approved for
Mercedes-Ben zvehicle sorw hichisn ot of an
equivalent qualityc ould affect your vehicle's
operatin gsafety.
Checkingb rake lining thickness
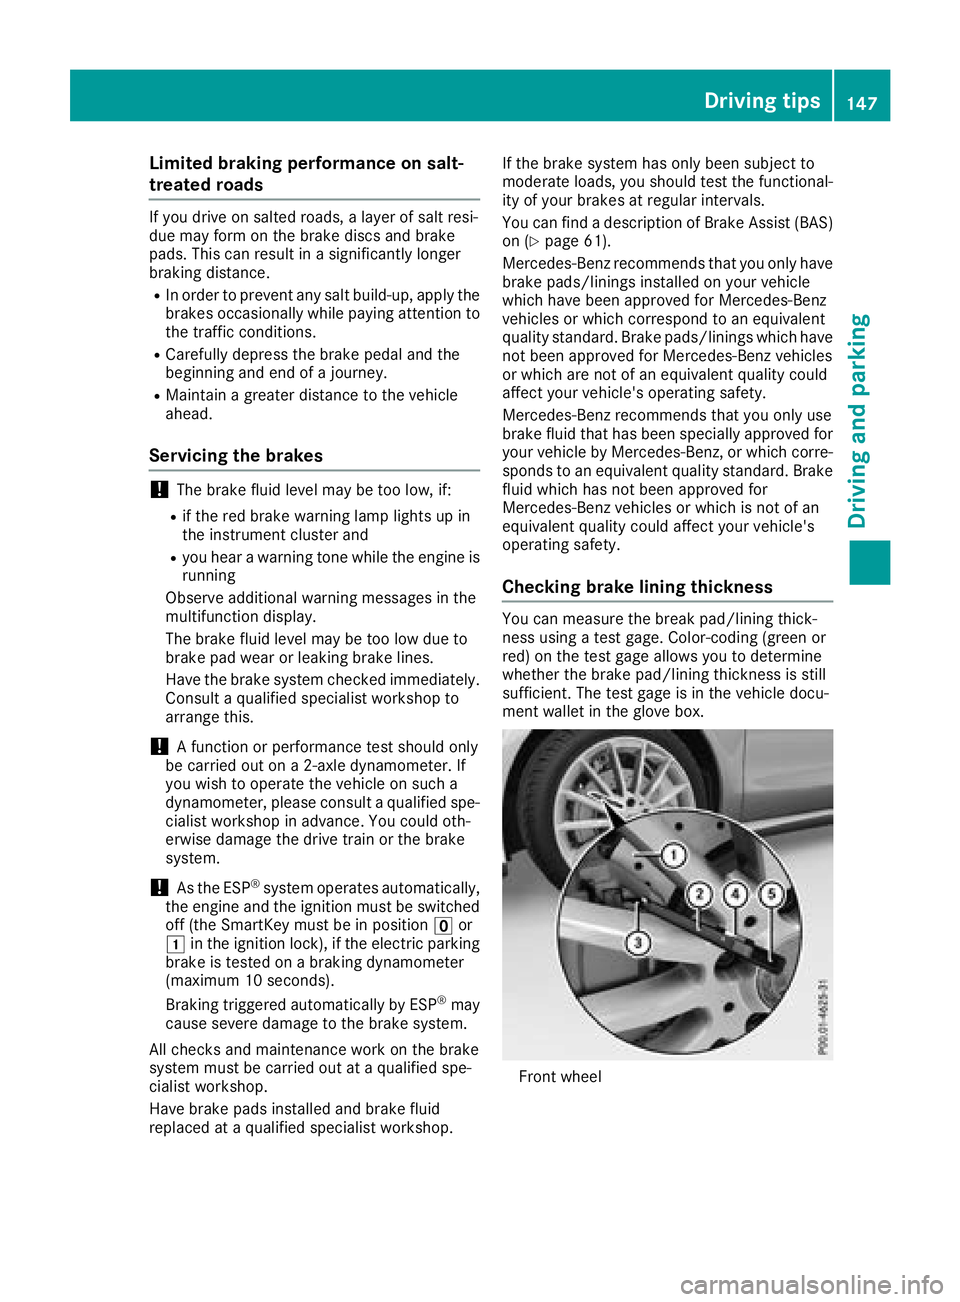
You can measure th ebreak pad/linin gthick-
nes susingat estg age. Color-coding( green or
red) on th etestg age allows you to determine
whether th ebrakep ad/linin gthicknes sisstill
sufficient .The tes tgage is in th evehicle docu-
mentw allet in th egloveb ox.
Front wheel
Driving tips147
Driving and parking
Z
Page 151 of 326

If you leave the engine or the auxiliary heatingrunning, make sure the exhaust pipe and area
around the vehicle are clear of snow. To
ensure an adequate supply of fresh air, open a
window on the side of the vehicle that is not
facing into the wind.
Have you rvehicle winter-proofed at aqualified
specialist workshop at the onset of winter.
Drive particularly carefully on slippery road sur-
faces. Avoid sudden acceleration, steering and
braking maneuvers. Do not use cruise control or Distance PilotD ISTRONIC.
If the vehicle threatens to skid or cannot be
stopped when moving at low speed:
XShift the transmission to position N.
XTry to bring the vehicle under control using
corrective steering.
The outsidet emperature indicator is not
designed to serve as an ice-warning device and is therefore unsuitable for that purpose.
Changes in the outsidet emperature are dis-
played after ashort delay.
Indicated temperature sjust above the freezing
point do not guarantee that the road surface is
free of ice. The road may still be icy, especially in
woodeda reasoronb ridges.
You shoul dpay speciala ttention to road condi-
tions when temperature sare around freezing
point.
For more information on driving with snow
chains, see (
Ypage 290).
For more information on driving with summer
tires, see (
Ypage 289).
Observe the notes in the "Winter operation" sec-
tion (
Ypage 289).
Drivin gsystems
Cruise control
General notes
Cruise control maintains aconstant road speed
for you .Itbrakes automatically in order to avoid
exceeding the set speed.Onl ong and steep
downhill gradients, especially if the vehicle is
laden, you must select alow gear in good time.
You need to shift manually using the steering
wheel paddle shifters beforehand. By doing so,
you willm ake use of the braking effect of the engine. This relieves the load on the brake sys-
tem and prevents the brakes from overheating
and wearing too quickly.
When the engine is running, you can use the
cruise control lever to limitt
he speed to any
speed between20m ph (30 km/h)and the tech-
nicallyp ermitted maximum speed of the vehicle.
Use cruise control only if road and traffic con-
ditions make it appropriate to maintain asteady
speed for aprolongedp eriod.
The speed indicated in the speedometer may
differ slightly from the speed stored.
Important safety notes
If you fail to adapt you rdriving style, cruise con-
trol can neither reduce the risk of an accident
nor override the lawsofp hysics. Cruise control
cannot take into account the road, traffic and
weather conditions. Cruise control is only an
aid.Y ou are responsible for the distance to the
vehicle in front, for vehicle speed,f or braking in
good time and for staying in you rlane.
Do not use cruise control:
Rin road and traffic conditions which do not
allow you to maintain aconstant speed,e .g. in
heavy traffic or on winding roads
Ron slippery road surfaces .Braking or accel-
erating could cause the drive wheelstol ose
traction and the vehicle could then skid
Rin poor visibility, e.g. due to fog, heavy rain or
snow
If there is achange of drivers, advise the new
driver of the speed stored.
Cruise control lever
:Activates or increases speed
;Activates or reduces speed
Driving systems149
Driving and parking
Z
Page 153 of 326
iWhen you switch off the engine, the last
speed stored is cleared.
Distance Pilot DISTRONIC
General notes
Distance Pilot DISTRONIC regulates the speed
and automatically helps you maintain the dis-
tanc etot he vehicle detected in front. Vehicles
are detected with the aid of the radar sensor
system. Distance Pilot DISTRONIC brakes auto-
matically to avoid exceedingt he set speed or to
maintain the designated distanc efrom the vehi-
cle in front.
If Distance Pilot DISTRONIC detect sthat there is
ar isk of acollision, you will be warned visually
and acoustically. Without your intervention, Dis-
tanc ePilot DISTRONIC cannot prevent acolli-
sion. An intermittent warning ton ewill then
sound and the distanc ewarning lamp will light
up in the instrument cluster. Brake immediately
in order to increase the distanc etothe vehicle in
frontort ake evasive action provided it is safe to
do so.
Distance Pilot DISTRONIC operates in the range
between 0mph (0 km/h) and 120 mph
(200 km/h).
Change into alower gear in good time on long
and steep downhill gradients .This is especially
importan tifthe vehicle is laden. By doing so, you
will make use of the braking effect of the engine.
This relieves the load on the brake system and
preventst he brakes from overheatin gand wear-
ing too quickly.
Do not use Distance Pilot DISTRONIC on roads
with steep gradients.
For Distance Pilot DISTRONIC to assist you
when driving, the radar sensor system must be
operational.
Sinc eDistance Pilot DISTRONIC transmits radar
waves, it can resemble the radar detectors of
the responsible authorities. You can refer to the
relevant chapter in the Operator' sManual if
questions are asked about this.
iUSA only: This device has been approved by
the FCC as a"Vehicular Radar System". The
radar sensor is intended for use in an auto-
motive radar system only. Removal, tamper-
ing, or altering of the device will void any war-
ranties, and is not permitted by the FCC. Do not tamper with, alter, or use in any non-
approved way.
An
yu nauthorized modification to this device
could void the user's authority to operate the
equipment.
iCanada only: This device complies wit h
RSS-210 of Industry Canada. Operation is
subject to the following two conditions:
1. This device may not cause interference,
and
2. This device must accept any interference
received, including interference that may
cause undesired operation of the device.
Removal, tampering, or altering of the device
will void any warranties, and is not permitted. Do not tamper with, alter, or use in any non-
approved way.
An yu nauthorized modification to this device
could void the user's authority to operate the
equipment.
Important safety notes
GWARNING
Distance Pilot DISTRONIC does not react to:
Rpeople or animals
Rstationary object sonthe road, e.g. stopped
or parked vehicles
Roncoming vehicles and crossingt raffic
As aresult, Distance Pilot DISTRONIC may
neither give warnings nor intervene in such
situations. There is arisk of an accident.
Always pay careful attention to the traffic sit- uation and be ready to brake.
GWARNING
Distance Pilot DISTRONIC cannot always
clearly identif yother road users and complex
traffic situations.
In such cases, Distance Pilot DISTRONIC may:
Rgive an unnecessary warning and then
brake the vehicle
Rneither give awarning nor intervene
Raccelerateorb rake unexpectedly
There is arisk of an accident.
Driving systems151
Driving and parking
Z