2018 MERCEDES-BENZ CLA COUPE height
[x] Cancel search: heightPage 18 of 326
Remote controlGarag edooro pener ....................... 252
Programming (garag edoor
opener) .......................................... 252
Replacing bulbs
Brake lamp .................................... 106
High-beam headlamp s................... 106
Important safety notes .................. 104
Installing/removing the cover
(front wheela rch).......................... 105
Low-bea mheadlamp s.................... 105
Overview of bulb types .................. 104
Rear fog lamp ................................ 106
Turn signal s(front) ......................... 106
Turn signal s(rear) .......................... 106
Reporting safety defects .................... 28
Rescue card ......................................... 29
Reserve (fuel tank)
see Fuel
Reserve fuel
Displa ymessage ............................ 206
Warning lamp ................................. 224
see Fuel
Residual hea t(clim ate control) ........ 119
Restrain tsystem
Displa ymessage ............................ 198
Introduction ..................................... 40
Warning lamp ................................. 224
Warning lamp (function) ................... 41
Revers egear(selecto rlever )........... 132
Reversin gfeature
Roller sunblind ................................. 87
Sid ew indow s................................... 82
Roadside Assistance (breakdown) .... 26
Rolle rsunblind
Panorama roofw ithp ower tilt/
sliding panel ..................................... 87
Roo fcarrier ........................................ 241
Roo flinin gand carpets (cleaning
guidelines) ......................................... 268
Roo floa d( maximum) ........................ 320
Route guidance
see also Digital Operator's Man-
ual.................................................. 229S
Safety
Childre ninthe vehicl e..................... 54
see Occupant safety
Safety system
see Driving safety systems
SD card
Inserting ........................................ 235
Inserting/removing ........................ 235
Removing ....................................... 235
SD memory card
see also Digital Operator's Man-
ual.................................................. 229
Search &Send
see also Digital Operator's Man-
ua l.................................................. 229
Seat
Correct driver'ss eatposition ........... 90
Seat belts
Adjusting the height ......................... 44
Cleaning ......................................... 267
Correct usag e.................................. 43
Fastening ......................................... 44
Important safety guideline s............. 42
Introduction ..................................... 41
Releasing ......................................... 44
Warning lamp ................................. 218
Warning lamp (function) ................... 44
Seats
Adjusting (electrically) ..................... 92
Adjusting (manually) ........................ 91
Adjusting (Performance Seat) .......... 94
Adjusting the 4-wa ylum bars up-
por t.................................................. 93
Adjusting the headr estraint ............ 92
Cleaning the cover. ........................ 267
Folding the backrest( rear com-
partment) forwards/back .............. 240
Important safety notes .................... 90
Seath eating problem ...................... 95
Storing settings (memory func-
tion) ................................................. 99
Switching seath eating on/off......... 94
Securing cargo .................................. 241
Selecto rlever
Cleaning ......................................... 267
Sensors (cleaning instructions) ....... 265
16Index
Page 45 of 326
Ifac hild younger than twelve years old and
under 5ft(1.50m)inh eight is travelingint he
vehicle:
Ralways secur ethe child in achild restraint
system suitable for this Mercedes-Ben zvehi-
cle. The child restraint system must be appro-
priatetot he age, weight and size of the child
Ralways observe the instructions and safety
notes on "Children in the vehicle"
(
Ypage 54) in addition to the child restraint
system manufacturer'si nstallation and oper-
atin ginstructions
Ralways observe the instructions and safety
notes on the "Occupant classification system
(OCS)" (
Ypage 47)
GWARNING
The seat belts may not perform their intended protective function if:
Rthe yare damaged, modified, extremely
dirty, bleache dordyed
Rthe seat belt buckle is damaged or
extremely dirty
Rthe Emergency Tensionin gDevices, belt
anchoragesori nertia reels have been modi-
fied.
Seat belts may be damaged in an accident,
althoug hthe damage may not be visible, e.g.
due to splinters of glass. Modifiedord amaged
seat belts may tear or fail, e.g. in an accident.
ModifiedE mergency Tensionin gDevices
could accidentally trigger or fail to deploy
when necessary. This poses an increased risk
of injury or even fatal injury.
Never modifyt he seat belts,Eme rgency Ten-
sioning Devices, belt anchoragesa nd inertia
reels. Make sure that the seat belts are
undamaged, not worn out and clean .Follow-
ing an accident ,have the seat belts checked
immediately at aqualified specialist work-
shop.
Only use seat belts that have been approved for
your vehicle by Mercedes-Benz.
Sports seat or AMG Performance seat: this
seat is designed for the standard three-point
seat belt. If you install another multi-point seat
belt, e.g. sport or racin gseat belts ,the restraint system cannot provide the best level of protec-
tion.
GWARNING
If you feed seat belts through the opening in
the seat backrest,t he seat backrest may be
damaged or may even break in the eventofa n
accident .This poses an increased risk of
injury or even fatal injury.
Only use the standard three-point seat belt.
Never modifyt he seat belt system.
Proper use of th eseat belts
Observe the safetyn otes on the seat belt
(Ypage 42).
All vehicle occupant smust be wearingt he seat
belt correctly beforeb eginningthe journey. Also
make sure that all vehicle occupant sare always
wearing the seat belt correctly while the vehicle
is in motion.
When fastenin gthe seat belt, always make sure
that:
Rthe seat belt buckle tongue is inserted only
int ot he belt buckle belonging to that seat
Rthe seat belt is pulled tigh tacross your body
Avoid wearing bulky clothing ,e.g. aw inter
coat.
Rthe seat belt is not twisted
Only the ncan the forces which occur be dis-
tributed over the area of the belt.
Rthe shoulder section of the belt is routed
across the center of your shoulder
The shoulder section of the seat belt should
not touc hyour nec korber outed under your
arm or behindy our back.Where possible,
adjust the seat belt to the appropriate height.
Rthe lap belt is taut and passes across your lap as low down as possible
The lap belt must always be routed across
your hip joints and not across your abdomen.
This applies particularly to pregnant women.
If necessary, push the lap belt down to your
hip join tand pull it tigh tusing the shoulder
section of the belt.
Rthe seat belt is not routed across sharp, poin-
ted or fragile objects
If you have such item slocated on or in your
clothing ,e.g. pens ,keys or eyeglasses,s tore
these in asuitable place.
Ronly one personisu singaseat belt
Occupant safety43
Safety
Z
Page 47 of 326
seconds or once the driver's seat belt is fas-
tened.
If the vehicle's speed exceeds 15 mph
(25 km/h) once and the driver's and front-
passenger seat belts are not fastened,awarning
tone sounds. Awarning tone also sounds with
increasing intensityf or 60 seconds or until the
driver or front passenger have fastened their
seat belts.
If the driver or front passenger unfasten their
seat belts during the journey, the seat belt warn-
ing is activated again.
Air bags
Introduction
The installation point of an air bag can be rec-
ognized by the AIRBAG marking.
An air bag complements the correctly fastened
seat belt. It is no substitute for the seat belt. The
air bag provides additional protection in appli-
cable accident situations.
Not all air bags are deployed in an accident. The
different air bag systems function independ-
ently from one another (
Ypage 52).
However, no system available today can com-
pletely eliminate injuries and fatalities.
It is also not possible to rule out arisk of injury
caused by an air bag due to the high speed at
which the air bag must be deployed.
Important safety notes
GWARNING
If you do not sit in the correct seat position,
the air bag cannot protect as intended and
could even cause additional injury when
deployed. This poses an increased risk of
injury or even fatal injury.
To avoid hazardous situations, always make
sure that all of the vehicle's occupants:
Rhave fastened their seat belts correctly,
including pregnant women
Rare sitting correctly and maintain the great-
est possible distance to the air bags
Rfollow the following instructions
Always make sure that there are no objects
between the air bag and the vehicle's occu-
pants.
RAdjust the seats properly before beginning
your journey. Always make sure that the seat
is in an almost upright position. The center of
the head restraint must support the head at
about eye level.
RMove the driver's and front-passenger seats
as far back as possible.T he driver's seat posi-
tion must allow the vehicle to be driven safely.
ROnly hold the steering wheel on the outside.
This allowst he air bag to be fully deployed.
RAlways lean against the backrest while driv-
ing. Do not lean forward or lean against the
door or side window. You may otherwise be in
the deployment area of the air bags.
RAlways keep your feet in the footwell in front
of the seat. Do not put your feet on the dash-
board, for example. Your feet may otherwise
be in the deployment area of the air bag.
RFor this reason, always secure persons less
than5ft(1.50 m) tall in suitable restraint sys-
tems. Up to this height, the seat belt cannot
be worn correctly.
If ac hild is traveling in your vehicle,a lso
observe the following notes:
RAlways secure children under twelve years of age and less than 5ft(1.50 m)tallins uitable
child restraint systems.
RChil drestraint systems shoul dbeinstalle don
the rea rseats.
ROnlys ecureac hild in arearward-facing child
restraint systemont he front-passengerseat
when the front-passengerf ront airbag is
deactivated .Ifthe PASSENGER AIR BAG OFF
indicator lamp is permanentl ylit,t he front-
passengerf ront airbag is deactivated
(
Ypage 41).
RAlway sobser ve the instructions and safety
notesont he "Occupant Classification System
(OCS) "(Ypage 47) and on "Children in the
vehicle" (Ypage 54 )ina ddit iontot he child
restraint systemm anufacturer's installation
and operating instructions.
Occupant safety45
Safety
Z
Page 56 of 326
sive role in the deployment of an air bag. Nor do
they provide an indication of air bag deploy-
ment.
The vehicle can be deformed considerably, with-
out an air bag being deployed. This is the case if only parts which are relatively easilyd eformed
are affected and the rate of deceleration is not
high. Conversely, air bags may be deployed even
though the vehicle suffers only minor deforma-
tion. This is the case if, for example, very rigid
vehicle parts such as longitudinal body mem-
bers are hit, and sufficient deceleration occurs
as aresult.
If the restraint system control unit detects aside
impact or if the vehicle rolls over, the applicable
componentsoft he restraint system are activa-
ted independently of each other depending on
the apparent type of accident.
RSide impact air bags on the side where the
impact takes place, independently of the
EmergencyT ensioning Device and the use of
the seat belt on the driver's seat and outer
seats in the second row
The side impact air bag on the front-
passenger side deploysu nder the following
conditions:
-the OCS system detects that the front-
passenger seat is occupied or
-the seat belt buckle tongue is engaged in
the belt buckle of the front-passenger seat
RWindow curtain air bag on the side of impact, independently of the use of the seat belt and
independently of whether the front-
passenger seat is occupied
REmergencyT ensioning Devices, if the system
determines that deployment can offer addi-
tional protection in this situation
RWindow curtain air bags on the driver's and
front-passenger side in certain situations
when the vehicle rolls over, if the system
determines that deployment can offer addi-
tional protection to that provided by the seat
belt
iNot all air bags are deployed in an accident.
The different air bag systems work independ- ently of each other. How the air bag system works is determined
by the severity of the accident detected,
especially the vehicle deceleration or accel-
eration and the apparent type of accident:
RFrontal collision
RSide impact
RRollover
Automatic measures after an acci-
dent
Immediately after an accident, the following
measures are implemented, depending on the
type and severity of the impact:
Rthe hazard warning lamps are activated
Rthe emergency lighting is activated
Rthe vehicle doors are unlocked
Rthe front side windows are lowered
Rthe engine is switched off and the fuel supply
is cut off
Rvehicles with mbrace: automatic emergency
call
Children in the vehicle
Important safety notes
Accident statistics show that children secured
in the rear seats are safer than children secured
in the front-passenger seat. For this reason,
Mercedes-Benz strongly advises that you install
ac hild restraint system on arear seat. Children
are generally better protected there.
If ac hild younger than twelve years old and
under 5ft(1.50 m) in height is traveling in the
vehicle:
Ralways secure the child in achild restraint
system suitable for Mercedes-Benz vehicles.
The child restraint system must be appropri-
ate to the age, weight and size of the child
Rbe sure to observe the instructions and safety
notes in this section in addition to the child
restraint system manufacturer's installation
instructions
Rbe sure to observe the instructions and safety notes on the "Occupant classification system
(OCS)" (
Ypage 47)
54Children in the vehicle
Safety
Page 57 of 326
GWARNING
If you leave children unsupervised in the vehi-
cle, they coul dset it in motion by, for example:
Rrelease the parking brake.
Rshift the automatic transmission out of the
parking position P.
Rstart the engine.
In addition, they may operate vehiclee quip-
ment and become trapped. There is arisk of
an accident and injury.
When leaving the vehicle, alway stake the
SmartKey with you and lock the vehicle. Never
leave children unsupervised in the vehicle.
GWARNING
If persons, particularl ychildren are subjected
to prolonged exposure to extreme heato r
cold, there is arisk of injury ,possibly even
fatal .Never leave children unattended in the
vehicle.
GWARNING
If the child restraint system is subjected to
direct sunlight, parts may get very hot. Chil-
dren may burn themselves on these parts,
particularl yonthe metal parts of the child
restraint system. There is arisk of injury.
If you leave the vehicle, taking the child with
you ,alway sensure that the child restraint
system is not exposedtod irect sunlight. Pro-
tect it with ablanket, for example. If the child
restraint system has been exposedtod irect
sunlight, let it cool downb efore securing the
child in it. Never leave children unattended in
the vehicle.
Always ensure that all vehicleo ccupants have
their seat belts fastened correctly and are sitting
properly.P articular attention must be pai dto
children.
Observe the safety notes on the seat belt
(
Ypage4 2) and the notes on correct use of seat
belts (Ypage4 3).
Ab ooster seat may be necessary to achieve
propers eat beltp ositioning for children over
41 lbs (18 kg )until they reach aheight where a three-point seat beltc
an be properly fastened
without abooster seat.
Special seatbelt retractor
GWARNING
If the seat beltisr eleased while driving, the
child restraint system wil lnolonger be
secure dproperly.T he special seat beltr etrac-
tor is disableda nd the inertia real draw sina
portion of the seat belt. The seat beltc annot
be immediatel yrefastened. There is an
increased risk of injury ,possibly even fatal.
Stop the vehiclei mmediately, paying atten-
tion to road and traffic conditions. Reactivate
the special seat beltr etractor and secure the
child restraint system properly.
All seat belts in the vehicle, except the driver's
seat belt, are equipped with aspecial seat belt
retractor. When activated, the special seat belt
retractor ensure sthat the seat beltc annot
slacken once the child seat is secured.
Installing achild restraint system:
XMake sure you observe the child restraint
system manufacturer's installation instruc-
tions.
XPul lthe seat belts moothly from the belto ut-
let.
XEngage seat beltt ongue in beltbuckle.
Activating the special seat beltr etractor:
XPullthe seat belto ut fullyand let the inertia
reel retract it again.
Whilet he seat beltisr etracting, you should
hear aratcheting sound .The special seat belt
retractor is enabled.
XPush the child restraint system downsot hat
the seat beltist ight and does not loosen.
Removing the child restraint system and deac-
tivating the special seat beltr etractor:
XMake sure you observe the child restraint
system manufacturer's installation instruc-
tions.
XPress the release button of the seat belt
buckle and guide the seat beltt ongue back
toward sthe belts ash guide.
The special seat beltr etractor is deactivated.
Children in the vehicle55
Safety
Z
Page 93 of 326
motion. This could cause you to lose control ofthe vehicle. There is arisk of an accident.
Always make sure that the driver'ss eat is
engagedb efore starting the vehicle.
GWARNING
You could lose control of you rvehicleify ou do
the following while driving:
Radjust the driver'ss eat, head restraint,
steering wheelorm irrors
Rfasten the seat belt
There is arisk of an accident.
Adjust the driver'ss eat, head restraint, steer-
ing wheela nd mirror and fasten you rseat belt
before starting the engine.
GWARNING
If you adjust the seat height carelessly,y ou or
other vehicleo ccupants could be trappeda nd
thereby injured. Children in particular could
accidentally press the electricals eat adjust-
ment buttons and become trapped. There is a
risk of injury.
Whilem oving the seats, make sure that your
hands or other body parts do not get under the
lever assembly of the seat adjustment sys-
tem.
!To avoidd amage to the seats and the seat
heating, observe the following information:
Rkeep liquid sfrom spilling on the seats. If
liquid is spilled on the seats, dry them as
soon as possible.
Rif the seat covers are damp or wet, do not
switch on the seat heating. The seat heat-
ing should als onot be used to dry the seats.
Rclean the seat covers as recommended;
see the "Interior care" section.
Rdo not transport heavy loads on the seats.
Do not place sharp objects on the seat
cushions, e.g. knives, nail sortools. The
seats should only be occupied by passen-
gers, if possible.
Rwhen the seat heating is in operation, do
not cover the seats with insulating materi-
als ,e.g. blankets, coats, bags ,seat covers,
child seats or booster seats.
!Make sure that there are no objects in the
footwellu nder or behind the seats when mov-
ing the seats back. There is arisk that the
seats and/or the objects could be damaged.
iFurther related subjects:
Rcargo compartment enlargement (folding
down the rear seats) (Ypage 240)
Adjusting the seats manually
Vehicles without the seating comfort
package
Seat fore-and-aft adjustment:
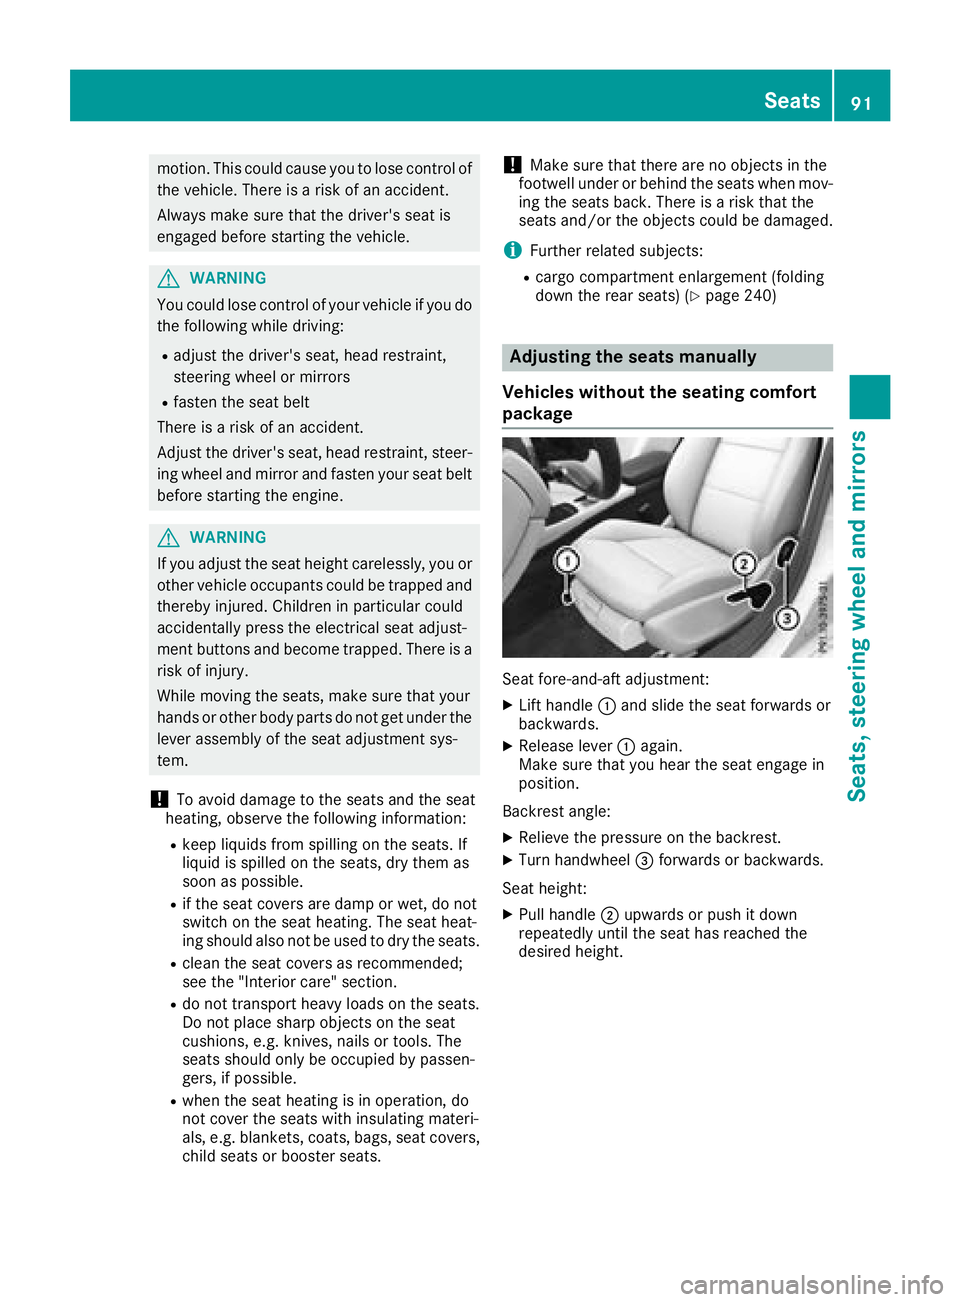
XLift handle :and slidet he seat forwards or
backwards.
XRelease lever :again.
Make sure that you hear the seat engage in
position.
Backrest angle:
XRelieve the pressure on the backrest.
XTurn handwheel =forwards or backwards.
Seat height:
XPullh andle ;upwards or push it down
repeatedly until the seat has reachedt he
desired height.
Seats91
Seats, steering wheel and mirrors
Z
Page 94 of 326
Vehicles with the seatingcom fort pack-
age
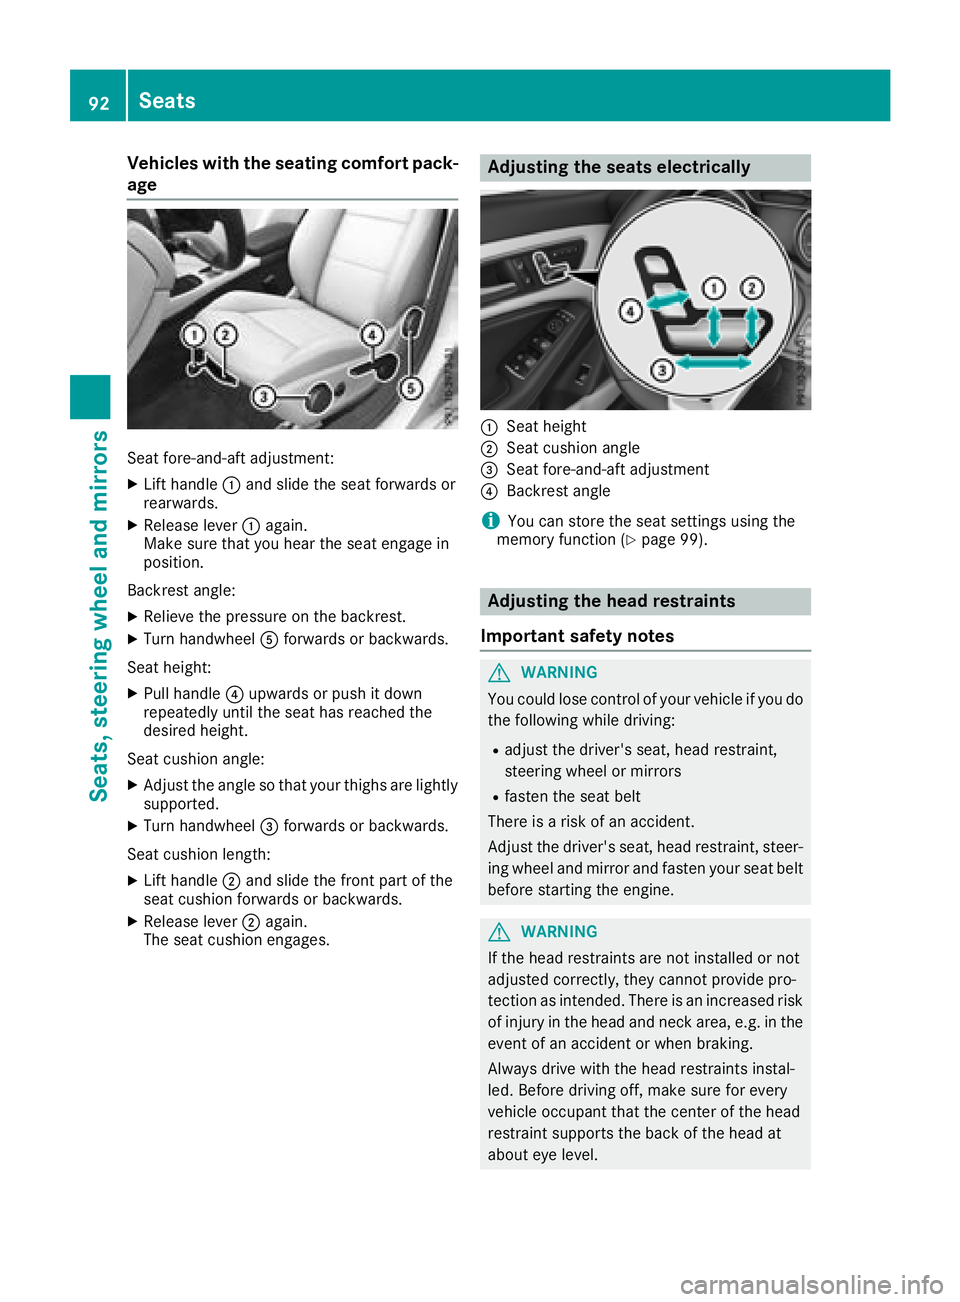
Sea tfore-and-aft adjustment:
XLif th andle :and slid ethe sea tforward sor
rearwards.
XReleas elever : again.
Make sure thaty ouhea rthe sea tengage in
position.
Backrest angle:
XRelieve the pressure on the backrest.
XTurn handwheel Aforward sorbackwards.
Sea theight:
XPull handle ?upwards or push it down
repeatedly unti lthe sea thas reachedt he
desired height.
Sea tcushion angle:
XAdjust the angle so thaty ourthighs are lightly
supported.
XTurn handwheel =forward sorbackwards.
Sea tcushion length:
XLifth andle ;and slid ethe front part of the
sea tcushion forward sorbackwards.
XReleas elever ; again.
The sea tcushion engages.
Adjustin gthe seats electrically
:Sea theight
;Sea tcushion angle
=Sea tfore-and-aft adjustment
?Backrest angle
iYo uc an storet he seatsettings using the
memory functio n(Ypage 99).
Adjustingthe hea drestraints
Important safety notes
GWARNING
Yo uc ould lose controlofy ourvehicl eifyoudo
the following whil edriving:
Radjus tthe driver'ss eat, headrestraint,
steering whee lormirrors
Rfasten the sea tbelt
There is ariskofana ccident.
Adjust the driver'ss eat, headrestraint, steer-
ing whee land mirror and fasten your sea tbelt
before starting the engine.
GWARNING
If the hea drestraints are not installe dornot
adjusted correctly, they canno tprovid epro-
tection as intended. There is an increased risk
of injury in the hea dand neck area, e.g .inthe
event of an accident or when braking.
Alway sdrive with the hea drestraints instal-
led. Before driving off, make sure for every
vehicl eoccupant thatt he centerofthe head
restraint supports the back of the hea dat
aboute yelevel.
92Seats
Seats, steering wheel andmirrors
Page 95 of 326
Using the fore-and-aft adjustment, adjust the
head restraint so that it is as close as possible to
your head.
General notes
For vehicles with sports seats you cannot adjust
the front head restraints or the outer rear head
restraints.
Adjusting the head restraints manually
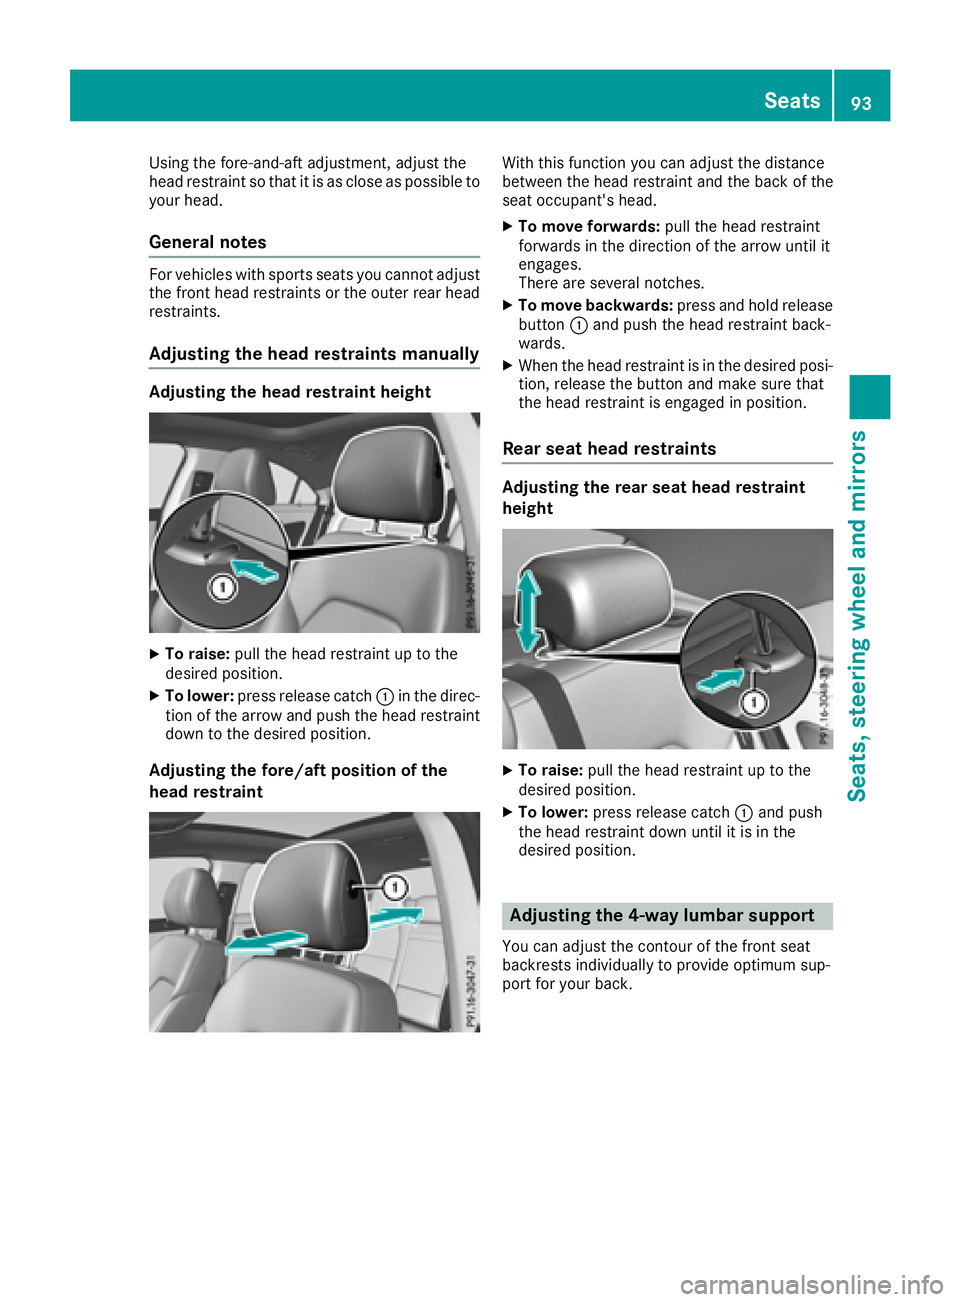
Adjusting the head restraint height
XTo raise:pull the head restraint up to the
desired position.
XTo lower: press release catch :in the direc-
tion of the arrow and push the head restraint
down to the desired position.
Adjusting the fore/aft position of the
head restraint
With this function you can adjust the distance
between the head restraint and the back of the
seat occupant's head.
XTo move forwards: pull the head restraint
forwards in the direction of the arrow until it
engages.
There are several notches.
XTo move backwards: press and hold release
button :and push the head restraint back-
wards.
XWhen the head restraint is in the desired posi-
tion, release the button and make sure that
the head restraint is engaged in position.
Rear seat head restraints
Adjusting the rear seat head restraint
height
XTo raise: pull the head restraint up to the
desired position.
XTo lower: press release catch :and push
the head restraint down until it is in the
desired position.
Adjusting the 4-way lumbar support
You can adjust the contour of the front seat
backrests individually to provide optimum sup-
port for your back.
Seats93
Seats, steering wheela nd mirrors
Z