2018 MERCEDES-BENZ CLA COUPE height
[x] Cancel search: heightPage 97 of 326

Problems with the seat heating
ProblemPossible causes/consequences andMSolutions
The seat heating has
switched off prematurely
or cannot be switched
on.The on-board voltage is too low because too many electrical consum-
ers are switched on.
XSwitch off electrical consumers that you do not need, such as the
rear window defroster or interior lighting.
Once the battery is sufficiently charged, the seat heating will switch
back on automatically.
Steering wheel
Important safety notes
GWARNING
You could lose control of your vehicle if you do the following while driving:
Radjust the driver's seat, head restraint,
steering wheel or mirrors
Rfasten the seat belt
There is arisk of an accident.
Adjust the driver's seat, head restraint,s teer-
ing wheel and mirror and fasten your seat belt before startin gthe engine.
GWARNING
Children could injure themselves if they
adjust the steering wheel. There is arisk of
injury.
When leaving the vehicle, always take the
SmartKey with you and lock the vehicle. Never
leave children unsupervised in the vehicle.
Adjusting the steering wheel
GWARNING
If the steering wheel is unlocked while the
vehicle is in motion, it could change position
unexpectedly. This could cause you to lose
control of the vehicle. There is arisk of an
accident.
Before startin goff, make sure the steering
wheel is locked. Never unlock the steering
wheel while the vehicle is in motion.
:Release lever
;Adjustst he steering wheel height
=Adjuststhe steering wheel position (fore-
and-aft adjustment)
XPush release lever :down completely.
The steering column is unlocked.
XAdjust the steering wheel to the desired posi-
tion.
XPush release lever :up completely.
The steering column is locked.
XCheck if the steering column is locked. When
doing so, try to push the steering wheel up or down or try to move it in the fore-and-aft
direction.
Steering wheel95
Seats, steering wheela nd mirrors
Z
Page 260 of 326

XMake sure that the windshield wipers are
switched off.
XPull release lever:on the hood.
The hood is released.
XReach into the gap between the hood and the radiator trim and press hood catch lever ;to
the left.
XRaise the hood.
XPull support strut ?out of bracket A.
XLift up support strut ?and insert it into yel-
low retaining clip =.
Closing the hood
XRaise the hood slightly and, at the same time,
remove support strut ?from yellow retaining
clip =.
XSwing support strut ?down and press it into
bracket Auntil it engages.
XLower the hood and let it fall from aheight of
approximately 8in(20 cm).
XCheck that the hood has engaged properly.
If the hood can be raised slightly, it is not
properly engaged. Do not press the hood
closed. Open the hood again and close it with
alittle more force.
Engine oil
General notes
Depending on your driving style, the vehicle
consumes up to 0.9 US qt (0.8 liters) of oil per
600 miles (1,000 km). The oil consumption may
be higher than this when the vehicle is new or if
you frequently drive at high engine speeds.
Depending on the engine, the oil dipstick may be
in ad ifferent location.
When checking the oil level:
Rpark the vehicle on alevel surface
Rthe engine should be switched off for approx-
imately five minutes if the engine is at normal
operating temperature
Rif the engine is not at normal operating tem-
perature, e.g. if the engine was only started
briefly, wait about 30 minutes before carrying
out the measurement
Checking the oil level using the oil dip-
stick
GWARNING
Certain components in the engine compart-
ment, such as the engine, radiator and parts
of the exhaust system, can become very hot.
Working in the engine compartmentp oses a
risk of injury.
Where possible, let the engine cool down and touch only the components described in the
following.
258Engine compartment
Maintenance and care
Page 305 of 326
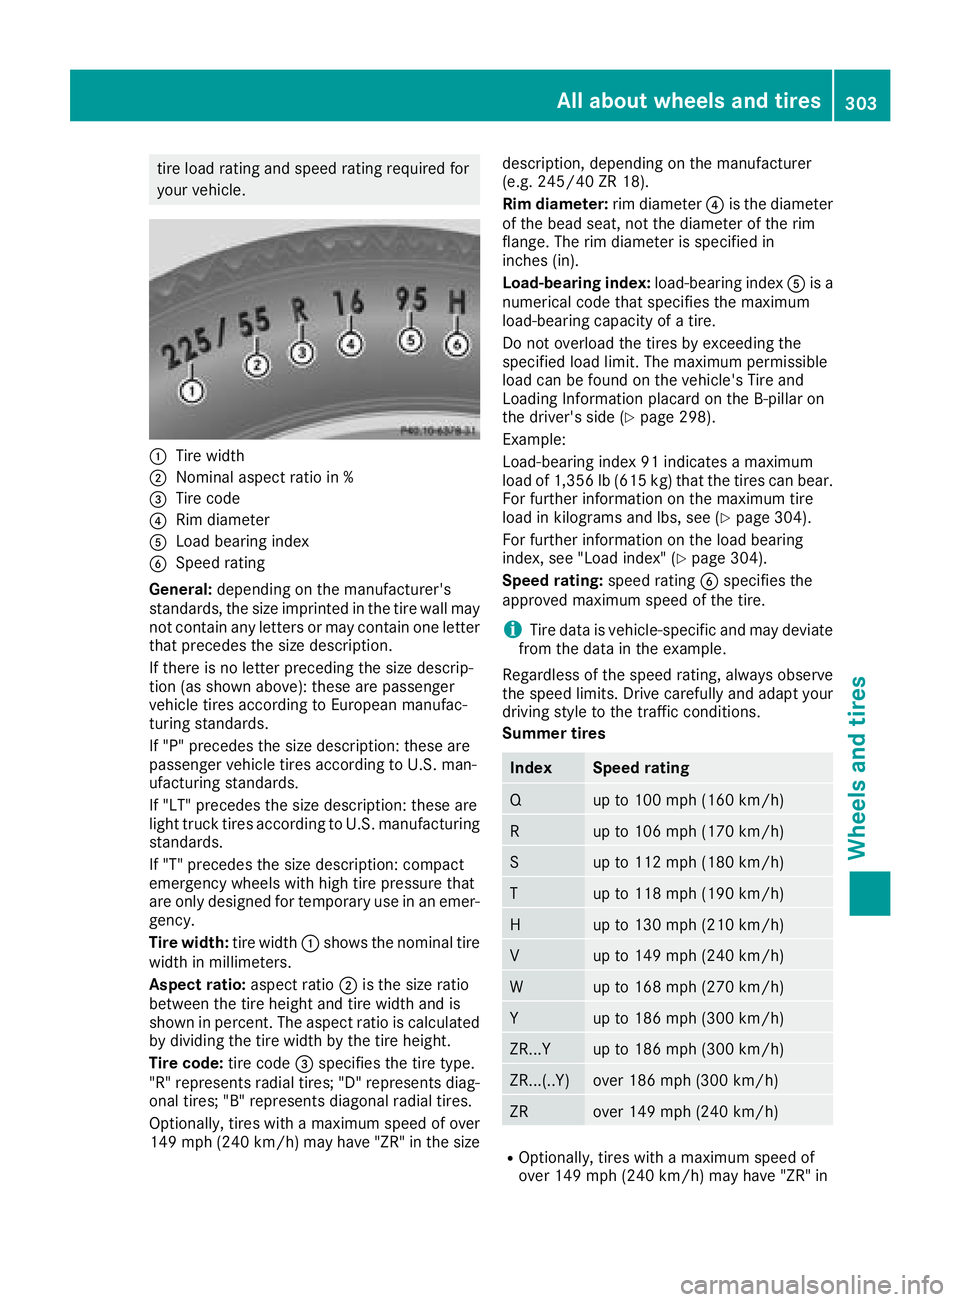
tire load rating and speedrating required for
your vehicle.
:Tire width
;Nomina laspec tratio in %
=Tire code
?Rimd iame ter
ALoadb earing index
BSpeed rating
General: depending on the manufacturer's
standards ,the size imprinted in the tire wall may
not contain any letters or mayc ontain one letter
thatp recedes the size description.
If there is no letter preceding the size descrip-
tio n(as shown above): these ar epassenger
vehicl etiresa ccording to Europea nmanufac-
turing standards.
If "P "precedes the size description: these are
passenge rvehicl etiresa ccording to U.S. man-
ufacturin gstandards.
If "LT" precedes the size description: these are
light truck tire saccording to U.S. manufacturing
standards.
If "T "precedes the size description: compact
emergency wheels with high tire pressure that
ar eo nlyd esig nedf or temporary us einanemer-
gency.
Tire width: tire width:shows the nominal tire
width in millimeters.
Aspec tratio: aspect ratio ;is the size ratio
between the tire height and tire width and is
shown in percent. The aspect ratio is calculated
by dividing the tire width by the tire height.
Tire code: tire code=specifie sthe tire type.
"R "r epresents radial tires; "D" represents diag-
ona ltire s; "
B" represents diagona
lradial tires.
Optionally ,tire sw itham aximum spee dofover
149 mph (240 km/h )mayhave "ZR" in the size description, depending on the manufacturer
(e.g. 245/40Z
R18).
Rim diameter: rim diameter?is the diameter
of the bead seat, not the diamete rofthe rim
flange .The ri mdiame teriss pecifie din
inches (in).
Load-bearin gind ex: load-bearing index Ais a
numerical cod ethats pecifie sthe maximum
load-bearing capacity of atire.
Do not overload the tire sbyexceeding the
specifie dloa dlimit .The maximu mpermissible
load can be found on the vehicle's Tire and
Loading Informatio nplacard on the B-pillar on
the driver's side (
Ypage 298).
Example:
Load-bearin gindex 91 indicates amaximum
load of 1,356 lb (61 5kg)thatt he tire scan bear.
For furtheri nformation on the maximum tire
load in kilograms and lbs, see(
Ypage 304).
For furtheri nformation on the load bearing
index, see" Loadindex" (
Ypage 304).
Speed rating: speedrating Bspecifie sthe
approved maximum spee dofthe tire.
iTire data is vehicle-specific and mayd eviate
fromt he data in the example.
Regardles softhe spee drating ,alway sobser ve
th
e spee dlimit s. Drive carefull yand adap tyou r
drivin gstyle to the trafficc onditions.
Summert ires
IndexSpeed rating
Qup to 100 mph (16 0km/h)
Rup to 106 mph (17 0km/h)
Sup to 112 mph (18 0km/h)
Tup to 118 mph (19 0km/h)
Hup to 130 mph (21 0km/h)
Vup to 149 mph (24 0km/h)
Wup to 168 mph (27 0km/h)
Yup to 186 mph (30 0km/h)
ZR...Yup to 186 mph (30 0km/h)
ZR...(..Y)ove r186 mph (300 km/h)
ZRove r149 mph (240 km/h)
ROptionally ,tire sw itham aximum spee dof
ove r149 mph (24 0km/h )mayhave "ZR" in
Alla bout wheels an dtires303
Wheel sand tires
Z
Page 309 of 326

Astandard unit of measure for tire pressure.
Aspect ratio
Relationship between tire height and tire width
in percent.
Tire pressure
This is pressure inside the tire applyin")
PSI (pounds per squareinch)
Astandard unit of measure for tire pressure.
Aspect ratio
Relationship between tire height and tire width
in percent.
Tire pressure
This is pressure inside the tire applying an out-
ward force to each square inch of the tire's sur-
face. The tire pressure is specified in pounds per
square inch (psi), in kilopascal (kPa) or in bar.
The tire pressure should only be corrected when
the tires are cold.
Cold tire pressure
The tires are cold:
Rif the vehicle has been parked with the tires
out of direct sunlight for at least three hours
and
Rif the vehicle has not been driven further than
1m ile (1.6 km)
Tread
The part of the tire that comes into contact with
the road.
Bead
The tire bead ensures that the tire sits securely
on the wheel. There are several steel wires in the
bead to prevent the tire from coming loose from
the wheel rim.
Sidewall
The part of the tire between the tread and the
bead.
Weight of optional extras
The combined weight of those optional extras
that weigh more than the replaced standard
parts and more than 2.3 kg (5 lbs). These
optional extras, such as high-performance
brakes, level control, aroof rack or ahigh-per-
formanceb attery, are not included in the curb
weight and the weight of the accessories.
TIN (Tire Identification Number)
This is aunique identifier which can be used by
at ire manufacturer to identify tires, for example
for aproduct recall, and thus identify the pur-
chasers. The TIN is made up of the manufactur-
er's identity code, tire size, tire type code and
the manufacturing date.
Load bearing index
The load bearing index (also load index) is acode
that contains the maximum load bearing capa-
city of atire.
Traction
Traction is the result of friction between the tires
and the road surface.
Treadwear indicators
Narrow bars (tread wear bars) that are distrib-
uted over the tire tread. If the tire tread is level
with the bars, the wear limit of áin (1.6 mm)
has been reached.
Occupant distribution
The distribution of occupants in avehicle at their
designated seating positions.
Total load limit
Nominal load and luggage load plus 68 kg
(15 0lbs)m ultiplied by the number of seats in
the vehicle.
Changing awheel
Flat tire
The "Breakdown assistance" section
(Ypage 271) contains information and notes on
how to deal with aflat tire. Information on driv-
ing with MOExtended tires in the event of aflat
tire can be found under "MOExtended tires (tires
with run-flat characteristics" (
Ypage 271).
Rotating the wheels
GWARNING
Interchanging the front and rear wheels may
severely impair the driving characteristics if
the wheels or tires have different dimensions. The wheel brakes or suspension components
may also be damaged. There is arisk of acci-
dent.
Rotate front and rear wheels only if the wheels and tires are of the same dimensions.
!On vehicles equippedw ithatire pressure
monitor ,electronic components are located
in the wheel.
Changing awheel307
Wheels and tires
Z
Page 311 of 326
.
The folding wheel chock is an additional sa")
Securing the vehicle to prevent it from
rolling away
If your vehicle is equippedwithaw heel chock,i t
can be found in the tire-change tool kit
(
Ypage 270).
The folding wheel chock is an additional safety
measure to prevent the vehicle from rolling
away,f or example when changing awheel.
XFold both plates up :.
XFold out lower plate ;.
XGuide the lugs on the lower plate fully into the
openings in base plate =.
XPlace chocksorother suitable items under
the front and rear of the wheel that is diago-
nally opposite the wheel you wish to change.
Raising the vehicle
GWARNING
If you do not position the jack correctly at the
appropriate jackingp oint of the vehicle, the
jack could tip over with the vehicle raised.
There is arisk of injury.
Only position the jack at the appropriate jack-
ing point of the vehicle. The base of the jack
must be positioned vertically, directly under
the jackingp oint of the vehicle.
!Only position the jack at the appropriate
jackingp oint of the vehicle. Otherwise, you
could damage the vehicle.
Observe the following when raising the vehi-
cle:
RTo raise the vehicle, only use the vehicle-spe-
cific jack that has been tested and approved
by Mercedes-Benz. If used incorrectly, the
jack could tip over with the vehicle raised.
RThe jack is designed only to raise and hold the
vehicle for ashort time while awheel is being
changed. It must not be used for performing
maintenance work under the vehicle.
RAvoid changing the wheel on uphill and down-
hill slopes.
RBefore raising the vehicle, secure it from roll-
ing away by applying the parking brake and
insertingw heel chocks. Do not disengage the
parking brake while the vehicle is raised.
RThe jack must be placed on afirm, flat and
non-slip surface. On aloose surface, alarge,
flat, load-bearing underlay must be used. On a
slippery surface, anon-slip underlay must be
used, e.g. rubber mats.
RDo not use wooden blocks or similar objects
as ajack underlay. Otherwise, the jack will not
be able to achieve its load-bearing capacity
due to the restricted height.
RMake sure that the distance between the
underside of the tires and the ground does not
exceed 1.2 in (3 cm).
RNever place your hands and feet under the
raised vehicle.
RDo not lie under the vehicle.
RDo not start the engine when the vehicle is
raised.
RDo not open or close adoor or the trunk lid
when the vehicle is raised.
RMake sure that no persons are present in the
vehicle when the vehicle is raised.
Changing awheel309
Wheels and tires
Z
Page 322 of 326

Refrigerant instructionlabel
Example:refrigerant instruction label
:
Warning symbol
;Refrigerant filling capacity
=Applicabl estandards
?PAG oilp artn umber
AType of refrigerant
Warning symbol :advises yo uabout :
RPossible dangers
RHaving service work carrie doutataq uali fied
specialist workshop
Fillin gcapacities
ModelRefrigerant
Mercedes ‑AMG
vehicles23.6 ±0.4 oz
(670 ±10g )
Allo the rm odels22.9 ±0.4 oz
(650 ±10g )
ModelPAG oil
All models4.2 oz
(120 g)
Vehicle data
General notes
Please note that for the specified vehicled ata:
RThe heights specified may vary asaresul tof:
-Tires
-Load
-Condition of the suspension
-Optionale quipment
ROptionalequipment reduces the maximum
payload.
Dimensions and weights
Model:
Height when opened
Mercedes‑AM Gvehicles68.0 in
(1727 mm)
All other models68.3 in
(1737 mm)
Model
Vehicle width
including exterior
mirrors80.0 in (2032 mm)
Wheelbase106.3 in (2699 mm)
Turning radius36.1 ft (11.0 m)
Turning circle,
Mercedes-AMG
vehicles36.2 ft (11.04 m)
320Vehicle data
Technical data
Page 323 of 326

All other models182.7 in (4640 mm)
ModelVehicle height
Mercedes‑AM Gvehi-
cles55.7 in (1416 mm)
All other models56.5 in (1436 mm)
Model")
ModelVehicle length
Mercedes‑AMGvehi-
cles184.7 in (4691 mm)
All other models182.7 in (4640 mm)
ModelVehicle height
Mercedes‑AM Gvehi-
cles55.7 in (1416 mm)
All other models56.5 in (1436 mm)
ModelMaximum roof load
Mercedes‑AM Gvehi-
cles220.5 lb (100 kg)
All other models220.5 lb (100 kg)
ModelMaximum trunk load
Mercedes‑AM Gvehi-
cles220.5 lb (100 kg)
All other models220.5 lb (100 kg)
Vehicle data321
Technical data
Z