2018 MERCEDES-BENZ CLA COUPE USB
[x] Cancel search: USBPage 9 of 326
ChildRestraints ystem .............................. 56
Child seat
Forward-facing restraint system ...... 59
LATCH-type (ISOFIX) child seat
anchors. .......................................... .57
On th efront-pa ssenger seat ............ 58
Rearward-facin grestraint system .... 59
Top Tether ...................................... .57
Child-proof locks
Important safety note s................... .59
Rear doors. ...................................... 60
Children
Special seat belt retracto r............... 55
Children in th evehicle
Important safety note s................... .54
Cigarett elighter ................................ 244
Cleaning
Mirror tur nsignal .......................... .265
Climate control
Air-conditioning system ................. 111
Automatic climate control (dual-
zone) .............................................. 113
Controlling automatically ...............1 16
Cooling with ai rdehumidification .. 115
Defrosting the windows ................. 118
Defrosting the windshield .............. 117
General notes ................................ 110
Indicator lamp ................................ 116
Information about using auto-
matic climate control ..................... 114
Maximum cooling .......................... 118
Notes on using the air-condition-
ing system ..................................... 112
Overview of systems ......................1 10
Problem with the rea
r window
defroster ........................................ 119
Problems with cooling with air
dehumidification ............................ 116
Refrigerant ..................................... 319
Refrigerant filling capacity ............. 320
Setting the ai rdistribution ............. 116
Setting the ai rvents ......................1 20
Setting the airflow ......................... 117
Setting the temperature ................ 116
Switching air-recirculation mode
on/off ............................................ 119
Switching on/off ........................... 115 Switching residua
lheato n/off ...... 119
Switching the rear window
defroster on/off ............................ 118
Switching the ZONE function
on/off ............................................ 117
Cockpit
Overview .......................................... 32
COMAND display
Cleaning ......................................... 266
Combination switch .......................... 101
Compass
Calibrating ..................................... 255
Calling up ....................................... 255
Magnetic fieldz one maps.............. 255
Setting ...........................................2 55
Connectin gaUSB device
see also Digita lOperator's Man-
ua l..................................................2 29
Consumptions tatistics(on -board
computer) .......................................... 180
Controller ...........................................2 30
Convenience closing feature .............. 83
Convenience opening feature ............ 83
Coolan t(en gine)
Checking the level. ........................ 260
Display message ............................ 205
Filling capacity ............................... 319
Important safety notes .................. 318
Temperature (on-board computer,
Mercedes-AMG vehicles) ...............1 88
Temperature gauge ........................ 177
Warning lamp ................................. 225
Cooling
see Climate control
Copyright ............................................. 31
Co rneringl
ight function
Display message ............................ 202
Cruis econtrol
Activatio nconditions ..................... 150
Cruise control lever. ...................... 149
Deactivating ................................... 150
Display message ............................ 210
Driving system ............................... 149
Function/notes .............................1 49
Important safety notes .................. 149
Setting aspeed. ............................. 150
Index7
Page 22 of 326
Traction (definition)....................... 307
Tread wear .....................................3 01
Uniform Tire Quality Grading
Standard s...................................... 301
Uniform Tire Quality Grading
Standard s(definition) .................... 306
Weari ndicator (definition) ............. 307
Wheelr im (definition) .................... 306
see Flat tire
Top Tether ............................................ 57
Tow-starting
Emergency engine starting ............ 284
Important safety notes .................. 281
Installing the towing eye. ............... 282
Removing the towing eye. ..............282
Towing atrailer
ESP
®(ElectronicS tability Pro-
gram) ............................................... 67
Towing away
Important safety guidelines ........... 281
Installing the towing eye. ............... 282
Notes for 4MATIC vehicles ............ 284
Removing the towing eye. ..............282
Transporting the vehicle ................ 283
With both axle sonthe ground ....... 283
With front axle raised ..................... 282
Towing eye ......................................... 270
Traffic reports
see also Digita lOperator's Man-
ua l..................................................2 29
Transmission
see Automatic transmission
Transmission position display
(DIRECT SELEC Tlever) ......................1 30
Transporting the vehicle .................. 283
Trim pieces (cleaning instruc-
tions) ..................................................2 67
Trip computer (on-board com-
puter) ..................................................1 80
Trip odometer
Calling up ....................................... 180
Resetting (on-board computer) ...... 181
Trunk
Emergency release .......................... 81
Emergency release button ...............8 1
Important safety notes .................... 78 Opening (automaticall
yfrom out-
side) .................................................7 9
Opening (from outside the vehi-
cle, HANDS-F REE ACCESS) ...
........... 79
Opening automaticallyf rom
inside ............................................... 80
Opening/closing (manually from
outside) ............................................ 78
Trunk lid
Display message ............................2 15
Opening dimensions ......................3 20
Trunk load (maximum) ......................320
Turn signals
Display message ............................ 202
Replacing bulbs (front) ................... 106
Switching on/off ........................... 101
Two-way radio
Frequencies ................................... 313
Installatio n..................................... 313
Transmissiono utput (maximum ).... 313
Type identification plate
see Vehicle identification plate
U
UnlockingEmergency unlocking ....................... 77
From insid ethe vehicle (central
unlocking button) .............................7 6
Upshifti ndicator (on-boardc om-
puter, Mercedes-AMG vehicles) .......188
USB devices
Connecting to the MediaI nter-
face ............................................... 236
V
Vanity mirror (in the sun visor) ........244
Vehicle
Correct use ...................................... 28
Data acquisition ............................... 29
Display message ............................ 213
Equipment ....................................... 25
Individua lsettings .......................... 186
Limited Warranty .............................2 9
Loading .......................................... 298
Locking (in an emergency) ............... 77
Locking (SmartKey) .......................... 70
20Index
Page 82 of 326
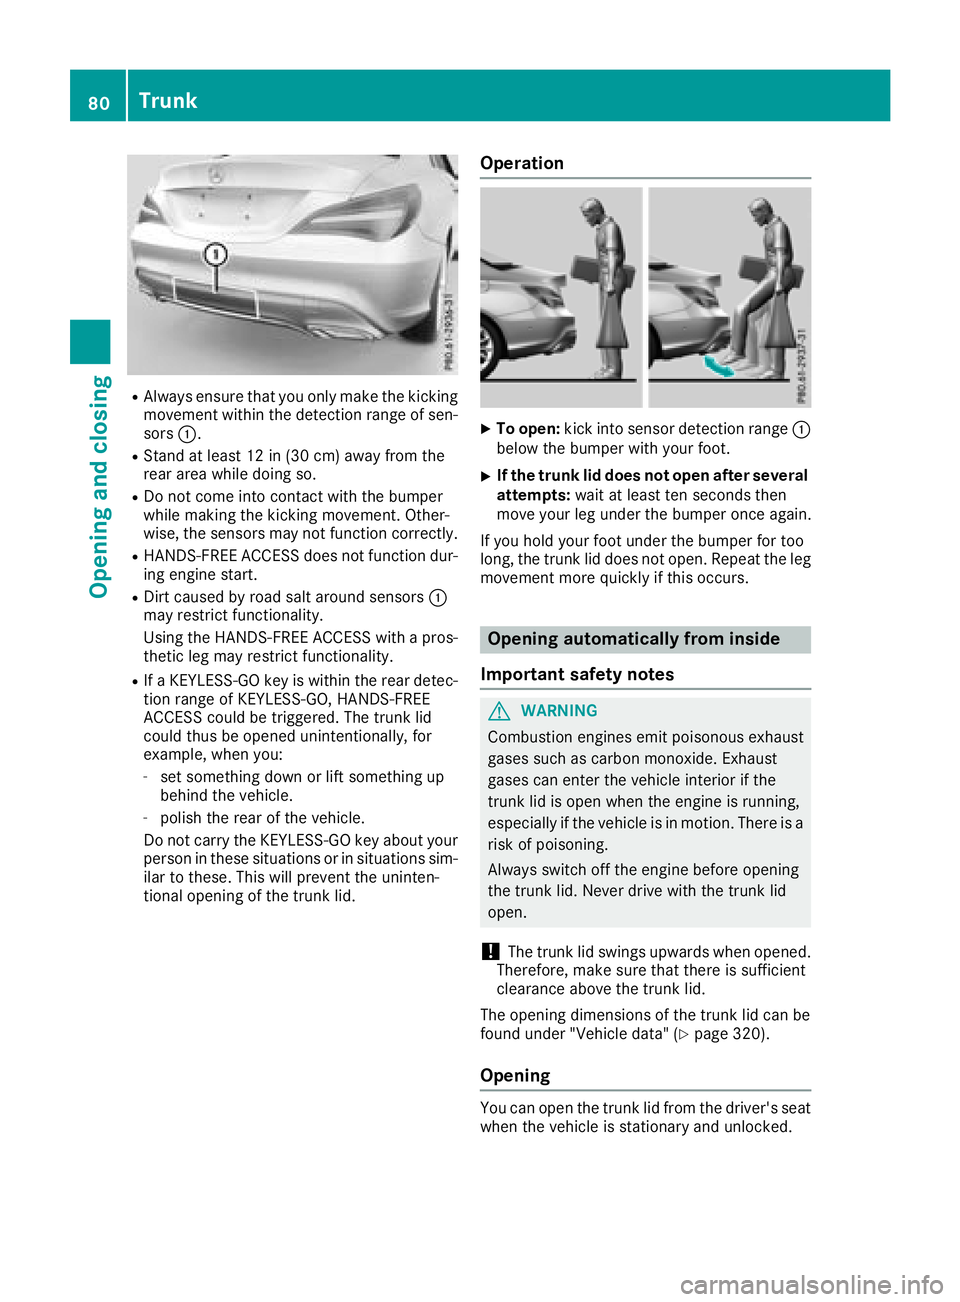
RAlwaysensure thaty ouonlym aket he kicking
movement withint he detection range of sen-
sors :.
RStand at leas t12in(30 cm)awa yfrom the
rea rareaw hile doing so.
RDo not come into contact with the bumper
whilemaking the kicking movement. Other-
wise, the sensors mayn ot functioncorrectly.
RHANDS-FREE ACCESS does not functio ndur-
ing engine start.
RDirt caused by roads alta round sensors :
mayr estrict functionality.
Using the HANDS-FREE ACCESS with apros-
theti cleg mayr estrict functionality.
RIfaK EYLESS-GO key is withint he reardetec-
tio nr ange of KEYLESS-GO ,HANDS-FREE
ACCESS could be triggered .The trun klid
could thusbeo penedu nintentionally, for
example, when you:
-set something down or lift something up
behind the vehicle.
-polish the rea rofthe vehicle.
Do not carry the KEYLESS-GO key abouty our
personint hesesituations or in situations sim-
ilar to these. Thi swillp revent the uninten-
tional opening of the trun klid.
Operation
XTo open: kick into sensor detection range :
belo wthe bumpe rwithy ourfoot.
XIf the trunk li ddoesn otope nafters everal
attempts: wait at leas tten secondst hen
move your le gunder the bumpe ronce again.
If yo uholdy ourfootu nder the bumpe rfor too
long, the trun klid does not open. Repeat the leg
movement more quickl yifthiso ccurs.
Opening automaticall yfrom inside
Important safety notes
GWARNING
Combustion engine semitp oiso nousexhaust
gases such as carbo nmonoxide. Exhaust
gases can entert he vehicleinterio rifthe
trun klid is open when the engine is running,
especially if the vehicl eisinmotion. There is a
ris kofp oisoning.
Alway sswitch off the engine before opening
the trun klid.N ever drive with the trun klid
open.
!The trun klid swing supwar ds when opened.
Therefore,m akes uret hatt hereiss ufficient
clearance above the trun klid.
The opening dimensions of the trun klid can be
found under "Vehicle data" (
Ypage 320).
Opening
Yo uc an open the trun klid from the driver's seat
when the vehicl eisstationar yand unlocked.
80Trunk
Opening and closing
Page 237 of 326
XAuthorizationusingS ecur eSimple Pai r-
ing:
Ac odeisd isplayed inthem ultimedia system
and on th emobile phone.
XConfir mcodeont hemob ilephone. Depend-
ing on th emobile phoneu sed, confirm the
connection to th emultimedia system and for
th eP BAPa nd MAPB luetooth
®profiles. The
prompt to confirm may tak euptotwo
minute stobed isplayed (see th emanufactur-
er' so peratin ginstructions).
XIfth ec odes are different :select Noon the
multimedia system.
The proces siscanceled.
Repeat authorization.
or
XAuthorizatio nbyentering apasskey
(passcode): enterany one- to sixteen-digit
number sequenc ewhichy ou have chosen
yourself int othe passke yinput menu.
XPress ¬to confirm.
XEnterand confirm th epasske yonthe mob ile
phone. Dependin gonthemob ilephoneu sed,
confirm th econnectio ntothemultimedia sys-
te ma nd for th ePBAPa nd MAPB luetooth
®
profiles. The prompt to confirm may tak eup
to two minute stobedisplayed (see th eman-
ufacturer' soperatin ginstructions).
Symbols in th edevice manager
The symbols are shown in color dependingon
their use.
SymbolExplanation
Mobile phonec onnected to the
multimedia system
Main telephone withfull range of
functions
Ad ditional telephone for incoming
calls intwo telephone mode
Media mode
General notes
If you wish toplay external medi asources ,the
appropriat emediam odem ust alread ybeturned on.F
urther informatio nonmediam ode(see the
Digital Operator's Manual).
The followinge xternalmediasources can be
used:
RApple®device s(e.g. iPhone®)
RUSBd evices(e.g. USBs tick ,M P3 player)
(Ypage 236)
RCD
RDV D(COMAND)
RSD cards
Rvia device sconnected by Bluetooth®
iInformation on single CD/DV DdriveorD VD
changer (see th eDigital Operator's Manual).
Selecting usin gthe device list
Multimedia system:
XSelectMediaQDevices.
The available medi asources willbe shown.
The #dot indicates th ecurren tsetting.
XSelect th emediasource.
Playable filesare played.
Inserting/removing an SD card
Important safety notes
GWARNING
SD cardsare smal lparts. They can beswal-
lowed and caus echoking. This posesa n
increased ris kofinjury or eve nfatal injury.
Keep th eSDc ardo ut of th ereac hofc hildren.
If aS Dc ardiss wallowed, seek medical atten-
tio nimmediately.
!If you are no longer usingt heSD card,you
should remove it and store itoutside thev ehi-
cle .Hight em peratures can damag ethe card.
Insertin ganSDc ard
TheSDcardslot islocate donthecontrol panel.
XInsertt heSD cardintot he SD cardslot until
th eS Dc arde ngages.T he side withthe con-
tacts must fac edown.
Removing an SD card
XPress th eSDc ard.
The SD car disejected.
XRemo vetheS Dc ard.
Operatin gsystem235
Multimedia system
Z
Page 238 of 326
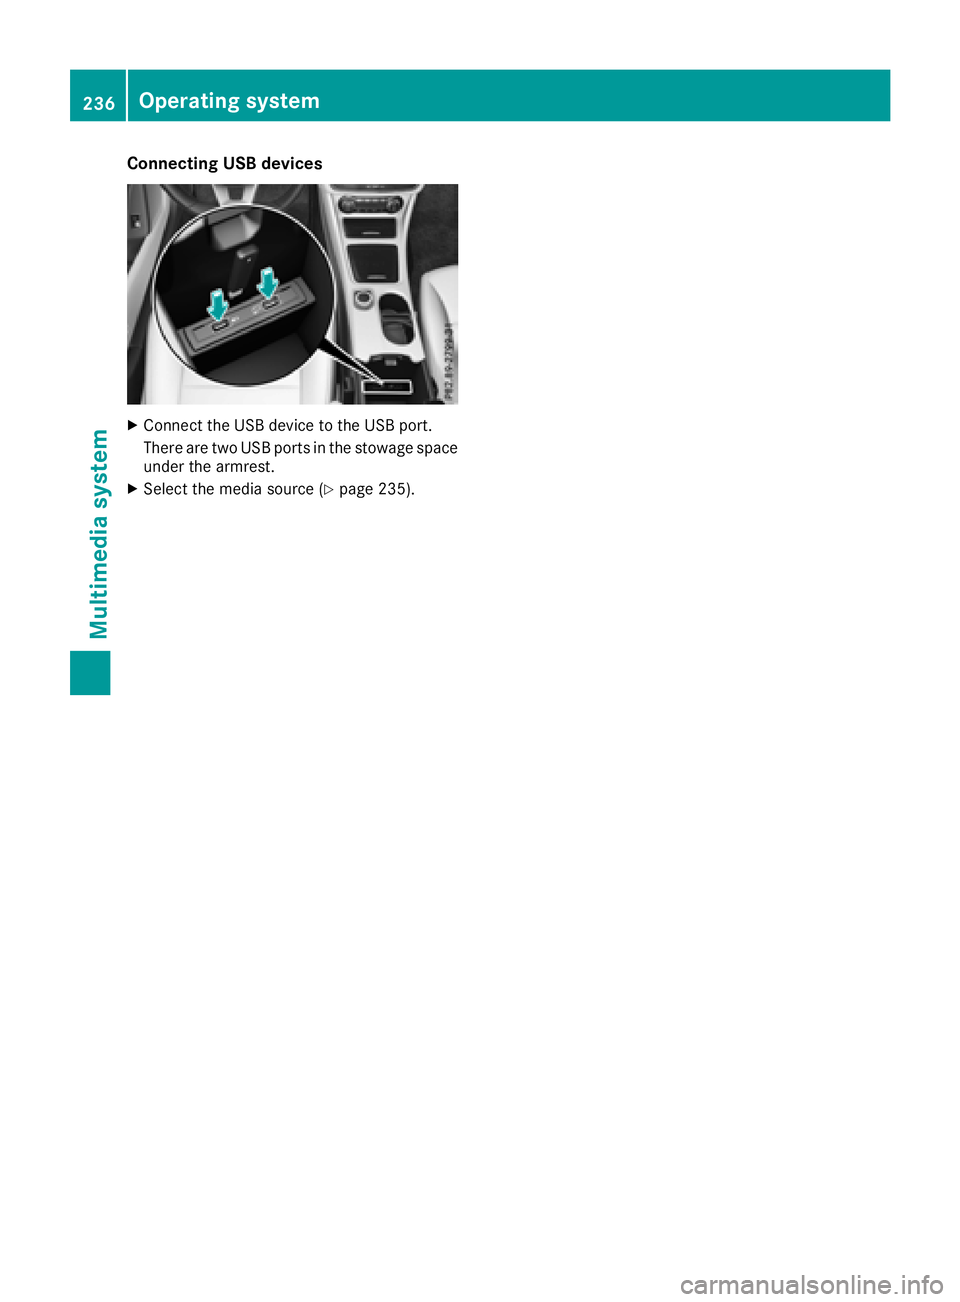
Connecting USB devices
XConnectthe USBd evice to th eUSBport.
Therea re two USBp ortsint hestowage space
unde rthe armrest.
XSelect th emediasource (Ypage 235).
236Operating system
Multimedia system
Page 241 of 326
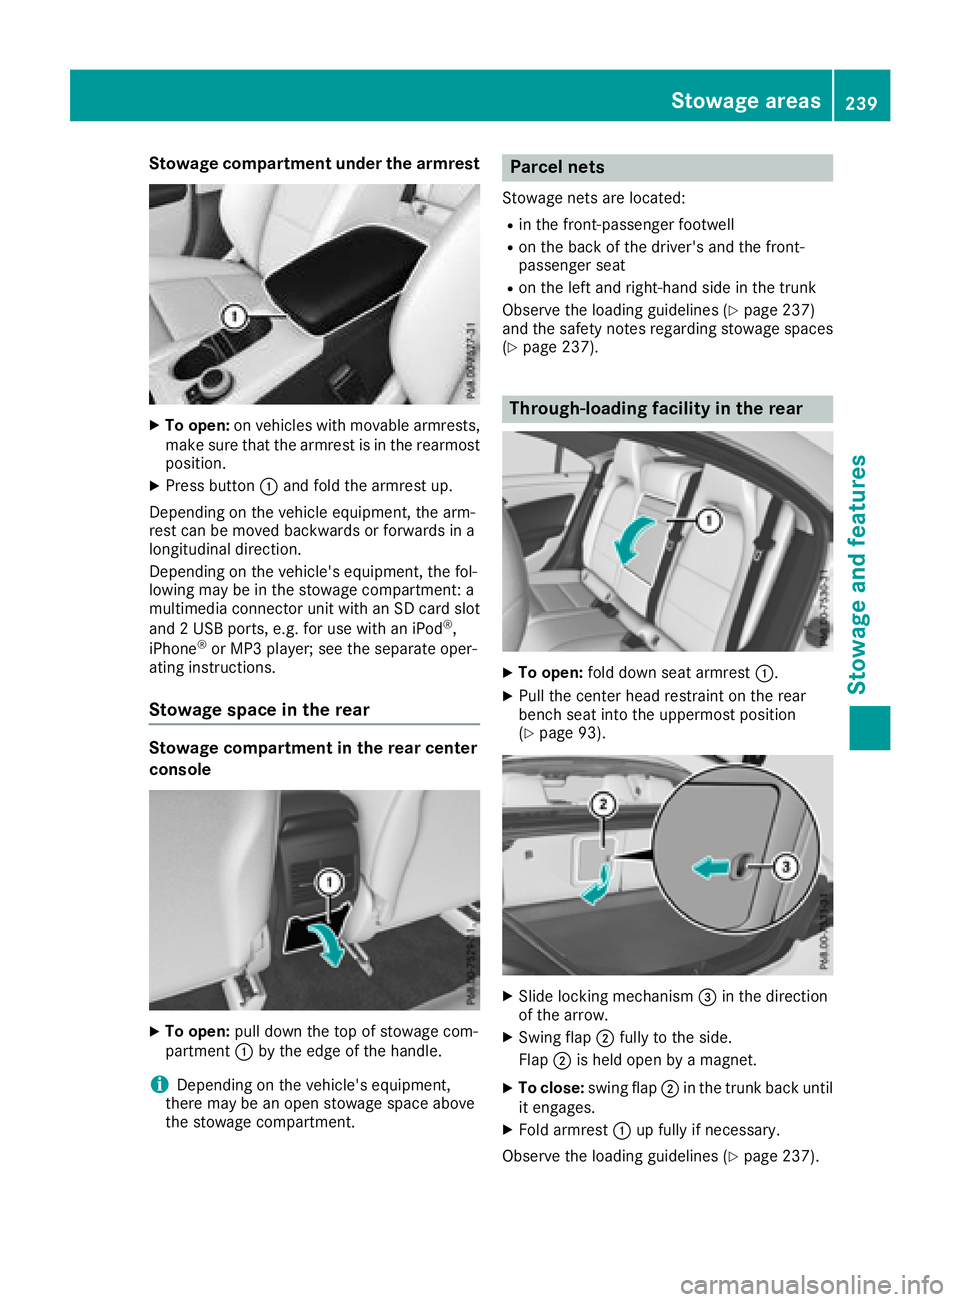
Stowage compartment under the armrest
XTo open:on vehicles with movable armrests,
make sure that the armrest is in the rearmost
position.
XPress button :and fold the armrest up.
Depending on the vehicle equipment, the arm-
rest can be moved backwards or forwards in a
longitudinal direction.
Depending on the vehicle's equipment, the fol-
lowing may be in the stowage compartment: a
multimedia connector unit with an SD card slot
and 2USB ports, e.g. for use with an iPod
®,
iPhone®or MP3 player; see the separate oper-
ating instructions.
Stowage space in the rear
Stowage compartment in the rear center
console
XTo open: pull down the top of stowage com-
partment :by the edge of the handle.
iDepending on the vehicle's equipment,
there may be an open stowage space above
the stowage compartment.
Parcel nets
Stowage nets are located:
Rin the front-passenger footwell
Ron the back of the driver's and the front-
passenger seat
Ron the left and right-hand side in the trunk
Observe the loading guidelines (
Ypage 237)
and the safety notes regarding stowage spaces
(
Ypage 237).
Through-loading facility in the rear
XTo open: fold down seat armrest :.
XPull the center head restraint on the rear
bench seat into the uppermost position
(
Ypage 93).
XSlide locking mechanism =in the direction
of the arrow.
XSwing flap ;fully to the side.
Flap ;is held open by amagnet.
XTo close: swing flap ;in the trunk back until
it engages.
XFold armrest :up fully if necessary.
Observe the loading guidelines (
Ypage 237).
Stowage areas239
Stowage and features
Z