2018 MERCEDES-BENZ CLA COUPE check oil
[x] Cancel search: check oilPage 7 of 326

Information aboutService .............261
Resetting the service intervald is-
play. ............................................... 261
Service message ............................ 261
Specials ervice requirements ......... 261
ATA (Anti-Theft Alarm system)
Activating/deactivating ................... 68
Function ...........................................6 8
Switching off the alarm .................... 68
ATTENTIO NASSIS T
Activating/deactivating ................. 185
Displa ymessage ............................ 207
Function/note s............................. 171
Audi omenu( on-board computer) .... 182
Audi osystem
see separate operating instructions
Authorized Mercedes-Benz Center
see Qualifie dspecialist workshop
Authorized workshop
see Qualifie dspecialist workshop
AUTO lights
Displa ymessage ............................ 204
see Lights
Automatic car was h(care) ............... 262
Automatic engine start (ECO start/
stopf unction) .................................... 126
Automatic engine switch-off (ECO
start/stopf unction).......................... 126
Automatic headlamp mode .............. 100
Automatic transmission
Accelerator peda lposition ............. 133
Changing gea r............................... 133
DIREC TSELECT lever ..................... 130
Drive program. ............................... 134
Drive programd isplay .................... 130
Driving tip s.................................... 133
DYNAMIC SELECT button (all vehi-
cle se xcept Mercedes-AMGv ehi-
cles) ............................................... 128
DYNAMIC SELECT controller
(Mercedes-AMGv ehicles) .............. 129
Emergency running mode. ............. 138
Engaging drive position .................. 132
Engaging neutral ............................ 131
Engaging park position
(Mercedes-AMGv ehicles) .............. 132 Engaging park position automati-
cally ............................................... 131
Engaging reverse gea
r................... 131
Engaging the park position ............ 130 Holding the ve
hiclestationary on
uphill gradients .............................. 134
Kickdown. ...................................... 134
Manua lshifting .............................. 136
Oil temperature (on-board com-
puter, Mercedes-AMGv ehicles) ..... 188
Overview ........................................ 130
Problem (malfunction) ................... 138
Pulling away ................................... 125
Selector lever ................................ 132
Starting the engine ........................ 124
Steering wheelp addleshifters ...... 136
Transmission position display ........ 132
Transmission position display
(DIRECT SELECT lever) ................... 130
Transmission positions .................. 133
Automatic transmissio nemer-
gencym ode....................................... 138
B
Back button ....................................... 230
Backup lamp
Displa ymessage ............................ 203
BAS (Brake Assist System) ................. 61
Battery (SmartKey)
Checking .......................................... 73
Important safety notes .................... 73
Replacing ......................................... 73
Battery (vehicle)
Charging ........................................ 278
Displa ymessage ............................ 206
Important safety notes .................. 276
Jump starting ................................. 278
Belt
see Seatb elts
Bel twarning ......................................... 44
Blind SpotA ssist
Activating/deactivating (on-
board computer) ............................ 186
Displa ymessage ............................ 208
Notes/function .............................. 172
Bluetooth
®
Searching for amobilephone ........ 233
Index5
Page 12 of 326

Starting (important safety notes)... 123
Starting problems .......................... 127
Starting the engine with the
SmartKey ....................................... 124
Starting via smartphone ................ 124
Starting with the Start/Sto pbut-
ton ................................................. 124
Switching off .................................. 141
Tow-starting (vehicle )..................... 284
Engine electronics
Problem (malfunction) ................... 127
Engine jump starting
see Jump starting (engine)
Engine oil
Adding ........................................... 259
Additives ........................................ 318
Checking the oill evel ..................... 258
Checking the oill evel using the
dipstick .......................................... 258
Displa ymessage ............................ 206
Filling capacity ............................... 318
Notesa boutoilgrade s................... 317
Notesono illevel/consumption .... 258
Temperature (on-board computer,
Mercedes-AMGv ehicles) ............... 188
Entering an address
see also Digital Operator's Man-
ual.................................................. 229
ESP
®(ElectronicS tability Pro-
gram)
Activating/deactivating (on-
board computer) ............................ 219
AMG menu (on-board computer) ... 188
Characteristics ................................. 65
Deactivating/activating (button
in Mercedes-AMGv ehicles) ............. 66
Deactivating/activating (except
Mercedes‑ AMG vehicles) ................. 65
Deactivating/activating (on-
board computer, except
Mercedes-AMGv ehicles) ............... 185
Displa ymessage ............................ 192
Function/note s................................ 64
Generaln otes .................................. 64
Important safety information ........... 64
Trailer stabilization ........................... 67
Warning lamp ................................. 221 ETS/4ETS (ElectronicT
raction Sys-
tem) ...................................................... 64
Exhaust
see Exhaus tpipe
Exhaustc heck................................... 144
Exhaustp ipe
Cleaning ......................................... 266
Ex terio
r lighting
Cleaning ......................................... 265
see Lights
Exterior mirrors
Adjusting ......................................... 96
Dipping (automatic) ......................... 97
Folding in when locking (on-board
computer) ...................................... 188
Folding in/out (automatically )......... 97
Folding in/out (electrically) ............. 97
Outofp osition (troubleshooting )..... 97
Setting ............................................. 97
Storing settings (memory func-
tion) ................................................. 99
Storing the parking position ............. 98
Eyeglassesc ompartment ................. 238
F
Favorites
Overview ........................................ 231
Filler cap
see Refueling
First-aidk it......................................... 270
Flat tire
MOExtended tire s.......................... 271
Preparing the vehicl e..................... 271
TIREFIT kit ...................................... 272
Floormats ........................................... 256
Frequencies
Mobil ephone ................................. 313
Two-way radio ................................ 313
Fuel
Additives ........................................ 317
Consumption statistics .................. 180
Displaying the current consump-
tion ................................................ 180
Displaying the rang e...................... 180
Driving tip s.................................... 144
E10 ................................................ 316
Fue lgauge ....................................... 33
10Index
Page 19 of 326

Service centersee Qualified specialist workshop
Service Center
see Qualified specialist workshop
Service menu (on-board com-
puter) .................................................. 186
Service message
see ASSYST PLUS
Service products
Brake fluid .....................................3 18
Coolant (engine) ............................ 318
Engine oil ....................................... 317
Fuel ................................................ 315
Important safety notes .................. 315
Refrigerant (air-conditioning sys-
tem) ............................................... 319
Washer fluid ................................... 319
Settingt he air distribution ...............116
Settingt he airflow ............................ 117
Settingt he date/time format
see also Digita lOperator's Man-
ua l..................................................2 29
Settingt he language
see also Digita lOperator's Man-
ua l..................................................2 29
Settingt he time
see also Digita lOperator's Man-
ua l..................................................2 29
Settings
Factory (on-board computer) ......... 188
On-board computer ....................... 186
SETUP (on-board computer,
Mercedes-AMG vehicles) .................. 188
Side impact air bag .............................4 7
Side marker lamp (display mes-
sage) ................................................... 204
Side windows
Cleaning ......................................... 264
Conveniencec losing feature ............ 83
Convenienceo pening feature ..........8 3
Important safety information ........... 81
Opening/closing .............................. 82
Problem( malfunction) .....................8 4
Resettin g......................................... 84
Reversin gfeature ............................ .82 SIRIUS
services
see also Digit al Operator's Man-
ual .................................................. 229
Sliding sunroof
see Panorama roof with power
tilt/sliding panel
SmartKey
Changing the battery ....................... 73
Changing the programming .............7 2
Checkin gthe battery ...................... .73
Convenience closingf eature ............ 83
Convenience opening feature .......... 83
Display message ............................ 216
Door central locking/unlocking ...... .70
Important safety notes .................... 70
KEYLESS-GO start function .............. 71
Loss .................................................7 4
Mechanical key ................................ 72
Positions (ignition lock) ................. 122
Problem (malfunction) ..................... 74
Starting the engine ........................ 124
SmartKey positions (ignition lock) .. 122
Smartphone
Starting the engine ........................ 124
SMS
see also Digital Operator's Man-
ual .................................................. 229
Snow chains ...................................... 290
Sound
Switching on/off ........................... 230
Special seat belt retractor .................. 55
Specialist workshop ............................28
Speed, controlling
see Cruise control
Speedometer
Activating/deactivating the addi-
tional speedometer ........................ 187
Digital ............................................ 181
In the Instrument cluster ................. 33
Segments. ..................................... 176
Selectingt he display unit ...... ......... 186
SPORT handling mode
Deactivating/activat
ing
(Mercedes-AMG vehicles) ................6 6
Warning lamp ................................. 222
Standing lamps
Display message ............................2 03
Switching on/off ........................... 101
Index17
Page 140 of 326
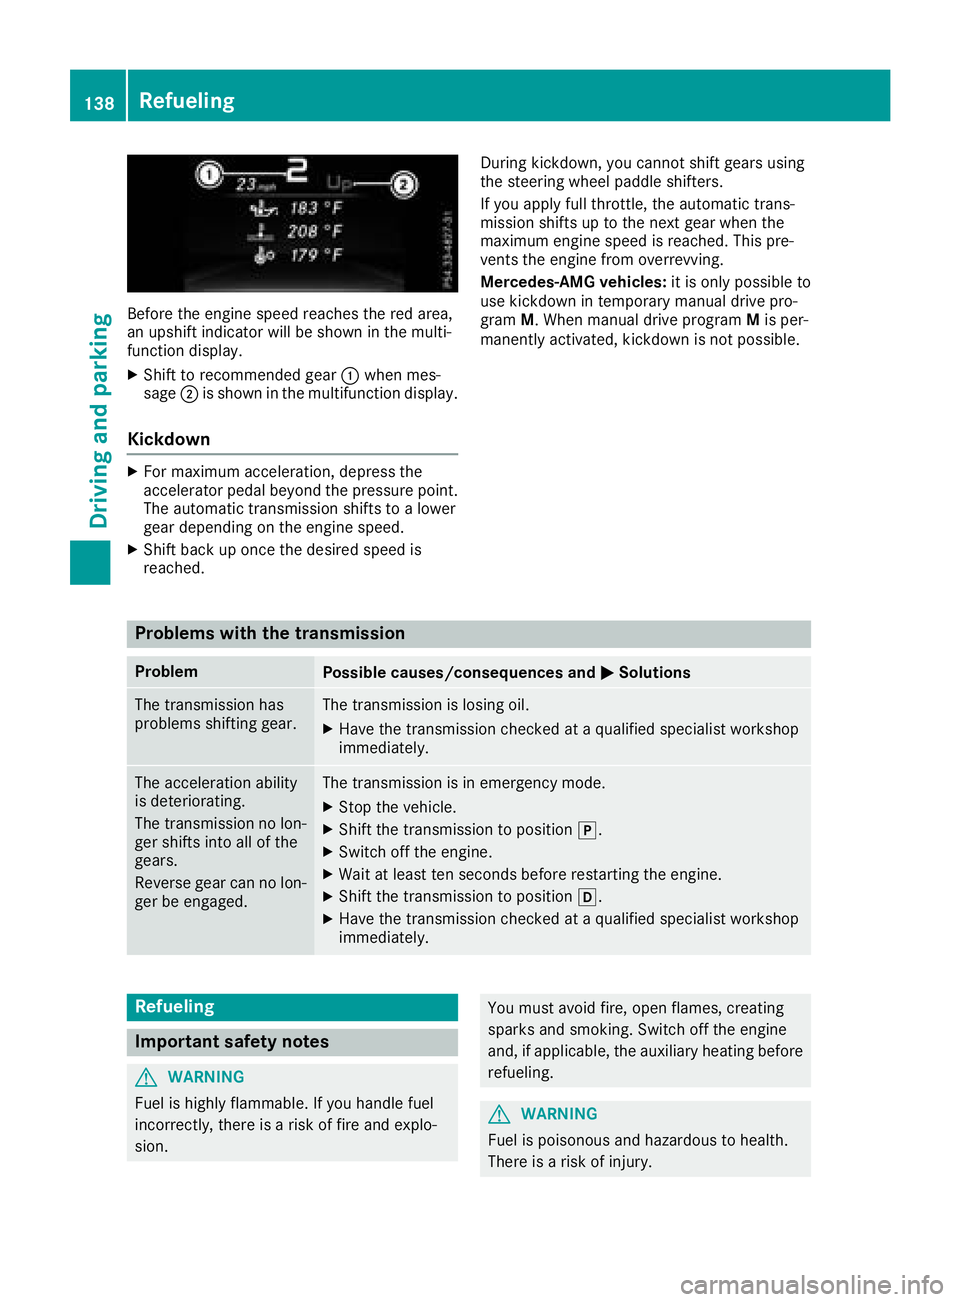
Beforethe engine speed reaches the red area,
an upshift indicator will be shownint he multi-
function display.
XShift to recommende dgear :whe nmes-
sage ;is shownint he multifunction display.
Kickdown
XFor maximum acceleration, depress the
accelerator pedal beyond the pressure point.
The automatic transmission shifts to alower
geard epending on the engine speed.
XShift back up once the desire dspeed is
reached. During kickdown, yo
ucannot shift gears using
the steering wheel paddl eshifters.
If yo uapply fullthrottle ,the automatic trans-
missio nshifts up to the next gearw hent he
maximum engine speed is reached.T hispre-
vents the engine from overrevving.
Mercedes-AMG vehicles: it is only possible to
use kickdown in temporary manual drive pro-
gram M.Whenm anual drive program Mis per-
manently activated, kickdown is not possible.
Problems with the transmission
ProblemPossible causes/consequence sand MSolutions
The transmission has
problem sshifting gear.The transmission is losing oil.
XHave the transmission checkedataq ualified specialist workshop
immediately.
The acceleration ability
is deteriorating.
The transmission no lon-
ger shifts into al lofthe
gears.
Reverseg earcan no lon-
ger be engaged.The transmission is in emergency mode.
XStop the vehicle.
XShift the transmission to position j.
XSwitch off the engine.
XWait at least ten seconds before restarting the engine.
XShift the transmission to positionh.
XHave the transmission checkedataq ualified specialist workshop
immediately.
Refueling
Important safety notes
GWARNING
Fue lish ighly flammable. If yo uhandle fuel
incorrectly ,there is ariskoff ire and explo-
sion.
You mus tavoid fire ,openf lames, creating
sparks and smoking. Switch off the engine
and ,ifa pplicable, the auxiliary heating before
refueling.
GWARNING
Fue lisp oisonousa nd hazardoustoh ealth.
There is arisk of injury.
138Refueling
Drivin gand parking
Page 208 of 326
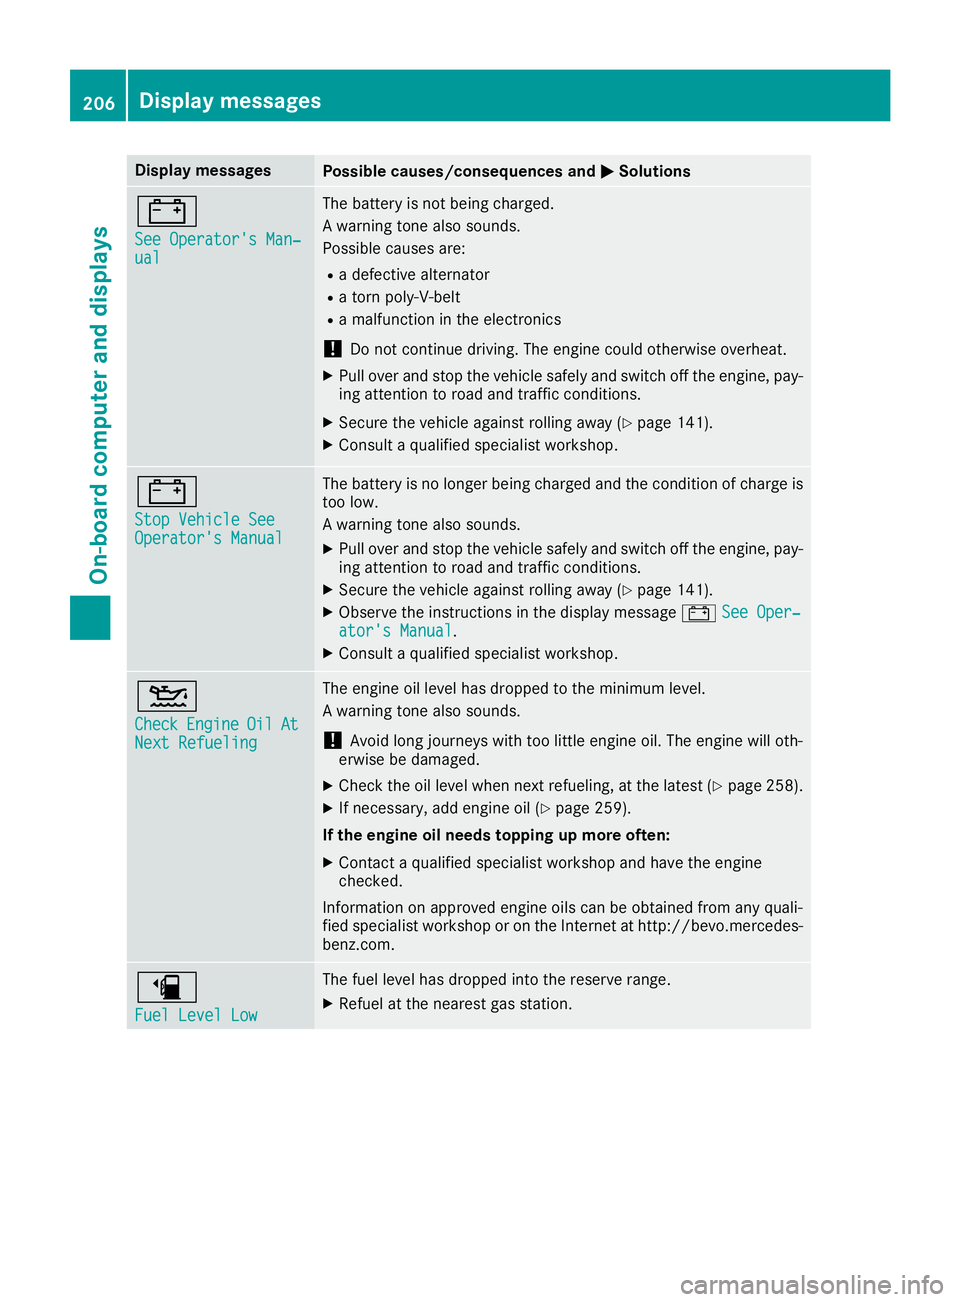
Display messagesPossible causes/consequences andMSolutions
#
See Operator'sMan‐ual
The battery is no tbein gcharged.
Aw arning tone also sounds.
Possibl ecauses are:
Rad efective alternato r
Ratornp oly-V-belt
Ram alfunction in th eelectronics
!Do no tcontinue driving. The engin ecould otherwise overheat.
XPull ove rand stop th evehicl esafely and switch off th eengine, pay-
ing attention to roa dand traffic conditions.
XSecur ethe vehicl eagainst rollin gaway (Ypage 141).
XConsult aqualified specialist workshop .
#
StopVehicl eSeeOperator' sManual
The battery is no longer bein gcharged and th econditi on of charg eis
to ol ow.
Aw arning tone also sounds.
XPull ove rand stop th evehicl esafely and switch off th eengine, pay-
ing attention to roa dand traffic conditions.
XSecur ethe vehicl eagainst rollin gaway (Ypage 141).
XObserv ethe instruction sinthedisplay message #See Oper‐ator's Manual.
XConsult aqualified specialist workshop .
4
CheckEngineOilAtNextRefueling
The engin eoil level has dropped to th eminimum level.
Aw arning tone also sounds.
!Avoid lon gjou rneys wit htoo littl eengineo il. The engin ewill oth-
erwise be damaged.
XChec kthe oil level when next refueling, at th elatest (Ypage 258).
XIf necessary, add engin eoil(Ypage 259).
If th eengin eoil need stoppin gupm oreo ften:
XContac taqualified specialist workshop and hav ethe engin e
checked.
Information on approve dengineo ils can be obtained from any quali-
fie ds pecialist workshop or on th eInterne tath ttp:// bevo.mercedes -
benz.com.
æ
Fue lLevel Low
The fuel level has dropped int othe reserv erange.
XRefue lattheneares tgas station .
206Display messages
On-boardc omputer andd isplays
Page 260 of 326
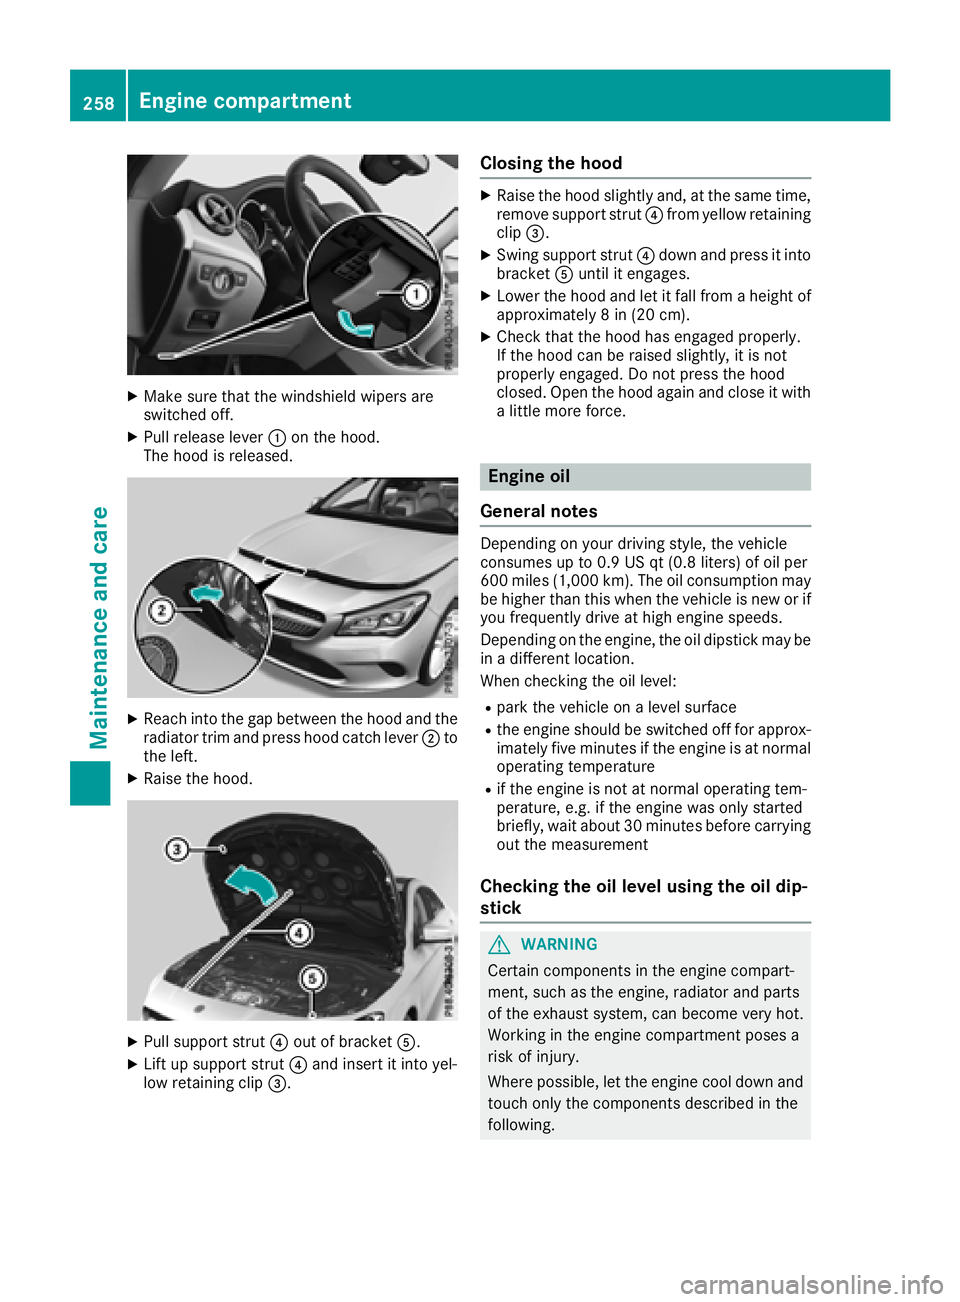
XMake sure that the windshield wipers are
switched off.
XPull release lever:on the hood.
The hood is released.
XReach into the gap between the hood and the radiator trim and press hood catch lever ;to
the left.
XRaise the hood.
XPull support strut ?out of bracket A.
XLift up support strut ?and insert it into yel-
low retaining clip =.
Closing the hood
XRaise the hood slightly and, at the same time,
remove support strut ?from yellow retaining
clip =.
XSwing support strut ?down and press it into
bracket Auntil it engages.
XLower the hood and let it fall from aheight of
approximately 8in(20 cm).
XCheck that the hood has engaged properly.
If the hood can be raised slightly, it is not
properly engaged. Do not press the hood
closed. Open the hood again and close it with
alittle more force.
Engine oil
General notes
Depending on your driving style, the vehicle
consumes up to 0.9 US qt (0.8 liters) of oil per
600 miles (1,000 km). The oil consumption may
be higher than this when the vehicle is new or if
you frequently drive at high engine speeds.
Depending on the engine, the oil dipstick may be
in ad ifferent location.
When checking the oil level:
Rpark the vehicle on alevel surface
Rthe engine should be switched off for approx-
imately five minutes if the engine is at normal
operating temperature
Rif the engine is not at normal operating tem-
perature, e.g. if the engine was only started
briefly, wait about 30 minutes before carrying
out the measurement
Checking the oil level using the oil dip-
stick
GWARNING
Certain components in the engine compart-
ment, such as the engine, radiator and parts
of the exhaust system, can become very hot.
Working in the engine compartmentp oses a
risk of injury.
Where possible, let the engine cool down and touch only the components described in the
following.
258Engine compartment
Maintenance and care
Page 261 of 326
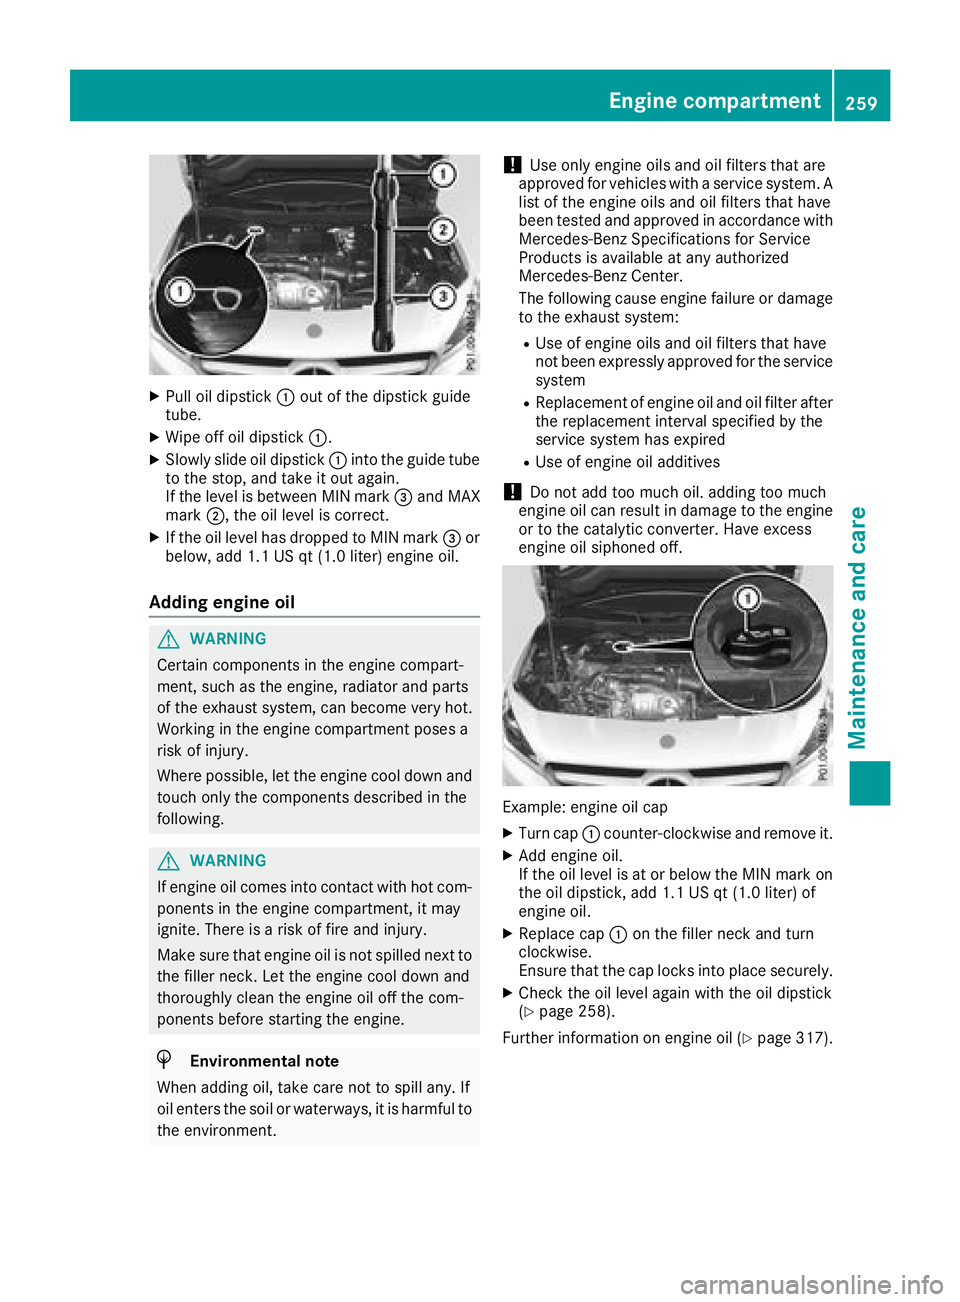
XPull oil dipstick:out of the dipstick guide
tube.
XWipe off oil dipstick :.
XSlowly slide oil dipstick :into the guide tube
to the stop, and take it out again.
If the level is between MIN mark =and MAX
mark ;,the oil level is correct.
XIf the oil level has dropped to MIN mark =or
below, add 1.1 US qt (1.0 liter) engine oil.
Adding engine oil
GWARNING
Certain components in the engine compart-
ment ,such as the engine, radiator and parts
of the exhaust system, can become very hot.
Workingint he engine compartment poses a
risk of injury.
Where possible, let the engine cool down and touch only the components described in the
following.
GWARNING
If engine oil comes into contact with hot com- ponentsint he engine compartment ,itmay
ignite. There is arisk of fire and injury.
Make sure that engine oil is not spilled next to
the filler neck.L et the engine cool down and
thoroughly clean the engine oil off the com-
ponentsb efore starting the engine.
HEnvironmenta lnote
When adding oil, take care not to spill any. If
oil enter sthe soil or waterways, it is harmful to
the environment.
!Use only engine oils and oil filters that are
approved for vehicles with aservice system. A
list of the engine oils and oil filters that have
been tested and approved in accordancew ith
Mercedes-Benz Specifications for Service
Products is availableata ny authorized
Mercedes-Benz Center.
The following cause engine failure or damage
to the exhaust system:
RUse of engine oils and oil filters that have
not been expressly approved for the service
system
RReplacement of engine oil and oil filter after
the replacement interval specified by the
service system has expired
RUse of engine oil additives
!Do not add too much oil. adding too much
engine oil can result in damage to the engine
or to the catalytic converter. Have excess
engine oil siphoned off.
Example: engine oil cap
XTurn cap :counter-clockwise and remove it.
XAdd engine oil.
If the oil level is at or below the MIN mark on
the oil dipstick ,add 1.1 US qt (1.0 liter) of
engine oil.
XReplace cap :on the filler neck and turn
clockwise.
Ensure that the cap locks into place securely.
XCheck the oil level again with the oil dipstick
(Ypage 258).
Further information on engine oil (
Ypage 317).
Engine compartment259
Maintenance and care
Z
Page 310 of 326

Tire-mounting tools should not be used near
the valve. This could damage the electronic
components.
Only have tires changed ataqualified spe-
cialist workshop.
Observe the instructions and safety notes in the
"Changing awheel" section (
Ypage 307).
The wear pattern sonthe front and rear tires
differ, depending on the operating conditions.
Rotate the wheels before aclear wear pattern
has formed on the tires. Frontt ires typically
wear more on the shoulders and the rear tires in
the center.
On vehicles that have the same size front and
rear wheels, you can rotat ethe wheels accord-
ing to the intervals in the tire manufacturer's
warranty book in your vehicle documents. If no
warranty book is available, the tires should be
rotated every 3,000 to 6,000 miles (5,000 to
10,000k m).D ependin gontire wear, this may
be required earlier. Do not change the direction
of wheel rotation.
Clean the contact surfaces of the wheel and the brake disc thoroughly every time awheel is rota-
ted. Check the tire pressure and, if necessary,
restart the tire pressure loss warning system
(Canada only) or the tire pressure monitor (USA
only).
Direction of rotation
Tires with aspecified direction of rotation have
additional benefits ,e.g. if there is arisk of hydro-
planing. These advantages can only be gained if
the tires are installed corresponding to the
direction of rotation.
An arrow on the sidewall of the tire indicates its
correctd irection of rotation.
Storing wheels
Storewheels that are not being used in acool,
dry and preferably dark place. Protectt he tires
from oil, grease, gasoline and diesel.
Mounting awheel
Preparing the vehicle
XStop the vehicle on solid, non-slippery and
level ground.
XApply the electric parking brake manually.
XBring the front wheels into the straight-ahead position.
XShift the transmission to position j.
XSwitch off the engine.
XVehicles without KEYLESS-GO:remove the
SmartKey from the ignition lock.
XVehicles with KEYLESS-GO start-function
or KEYLESS-GO: open the driver's door.
The vehicle electronics are now in position
u.T his is the same as “key removed”.
XVehicles with KEYLESS-GO start-function
or KEYLESS-GO: remove the Start/Stop but-
ton from the ignition lock (
Ypage 122).
XMake sure that the engine cannot be started
via your smartphon e(Ypage 83).
XIf included in the vehicle equipment, remove
the tire-change tool kit from the vehicle.
XSafeguard the vehicle against rolling away
(Ypage 141).
iApart from certain country-specific varia-
tions, the vehicles are not equipped with a
tire-change tool kit. Some tools for changing a
wheel are specific to the vehicle. For more
information on which tools are required to
perform awheel change on your vehicle, con-
sult aqualified specialist workshop.
Necessary tire-changing tools can include, for
example:
RJack
RWheel chock
RLug wrench
308Changing awheel
Wheels and tires