2018 MERCEDES-BENZ CLA COUPE oil pressure
[x] Cancel search: oil pressurePage 20 of 326

Start-off assistActivating ....................................... 158
Important safety notes .................. 158
Start/Stop button
Removing ....................................... 123
Starting the engine ........................ 124
Start/stop function
see ECO start/stop function
Starting (engine) ................................ 123
STEER CONTROL ..................................6 8
Steering
Display message ............................2 16
Steering assistant STEE RCON-
TROL
see STEER CONTROL
Steering wheel
Adjusting (manually). ....................... 95
Butto noverview ............................... 34
Buttons (on-board computer) ......... 177
Cleaning ......................................... 267
Important safety notes .................... 95
Paddle shifters ............................... 136
Steering whee lpaddle shifters ........ 136
Stopwatch (RACETIMER) ................... 189
Stowag ecom partments
Armrest (front) ............................... 238
Armrest (under )............................. 239
Center console .............................. 238
Center console (rear) ..................... 239
Cu ph olders ................................... 242
Eyeglasses compartment ............... 238
Glove box ....................................... 238
Important safety information ......... 237
Mapp ockets .................................. 239
Stowag enet ................................... 239
Stowag enet....................................... 239
Stowag ewellb enea th the trunk
floor .................................................... 241
Summert ires..................................... 289
Sun visor ............................................ 243
Suspension setting
AMG adaptive sport suspension
system ........................................... 159
Switchin gair-recirculatio nmode
on/off ................................................. 119
Switchin gonmediam ode
Via the device list .......................... 235T
Tachometer ........................................ 176
Tail lamps
Displa ymessage ............................ 203
see Lights
Tank
see Fue ltank
Tank content
Fuelgauge ....................................... 33
Technical data
Capacities ...................................... 315
Information .................................... 313
Tires/wheels ................................. 312
Vehicl edata. .................................. 320
Telephone
Accepting acall( multifunction
steering wheel) .............................. 184
Authorizing amobilephone (con-
necting) ......................................... 233
Authorizing amobil ephone via the
device manager (connecting) ......... 234
Connecting amobilephone
(device manager )........................... 234
Connecting amobilephone (gen-
erali nformation) ............................ 233
Displa ymessage ............................ 216
Introduction ................................... 183
Menu (on-board computer) ............ 183
Numbe rfrom the phone boo k........ 184
Redialing ........................................ 184
Rejecting/ending acall. ................ 184
see also Digital Operator's Man-
ua l.................................................. 229
Temperature
Coolant .......................................... 177
Coolant (on-board computer,
Mercedes-AMGv ehicles) ............... 188
Engine oil( on-board computer,
Mercedes-AMGv ehicles) ............... 188
Outsid etemperature ...................... 176
Setting (climate control )................ 116
Transmission oil( on-board com-
puter, Mercedes-AMGv ehicles) ..... 188
Through-loadin gfeature ................... 239
Timing (RACETIMER) ......................... 189
Tire pressure
Calling up (on-board computer) ..... 294
18Index
Page 136 of 326
Holding the vehicle stationary on uphill
gradients
GWARNING
If the clutch overheats, the electronic man-
agement system is automatically deactivated. This interrupts the power transmission. The
vehiclem ay,for example, roll backwards on
gradients. There is arisk of an accident.
Never hold the vehicles tationary on uphill
gradients by depressing the accelerator.
The clutch may overheat if you hold the vehicle
stationary on uphill gradients by depressing the
accelerator pedal. If the clutch overheats, a
warning tone sounds.
All vehicle s(except Mercedes-AMG vehi-
cles): theStop Vehicle Shift to 'P'
Leave Engine Runningdisplay message
appears in the multifunction display .You will
only be abl etocontinue you rjourney once the
clutch has cooledd ownand the display mes-
sage in the multifunction display has disap-
peared.
Mercedes-AMG vehicles: theTrans. Oil
Overheated Drive on with Caredisplay
message appears in the multifunction display.
Do not hold the vehicles tationary on uphill gra-
dients by depressing the accelerator pedal.
Instead, only ever hold the vehicles tationary on
uphill gradients by:
Rdepressing the brake pedal
Ractivating the HOLD function
Rengaging the electric parking brake
Kickdown
Use kickdown for maximu macceleration.
XDepress the accelerator pedalb eyond the
pressure point.
The automatic transmission shifts to alower
geard epending on the engine speed.
XEase off the accelerator pedalo nce the
desired speedisr eached.
The automatic transmission shifts back up.
Mercedes-AMG vehicles: it is only possible to
use kickdown in the automatic drive program
and the temporary manua ldrive program M.
When manua ldrive program Mis permanently
activated, kickdown is not possible. For further information on kickdown in manual
drive program
M(
Ypag e138).
Rocking the vehicle free
Shifting back and forth between transmission
positions hand kcan help to free up the
vehicleifitg ets stuck in mud or snow. The vehi-
cle's engine management system limits the
speedtoam aximumof5m ph (9 km/h) when
shifting back and forth. To shift repeatedly
between transmission positions hand k,
move the DIRECT SELECT leverupa nd down
pastt he point of resistance.
Drive programs
Al lv ehicle s(except Mercedes-AMG
vehicles)
Drive program C(Comfort)
Drive program Cis characterized by the follow-
ing:
Rthe vehicled elivers comfortable, economical
handling characteristics.
Rthe vehiclep ulls awaymore gently in forward
and reverse gears, unless the accelerator
pedalisd epressed fully.
Rthe vehicleh as improved driving stability,f or
exampl eonslippery road surfaces.
Roptimalf uel consumption resulting from the
automatic transmission shifting up sooner.
The vehicleisd riveninthe low engine speed
range and the wheels are less likelytos pin.
Drive programS(Sport)
Drive program Sis characterized by the follow-
ing:
Rsporty engine settings.
Rthe automatic transmission shifts up later.
The fuel consumption possibly being higher
as aresult of the later automatic transmission
shift points.
134Automatic transmission
Driving and parking
Page 140 of 326
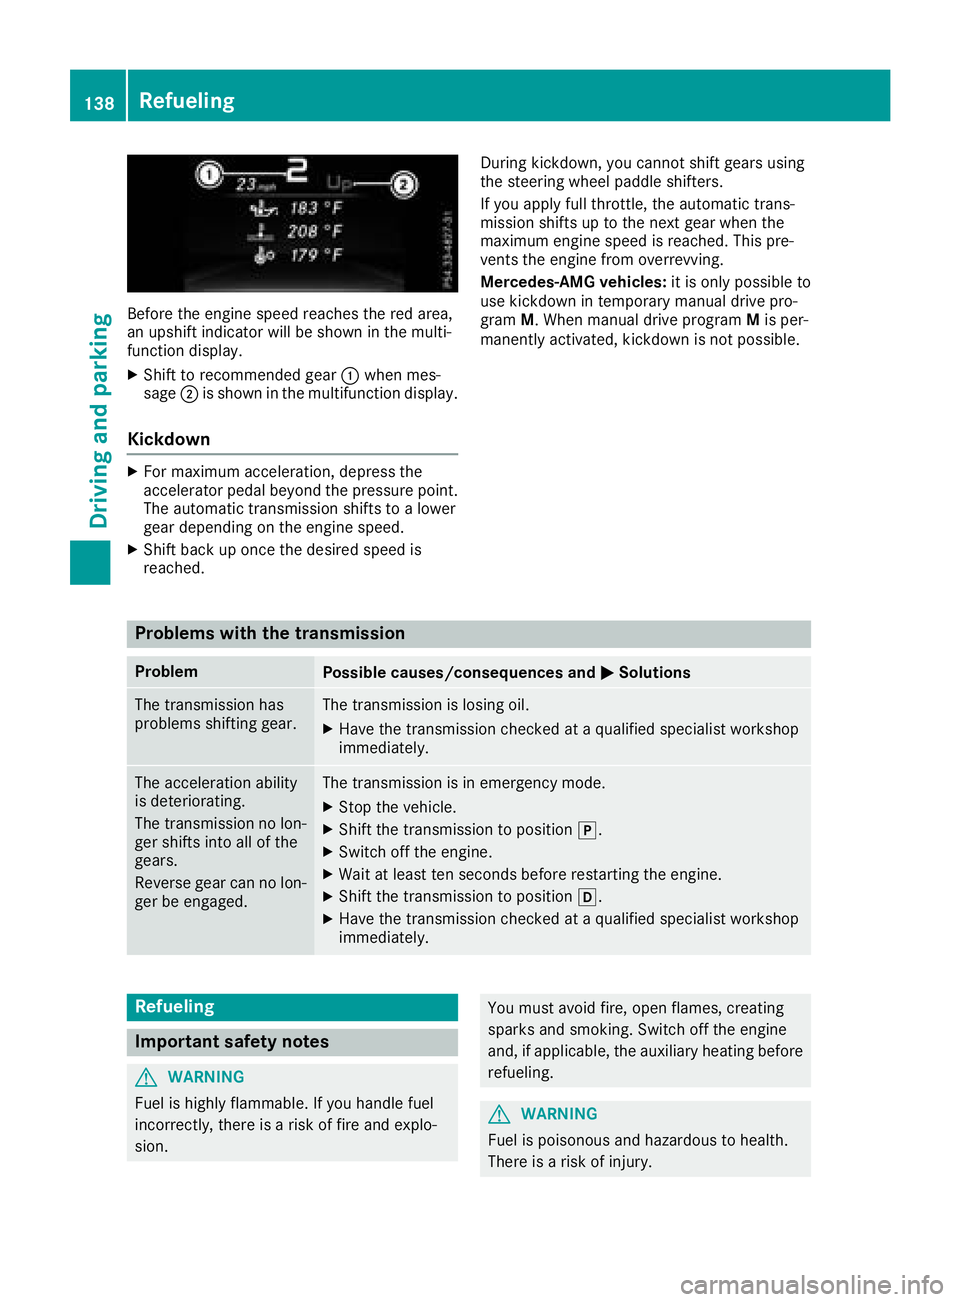
Beforethe engine speed reaches the red area,
an upshift indicator will be shownint he multi-
function display.
XShift to recommende dgear :whe nmes-
sage ;is shownint he multifunction display.
Kickdown
XFor maximum acceleration, depress the
accelerator pedal beyond the pressure point.
The automatic transmission shifts to alower
geard epending on the engine speed.
XShift back up once the desire dspeed is
reached. During kickdown, yo
ucannot shift gears using
the steering wheel paddl eshifters.
If yo uapply fullthrottle ,the automatic trans-
missio nshifts up to the next gearw hent he
maximum engine speed is reached.T hispre-
vents the engine from overrevving.
Mercedes-AMG vehicles: it is only possible to
use kickdown in temporary manual drive pro-
gram M.Whenm anual drive program Mis per-
manently activated, kickdown is not possible.
Problems with the transmission
ProblemPossible causes/consequence sand MSolutions
The transmission has
problem sshifting gear.The transmission is losing oil.
XHave the transmission checkedataq ualified specialist workshop
immediately.
The acceleration ability
is deteriorating.
The transmission no lon-
ger shifts into al lofthe
gears.
Reverseg earcan no lon-
ger be engaged.The transmission is in emergency mode.
XStop the vehicle.
XShift the transmission to position j.
XSwitch off the engine.
XWait at least ten seconds before restarting the engine.
XShift the transmission to positionh.
XHave the transmission checkedataq ualified specialist workshop
immediately.
Refueling
Important safety notes
GWARNING
Fue lish ighly flammable. If yo uhandle fuel
incorrectly ,there is ariskoff ire and explo-
sion.
You mus tavoid fire ,openf lames, creating
sparks and smoking. Switch off the engine
and ,ifa pplicable, the auxiliary heating before
refueling.
GWARNING
Fue lisp oisonousa nd hazardoustoh ealth.
There is arisk of injury.
138Refueling
Drivin gand parking
Page 265 of 326
XDo not usehot water and do not wash the
vehicl eindirect sunlight.
XUse asofts po ngetoc lean.
XUseamildc leaning agent, such as acar
shampo oapproved by Mercedes-Benz.
XThoroughl yhosed ownthe vehicl ewithag en-
tle jet of water.
XDo not point the water jet directl ytowards the
ai ri nlet.
XUse plenty of water and rinse ou tthe sponge
frequently.
XRinse the vehicl ewithc lean water and dry
thoroughl ywithac hamois.
XDo not le tthe cleaning agent dry on the paint-
work.
Carefully remove al ldeposit sofroads alta s
soo naspossibl ew hend rivin ginw inter.
Powe rwashers
GWARNING
The water jet fromac ircular jet nozzle(dirt
blasters )can cause invisible exterio rdamag e
to the tire sorchassisc omponents. Compo-
nents damage dinthisw aymayf ailu nexpect-
edly .There is ariskofana ccident.
Do not us epower washers with circular jet
nozzles to clean the vehicle. Hav edamaged
tire sorc hassisc omponents replaced imme-
diately.
!Alway smaintain adistance of at least
11.8 in (30 cm )between the vehicl eand the
powe rwashern ozzle. Informatio nabout the
correct distance is availabl efromt he equip-
ment manufacturer.
Mov ethe powe rwashern ozzlearound when
cleaning your vehicle.
Do not ai mdirectl yata ny of the following:
RTires
RDoorg aps,roofgaps, joints, etc.
RElectrical components
RBattery
RConnectors
RLamps
RSeals
RTrim
RVentilatio nslots Damaged seals or electrical components can
lead to leaks or failures.
!Vehicles with decorative film: parts of your
vehicl earecovered with adecorative film.
Maintain adistance of at leas t27.5 in (70 cm)
between the parts of the vehicl ecovered with
the fil mand the nozzl eofthe high pressure
cleaner.
Informatio nabout the correct distance is
availabl efromt he eq uip
ment manufacturer.
Mov ethe powe rwashern ozzlearound when
cleaning your vehicle.
Cleanin gthe paintwork
!Do not affix:
Rstickers
Rfilms
Rmagnetic plate sorsimilar items
to painte dsurfaces .You could otherwise
damage the paintwork.
Scratches, corrosive deposits, area saffecte dby
corrosion and damage caused by inadequate
car ecanno talway sbec ompletel yrepaired .In
such cases, visit aquali fied specialis tworkshop.
XRemov edirti mmediately, where possible,
whil eavoidin grubbi ng too hard.
XSoakinsect remains with insect remove rand
rinse off the treated area safterwards.
XSoa kbirdd ropping swithw ater and rinse off
the treated area safterwards.
XRemov ecoolant, brake fluid ,tree resin, oils,
fuel sand greases by rubbing gently with a
cloth soaked in petroleu mether or lighter
fluid.
XUse tar remove rtoremove tar stains.
XUse silicone remove rtoremove wax.
If water no longe rforms "beads "onthe paint
surface, us ethe paint car eproducts recommen-
de da nd approved by Mercedes-Benz. Thi sisthe
cas eapproximately every threetof ivem onths,
depending on the climate conditions and the
car eproduct used.
If dirt hasp enetrated the paint surface or if the
paint hasb ecome dull ,the paint cleane rrecom-
mend ed a
nd approved by Mercedes-Benz
shoul dbeu sed.
Do not us ethese car eproducts in the sunoro n
the hoo dwhile the hoo dishot.
Care263
Maintenance and care
Z
Page 268 of 326
XMake sure that the vehicle is atastandstill
and the SmartKey is in key position 2in the
ignition lock.
XOpen the camera cover for cleaning via the
multimedia system (see the separate operat-
ing instructions).
XTo clean the rear view camera: use clear
water and asoft cloth to clean camera
lens :.
Cleaningt he exhaust pipes
GWARNING
The exhaust tail pipe and tail pipe trim can
become very hot. If you come into contact
with these parts of the vehicle, you could burn
yourself. There is arisk of injury.
Always be particularly careful around the
exhaust tail pipe and the tail pipe trim. Allow
these components to cool down before touch-
ing them.
!Do not clean the exhaust pipe with acid-
based cleaning agents, such as bathroom
cleaner or wheel cleaner.
!Mercedes-AMG vehicles with black exhaust
pipes: the black-chrome tailpipe finishers
should not be polished with achrome polish.
They will otherwise lose their black sheen. For
optimal care, the faceplates should be rubbed with alightly oiled cloth after every car wash.
Commercially available engine and care oils
are suitable for this.
For heavier soiling, you can apply afine paint-
work polish with amicrofiber cloth. Remove
the excess polish residue after polishing.
Impurities combined with the effectsofr oad grit
and corrosive environmental factors may cause
flash rust to form on the surface. You can
restore the original shine of the exhaust pipe by
cleaning it regularly,e specially in winter and
after washing.
XClean the exhaust pipe with acare product
tested and approved by Mercedes-Benz.
Interior care
Cleaningt he display
!For cleaning, do not use any of the following:
Ralcohol-based thinner or gasoline
Rabrasive cleaning agents
Rcommercially-availableh ousehold cleaning
agents
These may damage the display surface. Do
not put pressure on the display surface when cleaning. This could lead to irreparable dam-
age to the display.
XBefore cleaning the display,m ake sure that it
is switched off and has cooled down.
XClean the display surface using acommer-
cially available microfiber cloth and TFT/LCD
display cleaner.
XDry the display surface using adry microfiber
cloth.
Cleaningt he plastic trim
GWARNING
Care products and cleaning agents containing solvents cause surfaces in the cockpit to
become porous. As aresult, plastic parts may
come loose in the event of air bag deploy-
ment. There is arisk of injury.
Do not use any care products and cleaning
agents to clean the cockpit.
!Never attach the following to plastic surfa-
ces:
Rstickers
Rfilms
Rperfume oil container or similar
You could otherwise damage the plastic.
!Do not allow cosmetics, insect repellent or
sunscreen to come into contact with the plas-
tic trim. This maintains the high-quality look of
the surfaces.
XWipe the plastic trim with adamp, lint-free
cloth, e.g. amicrofiber cloth.
XHeavy soiling: use care and cleaning prod-
ucts recommended and approved by
Mercedes-Benz.
The surface may change color temporarily.
Wait until the surface is dry again.
266Care
Maintenance and care
Page 276 of 326
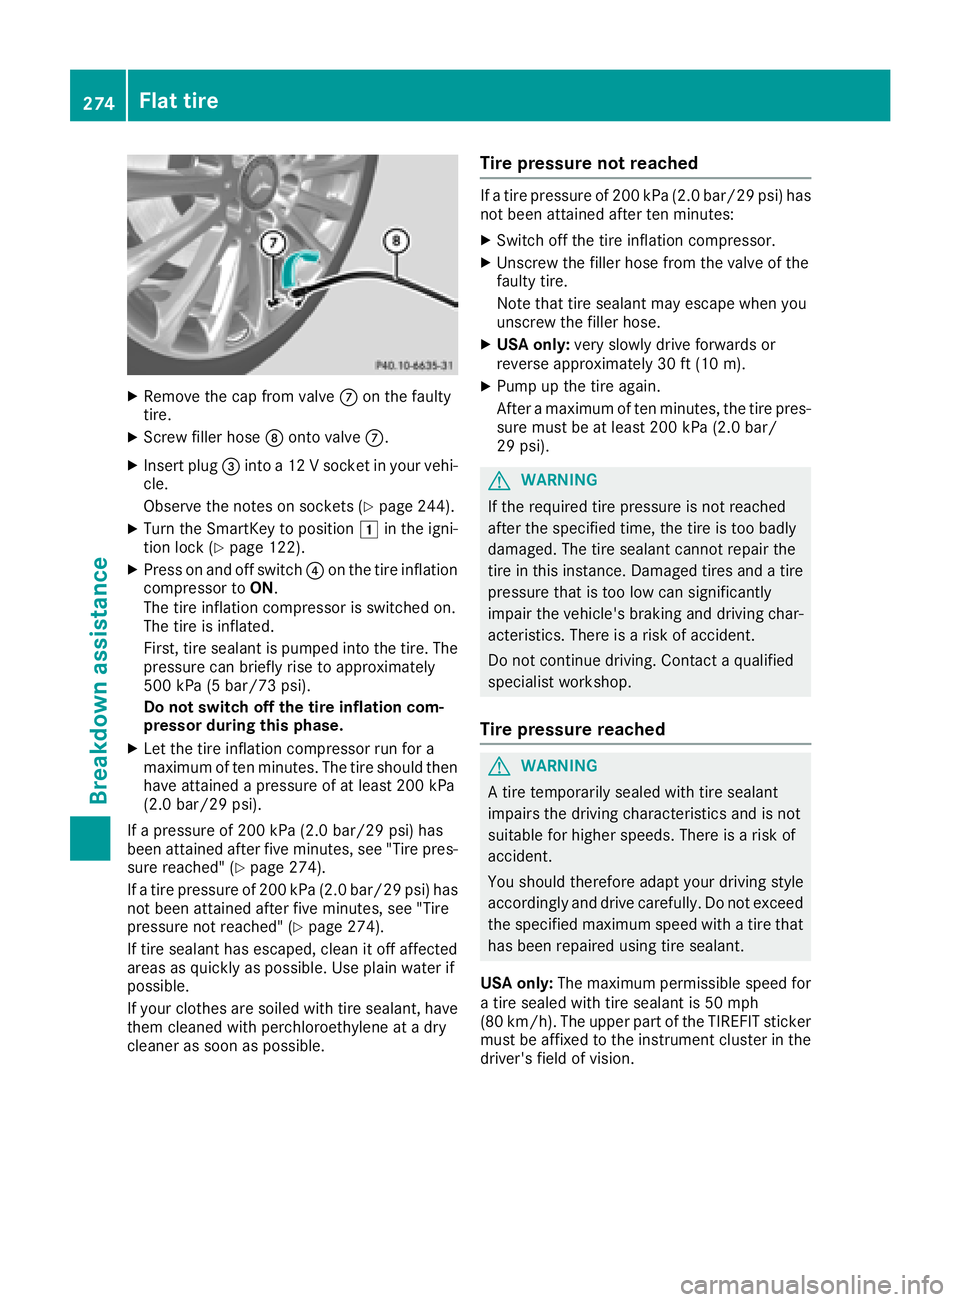
XRemove thecap from valv eC on th efault y
tire.
XScrew filler hos eD onto valv eC.
XInser tplug =intoa12Vs ocketinyour vehi-
cle .
Observ ethe note sons ockets (
Ypage 244).
XTurn theSmartKey to position 1in th eigni-
tion loc k(Ypage 122).
XPress on and off switch ?on th etirei nflation
compressor to ON.
The tire inflation compressor is switched on .
The tire is inflated.
First ,tires ealan tispumped int othe tire. The
pressur ecan briefly ris etoapproximately
50 0k Pa(5 bar/73 psi) .
Do not switch off th etirei nflation com -
pressor during this phase .
XLet thetirei nflation compressor run for a
maximum of te nminutes. The tire should then
hav eattained apressur eofatl east 200kPa
(2.0 ba r/29 psi) .
If ap ressur eof200 kP a(2.0 ba r/29 psi) ha s
been at tained after fiv eminutes, see" Tire pres-
sure reached" (
Ypage 274).
If at ire pressure of 200 kPa (2.0 bar/29 psi) has
not been attaine dafter fiv eminutes, see" Tire
pressure not reached" (
Ypage 274).
If tire sealant hase scaped ,clean it off affected
area sasq uickl yasp ossible. Use plai nwater if
possible.
If your clothesa resoile dwitht ire seala
nt, have
themc leanedwithp erchloroethylene at adry
cleane rassoona spossible.
Tire pressure no treached
Ifat ire pressure of 200 kPa (2.0 bar/29p si)h as
not been attaine dafter ten minutes:
XSwitch off the tire inflatio ncompressor.
XUnscrew the fille rhosef romt he valve of the
faulty tire.
Note thatt ire sealant maye scap ew heny ou
unscrew the fille rhose.
XUS Ao nly: veryslowl ydrive forwards or
revers eapproximately 30 ft (10 m).
XPump up the tire again.
After amaximum of ten minutes, the tire pres-
sure must be at leas t200 kPa (2.0 ba r/
29 psi) .
GWARNING
If the required tire pressure is not reached
afte rthe specified time ,the tire is too badly
damaged. The tire sealant cannot repai rthe
tire in this instance. Damaged tire sand atire
pressure that is too low can significantly
impai rthe vehicle's braking and driving char-
acteristics. There is ariskofa ccident.
Do not continu edriving .Contact aquali fied
specialist workshop.
Tire pressure reached
GWARNING
At ire temporaril yseale dwitht ire sealant
impairs the driving characteristics and is not
suitablef or higher speeds .There is arisko f
accident.
You shoul dtherefore adap tyou rd riving style
accordingly and drive carefully .Donot exceed
the specified maximum speed with atire that
hasb eenr epaired using tire sealant.
USA only: The maximum permissible speed for
at ire seale dwitht ire sealant is 50 mph
(80 km/h). The upper part of the TIREFIT sticker
mus tbea ffixed to the instrument cluster in the
driver'sf ield of vision.
274Flat tire
Breakdown assistance
Page 308 of 326
Uniform TireQualityG rading Standards
Aunifor mstandard to grade the quality of tires
with regards to tread quality, tire traction and
temperature characteristics. The quality grad-
ing assessmentism ade by the manufacturer
following specification sfrom the U.S .govern-
ment .The ratings are molded int othe sidewall of
the tire.
Recommended tir epressures
The recommended tire pressure applies to the
tires mounted at the factory.
The Tire and Loading Information placard con-
tains the recommended tire pressures for cold
tires on afully loaded vehicle and for the maxi-
mum permissible vehicle speed.
The tire pressure table contains the recommen-
ded pressures for cold tires for various operat-
ing conditions, i.e. differingl oad and speed con-
ditions.
Increased vehicle weight due to optional
equipment
The combined weight of all standard and
optional equipment available for the vehicle,
regardless of whether it is actually installed on
the vehicle or not.
Rim
This is the part of the wheel on which the tire is
mounted.
GAWR (Gross Axle Weight Rating)
The GAWR is the maximum gross axle weight
rating. The actual load on an axle must never
exceed the gross axle weight rating. The gross
axle weight ratin gcan be found on the vehicle
identification plate on the B-pillar on the driver's
side.
Speed rating
The speed ratin gispart of the tire identification.
It specifies the speed range for which the tire is
approved.
GVW (Gross Vehicle Weight)
The gross vehicle weight includes the weight of
the vehicle includin gfuel, tools, the spare wheel,
accessories installed, occupants, luggage and
the drawbar noseweight ,ifapplicable. The gross
vehicle weight must not exceed the gross vehi-
cle weight ratin gGVWR as specified on the vehi-
cle identification plate on the B-pillar on the
driver'ss ide.
GVWR(Gross Vehicle Weight Rating)
The GVWR is the maximum permissible gross
weight of afully loaded vehicle (the weight of the
vehicle includin gall accessories, occupants,
fuel, luggage and the drawbar n
oseweight
,if
applicable). The gross vehicle weight ratin gis
specified on the vehicle identification plate on
the B-pillar on the driver'ss ide.
Maximum loaded vehicle weight
The maximum weight is the sum of:
Rthe curb weight of the vehicle
Rthe weight of the accessories
Rthe load limit
Rthe weight of the factory installed optional
equipment
Kilopascal (kPa)
Metric unit for tire pressure. 6.9 kPa corre-
sponds to1psi. Another unit for tire pressure is
bar. 100 kilopascals (kPa) are the equivalent of
1b ar.
Load index
In addition to the load-bearin gindex ,the load
index may also be imprinted on the sidewall of
the tire. This specifies the load-bearin gcapacity
more precisely.
Curb weight
The weight of avehicle with standard equipment
includin gthe maximum capacityoff uel, oil and
coolant .Italso includes the air-conditionin gsys-
tem and optional equipment if these are instal-
led in the vehicle, but does not include passen-
gers or luggage.
Maximum load rating
The maximum tire load is the maximum permis-
sible weight in kilogram sorlbs for which atire is
approved.
Maximum permissible tir epressure
Maximum permissible tire pressure for one tire.
Maximum load on one tire
Maximum load on one tire. This is calculated by
dividing the maximum axle load of one axle by
two.
306All about wheels and tires
Wheels and tires
Page 310 of 326

Tire-mounting tools should not be used near
the valve. This could damage the electronic
components.
Only have tires changed ataqualified spe-
cialist workshop.
Observe the instructions and safety notes in the
"Changing awheel" section (
Ypage 307).
The wear pattern sonthe front and rear tires
differ, depending on the operating conditions.
Rotate the wheels before aclear wear pattern
has formed on the tires. Frontt ires typically
wear more on the shoulders and the rear tires in
the center.
On vehicles that have the same size front and
rear wheels, you can rotat ethe wheels accord-
ing to the intervals in the tire manufacturer's
warranty book in your vehicle documents. If no
warranty book is available, the tires should be
rotated every 3,000 to 6,000 miles (5,000 to
10,000k m).D ependin gontire wear, this may
be required earlier. Do not change the direction
of wheel rotation.
Clean the contact surfaces of the wheel and the brake disc thoroughly every time awheel is rota-
ted. Check the tire pressure and, if necessary,
restart the tire pressure loss warning system
(Canada only) or the tire pressure monitor (USA
only).
Direction of rotation
Tires with aspecified direction of rotation have
additional benefits ,e.g. if there is arisk of hydro-
planing. These advantages can only be gained if
the tires are installed corresponding to the
direction of rotation.
An arrow on the sidewall of the tire indicates its
correctd irection of rotation.
Storing wheels
Storewheels that are not being used in acool,
dry and preferably dark place. Protectt he tires
from oil, grease, gasoline and diesel.
Mounting awheel
Preparing the vehicle
XStop the vehicle on solid, non-slippery and
level ground.
XApply the electric parking brake manually.
XBring the front wheels into the straight-ahead position.
XShift the transmission to position j.
XSwitch off the engine.
XVehicles without KEYLESS-GO:remove the
SmartKey from the ignition lock.
XVehicles with KEYLESS-GO start-function
or KEYLESS-GO: open the driver's door.
The vehicle electronics are now in position
u.T his is the same as “key removed”.
XVehicles with KEYLESS-GO start-function
or KEYLESS-GO: remove the Start/Stop but-
ton from the ignition lock (
Ypage 122).
XMake sure that the engine cannot be started
via your smartphon e(Ypage 83).
XIf included in the vehicle equipment, remove
the tire-change tool kit from the vehicle.
XSafeguard the vehicle against rolling away
(Ypage 141).
iApart from certain country-specific varia-
tions, the vehicles are not equipped with a
tire-change tool kit. Some tools for changing a
wheel are specific to the vehicle. For more
information on which tools are required to
perform awheel change on your vehicle, con-
sult aqualified specialist workshop.
Necessary tire-changing tools can include, for
example:
RJack
RWheel chock
RLug wrench
308Changing awheel
Wheels and tires