2018 MERCEDES-BENZ CLA COUPE brake light
[x] Cancel search: brake lightPage 265 of 326

XDo not usehot water and do not wash the
vehicl eindirect sunlight.
XUse asofts po ngetoc lean.
XUseamildc leaning agent, such as acar
shampo oapproved by Mercedes-Benz.
XThoroughl yhosed ownthe vehicl ewithag en-
tle jet of water.
XDo not point the water jet directl ytowards the
ai ri nlet.
XUse plenty of water and rinse ou tthe sponge
frequently.
XRinse the vehicl ewithc lean water and dry
thoroughl ywithac hamois.
XDo not le tthe cleaning agent dry on the paint-
work.
Carefully remove al ldeposit sofroads alta s
soo naspossibl ew hend rivin ginw inter.
Powe rwashers
GWARNING
The water jet fromac ircular jet nozzle(dirt
blasters )can cause invisible exterio rdamag e
to the tire sorchassisc omponents. Compo-
nents damage dinthisw aymayf ailu nexpect-
edly .There is ariskofana ccident.
Do not us epower washers with circular jet
nozzles to clean the vehicle. Hav edamaged
tire sorc hassisc omponents replaced imme-
diately.
!Alway smaintain adistance of at least
11.8 in (30 cm )between the vehicl eand the
powe rwashern ozzle. Informatio nabout the
correct distance is availabl efromt he equip-
ment manufacturer.
Mov ethe powe rwashern ozzlearound when
cleaning your vehicle.
Do not ai mdirectl yata ny of the following:
RTires
RDoorg aps,roofgaps, joints, etc.
RElectrical components
RBattery
RConnectors
RLamps
RSeals
RTrim
RVentilatio nslots Damaged seals or electrical components can
lead to leaks or failures.
!Vehicles with decorative film: parts of your
vehicl earecovered with adecorative film.
Maintain adistance of at leas t27.5 in (70 cm)
between the parts of the vehicl ecovered with
the fil mand the nozzl eofthe high pressure
cleaner.
Informatio nabout the correct distance is
availabl efromt he eq uip
ment manufacturer.
Mov ethe powe rwashern ozzlearound when
cleaning your vehicle.
Cleanin gthe paintwork
!Do not affix:
Rstickers
Rfilms
Rmagnetic plate sorsimilar items
to painte dsurfaces .You could otherwise
damage the paintwork.
Scratches, corrosive deposits, area saffecte dby
corrosion and damage caused by inadequate
car ecanno talway sbec ompletel yrepaired .In
such cases, visit aquali fied specialis tworkshop.
XRemov edirti mmediately, where possible,
whil eavoidin grubbi ng too hard.
XSoakinsect remains with insect remove rand
rinse off the treated area safterwards.
XSoa kbirdd ropping swithw ater and rinse off
the treated area safterwards.
XRemov ecoolant, brake fluid ,tree resin, oils,
fuel sand greases by rubbing gently with a
cloth soaked in petroleu mether or lighter
fluid.
XUse tar remove rtoremove tar stains.
XUse silicone remove rtoremove wax.
If water no longe rforms "beads "onthe paint
surface, us ethe paint car eproducts recommen-
de da nd approved by Mercedes-Benz. Thi sisthe
cas eapproximately every threetof ivem onths,
depending on the climate conditions and the
car eproduct used.
If dirt hasp enetrated the paint surface or if the
paint hasb ecome dull ,the paint cleane rrecom-
mend ed a
nd approved by Mercedes-Benz
shoul dbeu sed.
Do not us ethese car eproducts in the sunoro n
the hoo dwhile the hoo dishot.
Care263
Maintenance and care
Z
Page 266 of 326

XUseasuitablet ouch-up stick, e.g. MB Touch-
Up Stick,tor epair slight damage to the paint-
work quickly and provisionally.
Mattef inish care
!Never polish the vehicle or the light alloy
wheels. Polishing causes the finish to shine.
!The following may cause the paint to
become shiny and thus reduce the matte
effect:
Rstrong rubbing of the paintwork with
unsuitablem aterials
Rfrequent use of automatic car washes
Rwashing the vehicle in direct sunlight
!Never use paint cleaner, buffing or polishing
products, or gloss preserver, e.g. wax, for the
purpose of paintwork care. These products
are only suitablef or high-gloss surfaces. Their
use on vehicles with matte paintwork leads to considerable surface damage or, more spe-
cifically,tos hiny, spotted areas.
Alwaysh ave paintwork repairs carried out at a
qualified specialist workshop.
!Do not use wash programs with ahot wax
treatment under any circumstances.
Observe these notes if your vehicle has aclear
matte finish. This will help you to avoid damage to the paintwork due to incorrect treatment.
These notes also apply to light alloy wheels with
ac lear matte finish.
The vehicle should ideally be washed by hand
using asoft sponge, car shampoo and plenty of
water.
Use only insect remover and car shampoo from
the range of approved Mercedes-Benz care
products.
Cleaning the vehiclep arts
Cleaning the wheels
GWARNING
The water jet from acircular jet nozzle (dirt
blasters) can cause invisible exterior damage
to the tires or chassis components. Compo-
nentsd amagedint his way may fail unexpect-
edly.T here is arisk of an accident.
Do not use power washers with circular jet
nozzles to clean the vehicle. Have damaged
tires or chassis componentsr eplaced imme-
diately.
!Do not use acidic wheel cleaning products
to remove brake dust. This could damage
wheel bolts and brake components.
!Do not park your vehicle for along period of
time directly after cleaning, particularlya fter
cleaning the wheel rim with wheel cleaner.
Wheel cleaner can lead to the increased cor-
rosion of the brake discs and pads. Therefore, drive for afew minutes after cleaning. By
heating up the brakes, the brake discs and
pads dry. The vehicle can then be parked for a
long period of time.
Cleaning the windows
GWARNING
You could become trapped by the windshield wipers if they start moving while cleaning the
windshieldorw iper blades. There is arisk of
injury.
Alwayss witch off the windshieldw ipers and
the ignition before cleaning the windshieldo r
wiper blades.
!Only fold the windshieldw ipers awayfrom
the windshieldw hen vertical. Otherwise, you
will damage the hood.
!Do not use dry cloths, abrasive products,
solvents or cleaning agents containing sol-
vents to clean the inside of the windows. Do
not touch the insides of the windows with
hard objects, e.g. an ice scraper or ring. There
is otherwise arisk of damaging the windows.
!Cleant he water drainage channels of the
windshielda nd the rear window at regular
intervals. Deposits such as leaves, petals and
pollen may under certain circumstances pre-
vent water from draining away. This can lead
to corrosion damage and damage to elec-
tronic components.
XCleant he inside and outside of the windows
with adamp cloth and acleaning product that
is recommended and approved by Mercedes-
Benz.
264Care
Maintenance and care
Page 282 of 326

Make sure that:
RThe jumper cables are not damaged.
RNon-insulated parts of the terminal clamps do not come into contact with other metal parts while
the jumper cables are connected to the battery.
RThe jumper cables cannot come into contact with parts that can move when the engine is running,
such as the V-belt pulleyorthe fan.
XSecure the vehicle by applying the electric parking brake.
XShift the transmission to position j.
XTurn the SmartKey to positiongin the ignition lock and remove it.
XSwitch off all electrical consumers, e.g. rear window defroster, lighting, etc.
XOpen the hood.
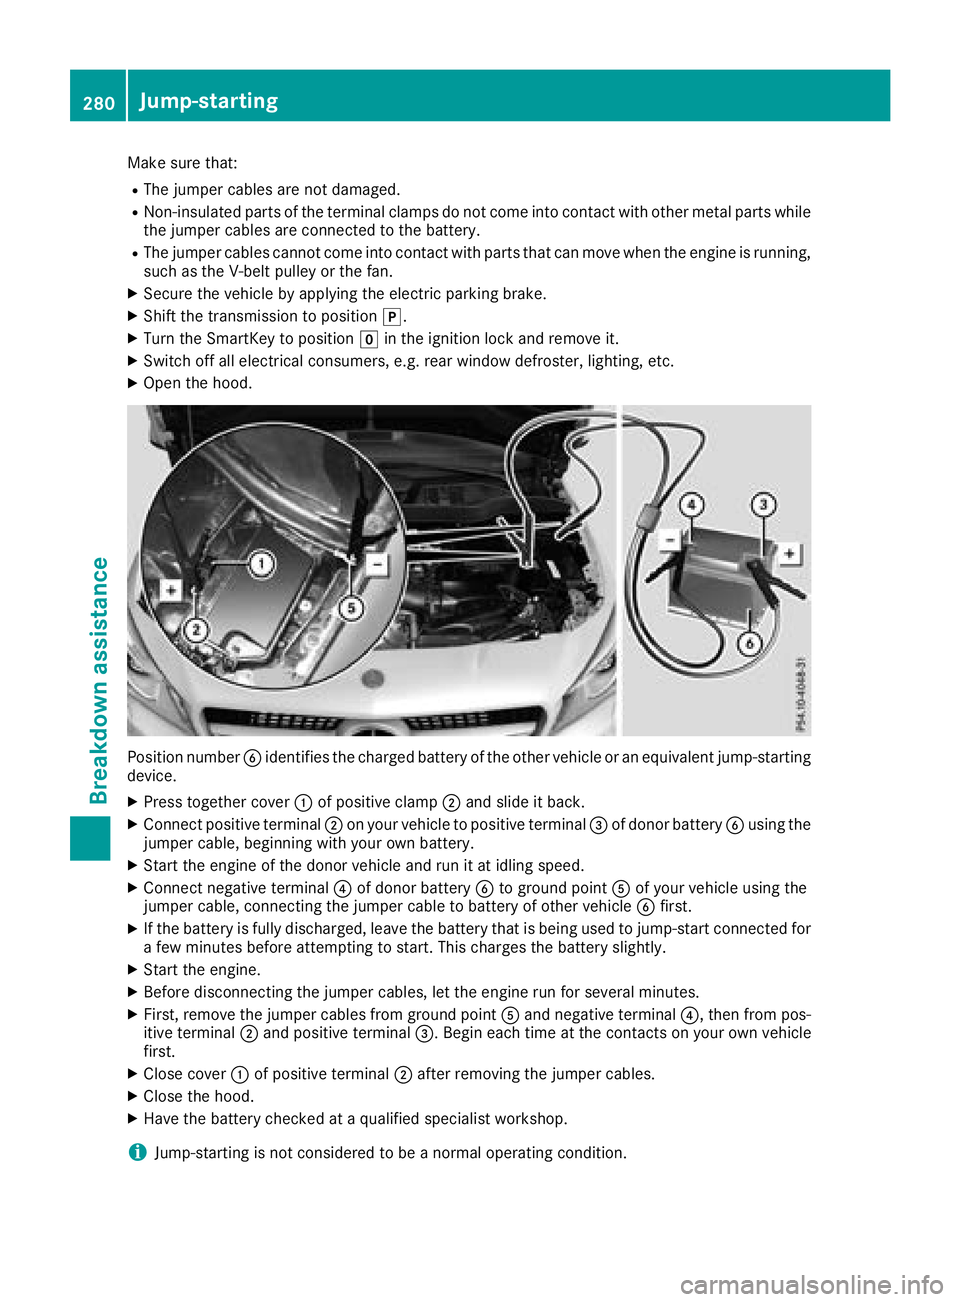
Position number Bidentifies the charged battery of the other vehicle or an equivalent jump-starting
device.
XPress together cover :of positive clamp ;and slide it back.
XConnect positive terminal ;on your vehicle to positive terminal =of donor battery Busing the
jumper cable, beginning with your own battery.
XStart the engine of the donor vehicle and run it at idling speed.
XConnect negative terminal ?of donor battery Bto ground point Aof your vehicle using the
jumper cable, connecting the jumper cable to battery of other vehicle Bfirst.
XIf the battery is fully discharged, leave the battery that is being used to jump-start connected for
afew minutes before attempting to start. This charges the battery slightly.
XStart the engine.
XBefore disconnecting the jumper cables, let the engine run for several minutes.
XFirst, remove the jumper cables from ground point Aand negative terminal ?,then from pos-
itive terminal ;and positive terminal =.Begin each time at the contacts on your own vehicle
first.
XClose cover :of positive terminal ;after removing the jumper cables.
XClose the hood.
XHave the battery checked at aqualified specialist workshop.
iJump-starting is not considered to be anormal operating condition.
280Jump-starting
Breakdown assistance
Page 309 of 326

PSI (pounds per squareinch)
Astandard unit of measure for tire pressure.
Aspect ratio
Relationship between tire height and tire width
in percent.
Tire pressure
This is pressure inside the tire applying an out-
ward force to each square inch of the tire's sur-
face. The tire pressure is specified in pounds per
square inch (psi), in kilopascal (kPa) or in bar.
The tire pressure should only be corrected when
the tires are cold.
Cold tire pressure
The tires are cold:
Rif the vehicle has been parked with the tires
out of direct sunlight for at least three hours
and
Rif the vehicle has not been driven further than
1m ile (1.6 km)
Tread
The part of the tire that comes into contact with
the road.
Bead
The tire bead ensures that the tire sits securely
on the wheel. There are several steel wires in the
bead to prevent the tire from coming loose from
the wheel rim.
Sidewall
The part of the tire between the tread and the
bead.
Weight of optional extras
The combined weight of those optional extras
that weigh more than the replaced standard
parts and more than 2.3 kg (5 lbs). These
optional extras, such as high-performance
brakes, level control, aroof rack or ahigh-per-
formanceb attery, are not included in the curb
weight and the weight of the accessories.
TIN (Tire Identification Number)
This is aunique identifier which can be used by
at ire manufacturer to identify tires, for example
for aproduct recall, and thus identify the pur-
chasers. The TIN is made up of the manufactur-
er's identity code, tire size, tire type code and
the manufacturing date.
Load bearing index
The load bearing index (also load index) is acode
that contains the maximum load bearing capa-
city of atire.
Traction
Traction is the result of friction between the tires
and the road surface.
Treadwear indicators
Narrow bars (tread wear bars) that are distrib-
uted over the tire tread. If the tire tread is level
with the bars, the wear limit of áin (1.6 mm)
has been reached.
Occupant distribution
The distribution of occupants in avehicle at their
designated seating positions.
Total load limit
Nominal load and luggage load plus 68 kg
(15 0lbs)m ultiplied by the number of seats in
the vehicle.
Changing awheel
Flat tire
The "Breakdown assistance" section
(Ypage 271) contains information and notes on
how to deal with aflat tire. Information on driv-
ing with MOExtended tires in the event of aflat
tire can be found under "MOExtended tires (tires
with run-flat characteristics" (
Ypage 271).
Rotating the wheels
GWARNING
Interchanging the front and rear wheels may
severely impair the driving characteristics if
the wheels or tires have different dimensions. The wheel brakes or suspension components
may also be damaged. There is arisk of acci-
dent.
Rotate front and rear wheels only if the wheels and tires are of the same dimensions.
!On vehicles equippedw ithatire pressure
monitor ,electronic components are located
in the wheel.
Changing awheel307
Wheels and tires
Z