Page 57 of 548

6.Remove the cap (E) on the normal
charge connector (F) and make sure that
there is no foreign matter such as dust at
the end of the normal charge connector and the normal charge port.
7. Connect the normal charge connector
until a click sound is heard without pressing the release button (G).
CAUTIONl Do not clasp the top of normal charge con-
nector. It could cause injury to touch the protrusion on the charging lid.NOTEl If the operation mode of the power switch is
ON with the EV charging cable remains
connected to the normal charge port, the
plug-in hybrid EV system does not turn ON.
l Do not connect or disconnect the normal
charge connector repeatedly in a short peri- od. Charging may not be started.
l If you want to turn the operation mode to
“OFF” from the “ACC” or “ON” position in
order to use an electrical device such as au- dio during charging, make sure that the se-lect position is in “P”, and press the power
switch to turn “OFF” without depressing the brake pedal.8. Make sure that the charging indicator
(H) on the instrument cluster is illumina-
ted.
If the charging indicator is not illumina-
ted, charging has not started.
Make sure that the normal charge port
and the plug are correctly connected, and
perform charging from Step 5 again.
Normal charging (charging method with rated AC 220-240V outlet)
3-14OGGE17E1Charging3
Page 58 of 548

NOTElWhen the normal charge connector is con-
nected to the charge port, the charging indi-
cator and charge port courtesy lamp will blink. When charging is started, the charging indicator illuminates and the charging portcourtesy lamp blinks 3 times.
l If you want to confirm the drive battery level
or the predicted charging time during charg- ing, one of the doors is opened or the multi
information display switch is operated, the drive battery level display (I) appears and
the predicted charging time display (J) ap- pears on the information screen in the multi
information display.
In addition, when the remaining time is less than 1 hour, the predicted charging time dis-
play (J) appears --:-- and does not indicate a
malfunction.
9. Charging is complete if the charging in-
dicator goes off. Pull out the normal charge connector while pressing the re-
lease button (K).
CAUTIONl Be sure to check the normal charge connec-
tor is removed from the normal charge port.The vehicle can be driven with the charge
connector inserted when it is not locked completely which may result in a serious ac-
cident.
Be sure the charge connector is removed
completely from the vehicle after the charg- ing is completed.NOTEl Charging can be stopped half way. In this
case, also pull out the normal charge connec-tor while pressing the release button. Press- ing the manual stop button on the control
box can also stop charging.
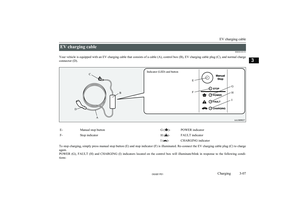
Refer to “EV charging cable” on page 3-07.
10. Close the inner lid and press the rear of
the charging lid until it clicks to close it.
WARNINGl After charging, be sure to close the inner
lid and charging lid completely.
Be careful that water or dust does not en-
ter in the normal charge port, inner lid and normal charge connector.
Entry of water or dust could cause an
electric leak, resulting in a fire or electric shock.NOTEl Make sure that the inner lid is completely
closed.
If the charging lid is forcibly closed without completely closing inner lid, the hinge on
the inner lid may be broken.
l While the charging lid is open, if the doors
and tailgate are locked with the central door
lock, the keyless entry system or the keyless operation system, the charging lid will lock
when the charging lid is closed.
l When the operation mode is switched to ON
while the charging lid is not completely
closed, a warning may be displayed on the information screen in the multi information
display.
Refer to “Warning display list” on page 6-25.
l If the charging lid is closed while the driv-
er’s door is locked, the charging lid will be locked.
11. Remove the charging cable plug from
the outlet.
Normal charging (charging method with rated AC 220-240V outlet)
3-15OGGE17E1Charging3
Page 59 of 548

12.Install the cap on the normal charge con-
nector.WARNINGl After charging, be sure to disconnect the
charge connector from the charge port.
If the charge connector is only partially
engaged and the connector latch is un-
locked, you could put the operation mode of the power switch in “ON” and the vehi-
cle could start moving. It could lead to an unexpected accident.NOTEl Make sure that the charging lid is complete-
ly closed before using an automatic car
wash. There is a possibility that the charging lid will be damaged if the lid is open.If the charging lid cannot be
unlocked
E08304400031
When the charging lid cannot be unlocked even if the driver’s door is unlocked, take the
following measure to open the charging lid. 1. Press the tab (A) of the lid located on the
right side of the luggage compartment to remove the lid.
2. Pull the rod (B) in the arrow direction to
unlock the charging lid.
NOTEl After taking the emergency measure, please
inspect at a MITSUBISHI MOTORS Au-
thorized Service Point immediately.Quick charging (charging
method with quick
charger)* E08301401196WARNINGlBe sure to use the quick charger applica-
ble to CHAdeMO standard and certified
by CHAdeMO association. Use of the oth- er quick charger may cause the fire or
malfunction.
l For operation of quick chargers, follow
the manual of each quick charger.
l If you use electro-medical apparatus such
as implantable cardiac pacemaker or im- plantable cardioverter-defibrillator, be careful the following precautions.
• Please do not use a quick charger.
• Keep away as much as possible from
the place where the quick charger is
stored. If you approach it carelessly, leave quickly without standing still.
• Please ask someone to perform the
quick charging if necessary.
l Before charging, make sure that there is
no foreign matter such as dust at the
quick charge port and the quick charge
connector.
At this time, do not touch the quick charge port.
Quick charging (charging method with quick charger)*
3-16OGGE17E1Charging3
Page 60 of 548

WARNINGlWhen the quick charge connector is con-
nected to the quick charge port, prevent foreign matter such as water or dust fromentering in the port.
Connection with foreign matter such as
water or dust may cause fire or an electric shock. Do not perform charging if there
might be strong exposure to water at the
connection.
l During charging, the cooling fans inside
the bonnet room may automatically be operated even if the operation mode of the
power switch is in OFF.
Keep your hands away from the cooling
fan during charging.NOTEl During quick charging, quick charging is
stopped by putting the operation mode of thepower switch in ON.
l If the charge connector is not easily connec-
ted to the charge port due to foreign material
entering, never force the connection. Doing so could damage the charging equipment or the vehicle. Contact a MITSUBISHI
MOTORS Authorized Service Point.
l The quick charger might be installed in the
public parking space, some chargers are not
suitable for this vehicle. Check the manual
of each quick charger when charging.NOTEl The charge connector and the EV charging
cable stick out of the vehicle body while charging, so be careful that your body does
not get stuck with them or they do not touch the next vehicle.
l The vehicle equipped with a quick charge
port is compatible with most CHAdeMO *1
connectors on charging stations.
l Make sure to lock the doors to prevent theft,
etc. during charging.
l When using a quick charger, make sure that
the time available is enough so that the quick
charging can be finished in the time availa- ble.
If the power supply of the quick charger is shut off during quick charging, it could leadto a vehicle failure.
1. Firmly apply the parking brake, press the
electrical parking switch to shift into the
“P” (PARK) position and put the opera-
tion mode of the power switch in the “OFF” position.
2. Unlock the driver’s door to unlock the
charging lid.
*1 CHAdeMO is a standard for quick charging of
electric vehicle originally started in Japan, andthe contents have also become an international
standard.3. Push the rear portion of the charging lid
(A) until it clicks, and open the charging lid.NOTEl The charging lid is unlocked in conjunction
with unlocking of the driver’s door as thefollowing condition.
• The operation mode is put in “OFF” or
“ACC”.
• The selector lever position is “P”
(PARK).
l When the charging lid cannot be unlocked
even if the driver’s door is unlocked. Open
the charging lid manually by using the re- lease lever inside of the interior trim in thecargo room.
Refer to “If the charging lid cannot be un- locked” on page 3-16.
Quick charging (charging method with quick charger)*
3-17OGGE17E1Charging3
Page 61 of 548

4.Press the tab (B) to open the inner lid
(C).WARNINGl Do not leave the inner lid open for a long
time.
It could cause an electric leak, a fire or an electric shock by water or dust entering
into the quick charge port.
l Do not touch the metal terminal of the
quick charge port (D) and the quick
charge connector.
Doing so could cause an electric shock and/or malfunction.CAUTIONl Be sure to insert the quick charge connector
straight into the quick charge port right up to
the base.
Failure to do so may result in the drive bat- tery not charging or could cause damage to the charging equipment.
l During quick charging, the quick charge
connector cannot be removed because it is locked. Do not touch or remove the quick
charge connector during charging. Doing so, the quick charge connector might be dam-
aged. If you want to stop the quick charging
on the way, stop the charging according to
the procedures of a quick charger, and re- move the quick charge connector after con-
firming the charging is stopped.NOTEl There is a hole on the charge port for water
drainage. If this hole is blocked and watergets trapped in the charge port, do not
charge. Contact a MITSUBISHI MOTORS
Authorized Service Point.
l If the charge port is frozen, melt the ice us-
ing a hair drier. Forcing the charge connec-
tor to connect while frozen could result in malfunction.5. Connect the quick charge connector in
the quick charge port to begin charging.
For connecting and disconnecting, fol- low the instruction manual for each
quick charger.
6. Make sure that the charging indicator
(E) on the instrument cluster is illumina-
ted.
Quick charging (charging method with quick charger)*
3-18OGGE17E1Charging3
Page 62 of 548

If the charging indicator is not illumina-
ted, charging is not started.
Follow the manual of each quick charg-
er.NOTEl When the quick charge connector is connec-
ted to the charge port, the charging indicator
is blinking. When charging is started, the charging indicator is illuminated.
l If you want to confirm the drive battery level
during charging, open one of the doors or operate the multi information display switch,
the drive battery level display (F) appears on the information screen in the multi informa-tion display.
Although the predicted charging time dis- play (G) appears, the charging time for the
quick charging is about 30 minutes and dis- played “--:--” in the screen and you cannot
confirm the remaining charging time.
l Operation noise may be heard from the vehi-
cle body during quick charging.
This noise comes from the operation of the drive battery cooling system, and it is not a malfunction.
l Since the drive battery cooling system uses
cool air of the air conditioning, the air condi-tioning is automatically operated.
After quick charging, if the area under the vehicle is wet, transparent and loose, it is de-
humidified water from the air conditioning and not a malfunction.7. Charging is complete when the charging
indicator turns off.
Disconnect the quick charge connector according to the manual of the quick
charger.CAUTIONl As the quick charge connector is heavier in
comparison to the normal charge connector,
allowing it to drop could cause damage to the vehicle or charge connector or personal injury. When removing the connector, be
sure to pull it out straight and as carefully as possible.
l Do not leave the quick charge connector
connected to the quick charge port after
charging.
Doing so, someone might stumble and it could cause an injury or the quick chargeport might be damaged by playing it.NOTEl Although it is possible to start the electric
motor unit if quick charging has not finishednormally, the charging indicator is continu-
ously blinking. In such a situation, perform quick charging again and finish it normally
or contact a MITSUBISHI MOTORS Au-
thorized Service Point.
8. Close the inner lid and press the rear of
the charging lid until it clicks to close it.
WARNINGl After charging, be sure to close the inner
lid and the quick charging lid completely.
Be careful that water or dust does not en-
ter in the quick charge port, inner lid and
quick charge connector.
Entry of water or dust could cause fire, electric shock or short circuit.
l After charging, be sure to disconnect the
charge connector from the charge port.If the charge connector is only partially
engaged and the connector latch is un-
locked, you could put the operation mode of the power switch in “ON” and the vehi-
cle could start moving. It could lead to an unexpected accident.NOTEl If the operation mode of the power switch is
put in ON with the quick charge connector
connected to the quick charge port, the plu-
gin hybrid EV system cannot be started.
Be sure to disconnect the quick charge con- nector before start.
l Charging may be completed before full
charge. This is a control for efficient charge
and not a malfunction.
To achieve full charge, repeat charging from
Step 5 again.
Quick charging (charging method with quick charger)*
3-19OGGE17E1Charging3
Page 63 of 548
NOTElMake sure that the inner lid is completely
closed.
If the charging lid is forcibly closed without completely closing inner lid, the hinge on
the inner lid may be broken.
l While the charging lid is open, if the doors
and tailgate are locked with the central door
lock, the keyless entry system or the keyless operation system, the charging lid will lock
when the charging lid is closed.
l When the operation mode is switched to ON
while the charging lid is not completely
closed, a warning may be displayed on the information display of the multi information
display.
Refer to “Warning display list” on page
6-25.
Quick charging (charging method with quick charger)*
3-20OGGE17E1Charging3
Page 64 of 548

Charging troubleshooting guideE08301501197SymptomPossible causePossible solutionCharging cannot be
started.The operation mode of the power
switch is in the “ON” position.Put the operation mode of the power switch in “OFF” before charging.The drive battery is already fully
charged.Charging cannot be performed if the drive battery is already fully charged. Charg- ing automatically turns off if the drive battery is fully charged.The temperature of the drive bat-
tery is too high or too low to
charge.Confirm the drive battery temperature.
Refer to “Cautions and actions to deal with intense heat” on page 2-11 and “Cau-
tions and actions to deal with intense cold” on page 2-11.The auxiliary battery is dis-
charged.The drive battery cannot be charged if the vehicle electrical systems cannot be
turned on. If the auxiliary battery is discharged, charge or emergency start the aux- iliary battery.
Refer to “Emergency starting” on page 9-07.The vehicle or the charging cable
has a malfunction.The vehicle or charging cable may have a malfunction. Confirm if the warning
lamp on the meter is illuminated. Confirm if the indicator on the control box is in-
dicating a malfunction. If a warning is displayed, stop charging and contact a
MITSUBISHI MOTORS Authorized Service Point.Normal charging can-
not be started.There is no electrical power com-
ing from the outlet.Confirm that there has not been a power failure. Make sure the breaker is on. If an
outlet with a timer device installed is used, power will only be available at the time
set by the timer.
Confirm if the POWER indicator on the control box is illuminated.The charge connector is not con-
nected correctly.Confirm the charge connector is connected correctly.The charge connector was connec-
ted and disconnected repeatedly in
a short time.Disconnect the charge connector, wait for a while, then start charging procedure again from the beginning.
Charging troubleshooting guide
3-21OGGE17E1Charging3