Page 33 of 236

a:,
a:,
...... N r--. N
'"' 0 0 ::, a:,
@ Tips
-The luggage compartment lid can be oper
ated manually if the vehicle battery is low.
It is necessary to use more force when doing
th is. Move the lid slowly to reduce the
amount of force needed .
- When the vehicle is locked, the luggage
compartment lid can be unlocked separately by p ressing the
c:5 button on the remote
control key. The luggage compartment lid
l ocks automatically when it is closed again.
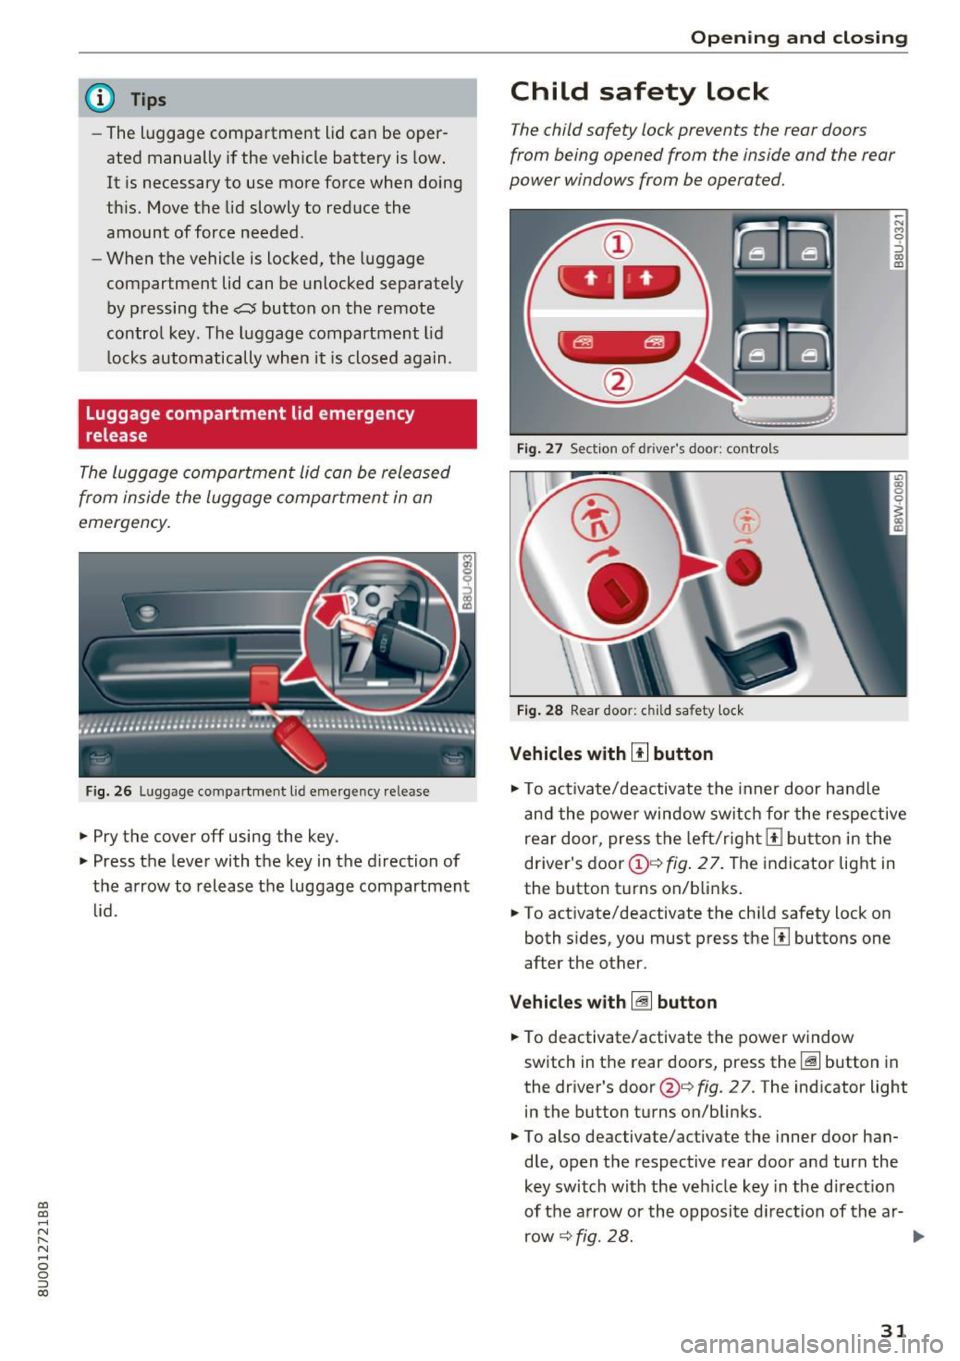
Luggage compartment lid emergency
release
The luggage compartment lid can be released
from inside the luggage compartment in an
emergency.
F ig. 26 Lu gg age compar tment lid eme rge ncy re le ase
.,. Pry the cover off using the key .
.,. Press the lever with the key in the d irection of
the arrow to release the luggage compartment
li d.
Open ing and closing
Child safety lock
The child safety lock prevents the rear doors
from being opened from the inside and the rear
power windows from be opera ted.
Fig. 27 Section of d river 's doo r: control s
Fig. 28 Rear door : ch il d safety lock
Vehicles with III button
N
"' 0
:::> Q) ID
.,. To act ivate/deactivate the inner door handle
and the powe r window switch for the respective
rear door, press the left/r ight
m bu tton in the
driver's
door lJ)' =~ fig . 27 . The indicator light in
the button turns on/blinks.
.,. To activate/deactivate the child safety lock on
both sides, you must press them buttons one
after the other.
Vehicles with ~ button
.,. To deactivate/activate the power window
switch in the rear doors, press the~ button in
the driver 's door @~
fig. 2 7 . The indicator light
in the button turns on/blinks .
.,. To also deactivate/activate the inner door han
dle, open the respective rear door and turn the
key switch with the veh icle key in the direct ion
of the arrow or the opposite d irection of the ar-
row
~ fig. 28. Ill-
31
Page 34 of 236

Opening and clo sin g
_&. WARNING
Always take the veh icle key with you when
leaving the vehicle, even for a short period of
time. Th is applies particularly when children
remain in the vehicle . Othe rw ise children
cou ld start the engine or operate elect rical
equipment (s uch as power windows), w hich
increases the risk of an accide nt.
Power windows
Controls
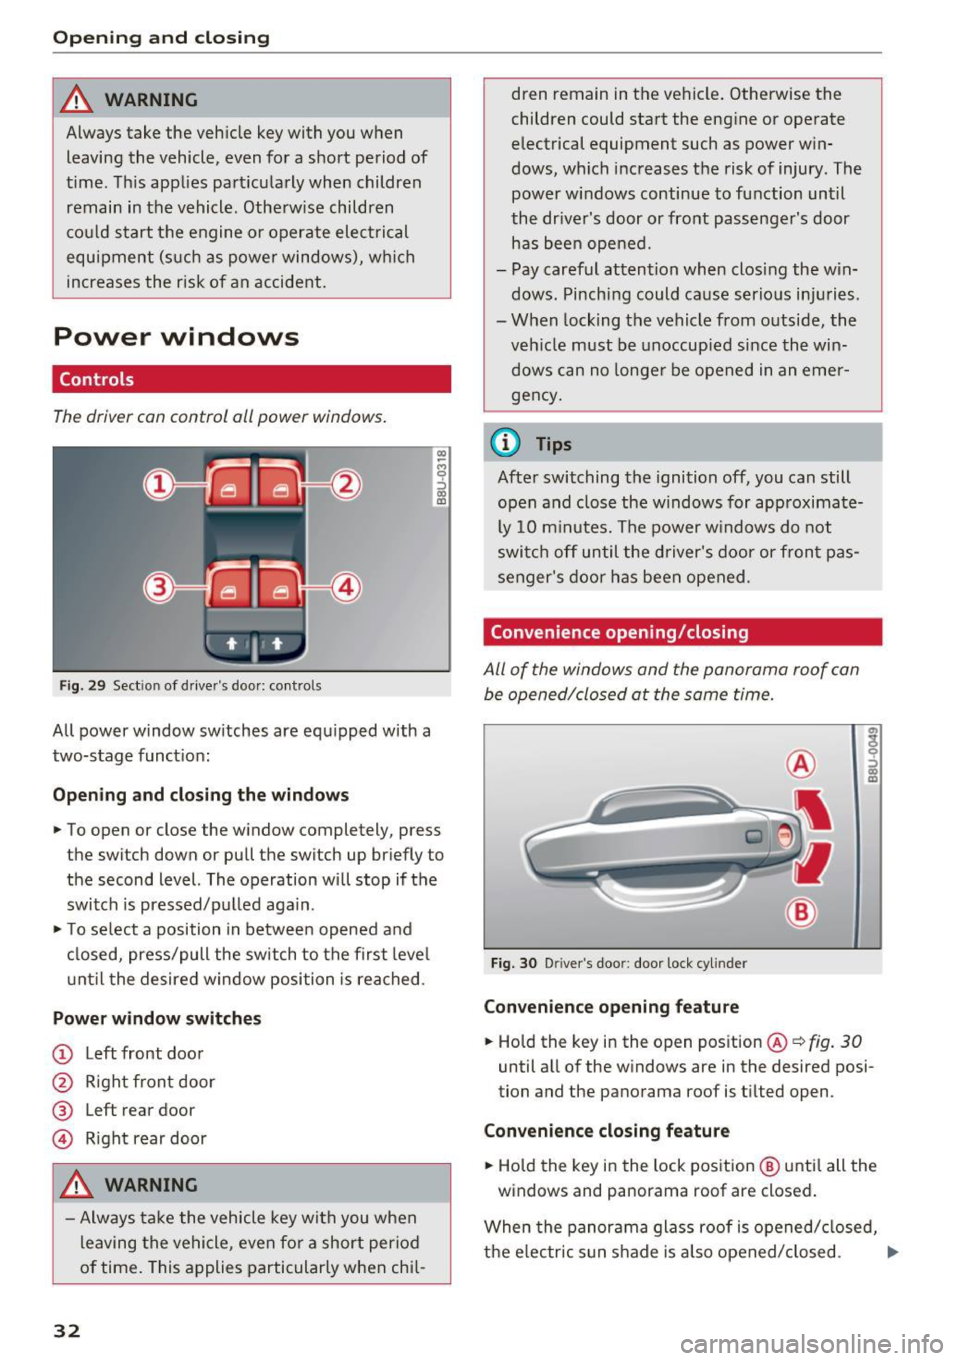
The driver can control all power windows.
Fig. 29 Sect ion of dr ive r's doo r: controls
All power window switches are equ ipped with a
two-stage funct ion:
Open ing and clo sing the window s
.. To open or close the w indow completely , press
the switch down or pull the switch up br iefly to
the second level. The operation will stop if the
switch is pressed/pulled aga in.
• To select a position in between opened and
closed, press/pull the switch to the first leve l
u nt il t he desired window position is reached .
Power window switch es
(D Left front door
@ R ight front door
@ Left rear door
© R ight rear door
_&. WARNING
- Always take the vehicle key with you when
leaving the vehicle, even fo r a short per iod
of time. This applies particularly when chi l-
32
.
dren remain in the vehicle . Otherwise the
children could start the eng ine or operate
electrical equipment such as power win
dows, wh ich increases the risk of injury. The
power windows continue to function until
the dr iver's door or fro nt passenger's door
has bee n ope ned.
- Pay caref ul attention when clos ing the w in
dows. Pinching could ca use serio us inju ries.
- When locking the vehicle from outside, the
veh icle must be unoccup ied since the win
dows can no longe r be opened in an emer
ge ncy.
{1) Tips
After switching the ignition off, you can still
open and close the windows fo r approximate·
l y 10 m inutes. The power w indows do not
swi tc h off until the driver's door or fron t pas
senger's door has bee n opened.
Convenience opening /closing
All of the windows and the panorama roof can
be opened/closed at the same time.
Fig . 30 D river's door: door lock cyli nder
Con venience opening feature
• Hold the key in the open position@¢ fig. 30
until all of the windows are in the desired posi
tion and the panorama roof is tilted open.
Convenience closing feature
• Hold the key in the lock position @ unti l all the
windows and panorama roof are closed .
When the panor ama glass roof is opened/ closed,
the e lec tric s un shade is a lso opened/closed. .,..
Page 35 of 236

a:,
A WARNING
-Never close the windows or panorama g lass
roof carelessly or in an uncontrolled man
ner, because this increases the risk of injury.
- For security reasons, the windows and the
panorama glass roof can only be opened
and closed w ith the remote control key at a
maximum distance of approximate ly 2 m
away from the vehicle. Always pay attention
when using the~ button to close the win
dows and the panorama glass roof so that
no one is pinched. The closing process will
stop immediate ly when the~ button is re
leased .
Correcting power window malfunctions
You can reactivate the one-touch up/down func
tion if it malfunctions.
"Pull the power window sw itch up until the win
dow is completely ra ised .
" Release the switch and pull it up again for at
least one second.
" Press the power window switch until the win
dow is comp lete ly lowered.
" Release the switch and press it again for at
least one second. Now you can close the win
dow as usual.
Panorama glass roof
Opening/closing the roof
App lies to : ve hicles wit h panorama g lass roof
Fig. 31 Front hea dliner : panor ama roof butto ns
lg
9 ::, co a,
~ @ Tilting the roof N
~ "To tilt the sunroof completely, press the~ 0
g button up br iefly to the second level. a:,
Opening and closing
"To close the sunroof completely, pull the~
button down briefly to the second level
c::> .&, .
.. To set a position between opened and closed,
press/pull the~ button up to the first level
until the desired position is reached.
® Sliding the roof
.. To open the sunroof completely, slide the but
ton ~ toward the rear briefly to the second lev
el.
" To close the sunroof completely, slide the~
button forward briefly to the second level
c:;> .&,.
"To select a partia lly open pos ition, slide the~
button forward/back to the first level until the
desired posit ion is reached.
© Opening and closing the sun shade
"To completely open the sun shade, briefly press
the right button .
" To completely close the sun shade, br iefly press
the left button.
" To stop the sun shade , press the corresponding
button again.
You can st ill operate the panorama glass roof for
about 10 minutes after the ignit ion is switched
off. The switch is deactivated once the driver's or
front passenger's door is opened.
& WARNING
Be careful when closing the panoramic sun
roof -otherwise serious inju ry could result!
For this reason, always remove the ignition
key when leaving the vehicle.
(D Note
-
Always close the panorama g lass roof when
l eav ing yo ur vehicle. Rain can cause damage
to the interior equipment of your veh icle, par
ticularly the electronic equ ipment.
(D Tips
- For information about convenience open
ing/closing, refer to
c:> page 32.
- The panorama roof will only open down to
-4°F (-20°).
33
Page 36 of 236
Opening and closing
Emergency closing the roof
Applies to: vehicles with panorama glass roof
If an object is detected when closing, the panora
ma glass roof* will open again automatically . In
this case, you can then close it with the power
emergency closing function.
"'Pull the respective button
r:::) page 33, fig. 31
within five seconds after the roof opens auto
matically and hold until the panorama glass
roof* is closed.
34
Page 37 of 236

a:,
a:,
...... N r--. N
'"' 0 0 ::, a:,
Lights and Vision
Exterior Lighting
Switching lights on and off
Fig. 32 Instrument panel: l ig ht switc h
Light switch ·'!;5- ·
Turn the switch to the corresponding position.
When the lights are sw itched on, the
;oo: symbol
turns on.
0 -lights off. On some market-specific vers ions,
the daytime running lights* will switch on when
the ign ition is switched on in this position .
-USA model s: the daytime running lights sw itch
on automatically when the ignition is switched
on and the light switch is in the
O position or in
the
AUTO position (on ly in daylight) . The Day
tim e running lights
can be switched on and off
in the radio or the MMI*
c:> page 36, c:> A.
-Canada models: the dayt ime running lights
switch on automatically when the ignition is
switched on and the light switch is set to the
0
pos ition, ;oo: o r the AUTO position (o nly in day
li gh t)
c::> A .
AUTO* -automatic headlig hts switch o n and off
dependi ng on br ightness, fo r example in tw ilight,
d ur ing ra in or in tunne ls .
::oo: -Parking lights
io -Low beam headlights
~- All weat he r ligh ts. T urn the swi tch to pa rking
light
; oo : or low beam head light io . Pull the
sw itch up to the first notch@.
@il -Rea r fog lig hts . T urn the sw itch to par king
l ight
;oo; o r low beam head lig ht gD. Pull the
sw itch up to the secon d no tch @.
Lights and V ision
All-weather lights
T he fro nt lights a re adju sted au to mat ic a lly so
t h at there is less g lare for the driver from his o r
her own lights, fo r example whe n roads a re wet.
Automatic dynamic headlight range control
system
Your vehicle is equip ped with a headlight r ange
contro l system so that there is less g lare for on
coming traff ic if the vehicle load changes . The
headlight range also adjusts automatically when
braking a nd accelerat ing .
Static cornering light*
The s tat ic co rnering light may be available de
pending on vehicle equipment and it only works
whe n the light switc h is in t he AUTO position. The
corner ing light sw itches on automat ically at
speeds up to approximately 44 mph (70 km)
whe n the steeri ng wheel is at a certain angle. The
area to the side of the veh icle is illuminated be t
te r when tur ning .
A WARNING
-Automatic headlights * are on ly inten ded to
assis t the driver. They do n ot relieve the
d river o f respons ibility to check the head
lights and to turn them on manua lly based
on the current light and vis ibility conditions.
For examp le, fog cannot be detected by the
light sensors . So always switch on the low
beam under these weat her condit ions an d
when dr iv ing in the da rk
gD .
-The rear fog lights shou ld only be turned on
in acco rdance w it h traffic regulations, to
p revent glare for traffic behind your vehicle.
- Always observe legal regulations when us
i n g the lighting systems desc ribed.
(D Tips
- The light sensor for the automat ic head
lights * is in the rearview mir ror mount. Do
not p lace any st ickers in this a rea on t he
w indshield.
- Some exter io r light ing funct ions can be ad
justed
c:> page 36.
35
Page 38 of 236

Lights and Vision
-If you turn off the ignition whi le the exter ior
lights are on and open the door, a warning
tone sounds.
- In cool o r damp weather, the inside of the
headlights, turn s ignals and tail lights can
fog over due to the temperature d if f erence
between the inside and outside. They will
clear short ly after switch ing them on. This
does not affect the serv ice life of the light
i ng .
Turn signal and high beam lever
The turn signal lever operates the turn signals,
the high beams and the headlight flasher .
Fig. 33 Turn signal and high beam lever
Tu rn signals ¢ 9
The turn s ignals activate when you move the lev
er into a turn s ignal position w hen the ign ition is
sw itched on.
@ -righ t turn signal
@ -left turn s ignal
The turn signal blinks three times if you just tap
the lever.
High b eams and headl ight flasher ~D
Move the lever to the co rrespo nd ing pos it ion .
@ -high beams on
© -high beams off or headlight flasher
The
II indicator light in the instrument cluster
turns on .
A WARNING
High beams can cause glare fo r other drivers,
w hi ch increases the risk of an accident. For
36
this reason, only use the high beams or the
headlight flasher when they will not create
glare for other dr ivers.
Adjusting the exterior lighting
The functions are adjusted in the Infotainment
system .
.,.. Sele ct: !CAR ! function b utton> (Car ) Systems *
control button > Vehicle settings > Exte rior
lighti ng.
Coming home, Leaving home*
The coming home fun ction ill umin ates the a rea
outside the vehicle when you tu rn the ignit io n off
and open the driver's doo r. To turn the func tion
on, select
Light s when leaving car > On .
The leaving home illum ina tes the area ou tside
the ve hicle when yo u un lo ck the vehicle . To turn
the function on, se lect
Lights when unlocking >
On .
The coming home and leav ing home func tions
on ly opera te when it is dar k and the l ight switc h
i s in the
AUTO position.
Daytime running lights*
USA models :
the daytime running lights can be
swit ched on/off. Sele ct
On or Off .
Canada models:
this function cannot be sw itched
off . They activate automatically each time the ig
nit ion is switched on .
Emergency flashers
Fig. 3 4 Center conso le: emerge ncy flasher button
The emergency flashers makes other drivers
aware of your veh icle in dange rous situations.
In N 0
~ Cl) m
Page 39 of 236

a:,
a:,
...... N r--. N .... 0 0 ::, a:,
"' Pr ess the &I. button to switch the emergency
flashers on or off.
You can indicate a lane change or a turn when the
em ergency flashers are switched on by using the
turn signal lever . The eme rg ency flashers stop
t e mporarily .
The emergency flashers also work when the igni
tion is turned off.
(D Tips
You shou ld sw itch the emergency flashers on
if:
- You are the last car in a traff ic jam so that
all othe r vehicles approach ing from beh ind
ca n see you , or if
- You r vehicle has bro ken down or you are
having an emergency, or if
- Your vehicle is being towed or if you a re
tow ing another vehicle .
Interior Lighting
Front interior lighting
Fig . 35 Hea d lin er: fr ont in ter ior l ighting (e xample)
Press th e app licab le button :
~ -Interior lighting on/off .
0
~
"' a,
lil-Door contact switch on/off . T he interior light
ing is controlled automatically .
~ -Re ad ing lights * on/off .
Lights and V ision
Rear interior lighting
Applies to: vehicles with rear reading lights
Fig. 36 Rear headl in er: read ing ligh ts (e xampl e)
"'To turn a reading l ight on/off, press the bu tton
~ or~ *.
Interior lighting
Applies to: vehicles with interior lighting
The In terior lighting can be adjusted in the Info
tainment system" .
"'In the Infotainment system*, select: ICARI
fun ction button > (C ar) Syste ms * cont rol but
ton
> Veh icle se tting s > Inte rior lighting .
Instrument illumination
You can adjust the background brightness of the
ins trumen ts and di splay illumina tion *.
F ig. 37 In str ume nt ill umin ation
"' To red uce or increase the b rightness, turn the
thumbwhee l down or up.
(D Tips
The need les and gauges i n the inst rument
cluster illumi nate when the headlights a re off
Iii>
37
Page 40 of 236

Lights and Vision
and the ignition is switched on . The illum ina
tion reduces automatica lly and eventually
turns
off as brightness outs ide decreases.
This function reminds the driver to turn the
low beams on at the appropriate time .
Vision
Adjusting the exterior mirrors
Fig . 38 D river's doo r: kn ob fo r th e ex te ri or m irrors
T u rn the knob to the desired pos ition:
Q/P -Adjus ting the left/ righ t exterior m irror .
Move the knob in the desired dire ction .
®l-Heating * th e mirror glass d epending on the
outs ide temperature .
8 -Folding exterior mirrors*.
Front passenger's exterior mirror tilt
function*
To he lp you see the curb w hen ba cking into a
parking space, the surface of the mirror tilts
slightly. For this to happen, the knob must be in
the position for the front passenger 's outs ide
mir ror .
You can adjust the tilted mirror surface by turn
ing the knob in the desired direction. When you
move out of r everse and into another g ear, the
new mirror position is stored and assigned to the
key you are us ing .
The mirror goes back into its origina l position
once yo u drive forward faster than 9 mph
( 1 5 km/h) or turn the ignition
off.
38
A WARNING
Curved mirror surfaces (for example convex)
e nla rge the field of vision. However, they
make ob jects in the mirro r appear smaller
a nd farther away . Your may est imate inco r
rect ly w hen you use these mirro rs to gauge
your dista nce from the veh icles beh ind you
when chang ing lanes , whi ch in cr eases the risk
of an acc ident .
(D Note
-If the m irror housing w as moved by outside
f o rces ( such as a n impac t when maneuve r
ing), yo u m ust use the power folding fu nc
tion to fo ld the mirror all the way out. The
mi rror housing must not be moved back in
to place by hand because t his wou ld impair
the funct ion of the mirror mechanism .
- If you wash the vehicle in an automatic ca r
wash, you must fold the exter ior mirrors in
to reduce the r isk of damage to the m irrors.
Never fold power fo ld ing exterior mirrors*
by hand . Only fold them in and out using
the power con trols.
(D Tips
If the power ad justing function ma lfunctions,
the glass in both m irrors can be adjusted by
pressing on the edge of it by hand .
Dimming the mirrors
Your vehicle is equipped with a manual or auto
matic dimming rearview mirror .
Fig. 39 A uto mat ic dimmin g rearview m irro r*
Manual dimming rearview mirror*
....
0 0
> ~ m
"" Pull the lever on the bot tom of the m irro r b ack . Ill-
 1
1 2
2 3
3 4
4 5
5 6
6 7
7 8
8 9
9 10
10 11
11 12
12 13
13 14
14 15
15 16
16 17
17 18
18 19
19 20
20 21
21 22
22 23
23 24
24 25
25 26
26 27
27 28
28 29
29 30
30 31
31 32
32 33
33 34
34 35
35 36
36 37
37 38
38 39
39 40
40 41
41 42
42 43
43 44
44 45
45 46
46 47
47 48
48 49
49 50
50 51
51 52
52 53
53 54
54 55
55 56
56 57
57 58
58 59
59 60
60 61
61 62
62 63
63 64
64 65
65 66
66 67
67 68
68 69
69 70
70 71
71 72
72 73
73 74
74 75
75 76
76 77
77 78
78 79
79 80
80 81
81 82
82 83
83 84
84 85
85 86
86 87
87 88
88 89
89 90
90 91
91 92
92 93
93 94
94 95
95 96
96 97
97 98
98 99
99 100
100 101
101 102
102 103
103 104
104 105
105 106
106 107
107 108
108 109
109 110
110 111
111 112
112 113
113 114
114 115
115 116
116 117
117 118
118 119
119 120
120 121
121 122
122 123
123 124
124 125
125 126
126 127
127 128
128 129
129 130
130 131
131 132
132 133
133 134
134 135
135 136
136 137
137 138
138 139
139 140
140 141
141 142
142 143
143 144
144 145
145 146
146 147
147 148
148 149
149 150
150 151
151 152
152 153
153 154
154 155
155 156
156 157
157 158
158 159
159 160
160 161
161 162
162 163
163 164
164 165
165 166
166 167
167 168
168 169
169 170
170 171
171 172
172 173
173 174
174 175
175 176
176 177
177 178
178 179
179 180
180 181
181 182
182 183
183 184
184 185
185 186
186 187
187 188
188 189
189 190
190 191
191 192
192 193
193 194
194 195
195 196
196 197
197 198
198 199
199 200
200 201
201 202
202 203
203 204
204 205
205 206
206 207
207 208
208 209
209 210
210 211
211 212
212 213
213 214
214 215
215 216
216 217
217 218
218 219
219 220
220 221
221 222
222 223
223 224
224 225
225 226
226 227
227 228
228 229
229 230
230 231
231 232
232 233
233 234
234 235
235


