Page 57 of 236

00
00
......
"' ,-...
"' ...... 0 0 :::,
00
e / e Adju sting th e te mpe ratur e
The temperat ure can be free ly adjusted using the
l eft dial.
~ Ad justing the seat heating*
You can adjust the left and right heated seat
temperature using the left/ right t humbwheel.
The seat heating is switched off when the level is
set to 0.
~ Sw itching the rear window defogger on
and off
The rear window defogger only operates when
the eng ine is running. It switches off a utomati
cally after approximate ly 10 to 20 minutes, de
pending on the outside temperature.
Adjusting air d istribution and air vents
You can adjust the vents where the air wi ll flow
out of. The a ir distribution is eas ily adjusted be
tween the two symbols positioned next to each
other
(®/;J/~/ ~).
In the ~ setting, the windshield and side win
dows are defrosted or cleared of condensation as
q ui ckly as possible. The maxim um amount of a ir
Warm and c old
flows mainly from the vents below the wind
shield. Recirculation mode switches off .
You can open o r close the center a nd rear vents in
the co ckpit and the vents in the rear center con
sole using the ridged thumbwheels . The levers
adjust the direction of the airflow from the vents.
A WARNING
-- You shou ld not use the recircu lation mode
for an extended period since no fresh air is
drawn in. When the A/C system* is switched
off, the windows can fog up which increases
the risk of an accident.
- Individuals w ith reduced sensit ivity to pa in
or temperature could develop burns when
using the seat heat ing* function. To reduce
the risk of injury, these individua ls should
not use seat heating*.
0 Note
To avoid damaging the seat heat ing* ele
ments, do not kneel on the seats or place
heavy pressure on one area of the seat.
55
Page 58 of 236
 i")
Warm and cold
Automatic climate control system
Applies to: vehicles with automatic climate control
Pressing the IAU TO I button and setting the temperature to +72 °F (22 °C) is recommended.
Fig . 67 Au to m atic cli mate co ntrol system contro ls
Press the buttons to turn the functions on or off .
The LED in a button will light up when the func
tion is sw itched on.
IO FF ! Switching the climate cont rol s ystem
on and off
The IO FFI button switches the cl imate contro l
system on or off. Airflow from outside is b locked
when the climate con trol system is switched off .
IA/Cl Switching the cooling mode on and off
The air is not cooled and humidity is not removed
when cooling mode is switched off. This can
cause fog on the windows . The cooling mode
sw itches off automatically when the re are cold
ou tside temperat ures .
1.,,.,. 1 Switching recirculation mode on and off
To switch on the rec irculat ion mode, press the
ldb •I but ton . The lower LED in the button t urns on .
I n recirculation mode, the a ir inside the vehicle is
56
c irculated and filtered . This prevents the unf il
te red air outs ide the veh icle from entering the
vehicle inte rior. We recommend sw itching re cir
cu lation mode on when d riving through a t unnel
o r when si tt ing in traffic ~.&. .
The
! AUTO I b utton or~ button switches rec i rcu
l at ion mode off.
T o switc h on the automat ic recirculation mode,
press the
l dbA I button again . T he upper LED in the
button turns on . Recirculation mode sw itches on
automat ica lly when the eng ine is cold, if you are
dr iv ing in reverse. The a ir quality sensor that is
designed for d iesel and gasoline exhaust auto
matically sw itches the recircu lation mode on or
off depend ing on the level of pollutants in t he
outside air. Automatic recircu lation mode is time
restricted when cooling mode (A/C) is switched
off and frost temperatures are iden tified.
IJ,-
Page 59 of 236

IAUTOI Switching automatic mode on and off
Automatic mode ma inta ins a constant tempera
ture ins ide the vehicle. Air temperature, airflow
and air distribution are controlled automatically.
- I -Adjusting the temperature
The vehicle inte rior temperature can be adjusted
for the driver and the front passenger us ing the
l eft/rig ht knob. Temperatures can be set be
tween a range o f 60 °F ( +16 °() and 84 °F
(+28 °C) . Outside of this range,
LO or HI will ap
pear in the climate control system display. At
both of these settings, the climate contro l sys
tem runs continuously at maximum cooling or
heating power. There is no temperature regula
tion .
~ Adjust ing the blower
You can adjust the vo lume of air generated by the
blower to your preference. Use the left
l!:I button
to decrease the air speed, and use the right
lj]
button to increase the air speed . The blower
should always run at a low sett ing to prevent the
windows from fogging and to ensure a continu
ous exchange of air ins ide the veh icle. To have
the airflow regulated automatically, press the
IAUTO! button.
~/l;o!/ h0! Adjusting air distribution
You can manually select the vents where the air
will flow. The buttons can be pressed individually
or in combination with each other. To have the air
d is tribution regulated automatical ly, press the
IAUTO ! button.
~ Adjusting the seat heating*
Pressing the button switches the seat heating on
at the h ighest setting (level 3). The LEDs indicate
the temperature level. To reduce the tempera
ture, press the butto n again . To switch the seat
heating off, press the button repeatedly until the
LED turns off.
Afte r approximately 10 minutes, the seat heating
a utomatically switches from level 3 to level 2.
00
~ I@ MAXI Switching the defroster on and off
"' ,....
~ The windshield and s ide windows are defrosted 0
g or cleared of condensation as quickly as possible.
00
Warm and cold
The maximum amount of air flows mainly from
the vents below the windshield . Recirculation
mode switches off. The temperature should be
set at +72°F (22°() or higher.
T he
!AUTOI button switches the defroster off.
llilil REAR! Switching the rear window defogger
on and off
T he rear window defogge r on ly operates when
the engine is running and will be automatically
switched off after approximate ly 10 minutes .
Synchronization
If you press the
IAUTO I button longer, you can
transfe r the d river temperature setting to the
front passenger. Synchronization is switched off
as soon as the temperature for the front pas
senger's s ide is changed.
Air vents
You can open o r close the center and rear vents in
the cockpit and the vents in the rear center con
sole using the ridged thumbwheels . The levers
adjust the direction of the airflow from the vents.
Switching the temperature measurement
units
T he temperature display can be switched be
tween°( and °F. Press and hold the
l ,e,,: ,.I button
r=;, fig. 67 and turn the knob on the driver's side to
- for three seconds.
A WARNING
-
-You shou ld not use the recirculation mode
for an extended period of time since no
fresh air is drawn in. With the air-condition
ing switched off, the windows can fog up,
which increases the risk of an acc ident.
- Indiv iduals w ith reduced sensit iv ity to pain
or temperature could develop burns when
using the seat heating* function. To reduce
the risk of injur y, these individua ls should
not use seat heating*.
0 Note
To avoid damaging the seat heating* ele
ments, do not kneel on the seats or place
heavy pressure on one area of the seat.
57
Page 60 of 236
.
For the first 600 miles (1,000")
Driving
Driving
General information
Breaking in
A new vehicle must be broken in, and the break in distance should be 1,000 miles (1,500 km).
For the first 600 miles (1,000 km), do not drive
at speeds that are more than 2/3 of the maxi
mum permitted RPM, avoid full acceleration and
do not tow a trailer. You may gradually start in
creasing the RPM and the speed between 600 miles (1,000 km) and 1,000 miles (1,500 km) .
During the first hours of use, the engine has a
higher internal friction than later on when all
moving parts have settled into place with each
other.
How the vehicle is driven during the first 1,000
miles (1,500 km) also affects the engine quality.
Drive at moderate engine speeds after the initial
break-in period, particularly when running a cold
engine . This will reduce engine wear and improve
the mileage .
Do not drive at too
low of an engine speed (rpm).
Shift down if the engine stops running "smooth ly". Extremely high engine speeds are automati
cally reduced .
Avoid damaging the vehicle
When you are driving on poor roads, or over
curbs, steep ramps , etc., make certain that low
lying parts such as spoilers and exhaust system
parts do not bottom out and get damaged.
This is especially true for vehicles with low-slung
chassis (sports chassis)* and fully loaded
vehicles.
Driving through water on roads
Note the following to reduce the risk of vehicle
damage when driving through water, for example
on flooded roads:
- The water must not be any higher than the bot
tom of the vehicle body.
- Do not drive faster than walking speed.
58
A WARNING ,_
After driving through water or mud, the effec
tiveness of the brakes may be reduced due to
moisture on the brake rotors and brake pads.
A few careful brake applications should dry
off the brakes.
([) Note
Vehicle components such as the engine,
transmission, suspension or electrical system
can be severely damaged by driving through
water.
(D Tips
- Determine the depth before driving through
water.
- Do not stop the vehicle, drive in reverse or
switch the engine off when driving through
water.
- Keep in mind that oncoming vehicles may
create waves that raise the water level and
make it too deep for your vehicle to drive
through safely.
-Avoid driving through salt water, because
this can cause corrosion.
Economical and environmentally-friendly
driving
The amount of fuel consumption, the environ
mental impact and the wear to the engine,
brakes and tires depends mostly on your driving
style . With an anticipatory and economic driving
style, fuel consumption can be reduced by ap proximately 10-15%. The following tips will help
you conserve the environment and your money at
the same time.
Anticipatory driving
A vehicle uses the most fuel when accelerating .
When you drive with anticipation, you do not need to brake as often and so you accelerate less.
When possible , let your vehicle coast with a gear
engaged, for example, when you notice that the
next traffic light is red. This produces an engine
braking effect, which helps to protect the brakes
and tires and reduces the emissions and fuel
...
Page 61 of 236
.
Shift efficiently
An effective way to save fuel is to upshift earlier .
Stay")
00
00
......
"' ,....
"' ...... 0 0 :::,
00
consumption to zero (fuel shut-off during decel
eration).
Shift efficiently
An effective way to save fuel is to upshift earlier .
Staying in a gear too long uses fuel unnecessari
ly. Press down on the accelerator pedal slowly
and avoid "kick-down".
Avoid full acceleration
You should rarely travel at the maximum vehicle
speed. High speeds cause a disproportionately
high increase in fuel consumption, emissions and
traffic noise. Slower driving saves fuel.
Reduce idling time
There are benefits to stopping the engine, for ex
ample when at railroad crossings or traffic lights
with longer red lights. Stopping the engine for
30-40 seconds already saves more fuel than the
amount of extra fuel needed to restart the en
gine.
It takes a very long time in idle to warm the en
gine up to operating temperature . Wear and
emissions are especially high in the warm-up
phase. Therefore, you should begin driving im
mediately after starting the engine. Avoid high
RPMs while doing this.
Have maintenance performed regularly
By having maintenance performed regularly on
your vehicle, you can help to reduce fuel con
sumption before you even start to drive. The maintenance condition of your vehicle not only
affects traffic safety and long-term value but al
so impacts
fuel consumption. A poorly main
tained engine can lead to fuel consumption that
is 10% higher than normal.
Also check the
oil level when refueling. The oil
consumption
depends largely on the engine load
and speed . It is normal for the oil consumption
of a new engine to reach its lowest point only af
ter a certain amount of use. Therefore, the oil
consumption can only be properly judged after
approximately 3,000 miles (5,000 km) have been
driven.
Driving
Fewer short trips
The engine and catalytic converter have to reach
their optimal
operating temperature to reduce
fuel consumption and noxious emissions effec
tively.
Just after starting, a cold engine in a mid-size car
only achieves a fuel economy of 6-8 mpg
(30-40 l/100 km). After about a half a mile, fuel
economy climbs to 12 mpg (20 l/100 km). After
about 2.5 mi
(4 km), the engine is at its proper
operating temperature and fuel economy has
reached a normal level. So you can see that you
should avoid short trips whenever possible .
The
outside temperature is also critical in this re
gard. Your car consumes more fuel in the winter
than in the summer.
@ Note
Do not leave engine idling unattended after
starting. If warning lights should come on to indicate improper operation, they would go
unheeded. Extended idling also produces
heat, which could result in overheating or
other damage to the vehicle or other proper
ty.
(D Note
- Have your vehicle maintained properly and
in accordance with the service recommenda
tions in your Warranty & Maintenance book
let. Lack of proper maintenance as well as
improper use of the vehicle will impair the
function of the emission control system and could lead to damage.
- Do not alter or remove any component of
the Emission Control System unless ap
proved by the manufacturer.
- Do not alter or remove any device, such as
heat shields, switches, ignition wires,
valves, which are designed to protect your
vehicle's Emission Control System and other
important vehicle components .
(j) Tips
The consumption estimates as published by
ENVIRONMENTAL PROTECTION AGENCY
(EPA) and Transport Canada may not
59
Page 62 of 236

Driving
correspond to you r actua l consumption on the
road, which will vary depending upon vehicle
load and speed, road and weather conditions,
trip length, etc.
Steering
Adjusting the steering wheel position
The steering column can be adjusted up and
down and forward and back.
F ig . 68 Lever u nde r the stee ring column
.,. Tilt the lever downward ¢ _A.
.,. Bring the steering wheel into the desired posi
tion .
.,. Press the lever upward again until it locks in
place .
.&_ WARNING
Improper use of steer ing whee l adjustment
and improper seating position can cause ser i
ous pe rsonal injury.
- Adjust the steering wheel column on ly when
the vehicle is not mov ing to prevent loss of
vehicle control.
- Adjust the driver's seat o r steering wheel so
that there is a minimum of 10 in (25 cm)
be tween your chest and t he s teering wheel
~ page 101, fig. 101 . If yo u cannot main
tain this minimum distance, the airbag sys
tem cannot protect you properly.
- If physica l limitations prevent you from sit
t ing 10 in (25 cm)
or more from the steer
ing wheel, check with your authorized Audi
dealer to see if adaptive equipment is avail
able .
- If the steering wheel is aligned with your
face, the supplemental driver's airbag can-
60
not provide as much protect ion in an acci
dent. Always make sure that the steer ing
wheel is aligned with your chest.
- Always hold the steering wheel with your
hands at the 9 o'clock and 3 o'clock posi
tions to reduce the risk of personal in jury if
the driver's airbag deploys .
- Never hold the steering wheel at the 12
o'clock position or with your hands inside
the steering wheel rim or on t he steering
wheel hub . Holding the steering wheel the
wrong way can cause serious in juries to the
h an ds, arm s and head if the drive r's airbag
deploys.
Starting and stopping
the engine (vehicles with an ignition lock)
Starting the engine
Applies to: vehicles wit h ignition lock
The ignition is switched on and the engine start
ed with the key in the ignition.
Fig. 69 Ign it ion lock : pos ition of the ig ni tio n key
Switching the ignition on/off
.,. To switch the ignition on, turn the ignition key
to position
(D .
.,. To switch the ignit ion off, turn the ignition key
to position @.
Starting the engine
.,. Press the brake pedal and move the selector
lever to the P or N posit ion.
.,. Turn the key to position @. The ignit ion key au
tomatically returns to posit ion
(D . Do not press
the accelerator peda l when doing this . ..,.
Page 63 of 236

00
00
......
"' ,....
"' ...... 0 0 :::,
00
E quipment that uses a lot of electricity is switch
ed off temporari ly when you start the engine.
I f the engine does not start im mediately, stop
the s tart ing proced ure and repeat afte r 30 sec
onds. To restart the engine, t urn the ignition key
back to position @.
A WARNING
-Never allow the engine to run in confined
spaces -danger of asphyxiation .
- Never remove the ignition key from the igni
tion look while the vehicle is moving. Other
wise, the steering lock could suddenly en gage and you would not be able to steer the
vehicle .
- Always take the key with you whenever you
leave your vehicle. Otherw ise, the engine
could be started or electrical equ ipme nt
such as the power windows cou ld be operat
ed . T his can lead to serious injury.
- Never leave children or persons requiring as
sistance unattended in the vehicle. The
doo rs can be loc ked using the remote trans
mitter, preventing people from escap ing
from the vehicle on the ir own in the event o f
an emergency. Depend ing on the t ime of
year, peop le inside the vehicle can be ex
posed to very high or very low tempera
tures .
(D Note
Avoid high engine speed, full throttle, and
heavy engine load if the engine has not
reached operating temperature yet. You could
damage the engine.
@ For the sake of the environment
Do not let the engine run while parked to
warm up. Begin driving immediately . This re
duces unnecessary emissions.
(D Tips
- If it is difficu lt to turn the key to position
(D, turn the steering wheel back and forth
slightly to release the steering wheel lock .
- Some noise after starting the engine is nor
mal and is no cause for concern.
D riving
Stopping the engine
App lies to : vehicles wi th ignition lock
Stopping the engine
.,. Br ing the veh icle to a full stop.
.,. Tu rn the key to position @.
Engaging the steering lock
Requirement: the selector lever must be in P.
.,. Remove the ignition key in position @
¢ page 60, fig. 69 ¢ .&_.
.,. Turn the steering wheel until you hear the
steering whee l lock .
The locked steering helps prevent vehicle theft.
A WARNING ....._ --Never turn off the engine before the vehicle
has come to a complete stop. The full func
tion of the brake booster and the power
steer ing is not guaranteed. You must use
more force to turn or brake if necessary. Be
cause yo u cannot stee r and brake as you
usually would, th is could lead to crashes
and serious injuries .
- For safety reasons, you should always park
your veh icle w ith the selector lever in P.
Otherwise, the vehicle could inadvertently
ro ll away .
- The radiator fan can continue to run for up
to 10 minu tes even after you have turned
off the engine and removed the ignition key.
The radiator fan can also turn on again if the
engine coolant heats up because of intense
sunlight or heat build-up in the eng ine com
partment.
- Always take the key with you whenever you leave your vehicle. Otherwise, the engine
could be started or electrical equipment
such as the power windows could be operat
ed. This can lead to ser ious injury.
- Never leave children or persons requ iring as
sistance unattended in the vehicle . The
doors can be locked using the remote t rans
mitter, preventing people from escaping
from the vehicle on their ow n in the event of
an emergency . Depending on the time of
year, people inside the vehicle can be
61
Page 64 of 236

Driving
exposed to very high or very low tempera
tures.
CD Note
If the engine has been under heavy load for
an extended period of time, heat builds up in
the engine compa rtment after the engine is
sw itched off and there is a risk of damaging
the engine. For this reason, let the engine run
at idle for approximately two minutes before
shutt ing it off .
Starting and stopping
the engine (vehicles with
a convenience key)
Starting the engine
Applies to: vehicles with convenience key
The I START E N GINE STOP I button switches the
ignition on and starts the engine .
Fig. 70 Center conso le : STAR T ENGINE S TOP b utt o n
Starting the engine
.,. Press t he b rake pedal and pu t the sele ctor leve r
into P or N .
.,. Press the
I S TART ENGINE STOPI button . The
engine wi ll start .
If the engine does not sta rt immed iate ly, stop
the starting procedure by pushing the
I START ENGINE STOP I button again and repeat
after 30 seconds.
Switch ing the ignition on/off
If you wou ld like to swi tch the ig nition on wi th
out starting the e ngine, fo llow these steps:
.,. Press the
I S TAR T ENGIN E STOPI button with
out
press ing the brake pedal.
62
.,. To switch the ignition off, press the button
again.
A WARNING
- Never a llow the engine to run in conf ined
spaces -danger of asphyx iat ion.
- Never turn off the engine until the vehicle
has come to a complete stop.
- Always take the key with you whenever yo u
leave your vehicle . Otherwise, the engine
could be started or electrical equipment
such as the powe r windows could be operat
ed. This can lead to serious injury .
- Never leave children o r persons requ iring as
sistance unattended in the ve hicle. The
doors can be locked us ing t he remote trans
m itter, p reventing peop le from escaping
from the vehi cle on their own in the even t of
an emergen cy. Depending on t he time of
year, peo ple ins ide the veh icle can be ex
posed to very high o r very low tempera
tures .
CD Note
Avoid high engi ne spee d, full t hrott le, and
h eavy engine load if the e ngine has not
reached operat ing temperatu re ye t. You could
d amage the eng ine.
@ For the sake of the environment
D o not le t the eng ine run wh ile parked to
warm up. Beg in driving immed iate ly . Th is re
d uces un necessa ry emissions .
@ Tips
Some noise after s tarting the eng ine is nor
mal and is no ca use for concern .
Stopping the engine
Applies to: vehicles with convenience key
.,. Bring the vehicle to a full stop .
.,. Select the P or N se lector lever position .
.,. Press the
I START E NGINE STOP I button
¢ page 62, fig. 70.
-
 1
1 2
2 3
3 4
4 5
5 6
6 7
7 8
8 9
9 10
10 11
11 12
12 13
13 14
14 15
15 16
16 17
17 18
18 19
19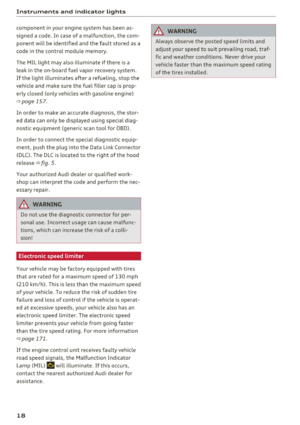 20
20 21
21 22
22 23
23 24
24 25
25 26
26 27
27 28
28 29
29 30
30 31
31 32
32 33
33 34
34 35
35 36
36 37
37 38
38 39
39 40
40 41
41 42
42 43
43 44
44 45
45 46
46 47
47 48
48 49
49 50
50 51
51 52
52 53
53 54
54 55
55 56
56 57
57 58
58 59
59 60
60 61
61 62
62 63
63 64
64 65
65 66
66 67
67 68
68 69
69 70
70 71
71 72
72 73
73 74
74 75
75 76
76 77
77 78
78 79
79 80
80 81
81 82
82 83
83 84
84 85
85 86
86 87
87 88
88 89
89 90
90 91
91 92
92 93
93 94
94 95
95 96
96 97
97 98
98 99
99 100
100 101
101 102
102 103
103 104
104 105
105 106
106 107
107 108
108 109
109 110
110 111
111 112
112 113
113 114
114 115
115 116
116 117
117 118
118 119
119 120
120 121
121 122
122 123
123 124
124 125
125 126
126 127
127 128
128 129
129 130
130 131
131 132
132 133
133 134
134 135
135 136
136 137
137 138
138 139
139 140
140 141
141 142
142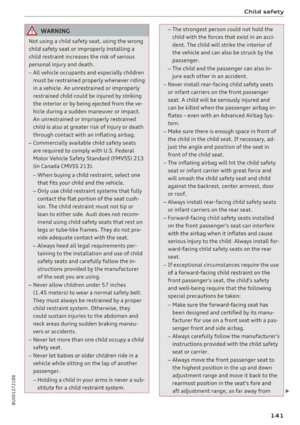 143
143 144
144 145
145 146
146 147
147 148
148 149
149 150
150 151
151 152
152 153
153 154
154 155
155 156
156 157
157 158
158 159
159 160
160 161
161 162
162 163
163 164
164 165
165 166
166 167
167 168
168 169
169 170
170 171
171 172
172 173
173 174
174 175
175 176
176 177
177 178
178 179
179 180
180 181
181 182
182 183
183 184
184 185
185 186
186 187
187 188
188 189
189 190
190 191
191 192
192 193
193 194
194 195
195 196
196 197
197 198
198 199
199 200
200 201
201 202
202 203
203 204
204 205
205 206
206 207
207 208
208 209
209 210
210 211
211 212
212 213
213 214
214 215
215 216
216 217
217 218
218 219
219 220
220 221
221 222
222 223
223 224
224 225
225 226
226 227
227 228
228 229
229 230
230 231
231 232
232 233
233 234
234 235
235