Page 49 of 268

47
108_en_Chap03_ergonomie-confort_ed01-2016
ensure that no person or object
prevents the seat slide from returning to
its initial position.
Check that the seat belt has reeled in
correctly so as to not impede access for
passengers to the rear seats.
Heated seat controlAccess to the rear seats
(3-door)
F Pull this control toward you to fold the seat
back and move the seat for ward.
When returning the seat to its initial position,
guide it back until the seat and backrest lock
into place.
With the engine running, the front seats can be
heated separately.
F
P
ress the control switch.
t
h
e indicator lamp comes on.
F
P
ressing the switch again stops the
heating.
the
temperature is controlled automatically.
the
seat heating function is deactivated about
two minutes after switching off the ignition.
t
o
r
eactivate it, switch the ignition on and press
the control switch again. Switch the seat heating off as soon
as it is no longer needed, as reducing
the vehicle's electrical current demand
reduces fuel consumption.
3
ease of use and comfort
Page 50 of 268
48
108_en_Chap03_ergonomie-confort_ed01-2016
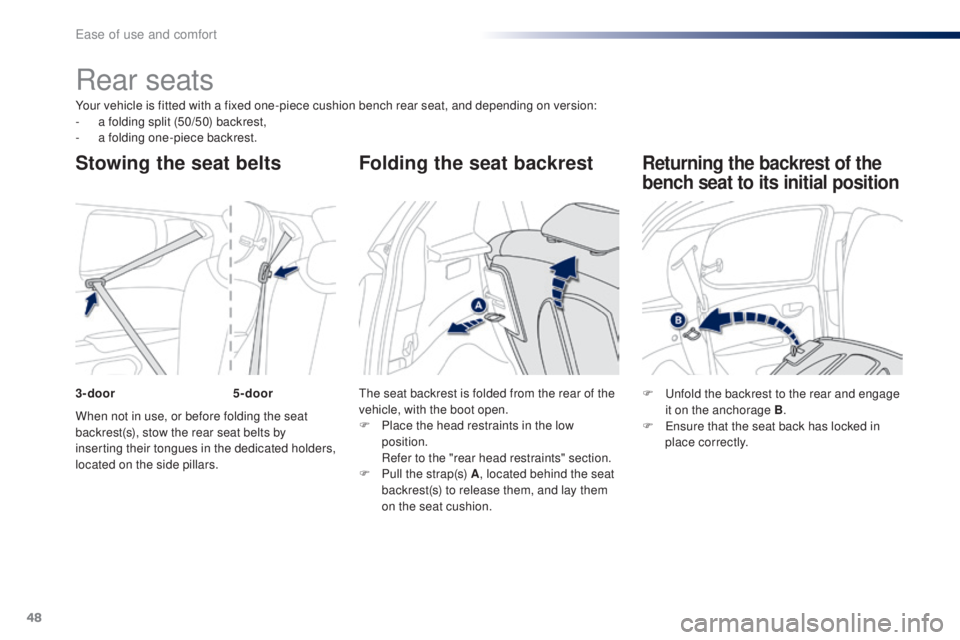
Your vehicle is fitted with a fixed one-piece cushion bench rear seat, and depending on version:
- a f olding split (50/50) backrest,
-
a f
olding one-piece backrest.
When not in use, or before folding the seat
backrest(s), stow the rear seat belts by
inserting their tongues in the dedicated holders,
located on the side pillars.
th
e seat backrest is folded from the rear of the
vehicle, with the boot open.
F
P
lace the head restraints in the low
position.
R
efer to the "rear head restraints" section.
F
P
ull the strap(s) A, located behind the seat
backrest(s) to release them, and lay them
on the seat cushion.
Rear seats
Stowing the seat belts Folding the seat backrest
F unfold the backrest to the rear and engage it on the anchorage B .
F
e
n
sure that the seat back has locked in
place correctly.
Returning the backrest of the
bench seat to its initial position
3-door 5-door
ease of use and comfort
Page 51 of 268
49
108_en_Chap03_ergonomie-confort_ed01-2016
Rear head restraints*
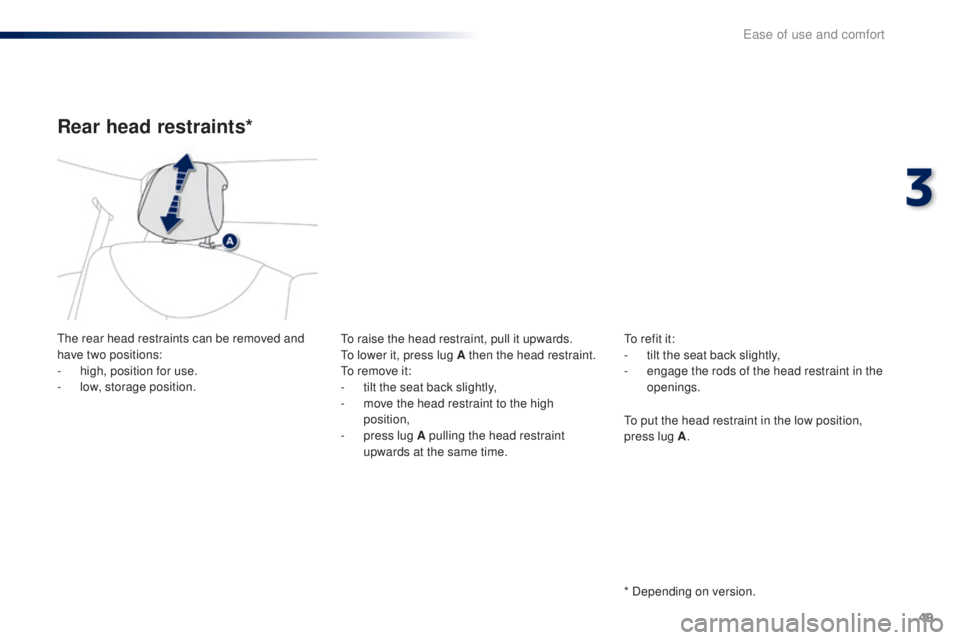
the rear head restraints can be removed and
have two positions:
-
h
igh, position for use.
-
lo
w, storage position.to r aise the head restraint, pull it upwards.
to l
ower it, press lug A then the head restraint.
to r
emove it:
-
t
ilt the seat back slightly,
-
m
ove the head restraint to the high
position,
-
p
ress lug A pulling the head restraint
upwards at the same time.to refit it:
-
t
ilt the seat back slightly,
-
e
ngage the rods of the head restraint in the
openings.
* Depending on version.
to p
ut the head restraint in the low position,
press lug A .
3
ease of use and comfort
Page 52 of 268
50
108_en_Chap03_ergonomie-confort_ed01-2016
Mirrors
Manual door mirrors
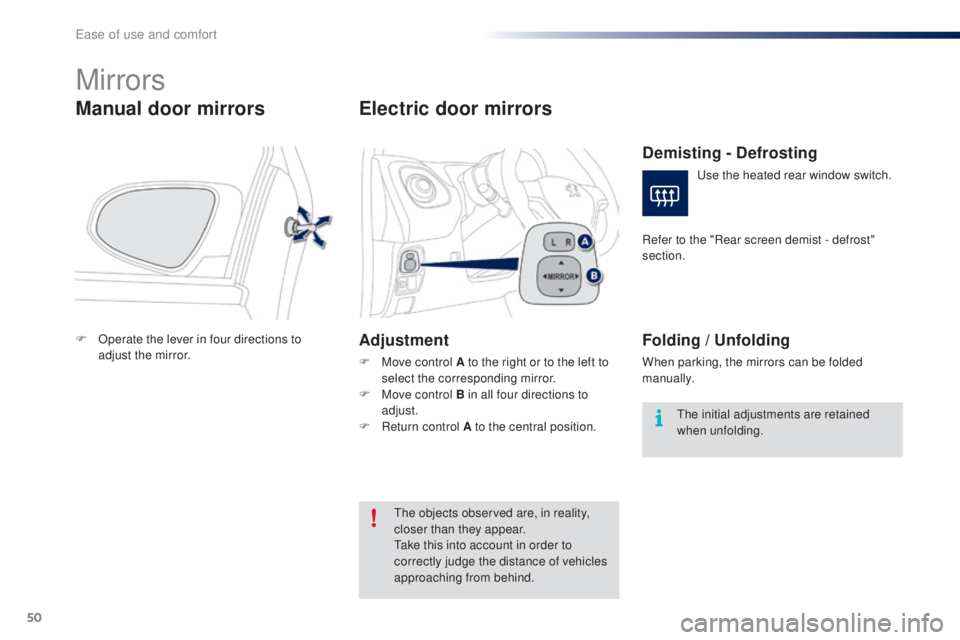
F Operate the lever in four directions to adjust the mirror.
electric door mirrors
Adjustment
F Move control A to the right or to the left to select the corresponding mirror.
F
M
ove control B in all four directions to
adjust.
F
R
eturn control A to the central position.
th
e objects observed are, in reality,
closer than they appear.
ta
ke this into account in order to
correctly judge the distance of vehicles
approaching from behind.
Demisting - Defrosting
use the heated rear window switch.
Refer to the "Rear screen demist - defrost"
section.
Folding / un folding
When parking, the mirrors can be folded
manually.
th
e initial adjustments are retained
when unfolding.
ease of use and comfort
Page 53 of 268

51
108_en_Chap03_ergonomie-confort_ed01-2016
Steering wheel adjustment
(with power steering)
F When stationary, hold the steering wheel then lower
the lever to release the adjustment mechanism.
F Adjust the steering wheel to the desired height
and then raise the lever to lock the adjustment
mechanism.
For safety reasons, these operations
must not be carried out while driving.
Once these adjustments have been made,
ensure that you can see the instrument
panel clearly from your driving position.
Manual rear view mirror
the rear view mirror has two positions:
- d ay (normal),
-
n
ight (anti-dazzle).
to c
hange from one to the other, push or pull
the lever on the lower edge of the mirror.
Correct driving position
Before taking to the road and to make the most
of the ergonomics of your driving position, carry
out these adjustments in the following order:
-
b
ackrest angle,
-
c
ushion height,
-
l
ongitudinal position of the seat,
-
hei
ght of the steering wheel,
-
t
he interior and door mirrors.
3
ease of use and comfort
Page 54 of 268
52
108_en_Chap03_ergonomie-confort_ed01-2016
Ventilation
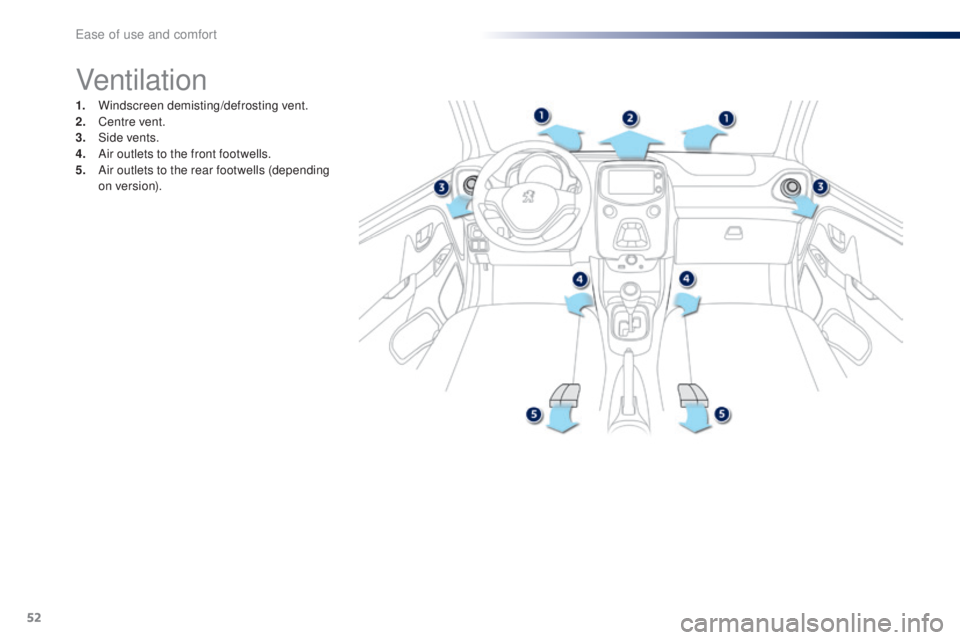
1. Windscreen demisting/defrosting vent.
2. Centre vent.
3.
Sid
e vents.
4.
A
ir outlets to the front footwells.
5.
A
ir outlets to the rear footwells (depending
on version).
ease of use and comfort
Page 55 of 268

53
108_en_Chap03_ergonomie-confort_ed01-2016
Recommendations for use
If the interior temperature remains very high after a prolonged period parked in the sun, first
ventilate the passenger compartment for a few minutes.
For an even air distribution, make sure that you do not block the outside air inlet grille, the
vents, the air passages and the air outlets to the footwells.
en
sure that the passenger compartment filter, located behind the glove box in the heater
unit, is in good condition. Have the filter elements replaced regularly. If you drive in dusty
conditions, change them twice as often.
Operate the air conditioning system for 5 to 10 minutes, once or twice a month, to keep it in
perfect working order.
In order to ensure that your air conditioning system continues to operate correctly, you are
advised to have it checked regularly.
If the system does not produce cold air, do not use it and contact a P
e
uge
Ot
dealer or a
qualified workshop.
th
e air conditioning system does not contain chlorine and does not present any danger to
the ozone layer.
th
e condensation created by the air conditioning results in a flow of water under the vehicle
when stationary which is per fectly normal.
3
ease of use and comfort
Page 56 of 268
54
108_en_Chap03_ergonomie-confort_ed01-2016
Heating
the heating system only operates with the engine running.F t
u
rn the control from blue
(cold) to red (hot) to adjust the
temperature to your wishes.
temperature adjustment
Air flow adjustment
F turn the knob from position 1 to 4 to obtain the desired flow
o f a i r.
Avoid driving for too long without
ventilation (risk of misting and
deterioration of air quality).
Air distribution adjustment
Centre vent and side air vents.
Centre vent, side vents and footwells.
Footwells.
Windscreen and footwells.
Windscreen.
th
e air distribution can be varied by
placing the control in an intermediate
position.
ease of use and comfort