Page 137 of 268

135
108_en_Chap06_securite_ed01-2016
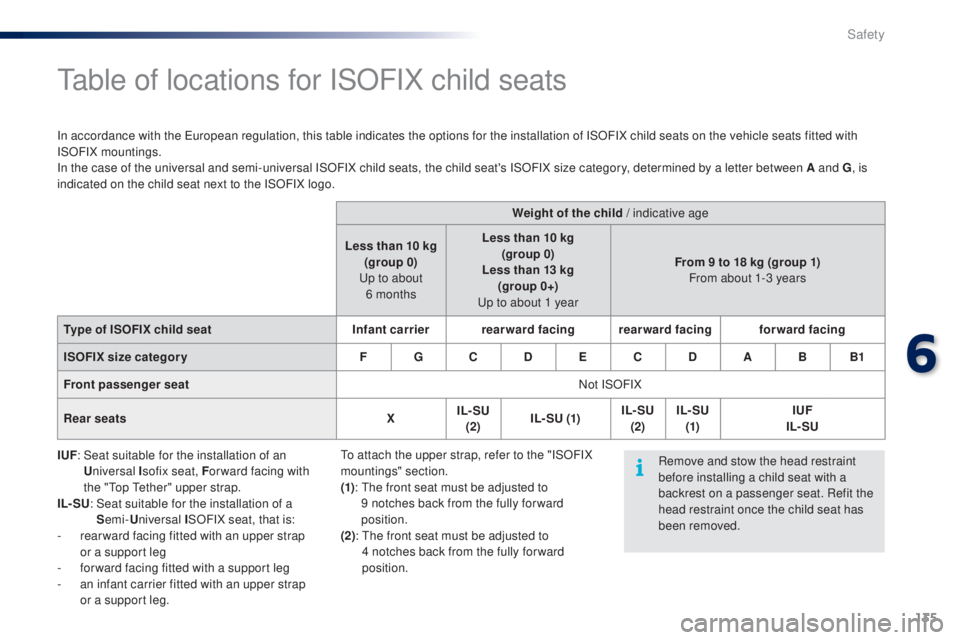
table of locations for ISOFIX child seats
In accordance with the european regulation, this table indicates the options for the installation of ISOFIX child seats on the vehicle seats fitted with
ISOFIX mountings.
In the case of the universal and semi-universal ISOFIX child seats, the child seat's ISOFIX size category, determined by a letter between A and
g
, i
s
indicated on the child seat next to the ISOFIX logo.
I
u
F:
S
eat suitable for the installation of an
un
iversal I sofix seat, F or ward facing with
the "
to
p t
e
ther" upper strap.
IL- S
u:
S
eat suitable for the installation of a
S emi-
un
iversal ISOFIX seat, that is:
-
r
ear ward facing fitted with an upper strap
or a support leg
-
f
or ward facing fitted with a support leg
-
a
n infant carrier fitted with an upper strap
or a support leg. Weight of the child / indicative age
Less than 10 kg (group 0)
up t
o about
6
monthsLess than 10 kg
(group 0)
Less than 13 kg (group 0+)
up t
o about 1 yearFrom 9 to 18 kg (group 1)
From about 1-3 years
ty
pe of IS
oF
IX child seat Infant carrierrearward facing rearward facing forward facing
IS
oF
IX size categor y F
gC DeC DABB1
F
ront passenger seat Not ISOFIX
Rear seats XIL- S
u
(2
)I L- S
u (
1)IL- S
u
(2
)IL- S
u
(
1)I
u
F
IL- S
u
R
emove and stow the head restraint
before installing a child seat with a
backrest on a passenger seat. Refit the
head restraint once the child seat has
been removed.
to a
ttach the upper strap, refer to the "ISOFIX
mountings" section.
(1) :
t
h
e front seat must be adjusted to
9
notches back from the fully for ward
position.
(2):
t
h
e front seat must be adjusted to
4
notches back from the fully for ward
position.
6
Safety
Page 138 of 268

136
108_en_Chap06_securite_ed01-2016
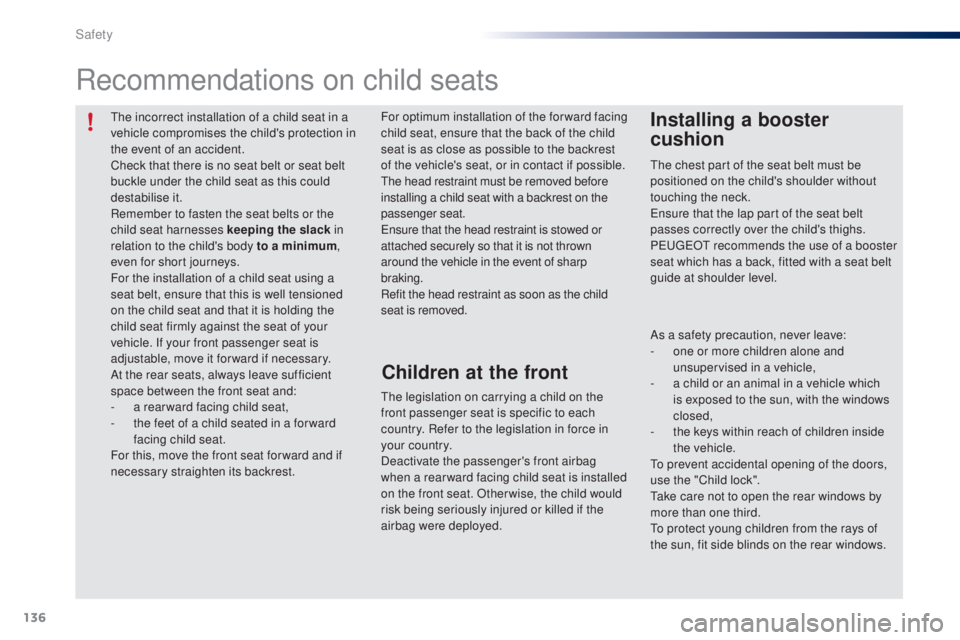
the incorrect installation of a child seat in a
vehicle compromises the child's protection in
the event of an accident.
Check that there is no seat belt or seat belt
buckle under the child seat as this could
destabilise it.
Remember to fasten the seat belts or the
child seat harnesses keeping the slack in
relation to the child's body to a minimum,
even for short journeys.
For the installation of a child seat using a
seat belt, ensure that this is well tensioned
on the child seat and that it is holding the
child seat firmly against the seat of your
vehicle. If your front passenger seat is
adjustable, move it forward if necessary.
At the rear seats, always leave sufficient
space between the front seat and:
-
a r
ear ward facing child seat,
-
t
he feet of a child seated in a for ward
facing child seat.
For this, move the front seat for ward and if
necessary straighten its backrest.
Recommendations on child seats
the chest part of the seat belt must be
positioned on the child's shoulder without
touching the neck.
en
sure that the lap part of the seat belt
passes correctly over the child's thighs.
P
e
uge
Ot
recommends the use of a booster
seat which has a back, fitted with a seat belt
guide at shoulder level.
As a safety precaution, never leave:
-
o
ne or more children alone and
unsupervised in a vehicle,
-
a c
hild or an animal in a vehicle which
is exposed to the sun, with the windows
closed,
-
t
he keys within reach of children inside
the vehicle.
to p
revent accidental opening of the doors,
use the "Child lock".
ta
ke care not to open the rear windows by
more than one third.
to p
rotect young children from the rays of
the sun, fit side blinds on the rear windows.
th
e legislation on carrying a child on the
front passenger seat is specific to each
country. Refer to the legislation in force in
your country.
Deactivate the passenger's front airbag
when a rear ward facing child seat is installed
on the front seat. Otherwise, the child would
risk being seriously injured or killed if the
airbag were deployed. For optimum installation of the forward facing
child seat, ensure that the back of the child
seat is as close as possible to the backrest
of the vehicle's seat, or in contact if possible.
th
e head restraint must be removed before
installing a child seat with a backrest on the
passenger seat.
en
sure that the head restraint is stowed or
attached securely so that it is not thrown
around the vehicle in the event of sharp
braking.
Refit the head restraint as soon as the child
seat is removed.
Installing a booster
cushion
Children at the front
Safety
Page 139 of 268
137
108_en_Chap06_securite_ed01-2016
Child lock
this prevents the opening of the rear doors
from the inside.
th
e controls are located on the edge of each
rear door.
F
L
ower the control.
Check the status of this safety device before
switching on the ignition.
th
is system is independent of the central
locking.
6
Safety
Page 140 of 268

138
108_en_Chap07_info-pratiques_ed01-2016
Fuel tank
Low fuel levelRefuelling
When the low fuel level is reached,
this warning lamp comes on,
accompanied by an audible signal.
th
e message "LO F
u
e
L
" is displayed in place
of the range.
You have approximately 5 litres remaining.
In certain driving conditions and depending on
the engine, the distance which can be travelled
with the fuel remaining may be less than
30
miles (50 km).
to r
efuel in complete safety:
F
Y
ou must stop the engine and switch off
the ignition (ignition in "L
oC
K" position
or "
oF
F" mode).
F
P
ull the control on the lower dashboard,
driver's side, to release the filler flap.
F
O
pen the fuel filler flap.
If you run out of fuel, the emission
control system warning lamp may come
on in the instrument panel. It will go off
automatically after the engine has been
started a few times. Refuelling must only be done with the engine
stopped
and the ignition switched off (ignition
switch in the " L
o
C
K" position or "
oFF "
m o d e).
th
e capacity of the fuel tank is approximately 35 litres.
Additions of fuel must be of at least 5 litres to
be registered by the fuel gauge.
A label on the inside of the flap reminds you
which type of fuel to use.
th
ere may be an inrush of air when removing
the filler cap.
t
h
is vacuum is per fectly normal
and results from the sealing of the fuel system.
Practical information
Page 141 of 268

139
108_en_Chap07_info-pratiques_ed01-2016
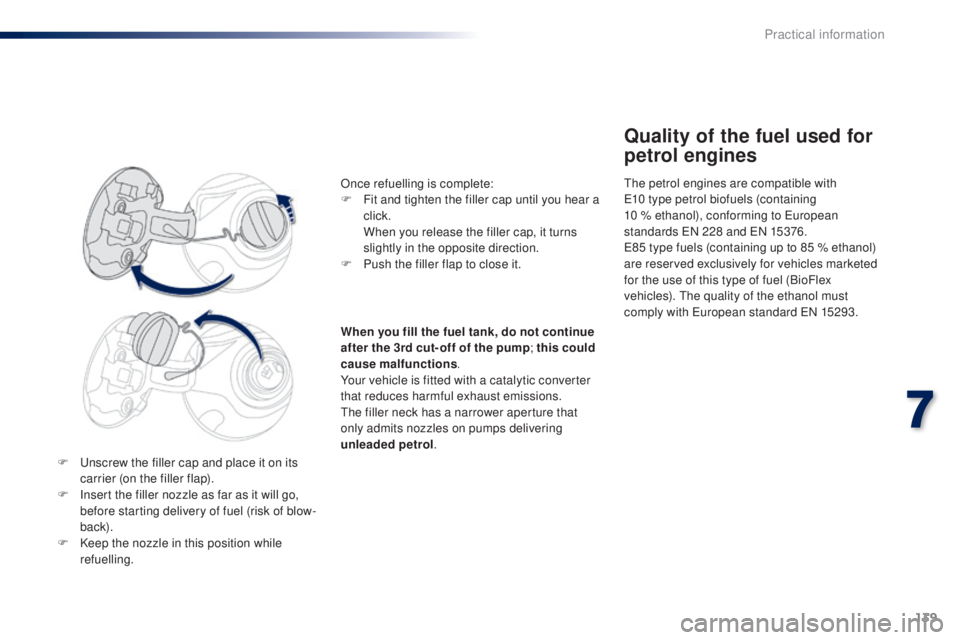
F unscrew the filler cap and place it on its carrier (on the filler flap).
F
I
nsert the filler nozzle as far as it will go,
before starting delivery of fuel (risk of blow-
back).
F
K
eep the nozzle in this position while
refuelling.
Quality of the fuel used for
petrol engines
the petrol engines are compatible with e1 0 type petrol biofuels (containing
10
% ethanol), conforming to e
u
ropean
standards
e
N 2
28 and e
N 1
5376.
e8
5 type fuels (containing up to 85 % ethanol)
are reserved exclusively for vehicles marketed
for the use of this type of fuel (BioFlex
vehicles).
t
h
e quality of the ethanol must
comply with
e
u
ropean standard e
N 1
5293.
Once refuelling is complete:
F
F
it and tighten the filler cap until you hear a
click.
W
hen you release the filler cap, it turns
slightly in the opposite direction.
F
P
ush the filler flap to close it.
When you fill the fuel tank, do not continue
after the 3rd cut- off of the pump ; this could
cause malfunctions .
Your vehicle is fitted with a catalytic converter
that reduces harmful exhaust emissions.
th
e filler neck has a narrower aperture that
only admits nozzles on pumps delivering
unleaded petrol .
7
Practical information
Page 142 of 268

140
108_en_Chap07_info-pratiques_ed01-2016
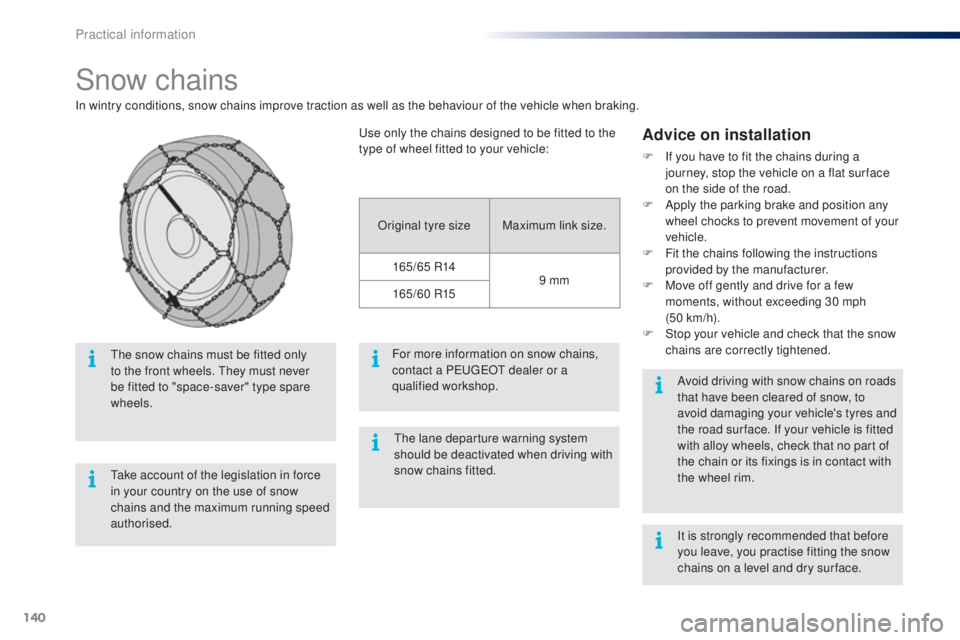
Snow chains
In wintry conditions, snow chains improve traction as well as the behaviour of the vehicle when braking.
Advice on installation
F If you have to fit the chains during a journey, stop the vehicle on a flat sur face
on the side of the road.
F
A
pply the parking brake and position any
wheel chocks to prevent movement of your
vehicle.
F
F
it the chains following the instructions
provided by the manufacturer.
F
M
ove off gently and drive for a few
moments, without exceeding 30 mph
(50
km/h).
F
S
top your vehicle and check that the snow
chains are correctly tightened.
ta
ke account of the legislation in force
in your country on the use of snow
chains and the maximum running speed
authorised.
th
e snow chains must be fitted only
to the front wheels.
t
h
ey must never
be fitted to "space-saver" type spare
wheels. Avoid driving with snow chains on roads
that have been cleared of snow, to
avoid damaging your vehicle's tyres and
the road sur face. If your vehicle is fitted
with alloy wheels, check that no part of
the chain or its fixings is in contact with
the wheel rim.
us
e only the chains designed to be fitted to the
type of wheel fitted to your vehicle:
Original tyre size Maximum link size.
165/65 R14 9 mm
165/60 R15
For more information on snow chains,
contact a P
e
uge
Ot
dealer or a
qualified workshop.
It is strongly recommended that before
you leave, you practise fitting the snow
chains on a level and dry sur face.
th
e lane departure warning system
should be deactivated when driving with
snow chains fitted.
Practical information
Page 143 of 268

141
108_en_Chap07_info-pratiques_ed01-2016
electrical energy economy mode*
System which manages the duration of use of certain functions to conserve a sufficient level of
charge in the battery.
After the engine has stopped, you can still use functions such as the audio system, windscreen
wipers, dipped beam headlamps,
courtesy lamps, etc. for a maximum combined duration of
twenty
minutes.
th
is period may be greatly reduced if the battery is not fully charged. Let the engine run for the duration
specified to ensure that the battery
charge is sufficient.
Do not repeatedly and continuously
restart the engine in order to charge the
battery.
A flat battery prevents the engine from
starting.
Refer to the "Battery" section.
Switching to economy mode
Once this time has elapsed the active functions
are put on standby.
exiting economy mode
these functions are reactivated automatically
next time the vehicle is driven.
to r
estore the use of these functions
immediately, start the engine and let it run for at
least 5 minutes.
*
O
nly on vehicles with the "Keyless e
n
try and
Starting" system.
7
Practical information
Page 144 of 268

142
108_en_Chap07_info-pratiques_ed01-2016
Accessories
A wide range of accessories and genuine parts is available from the PeugeOt dealer network.th
ese accessories and parts are all suitable for your vehicle and benefit from Pe ugeOt' s recommendation and warranty.
"
tr
ansport solutions":
boot carpet, boot liner,
transverse roof bars, bicycle carrier, ski carrier,
roof boxes, boot dividers, ...
"Style":
ligne S body kit, ligne S personalised
mats, aluminium gear lever knob, alloy wheels,
exterior and interior personalisation stickers,
chrome side mouldings, chrome mirror shells,
door sill finishers, personalised remote control
shells, ... "Comfort":
air deflectors, insulated module,
sun blinds, scented air freshener, portable
ashtray, reading lamp, front and rear parking
sensors, centre armrest, cigarette lighter... "Security and safety":
anti-theft alarm,
vehicle tracking system, snow chains, wheel
non-slip covers, wheel security bolts, child
seats, first aid kit, warning triangle, high
visibility vest, breathalyzer, fire extinguisher,
pet seat belt, foglamp kit, seat belt cutter/glass
hammer, ...
"Protection": mats, mud flaps, vehicle cover,
seat covers, bumper protectors, black grained
side mouldings, ...
to p
revent the mat from becoming caught
under the pedals:
-
e
nsure that the mat is secured correctly,
-
n
ever fit one mat on top of another."Multimedia":
audio system, speaker, semi-
integral navigation systems, hands-free kit,
driving assistance systems, 230 V socket,
portable satellite navigation system, telephone/
smartphone support, digital radio, ...
Practical information