Page 249 of 300
 with an assumed weight of
150 lbs. (68 k")
plus maximum load. The maxi
mum load includes the number of
passengers that the vehicle is in
tended to carry ("seating capaci
ty") with an assumed weight of
150 lbs. (68 kg) for each passen
ger at a designated seating posi
tion and the total weight of any luggage in the vehicle . If you tow
a trailer, the weight of the trailer
hitch and the tongue weight of
the loaded trailer must be includ
ed as part of the vehicle load .
The
Gross A xle Weight Rating
("GAWR") is the maximum load
that can be appl ied at each of the
vehicle's two axles.
The fact that there is an upper
limit to your vehicle's Gross Vehi
c le Weight Rating means that the
total weight of whatever is being
carried in the vehicle (including
the weight of a tra iler hitch and
the tongue weight of the loaded
trailer) is limited. The more pas
sengers in the vehicle or passen
gers who are heavier than the
standard weights assumed mean
that less weight can be carried as luggage.
The Gross Vehicle We ight Rating
and the Gross Axle Weight Rating
Wheels
are listed on the safety compli
ance sticker label located on the
driver's side B -pillar
¢ page 244,
fig . 206.
_& WAR NING
Overloading a vehicle can cause
loss of vehicle control, a crash
or other accident, serious per
sonal in jury, and even death.
-Carrying more weight than
your vehicle was designed to carry will prevent the vehicle
from handling properly and increase the risk of the loss of
vehicle control.
- The brakes on a vehicle that
has been overloaded may not
be able to stop the vehicle
within a safe distance.
-Tires on a vehicle that has
been overloaded can fail sud
denly, including a blowout and
sudden deflation, causing loss
of control and a crash.
-Always make sure that the to
tal load being transported -
including the weight of a trail
er hitch and the tongue
weight of a loaded trailer - does not make the vehicle
heavier than the vehicle's
Gross Vehicle Weight Rating .
247
Page 250 of 300

Wheels
Determining correct load
limit
Use the example below to calcu
late the total weight of the pas
sengers and luggage or other
things that you plan to transport so that you can make sure that
your vehicle will not be overload ed .
Steps for Determining Correct
Load Limit
1 . Locate the statement "THE
COMBINED WEIGHT OF OCCU PANTS AND CARGO SHOULD
NEVER EXCEED XXX KG OR XXX
LBS"on your vehicle 's placard
(tire inflation pre ssure label)
c:::> page 244, fig. 206.
2. Determine the combined
weight of the driver and pas
sengers that will be riding in
your vehicle.
3 . Subtra ct the combined weight
of the driver and passengers
from
"XXX" kilograms or " XXX"
pounds shown on the sticker
c:::> page 244 , fig. 206 .
4. The re sulting figure equals the
available amount of cargo and luggage load capacity. For ex
ample, if the
"XXX" amount
equals 1400 lbs. and there will
248
be five 150 lbs. passengers in
your vehicle, the amount of available cargo and luggage load capacity is 650 lb s.
(1400-750 (5 X 150) = 650
lb s.)
5. Determine the combined weight of luggage and cargo
being loaded on the vehicle.
That weight may not safely ex
ceed the available cargo and luggage load capacity calculat
ed in Step 4 .
6. If your vehicle will be towing a trailer, load from your trailer
will be transferred to your ve
hicle. Con sult this manual to
determine how this reduces
the available cargo and lug gage load capacity of your vehi
cle .
~check the tire sidewall
(¢ page 234, fig. 204) to deter
mine the designated load rating
for a specific tire.
· Wheel bolts and rims
Wheel bolts
W heel bolts mus t be clean and loose n/tighten
eas ily.
Rims
R ims with a bo lted r im ring * or with bo lted wheel
covers" co nsist of mult ip le p ieces . T h ese compo-
n ents were bolted togethe r usin g s pec ial bolts ..,.
Page 251 of 300
 Lil ,...., <J:) ,....,
and a special procedure. You must not repair or
disassemble them ¢.&. .
A WARNING
Wheel bolts that are tightened or repaired")
,....,
N
co
er::
co
,....,
and a special procedure. You must not repair or
disassemble them ¢.&. .
A WARNING
Wheel bolts that are tightened or repaired in
correctly can become loose and result in loss
of vehicle control, which increases the risk of
an acc ident. For the correct tightening specifi
cation, refer to ¢
page 260, After changing a
wheel .
- Always keep the wheel bolts and the
threads in the wheel hub clean and free of grease.
- Only use wheel bolts that fit the rim .
- Always have damaged r ims repa ired by an
authorized Audi dealer o r autho rized Aud i
Service Facility . Never repair or d isassemble
rims yourself, because this increases the risk
of an accident.
Winter tires
W inte r ti res s ignificantly improve the vehicle's
h andling when driving in win ter condit ions . Be
cause of the ir constr uction (width, compound,
tread pattern), summer tires provide less trac
tion on ice and snow .
"'U se winter t ires on all fo ur wheels .
.. Only use winter t ires that are approve d for your
v ehicl e.
"' Please note that the maximum permitted
speed may be lower with winter tires¢.&_ . An
authorized Aud i dealer or au thori zed Aud i Serv
ice Fac ility can inform you about the maximum
permitted speed fo r your tires .
"' Check the tire press ure after installing wheels
¢page 244.
The effectiveness of winter tires is reduced great
l y when the tread is worn down to a depth of
0 .1 57 inch (4 mm). The character ist ics of winter
tires a lso de crease great ly as the tire ages, re
ga rdless of the remain ing tread.
WARNING
- Never drive faster than the maxim um per
mitted speed for your t ires. This cou ld cause
the tires to heat up too much. Th is increases
Wh eel s
the risk of an accident because it can cause
the t ire to burst.
- Always adapt your driving to the road and
traffic cond itions . Drive carefully and reduce
your speed on icy or slippery roads . Even
winter t ires can lose tract io n on black ice.
@ For the sake of the environment
Reinsta ll summer tires at the app ropr iate
time, beca use they prov ide better handling
when roads are free of snow and ice. Summer
tires cause less road no ise, tire wear and fue l
consumpt io n.
(D Tips
You can also use all season tires instead of
winter tires. Please note that in some coun
tries where winter tires are required, on ly
winter tires w ith the
& symbo l may be per
mitted .
Snow chains
Snow chains improve traction in the snow.
"'On ly install snow chains on the rear wheels.
"' Check and correct the seating of the snow
chains if necessary after drivi ng a few feet. Fol
low the instructions from the manufacturer .
"' Note the maximum pe rmitted spe ed wh en dr iv
ing w it h snow cha ins. Do not excee d 30 mph
( SO km/h) .
S now c ha ins not o nly improve the
driving in win
te r road condit io ns, but also the
braking.
Use of snow chains is only permitted w ith certa in
r im/tire comb inat ions due to technical reasons .
Check with an author ized Audi dealer or author
ized Audi Service Facility to see if you may use
snow chains.
U se
fine-mesh snow chains . They must not add
more than 0 .53 inch (13 .5 mm) in heig ht, incl ud
ing the cha in lock.
You m ust remove the chai ns when driving on
r oads t hat are
free of snow . When roads are free
of snow, snow chai ns can impa ir han dling and .,.
249
Page 252 of 300

Wheels
damage the ti res, and the chains w ill quickly be
destroyed .
A WARNING
Using incorrect snow chains or insta lling snow
chains incorrectly can result in loss of vehicle
control, which increases the risk of an acc i
dent .
(D Note
Snow chains can damage the rims/wheel cov
ers * if the chains come into d irect contact
w ith them. Remove the wheel covers* first .
Use coated snow chains.
(D Tips
When using snow cha ins, it may be useful to
sw itch the off road mode on
<=> page 191.
Low aspect ratio tires
Your Aud i is factory -equipped with low aspect ra
tio tires. These t ires have been tho roughly tested
a nd been se lected specifically fo r yo ur model fo r
thei r supe rb per fo rman ce , road feel and handling
un der a va riety of d riving conditions . As k yo ur au
thor ized Audi dealer for mo re details .
T he low aspect ratio of these t ires is in dicated by
a nume ral of
55 or less in the tire's size desig na
tion . The numera l rep resents the rat io o f th e
tire's sidewall he ight in relat ion to its tread width
expressed in pe rcentage. Conventional tires have
a height/w idt h rat io o f 60 o r more .
The performance of low-aspect -ra tio tires i s par
ticularly sensitive to improper inflation pres
sure . It is therefore important that low aspect
ratio tires are inflated to the specified pressure
and that the inflation pressure is regularly
checked and maintained . Tire pressures should
be checked at least once a month and always
before a long trip <=>
page 244.
What you can do to avoid tire and rim
damage
Low aspect rat io tires can be damaged more easi
ly by impact with potholes, cu rbs, gullies or
250
ridges on the road, particularly if the tire is un
derinflated.
I n orde r to mi nimize the occur rence o f imp act
dam age to the tires o f yo ur vehicle, we recom
mend that you observe the following preca u
tions:
- Always m aintain reco mmende d in fla tion pres
sures. Check yo ur tir e pressure eve ry 2,0 00
m iles (3,00 0 km) and add air if necessary .
- Dr ive c arefully on ro ads w ith potholes, deep
gu llies o r ridges . The impact from dr iving
through or over such obstacles can damage
your tires. Impact with a curb may a lso ca use
damage to your t ires.
- After any impact, immediate ly inspect you r
tires or have them inspected by the nearest au
thorized Aud i dealer. Replace a damaged tire as
soon as possible.
- Inspect your tires every 2,000 m iles (3,000 km)
for damage and wear . Damage is not always
easy to see . Damage can lead to loss of a ir and
unde rinflation, w hich could event ua lly cause
tire fa ilure . If you believe that a tire may have
be en damaged, replace the tire as soon as pos
sible .
- These tires may wear mo re quickly than o thers .
- Please also remember that, while these tires delive r responsive hand ling, they may ride less
comfortab ly and make mo re noise than o ther
choi ces.
Reduced performance in winter/cold season
conditions
A ll tires are des igned for certain purposes. The
l ow aspect ratio, ultra h igh performance tires
o rigin ally ins talle d on your veh icle are inten ded
for m aximum dry and wet road per forma nce and
handling . They a re not suitable for co ld, snowy or
i cy weather conditions . If you drive under those
c ir cumstances, you should equip yo ur vehicle
with all-season o r winter tires, which offer better
tract ion under t hose conditions. We suggest you
u se the recommended s now or all-season tires
spec ified for your vehicle, o r the ir equiva lent .
Refer to<=>
page 249 for more detailed informa
tion regard ing winter tires.
Page 253 of 300
 Lil ,...., <J:) ,....,
Uniform tire quality grading
- T read wear
- Traction AA A B C
- Temperature ABC
Qua lity grades can be found where applicab")
,....,
N
co
er::
co
,....,
Uniform tire quality grading
- T read wear
- Traction AA A B C
- Temperature ABC
Qua lity grades can be found where applicable on
the tire side wall between tread shoulder and
maximum sect ion w idth
c:> page 234, fig. 204.
For example: Tread wear 200 , Traction AA, Tem
perature
A .
All passenge r ca r tires m ust conform to Federal
Safety Requirements in add ition to these grades .
Tread wear
The tread wear grade is a comparat ive rating
based on the wear rate of the t ire when tested
under cont ro lled conditions o n a specified gov
e rnment test course.
For example, a t ire graded
1 50 would wear one
and one ha lf
( 1 1/2) times as well on the gove rn
men t course as a tire g raded
100.
The relative performance of t ires depends upo n
the actual conditions of their use, howeve r, and
may depart significant ly from the norm due to
va ria tions in driving ha bits, serv ice practices and
d ifferences in road cha racteristics and climate .
Traction
The traction grades, from highest to lowest, are
AA, A, B and
C. T hose grades represent the t ire's
ab il ity to stop on wet pavement as meas ured un
de r contro lled condi tions on specified gove rn
ment tes t sur faces of asphalt and conc re te. A tire
mar ked C may have poor traction performance
c:> &. .
Temperature
The temperature grades are A (t he hi ghest), B ,
a nd C, represent ing the tire's resis tan ce to t he
generation o f heat and its ability to diss ipate
h eat when tested unde r contro lled conditions on
a specified indoor laboratory test whee l.
Sus ta ined hig h temper ature c an cause t he mate
r ial of the ti re to degenerate and red uce tire life,
and excessive temperatu re can lea d to sud den
tire fai lure
c:> &..
Wh eel s
The grade C cor responds to a level of perform
ance which all passenger car tires must meet un
der the Federal Motor Vehicle Safety Standa rd
No.
109 . Grades Band A represent higher levels
of pe rformance on the laboratory test wheel than
the minimum req uired by law .
A WARNING ,-
The tractio n grade assigned to this tire is
based on st raight-a head braking traction
t es ts, and does no t include acceler ation, co r
n eri ng, hy dropla ning or pe ak tra ction charac
terist ics.
A WARNING ,.,___
The tempera ture grade for this tire is estab
lished for a tire that is properly inflated and
not overloaded . Excessive speed, underinfla
tion, or excessive loading, either separate ly or
i n comb inat ion, can cause heat bu ildup and
possib le tire fai lure.
A WARNING
-
Temperature g rades apply to tires that are
p roperly inflated a nd not over o r under inflat
ed.
Tire pressure monitoring system
ill General notes
App lies to vehicles: wi th tire pressure mo nito rin g syste m
-
Each tire, including the spare (if provided),
should be checked monthly whe n cold and inflat
ed to the inflat io n pressure recommended by the
vehicle manufacturer on the veh icle placard or
t ir e infla tion p ressure la be l. (If your ve hicle has
t ir es of a different size than t he si ze ind ic a ted on
the vehi cle placar d or tire in flat ion press ure la
bel, you sho uld dete rmine the proper tire infla
t ion press ure for those tires) .
As an ad ded s afety feat ure, yo ur vehicle has been
equipped with a tire press ure mon itor ing system
( T PMS) t hat illuminates a low tire pressure tell
ta le when one or mo re of your tires is signif icant -
ly under-inf lated. According ly, when the low t ire
pressure telltale i llum inates, you shou ld stop and.,.
251
Page 254 of 300

Wheels
check your tires as soon as possible, and inflate
them to the proper pressure. Driving on a signifi
cantly under-inflated tire causes the tire to overheat and can lead to tire failure. Under-inflation
also reduces fuel efficiency and tire tread life,
and may affect the vehicle's handling and stop
ping ability.
Please note that the TPMS is not a substitute for
proper tire maintenance, and it is the driver's re
sponsibility to maintain correct tire pressure,
even if under-inflation has not reached the level
to trigger illumination of the TPMS low tire pres
sure telltale.
Your vehicle has also been equipped with a TPMS malfunction indicator to indicate when the sys
tem is not operating properly. The TPMS mal
function indicator is combined with the low tire pressure telltale. When the system detects a
malfunction, the telltale will flash for approxi
mately one minute and then remain continuously
illuminated. This sequence will continue upon
subsequent vehicle start-ups as long as the mal
function exists .
When the malfunction indicator is illuminated,
the system may not be able to detect or signal low tire pressure as intended . TPMS malfunctions
may occur for a variety of reasons, including the
installation of replacement or alternate tires or
wheels on the vehicle that prevent the TPMS from functioning properly . Always check the
TPMS malfunction telltale after replacing one or
more tires or wheels on your vehicle to ensure
that the replacement or alternate tires and
wheels allow the TPMS to continue to function
properly.
252
· If the Tire Pressure Monitoring System
indicator appears
Applies to vehicles: with tire pressure monitoring system
The tire pressure indicator in the instrument
cluster informs you if the tire pressure is too low
or if there is a system malfunction.
Fig. 208 Instrument cl uster: i ndic ator ligh t with message
Using the ABS sensors, the tire pressure monitor
ing system compares the tire tread circumfer
ence and vibration characteristics of the individu
al tires . If the pressure changes in one or more
tires , this is indicated in the instrument cluster
display with an indicator light
RE and a message
c>fig. 208. If only one tire is affected, the loca
tion of that tire will be indicated.
The tire pressures must be stored in the Infotain
ment system again each time the pressures
change (switching between partial and full load
pressure) or after changing or replacing a tire on
your vehicle
c> page 253. The tire pressure moni
toring system only monitors the tire pressure you have stored. Refer to the tire pressure label for
the recommended tire pressure for your vehicle
c> page 244, fig . 207.
Tire tread circumference and vibration character
istics can change and cause a tire pressure warn
ing if:
- the tire pressure in one or more tires is too low.
- the tire has structural damage.
- the tire was replaced or the tire pressure was
changed and it was not stored
c> page 253 .
-the collapsible spare* tire is installed.
Indicator lights
RE Loss of pressure in at least one tire c> &.
Check the tires and replace or repair if necessary . .,.
Page 255 of 300
 Lil ,...., <J:) ,....,
Check/correct the pressures of all four tires and
store the pressure again in the Infotainment sys
tem
¢ page 253.
mm (T i")
,....,
N
co
er::
co
,....,
Check/correct the pressures of all four tires and
store the pressure again in the Infotainment sys
tem
¢ page 253.
mm (T ire Pressure Monitoring System) Tire
pressu re: S ys tem malfunction !. If m:m
appears
after switching the ignition on or whi le driving
and the
all indicator light in the instrument clus
ter blinks for approximate ly one minute and then
stays on, there is system malfunction. Try to
store the correct tire pressures¢
page 253. If
the ind icator light does not turn off or turns on
again after a short period of time, drive to an au
thor ized Audi dealer or authorized Audi Se rvice
F ac ility immediately to have the malfunction cor
rected .
& WARNING ,___ -
- If the tire pressure indicator appears in the
display, reduce your speed immed iate ly and
avoid any hard steering or braking maneu
vers. Stop as soon as possib le and check the
t ires and their pressure.
- The driver is responsib le for maintaining the
correct tire pressure. You must check the
t ire pressure regu larly.
- Under certa in conditions (such as a sporty
driv ing style, winter cond itions or unpaved
roads), the tire p ressure monitoring system
indicator may be delayed.
(D Tips
- The t ire pressure monitoring system can al
so stop work ing when there is an ESC mal
funct ion.
- Using snow chains may result in a system
malfunction.
- The Tire Pressure Mon itoring System in your
Audi was calibrated with "Audi Orig inal
Equ ipment tires"¢
page 241. We recom
mend that you use these tires .
Wheel s
Storing tire pressures
App lies to vehicles : wi th tire pressure monitor ing syste m
If the tire pressure changes or a tire is replaced,
it must be confirmed in the Infotainment sys
tem .
.,.. Make sure before storing t hat the t ire pressures
of all four tires meet the specified values and
are adapted to the load
¢ page 244.
.,.. Switch on the ign ition.
.,.. Select: the
I CAR ! funct io n key> Tire Press ure
Monitoring Sy stem > Store now .
Or
.,.. Sele ct: the
I CAR I funct ion but ton > Car S ys
tem s*
control b utton > Servicing & check s >
Tire pressure mon itoring > Sto re tire pre ssures
> Yes , store now .
(D Tips
Do not store the tire pressures if snow chains
are installed.
253
Page 256 of 300

Emerg ency assis ta nce
Emergency assistance
Vehicle jack, vehicle tool kit and collapsible spare
tire
Onboard tool kit and vehicle jack
The vehicle tools and vehicle jock* ore stored in
the luggage comportment under the floor cover.
Fig. 209 Luggage compartment: on board tool kit and vehi
cle jack
The vehicle jack* is stored under the onboard tool
kit ¢ fig. 209.
Hybr id d rive*: the storage location of the on
board tool kit varies ¢ page 104.
The onboard tool k it includes:
- Hook for removing wheel covers*
- Plastic hook to
remove wheel bolt covers*
-Alignment pin for changing wheels
- Wheel bolt wrench
- Folding chocks
- Screwdriver with revers ible blade
- Socket (removable Torx socket)*
- 10 x 13 open ended wrench (for disconnecting
the battery cables)
- Towing eye
A WARNING
Improper use of the vehicle jack* can cause
ser ious personal injuries.
- Never use the jack* supplied with your Aud i
on another vehicle, particularly on a heavier
one. The jack* is only su itable for use on the
vehicle it came w ith.
254 -
Using a bumper jack to raise the vehicle will
damage the bumper system. The jack may
slip, caus ing injury.
- Never support your vehicle on cinder blocks,
bricks or other objects. These may not be
able to support the load and could cause in
jury when they fail.
- Never start or run the engine while the vehi
cle is supported by the jack* .
- If you must work under the vehicle, always
use safety stands specifically designed for
this purpose .
- Never use the hexagonal socket in the han
dle of the screwdr iver to loosen or tighten
the wheel bolts .
- Always make sure the inflatable spare tire*
and
even a flat tire are secu red in place and
not loose, otherwise they could fly forward,
causing personal inj ury to passenge rs in the
vehi cle in an a cc ident or sudden maneuve r.
@ Tips
The vehicle jack in your vehicle is mainte
nance-free.
Folding chocks
The folding chocks ore port of the on board tool
kit .
---
Fig . 210 Open ing fo lding chocks
To use the chocks, you fi rst have to raise the sup
port plate
¢ fig. 210 (D and then insert the lock
ing plate with the two "tabs" into the elongated
holes in the base plate
@ c> &.. .,,_
 1
1 2
2 3
3 4
4 5
5 6
6 7
7 8
8 9
9 10
10 11
11 12
12 13
13 14
14 15
15 16
16 17
17 18
18 19
19 20
20 21
21 22
22 23
23 24
24 25
25 26
26 27
27 28
28 29
29 30
30 31
31 32
32 33
33 34
34 35
35 36
36 37
37 38
38 39
39 40
40 41
41 42
42 43
43 44
44 45
45 46
46 47
47 48
48 49
49 50
50 51
51 52
52 53
53 54
54 55
55 56
56 57
57 58
58 59
59 60
60 61
61 62
62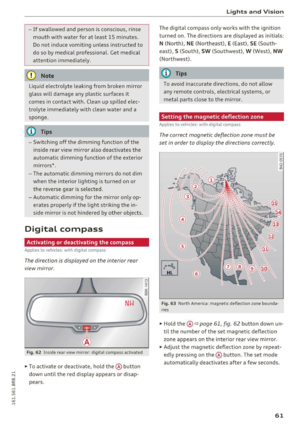 63
63 64
64 65
65 66
66 67
67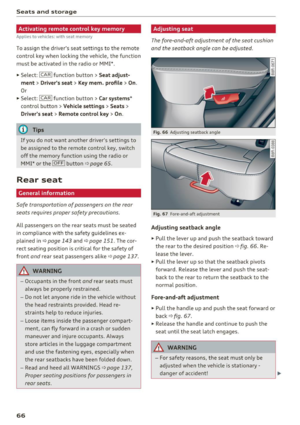 68
68 69
69 70
70 71
71 72
72 73
73 74
74 75
75 76
76 77
77 78
78 79
79 80
80 81
81 82
82 83
83 84
84 85
85 86
86 87
87 88
88 89
89 90
90 91
91 92
92 93
93 94
94 95
95 96
96 97
97 98
98 99
99 100
100 101
101 102
102 103
103 104
104 105
105 106
106 107
107 108
108 109
109 110
110 111
111 112
112 113
113 114
114 115
115 116
116 117
117 118
118 119
119 120
120 121
121 122
122 123
123 124
124 125
125 126
126 127
127 128
128 129
129 130
130 131
131 132
132 133
133 134
134 135
135 136
136 137
137 138
138 139
139 140
140 141
141 142
142 143
143 144
144 145
145 146
146 147
147 148
148 149
149 150
150 151
151 152
152 153
153 154
154 155
155 156
156 157
157 158
158 159
159 160
160 161
161 162
162 163
163 164
164 165
165 166
166 167
167 168
168 169
169 170
170 171
171 172
172 173
173 174
174 175
175 176
176 177
177 178
178 179
179 180
180 181
181 182
182 183
183 184
184 185
185 186
186 187
187 188
188 189
189 190
190 191
191 192
192 193
193 194
194 195
195 196
196 197
197 198
198 199
199 200
200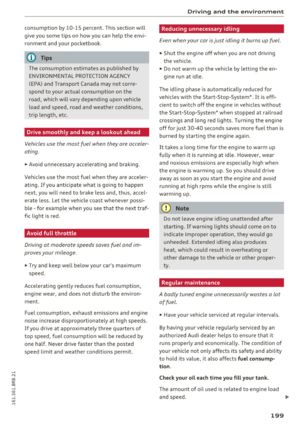 201
201 202
202 203
203 204
204 205
205 206
206 207
207 208
208 209
209 210
210 211
211 212
212 213
213 214
214 215
215 216
216 217
217 218
218 219
219 220
220 221
221 222
222 223
223 224
224 225
225 226
226 227
227 228
228 229
229 230
230 231
231 232
232 233
233 234
234 235
235 236
236 237
237 238
238 239
239 240
240 241
241 242
242 243
243 244
244 245
245 246
246 247
247 248
248 249
249 250
250 251
251 252
252 253
253 254
254 255
255 256
256 257
257 258
258 259
259 260
260 261
261 262
262 263
263 264
264 265
265 266
266 267
267 268
268 269
269 270
270 271
271 272
272 273
273 274
274 275
275 276
276 277
277 278
278 279
279 280
280 281
281 282
282 283
283 284
284 285
285 286
286 287
287 288
288 289
289 290
290 291
291 292
292 293
293 294
294 295
295 296
296 297
297 298
298 299
299