Page 257 of 300

..... I.Cl U\"I
..... I.Cl .....
_& WARNING
-The chock cannot fulfil its function and may
lose its stability if the \"tabs\" on the support
plate a re not inserte")
..... N
co ~ CX)
..... I.Cl U"I
..... I.Cl .....
_& WARNING
-The chock cannot fulfil its function and may
lose its stability if the "tabs" on the support
plate a re not inserted correctly into the
elongated holes in the base plate. If th is
happens, the vehicle may sta rt to move
wh ile a wheel is being changed.
- Never use the fold ing chocks if they are
damaged or if they have not been assem
bled co rrectly.
Removing bass box
Appl ies to vehicles : wit h bass box
Before the inflatable spare tire* can be token
out, the bass box must be removed.
Fig . 21 1 Spare w heel well: Bass box
Removing ba ss box
"Lift up the cargo floor using the hand le .
" Squeeze the locking tabs
c:> fig . 211 (D of the
connector.
" Disconnect the connector @and place the lead
to one s ide.
"T urn the large screw counter -clockwise .
" Carefully remove t he bass box .
Installing bas s bo x
"Carefully place the bass box in the whee l. The
inscription "FRONT" on the bass box must face
forward.
" Reconnect the co nnector that was removed.
" Secu re the bass box w ith the la rge screw .
" Fold the cargo floo r bac k down.
Em ergen cy a ssis tanc e
Inflatable spare tire
Applies to vehicles: w ith inflatable spare tire
The inflatable spare tire expands to its full diam
eter when it is inflated .
Fig. 212 In flatable spare tire wit h comp ressor
Removing inflatabl e spare tire
"Lift up the cargo floo r us ing the handle.
" Remove the dirt tray .
" Turn the large screw <=:>
fig. 212 counter -clock-
w ise .
" Remove the bass box as required<=:>
page 255.
"Take out the inflatab le spare tire.
" Always store the vehicle too l kit, the jack* and
the replaced tire in the luggage compartment
<=:> page 139.
Stowing the inflatable spare t ire
.. Release the air by unscrewing the valve stem.
" Screw the valve stem back in afterwards.
" Wa it a few hours before plac ing the wheel in
the spare wheel well<=:>,& .
" Insta ll the bass box as required <=:>
page 255 .
" Secure the whee l w ith the la rge sc rew.
" Place t he d irt tray back in .
" Fold t he c argo floor back down .
After using the inflatable spare wheel
The inflatable spare tire can be re-used as long as
it is not damaged and is not worn down to the
tread wea r indicators
c:> .&, .
When you let the a ir out of the inf latab le spare
t ir e, it does not assume its folded shape again for
severa l hours . Unt il then, it cannot be placed
back i n the spare wheel well and stowed securely.
IJI>
255
Page 258 of 300

Emerg ency assis ta nce
_& WARNING
- Never use the spare tire if it is damaged or if
it is worn down to the tread wear indicators .
- If the inflatable spare tire is more than 6
years old, use it only in an emergency and
with extreme caut ion and careful driving.
- The inflatable spare tire is intended only for
temporary and short-term use . It should be
replaced as soon as poss ible with the nor
mal wheel and tire.
- The tire pressure value for the inflatable
spare tire is located on the driver's s ide B
pillar
~ page 244, fig. 207.
- Max imum permissible speed is SO mph
(80 km/h).
- Avoid full-throttle accelerat ion, heavy brak
ing, and fast cornering.
- When the air is let out of the inflatable
spare wheel, it does not ass ume its folded
shape for several hours . Until then, it can
not be placed back in the spare wheel well
and stowed sec urely .
- Never dr ive with more than one inflatable
spare tire.
- For technical reasons, the use of tire chains
on the inflatab le spare tire is not perm itted.
If it is necessa ry to drive w ith tire chains,
the in flatable spare wheel m ust be mounted
on the front ax le in the event of a flat in a
rear tire. The newly avai lab le front wheel
must then be installed in place of the rear
wheel w ith the flat tire. Installing the tire
chain before mounting the wheel and tire is
recommended .
- Loose items in the passenger compartment
can cause ser ious personal injury during
hard braking or in an accident . Never store
the inflatable spare t ire or jac k* and tools in
the passenger compartment.
0 Note
- The inflatable spare tire has been developed
spec ifically for this vehicle model. It must
not be exchanged or used for other vehicle
models. Similarly, inflatable tires from oth
er vehicle models mus t no t be used.
256
- Norma l summer or winte r tires must not be
installed on the inflatable tire rim .
Inflating inflatable spare tire
Applies to vehicles: with inflatable spare tire
F ig . 213 Luggage compart men t left s ide : comp ressor
.,. Remove the left tr im pane l in the luggage com
partment.
.. Open the Velcro strap and remove the compres
sor
r=;, fig. 213.
.. Unscrew the valve stem from the spare tire.
.,. Screw the tire filler hose from the compressor
firmly onto the valve of the spare t ire.
.,. Insert the plug from the comp ressor into a
socket of the veh icle
~ page 77 .
.,. Switch the comp ressor on.
.,. Let the compressor run unt il the value spec ified
on the tire p ressure label is reached
r=:> page 244, fig. 207. Switch the compressor
off after r unning for 12 minutes at the most -
danger of overheating!
A WARNING
The compressor and the tire filler hose can become extremely hot whi le they are running
- danger of burns!
(D Note
Switch the compressor off after running for
12 minutes at the most - danger of overheat
i ng! Allow the compressor to cool down for a
few minutes before you use it aga in .
-
Page 259 of 300

..... I.Cl U\"I
..... I.Cl .....
Tire mobility kit
General information and safety precautions
Appl ies to vehicles: with tire repair kit
The tire repair is only mea")
..... N
co ~ CX)
..... I.Cl U"I
..... I.Cl .....
Tire mobility kit
General information and safety precautions
Appl ies to vehicles: with tire repair kit
The tire repair is only meant for temporary use.
Fig. 214 T ire damage, for which the ti re repair kit is not
su itable
N
-r--0 ci: co ID
Your veh icle is equipped with a tire repair kit (Tire
Mobility System) .
In the event of a flat tire, the tire repair kit is
found in the luggage compartment behind the right side trim panel, and is made up of tire seal
ant and a compressor¢
page 104 , fig. 115.
Only tire damage caused by foreign objects up to
approx imately 0.16 in
( 4 mm ) in diameter can be
safely sealed with the tire repair kit.
The foreign object can stay in the tire .
The tire sealant may not be used :
-If the t i re has cuts or punctures that are larger
than 0.16 in (4 mm)
,=;,fig. 214@.
-If the rim is damaged @.
- If you drove with very low t ire pressure or with-
out air in the tire@.
Tire repair kit usage is described in
Performing
t he repai r
c;, page 258 and in the instructions
with the sealant bottle .
The tire repair kit is able to be used at tempera
tures as low as -4
°F ( -20 °().
A WARNING
Pay attent ion to the following after repairing
the tire:
- Do not drive faster than SO mph (80 km/h) .
Em ergen cy a ssis tanc e
-Avoid hard acce leration, braking sharply,
and fast cornering .
- The vehicle may become more difficult to
control.
- Tires sealed with the tire repair kit are only
meant to be used
t e mpo raril y. Damaged
tires must be replaced.
- The tire repa ir k it may
NO T be used
- If the t ire has cuts or punctures that are
larger than 0.16 in (4 mm) .
- If the rim is damaged.
- If you drove with very low tire pressure or
without air in the tire.
- Obta in qualified help if it is not possible to
perform the repair with the tire sealant.
- The tire sealant must not come in contact
with skin, eyes, or clothes.
- If tire sealant gets in you r eyes or on your
skin, thoroughly rinse the affected area im mediately with clean water .
- Change yo ur clothes immediately if they get
tire sealant on them.
- Do not inha le the fumes .
- If the tire sea la nt is swallowed, thoro ughly
rinse out your mouth and drink lots of wa
ter .
- Do not induce vomiting . Seek medical atten
tion immediately.
- If an a llergic reaction occurs, seek immedi
ate med ica l attent ion .
- Keep the t ire sealant away from child ren.
@ For the sake of the environment
Used sealant bottles may be returned to yo ur
a uthorized Audi dea le r fo r disposal.
@ Tips
- If sealant has spilled out, let it d ry and then
you ca n remove it by pee ling it away like a
foil.
- Note the expiration date on the sealant bot
tle. Rep lace the ti re sealant at an a utho r
ized Aud i dea le rship.
- Radio reception may be impaired when the
compressor is in use.
257
Page 260 of 300

Emergency assistance
Performing the repair
Applies to vehicles: w ith tire repair k it
Fig. 215 Performing the repair
Preparations
.,. Park the vehicle as far as possible from moving
traffic in the event of a flat tire.
.,. Set the
parking brake to prevent the vehicle
from rolling unintentionally.
.,. Shift the
selector lever into the P position.
.,. Determine whether a repair with the tire repair
kit is possible or not¢
page 257.
.,. Let all of the passengers
exit the vehicle and
move a safe distance away¢_&. .
.,. Take the
sealant bottle and the compressor
out of the luggage compartment ¢ page 104,
fig. 115.
.,. Affix the label "max. 50 mph (80 km/h)", found
on the sealant bottle, to the instrument cluster
where it can be seen by the driver.
Filling a tire
.,. Shake the bottle thoroughly before filling.
.,. Screw the accompanying filling hose complete
ly onto the bottle. This breaks through the foil
seal automatically at the connection .
.,. Remove the valve cap from the tire valve and
unscrew the valve insert using the accompany
ing valve insert tool
~fig. 215.
.,. Lay the valve insert on a clean surface .
.,. Remove the sealing plug from the filling hose
and connect the hose to the tire valve .
.,. Hold the bottle with the bottom facing upward
and empty the entire contents into the tire .
.,. Then pull out the hose and screw the valve in
sert tightly back into the tire valve.
258 Inflating a tire
.,.
Screw the filling hose for the compressor onto
the tire valve and insert the connector into the
cigarette lighter.
.. Inflate the tire to between 29 PSI (200 kPA)
and 36 PSI (250 kPA) and read the pressure on
the gauge .
.,. If this tire pressure is not reached, drive your
vehicle approximately 33
ft (10 meters) for
ward or backward so that the sealant can be re
distributed inside the tire. If at this time the re
quired air pressure still cannot be reached, the
tire is too badly damaged and cannot be re
paired with the tire sealant.
Final inspection
.,. Stop the vehicle after driving for about 10 mi
nutes and check the tire pressure.
.,. If the tire pressure is lower than 19 PSI
(130 kPA), then the tire is too severely dam
aged. Do not continue driving. Please seek pro
fessional assistance .
&_ WARNING
- Turn on the emergency flashers if you have a
flat tire while in moving traffic. This is for
your protection and the for the safety of
other drivers.
- Take care to move all of the passengers to a
safe place (behind a guard rail for example) .
- Read and follow the manufacturer's safety
precautions on the compressor and in the instructions on the bottle of sealant!
- If a tire pressure of 29 PSI (200 kPA) cannot
reached after inflating for 12 minutes, then
the tire is too severely damaged. Do not
continue driving.
- Obtain qualified help if it is not possible to
perform the repair with the tire sealant .
- If the tire pressure is less than 19 PSI
(130 kPA) after 10 minutes of driving, then
the tire is too severely damaged . Do not
continue driving. Seek professional assis
tance .
Page 261 of 300
 Lil ,...., <J:) ,....,
(D Note
Special care is required if you are repairing
the tire on a steep incline.
@ Tips
- Do not operate the compressor")
,....,
N
co
er::
co
,....,
(D Note
Special care is required if you are repairing
the tire on a steep incline.
@ Tips
- Do not operate the compressor for more
than 12 minutes continuously, otherwise it
can overheat. Once the compressor has
cooled, you can continue to use it.
- If sealant has spi lled out, let it dry and then
you can remove it by peeling it away like a
foil.
- Remember to obtain a new bott le of sealant
from your authorized Audi dealer after re
pair ing a tire. After this, the functionality of
the tire repair set is restored .
- Obey all laws.
Replacing wheels
Before changing a wheel
Observe the following precautions for your own
and your passenger's safety when changing a
wheel.
""After you experience a tire failure, pull the car
well away from moving traff ic and try to reach
level ground before you stop¢_& .
.. All passengers sho uld
leave the car and move
to a safe location (fo r instance, behind the
guardrai l) ¢ .&_ .
.. Engage the
par king b rake to prevent yo ur vehi
cle from roll ing unintentionally ¢&_ .
.. Move
selecto r le ver to po sitio n P ¢ &_ .
"" If you are towing a trailer: unh itch the trailer
from your veh icle.
"" Block the diagonally opposite wheel with the
folding chocks o r other objects .
""T ake the
jac k* and the inflatable spa re tir e*
out of the luggage compartment ¢ page 254 .
A WARNING
You or your passengers cou ld be inj ured while
changing a wheel if you do not follow these
safety precautions:
- If you have a flat tire, move a safe distance
off the road. Turn off the engine, turn the
Em ergenc y ass is tanc e
emergency flashers on and use other wa rn
ing dev ices to alert other motorists.
- Make sure that passengers wait in a safe
place away from the vehicle and well away
from the road and traff ic.
- To help prevent the veh icle from moving
suddenly and possib ly slipping off the jack*,
always fully set the parking brake and block
the wheel diagonally opposite the wheel be i n g changed with the fold ing c hocks or oth
er objects . When one front whee l is lifted
off the ground, placing the Automatic
Transmission in P (Park) w ill
not prevent the
veh icle from moving.
- Before you change a wheel, be sure the
gro und is leve l and firm.
If necessary, use a
sturdy board under the jack*.
- Always s tore the vehicle too l kit, the jack*
and the replaced tire in the lugg age com
partment
¢ page 139.
Changing a wheel
When you change a wheel, follow the sequence
described below s tep-by -step and in exactly that
order.
1. Remove the de corative wheel cover* . For
more detai ls see also¢
page 260, Decaro-
tive wheel covers
o r¢ page 260, Wheels
with wheel bolt cops .
2. Loosen the w
heel bolt s ¢ page 260.
3 . Locate the proper mounting point for the
jack* and align the jack* below that point
¢ page 261.
4. Li ft the car with the jack*¢ page 261 .
s. Remove the wheel with th e flat tire and then
insta ll the
inflatable spar e tir e *
¢ page 262.
6. Tighte n all whee l bolts lightly.
7 .
Lo wer the vehicle wi th the jack *.
8 . Use the whee
l bolt wrench and
firml y tighten
all wheel bo lts ¢
page 260 .
9. Replace the decorat ive wheel co ver* .
259
...
Page 262 of 300

Emergency assistance
_& WARNING
Always read and follow all WARNINGS and in
formation
c:> & in Raising the vehicle on
page 261
and c:>poge 263.
After changing a wheel
A wheel change is not complete without the do
ing the following .
.. Always store the vehicle tool kit, the jack* and
the replaced tire in the luggage compartment
c:>page 139 .
.. As soon as possible, have the tightening tor
ques
on all wheel bolts checked with a torque
wrench. The correct t ightening torque is
105 ft lb (140 Nm) .
.. Have the flat tire
replaced as soon as possible.
(j) Tips
- If
you notice that the wheel bolts are cor
r oded and difficu lt to turn while changing a
tire, they should be replaced before you
check the tightening torque.
- Drive at reduced speed until you have the
tightening torques checked.
Decorative wheel covers
Appl ies to veh icles: w ith deco rat ive whee l covers
The decorative wheel covers must be removed
first to access the wheel bolts.
Fig. 216 Chan gin g a w heel : Removing the wheel cover
Removing
.. Insert the hook provided with the vehicle too l
kit in the hole in the hub.
.. Pull off the
decorative wheel cover c:> fig. 216.
260
Wheels with wheel bolt caps
Applies to vehicles: wit h whee l bo lts wi th caps
The cops must be removed first from the wheel
bolts before the bolts con be unscrewed .
Fig. 217 Changing a wheel: removing the wheel bo lt caps
Removing
.. Push the plastic clip provided with the vehicle
tool kit over the wheel bolt cap until it engages .
.. Pull on the
plastic clip to remove the cap
c:!>fig. 217.
Refitting
.. Place the caps over the whee l bolts and push
them back on.
The caps are to protect and keep the wheel bo lts
clean.
Loosening and tightening the wheel bolts
The wheel bolts must be loosened before raising
the vehicle .
Fig. 218 Changing a whee l: loosening the wheel bolts
Loosening
.. Insta ll the wheel bolt wren ch over the wheel
bolt and push it down as far as it wi ll go .
Page 263 of 300

..... I.Cl U\"I
..... I.Cl .....
.. Take t ight hold of the end of the wrench handle
and turn the wheel bolts
c o un ter-cloc kwi se
about one single tu rn in the")
..... N
co ~ CX)
..... I.Cl U"I
..... I.Cl .....
.. Take t ight hold of the end of the wrench handle
and turn the wheel bolts
c o un ter-cloc kwi se
about one single tu rn in the d irection of arrow
r=> fig . 218.
T igh tening
.. Install the wheel b olt w renc h over the wheel
bolt and push it down as far as it will go .
.. Take tight hold of the
end of the wrench handle
and turn each wheel bolt
cl oc kwise until it is
seated.
_& WARNING
- Do not use force or hurry when changing a
wheel - you can cause the vehicle to slip off
the jack* and cause ser ious personal inju
ries.
- Do not loosen the wheel bolts more than
one turn
before you raise the vehicle with
the jac k*. -Yo u ris k an injury.
@ Tips
If a wheel bolt is very tight, you may find it
easier to loosen by carefu lly pushing down on
the end of the wheel bo lt wrench with
one
foot only.
As you do so, hold on to the car to
keep your balance and take care not to slip.
Raising the vehicle
The vehicle must be li~ed with the jack* first be
fore the wheel can be removed .
Fig . 219 Sill pane ls: markin gs
Em ergen cy a ssis tanc e
Fig . 220 Sill: pos ition ing the jack
.. Engage the parking brake to prevent your vehi
cle from rolling unintentionally
.. Move the
sel ecto r le ver to po sitio n P.
.. Find the mark ing (imprint) on the sill that is
nearest the wheel that will be changed
r=> fig . 219 . Behind the marking, there is a lift
ing point on t he sill fo r the jack* .
"" Turn the
ja ck * located under the lifting point
on the sill to raise the jack until its arm @
r=> fig. 220 is located under the designated plas
tic mo unt
r=> A r=> (j) .
.. Align the jack* so that its arm @ r=> fig. 220 en
gages in the designated lifting point in the door
sill and the movable base @ lies flat on the
ground. The base @ must be
vertical under the
lifting point @.
"" Wind the jack* up furthe r unt il the flat tire
comes off the g round
r=> _&. .
Pos ition the jack* onl y under the designated lift
ing points on the s ill
r=> fig . 219. There is exactly
one location for each wheel. The jack* must not
be pos itioned at any othe r loca tion
r=> & r=> @.
An un stable surf ace under the jack* can cause
the vehicle to slip off the jack* . Always prov ide a
firm base for the jack* on the ground .
If necessa
r y place a s turdy board or similar support unde r
t h e jack*. O n
hard, slipp ery surfa ce s (such as
t il es) use a r ubber mat or sim ilar to prevent the
jac k* from slipp ing
r=> .&. .
_& WARNING
-
-You or your passengers could be i njured
while changing a wheel if you do not follow these safety precautions :
261
Page 264 of 300

Emergency assistance
-Position the jack* only at the designated
lifting points and align the jack *. Other
wise, the jack* could slip and cause an in
jury if it does not have sufficient hold on
the vehicle .
- A soft or unstable surface under the jack*
may cause the vehicle to slip off the jack*.
Always provide a firm base for the jack* on
the ground. If necessary, use a sturdy
board under the jack*.
- On hard, s lippery surface (such as tiles)
use a rubber mat or similar to prevent the
jack* from slipping.
- To help pre vent injury to you rself and yo ur
passenge rs:
- Do not raise the vehicle until you are sure
the jack * is securely engaged.
- Passengers must not remain in the vehicle
when it is jacked up.
- Make sure that passengers wait in a safe
place away from the vehicle and well away
from the road and traffic.
- Make sure jack position is correct, adjust
as necessary and then continue to raise
the jack *.
(D Note
Do not lift the vehicle by the sill. Position the
jack * only at the designated lifting points on
the sill. Otherwise, your vehicle will be dam
aged.
262
Taking the wheel off/installing the inflatable spare tire
Follow these instructions step-by-step for chang
ing the wheel
Fig. 221 Changing a wheel: usin g the screwdriver handle
(w ith the blade removed) to turn the bolts
Fig. 222 Changi ng a w heel: alignment pin inside the top
h ole
After you have loosened all wheel bolts and
raised the vehicle off the ground, remove and re
place the wheel as follows:
Removing the wheel
.,. Use the hexagonal socket in the screwdriver
handle
to comp letely remove the topmost
wheel bolt and set it aside on a
clean surface
qfig. 221 .
.. Screw the threaded end of the alignment pin
from the tool kit hand-tight into the empty bolt
hole
q fig. 222 .
.,. Then remove the other wheel bolts as described
above .
.,. Take off the whee l leaving the alignment p in in
the bolt hole
q(D.
Putting on the inflatable spare tire*
.,. Inflate the inflatable spare tire* q page 256
and push the whee l over the alignmen t pin.
 1
1 2
2 3
3 4
4 5
5 6
6 7
7 8
8 9
9 10
10 11
11 12
12 13
13 14
14 15
15 16
16 17
17 18
18 19
19 20
20 21
21 22
22 23
23 24
24 25
25 26
26 27
27 28
28 29
29 30
30 31
31 32
32 33
33 34
34 35
35 36
36 37
37 38
38 39
39 40
40 41
41 42
42 43
43 44
44 45
45 46
46 47
47 48
48 49
49 50
50 51
51 52
52 53
53 54
54 55
55 56
56 57
57 58
58 59
59 60
60 61
61 62
62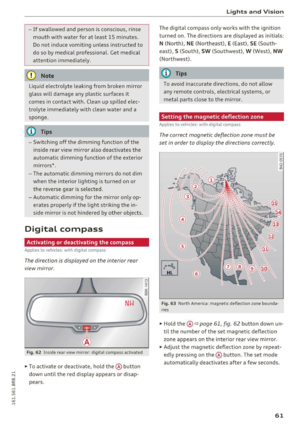 63
63 64
64 65
65 66
66 67
67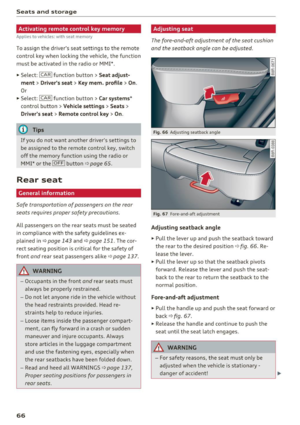 68
68 69
69 70
70 71
71 72
72 73
73 74
74 75
75 76
76 77
77 78
78 79
79 80
80 81
81 82
82 83
83 84
84 85
85 86
86 87
87 88
88 89
89 90
90 91
91 92
92 93
93 94
94 95
95 96
96 97
97 98
98 99
99 100
100 101
101 102
102 103
103 104
104 105
105 106
106 107
107 108
108 109
109 110
110 111
111 112
112 113
113 114
114 115
115 116
116 117
117 118
118 119
119 120
120 121
121 122
122 123
123 124
124 125
125 126
126 127
127 128
128 129
129 130
130 131
131 132
132 133
133 134
134 135
135 136
136 137
137 138
138 139
139 140
140 141
141 142
142 143
143 144
144 145
145 146
146 147
147 148
148 149
149 150
150 151
151 152
152 153
153 154
154 155
155 156
156 157
157 158
158 159
159 160
160 161
161 162
162 163
163 164
164 165
165 166
166 167
167 168
168 169
169 170
170 171
171 172
172 173
173 174
174 175
175 176
176 177
177 178
178 179
179 180
180 181
181 182
182 183
183 184
184 185
185 186
186 187
187 188
188 189
189 190
190 191
191 192
192 193
193 194
194 195
195 196
196 197
197 198
198 199
199 200
200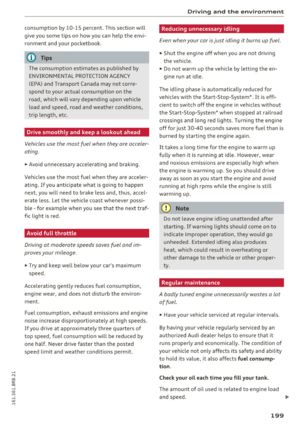 201
201 202
202 203
203 204
204 205
205 206
206 207
207 208
208 209
209 210
210 211
211 212
212 213
213 214
214 215
215 216
216 217
217 218
218 219
219 220
220 221
221 222
222 223
223 224
224 225
225 226
226 227
227 228
228 229
229 230
230 231
231 232
232 233
233 234
234 235
235 236
236 237
237 238
238 239
239 240
240 241
241 242
242 243
243 244
244 245
245 246
246 247
247 248
248 249
249 250
250 251
251 252
252 253
253 254
254 255
255 256
256 257
257 258
258 259
259 260
260 261
261 262
262 263
263 264
264 265
265 266
266 267
267 268
268 269
269 270
270 271
271 272
272 273
273 274
274 275
275 276
276 277
277 278
278 279
279 280
280 281
281 282
282 283
283 284
284 285
285 286
286 287
287 288
288 289
289 290
290 291
291 292
292 293
293 294
294 295
295 296
296 297
297 298
298 299
299