Page 105 of 146
JauneNoirNoir texte
5.5
ENG_UD5599_1Enjoliveurs - Jantes (B90 - Dacia)ENG_NU_817-2_NU_Dacia_5
WHEEL TRIM - WHEELS (continued)
Central wheel trim with
concealed wheel bolts
Remove it using the hubcap tool 1, in-
serting the tool into recess 5 provided.
To refit it, turn it so that it is aligned with the rim and clip it in place.
Central wheel trim with
visible wheel bolts
6
To remove it without removing the wheel, press it at the points indicated by the arrows.
Turn it so that the retaining brackets holding it in place behind the wheel bolts are released.
To refit the hubcap, proceed in reverse order.
15
6
Page 106 of 146
practical advice .....................................(up to the end of the DU)jack .......................................")
changing a wheel..................................(up to the end of the DU)practical advice .....................................(up to the end of the DU)jack .......................................................(up to the end of the DU)puncture................................................(up to the end of the DU)lifting the vehiclechanging a wheel ............................(up to the end of the DU)
5.6
ENG_UD5600_1Changement de roue (B90 - Dacia)ENG_NU_817-2_NU_Dacia_5
Changement de roue
CHANGING A WHEEL
Park the vehicle away from traffic and on level ground which is not slippery (place a plank under the jack if necessary). Switch on the hazard warning lights.
Apply the hand brake and engage a gear (first or reverse).
Ask all the passengers to leave the vehicle and keep them away from traffic.
If you have a puncture, re-
place the wheel as soon as possible.
A tyre which has been punc- tured should always be inspected (and repaired, where possible) by a specialist.
Remove the wheel trim (refer to the in- formation on “Wheel trims”).
Use the wheelbrace
1 to slacken off the wheel bolts. Fit it so that you press downwards rather than pulling up- wards.
Present the jack horizontally, the jack head must slide in the lower slot in the body, as close as possible to the wheel concerned.
Crank up the jack
2 by hand to align the base plate (slightly inwards under the vehicle). Place a plank of wood under the base plate if on soft ground.
Turn the wheelbrace until the wheel lifts off the ground.
Remove the bolts.
Take off the wheel.
Fit the emergency spare wheel on the central hub and turn it to locate the mounting holes in the wheel and the hub.
If bolts are supplied with the emergency spare wheel, only use these bolts for the emergency spare wheel.
Tighten the bolts, checking that the wheel is correctly positioned on its hub and lower the jack.
With the wheels on the ground, tighten the nuts as fully as possible and check the tightness as soon as possible (tight- ening torque 105 Nm).
1
2
Page 107 of 146
tyres ......................................................(up to the end of the DU)emergency spare wheel ...........")
practical advice .....................................(up to the end of the DU)tyres ......................................................(up to the end of the DU)emergency spare wheel .......................(up to the end of the DU)
5.7
ENG_UD5513_1Pneumatiques (U90 - Dacia)ENG_NU_817-2_NU_Dacia_5
Pneumatiques (sécurité pneumatiques, roues, utilisation hivernale\
)
TYRES
Tyre and wheel safety
The tyres are the only contact between the vehicle and the road, so it is essen- tial to keep them in good condition.
You must make sure that your tyres con- form to local road traffic regulations.
When they need to be re- placed, only tyres of the same make, size, type and profile should be used.
Tyres fitted to the vehicle should either be identical to those fitted originally or conform to those recommended by your approved dealer.
Maintaining the tyres
The tyres must be in good condition and the tread form must have sufficient depth; tyres approved by our Technical
Department have wear warning strips 1 which are indicators moulded into the tread at several points.
When the tyre tread has been worn to the level of the warning strips, they become visible 2: it is then neces- sary to replace your tyres because the tread rubber is now only 1.6 mm deep at most, resulting in poor road hold- ing on wet roads.
An overloaded vehicle, long journeys by motorway, particularly in very hot weather, or continual driving on poorly surfaced minor roads will lead to more rapid tyre wear and affect safety.
Incidents which occur when driving, such as striking the kerb, may damage the tyres and wheel rims, and could also lead to misalignment of the front or rear axle geometry.
In this case, have the condition of these checked by an approved dealer.
1
2
Page 108 of 146

5.8
ENG_UD5513_1Pneumatiques (U90 - Dacia)ENG_NU_817-2_NU_Dacia_5
JauneNoirNoir texte
Changing wheels around
This")
tyre pressure..........................................................(current page)
5.8
ENG_UD5513_1Pneumatiques (U90 - Dacia)ENG_NU_817-2_NU_Dacia_5
JauneNoirNoir texte
Changing wheels around
This practice is not recommended.
Emergency spare wheel
Refer to the information on the “ E m e r g e n c y s p a r e w h e e l ” a n d “Changing a wheel” in Section 5.
Fitting new tyres
TYRES (continued)
Tyre pressures
Tyre pressures must be respected. Tyre pressures for all wheels (including the spare wheel) must be checked at least once a month and always before a long journey (refer to the information on “Tyre pressures” at the beginning of this document).
Incorrect tyre pressures lead to abnormal tyre wear and unusually hot running. These are factors which may seriously affect safety and lead to:
– poor road holding,
– risk of blowouts or throwing a
tread.
Tyre pressures depend on the load and the driving speed. Adjust the pressures according to the condi- tions of use. (Refer to the informa- tion on “Tyre pressures” at the be- ginning of this document).
Pressures should be checked when the tyres are cold; ignore higher pressures which may be reached in hot weather or following a fast journey.
If tyre pressures cannot be checked when the tyres are cold, assume an in- crease of 0.2 to 0.3 bar.
Never deflate a hot tyre.
Note: a label (depending on country or model) fixed to the edge or frame of the driver’s door gives the recommended tyre pressures.
For safety reasons, this op- eration must be carried out by a specialist.
Fitting different tyres may change your vehicle as follows:
– It may mean that your vehicle no
longer conforms to current regu- lations.
– It may change the way it handles
when cornering.
– Heavy steering.
– It may affect the use of snow
chains.
Please be aware that a poorly tightened or miss- ing valve cap can make the tyres less airtight and lead to pressure loss.
Always use valve caps identical to those fitted originally and tighten them fully.
Page 109 of 146
ENG_NU_817-2_NU_Dacia_5
Use in winter
– Chains
For safety reasons, fitting snow chains to the rear axle is strictly forbi")
JauneNoirNoir texte
5.9
ENG_UD5513_1Pneumatiques (U90 - Dacia)ENG_NU_817-2_NU_Dacia_5
Use in winter
– Chains
For safety reasons, fitting snow chains to the rear axle is strictly forbidden.
Chains must not be fitted to tyres which are larger than those originally fitted to the vehicle.
TYRES (continued)
Chains may only be fitted to tyres of the same size as those originally fitted to your vehicle.
Only certain chains can be fitted to tyres. Contact an approved dealer.
– Snow or winter tyres
We would recommend that these be fitted to all four wheels to ensure that your vehicle retains maximum adhesion.
NB: we would point out that these tyres may sometimes have:
– a specific direction of rotation
– a maximum speed index which
may be lower than the maximum speed of your vehicle.
– Studded tyres
This type of equipment may only be used for a limited period and as laid down by local legislation.
It is necessary to observe the speed specified by current legislation.
These tyres must, at a minimum, be fitted to the two front wheels.
In all cases, we would recommend that you contact your approved dealer who will be able to advise you on the choice of equipment which is
most suitable for your vehicle.
Page 110 of 146
practical advice .....................................(up to the end of the DU)wipersblades ..........................")
wiper blades .........................................(up to the end of the DU)practical advice .....................................(up to the end of the DU)wipersblades .............................................(up to the end of the DU)
5.10
ENG_UD8569_2Balais d’essuie-vitre (B90 - Dacia)ENG_NU_817-2_NU_Dacia_5
Wiper blades
WIPER BLADES
Replacing windscreen wiper
blades
1
– Lift the wiper arm 3.
– Turn the wiper blade until it is hori
- zontal.
– Press tab
2 and slide the wiper blade
downwards to release hook 4 from the wiper arm.
– Slide the blade (
A) then lift it (B) to release it.
– Before using the rear wiper, check that no object being transported is ob- structing the travel of the blade.
– In frosty weather, make sure that
the wiper blades are not stuck by ice (to avoid the risk of the motor overheating).
– Monitor the condition of the
blades. Replace the wiper blades as soon as they begin to lose ef- ficiency (approximately once a year).
– When changing the blade, when it
has been removed, do not let the wiper arm fall against the window:
risk of breaking the window.
– Do not lift the front wiper arms
beyond their stable position.
Clean the windscreen and rear screen regularly.
12
3
4B
A
Replacing the rear screen
wiper blades
6– Lift the wiper arm 5.
– Pivot blade 6 until some resistance is met.
– Pull the blade to release it (move-
ment C).
Refitting a front or rear wiper
blade
To refit the wiper blade, proceed in the reverse order to removal. Make sure that the blade is correctly locked in po- sition.
5
6
C
Page 111 of 146
changing a bulb ....................................(up to the end of the DU)indicators .............................")
bulbschanging .........................................(up to the end of the DU)changing a bulb ....................................(up to the end of the DU)indicators ...............................................................(current page)practical advice .....................................(up to the end of the DU)lighting:exterior ............................................(up to the end of the DU)lights:dipped beam headlights ..................(up to the end of the DU)lights:direction indicators ..........................(up to the end of the DU)lights:side lights ........................................(up to the end of the DU)lights:main beam headlights .....................(up to the end of the DU)bulbschanging .........................................(up to the end of the DU)
5.11
ENG_UD5603_1Feux avant : remplacement des lampes (B90 - Dacia)ENG_NU_817-2_NU_Dacia_5
Remplacement des lampesFeux avant
Main beam headlights,
dipped beam headlights
Remove cover A.
Remove the connector from bulb
1.
Unclip spring
4 and take out the bulb.
Bulb type: H4It is essential to use anti-UV bulbs so as not to damage the plastic on the headlights.
Do not touch the bulb glass. Hold it by its base.
The engine may be hot during operations in close proximity. In addition, the engine cooling fan may come on at any moment.
Risk of injury.
The bulbs are under pres- sure and can break when replaced.
Risk of injury.
Direction indicator lights
Turn bulb holder 2 a quarter of a turn and take out the bulb.
Bulb type: PY21W.
When the bulb has been changed, make sure you refit the cover correctly.
Front side light
Remove the bulb holder 3 to access the bulb.
Bulb type: W5W.
FRONT LIGHTS: changing bulbs
To comply with current legislation, or as a precaution, you can obtain an emergency kit from your approved dealer containing a set of spare bulbs and fuses.
A
1
42
3
Page 112 of 146
changing a bulb ....................................(up to the end of the DU)practical advice .......................")
bulbschanging .........................................(up to the end of the DU)changing a bulb ....................................(up to the end of the DU)practical advice .....................................(up to the end of the DU)lighting:exterior ............................................(up to the end of the DU)lights:fog lights .........................................(up to the end of the DU)bulbschanging .........................................(up to the end of the DU)lightsadditional ........................................(up to the end of the DU)
5.12
ENG_UD5604_1Projecteurs antibrouillard : remplacement des lampes (B90 - Dacia)ENG_NU_817-2_NU_Dacia_5
Additional lights
If you wish to fit fog lights or long range headlights to your vehicle, consult an approved Dealer.
Feux de brouillard
FOG LIGHTS: changing bulbs
Cleaning the headlights
As the headlights are made of plastic glass, use a soft cloth or cotton wool to clean them.
If this does not clean it properly, use a soft cloth (or cotton wool) slightly mois- tened with soapy water and then wipe clean with a soft damp cloth or cotton wool.
Finally, dry off carefully with a soft dry cloth.
Cleaning products containing alco- hol must not be used under any cir- cumstances.
Front fog lights 1
Changing a bulbContact an approved dealer.
Bulb type: H11.
Any operation on (or modi- fication to) the electrical system must be performed by an approved Dealer since an incorrect connection might damage the electrical equipment
(harness, components and in partic- ular the alternator). In addition, your Dealer has all the parts required for fitting these units.
The engine may be hot during operations in close proximity. In addition, the engine cooling fan may come on at any moment.
Risk of injury.
1
 1
1 2
2 3
3 4
4 5
5 6
6 7
7 8
8 9
9 10
10 11
11 12
12 13
13 14
14 15
15 16
16 17
17 18
18 19
19 20
20 21
21 22
22 23
23 24
24 25
25 26
26 27
27 28
28 29
29 30
30 31
31 32
32 33
33 34
34 35
35 36
36 37
37 38
38 39
39 40
40 41
41 42
42 43
43 44
44 45
45 46
46 47
47 48
48 49
49 50
50 51
51 52
52 53
53 54
54 55
55 56
56 57
57 58
58 59
59 60
60 61
61 62
62 63
63 64
64 65
65 66
66 67
67 68
68 69
69 70
70 71
71 72
72 73
73 74
74 75
75 76
76 77
77 78
78 79
79 80
80 81
81 82
82 83
83 84
84 85
85 86
86 87
87 88
88 89
89 90
90 91
91 92
92 93
93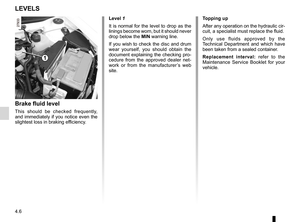 94
94 95
95 96
96 97
97 98
98 99
99 100
100 101
101 102
102 103
103 104
104 105
105 106
106 107
107 108
108 109
109 110
110 111
111 112
112 113
113 114
114 115
115 116
116 117
117 118
118 119
119 120
120 121
121 122
122 123
123 124
124 125
125 126
126 127
127 128
128 129
129 130
130 131
131 132
132 133
133 134
134 135
135 136
136 137
137 138
138 139
139 140
140 141
141 142
142 143
143 144
144 145
145ENG_NU_817-2_NU_Dacia_5
WHEEL TRIM - WHEELS (continued)
Central wheel trim with
concealed wheel bolts
Remove it using the")