Page 49 of 262

Mirrors
Adjusting the exterior mirrors
Fig. 48 Forw ar d section of driver's armrest: powe r m ir
r or co nt rols
Turn the knob to the desi red position :
Q/P -In th is position, you can adjust the
driver's and front passenger's exter ior mir rors
by turn ing the knob in t he des ired direction .
® -The m irrors are heated depending on the
out side temperature .
8 -The exterior mirrors fold in *
You are well-advised to fold the exterior m ir
r ors in when maneuveri ng in tight spaces or
when leaving the car parked close to other
ve hicles .
A WARNING
- Curved ( i.e. convex) mirror s urfaces in
crease your field of view. Remember that
vehicles or other objects will appear
smaller and fa rther away than when seen
in a flat m irror .
If you use this mirro r to
est imate distances of following vehicles
whe n changing lanes, you cou ld es tim ate
incorrectly and cause an accident.
(D Note
- If the mirro r hous ing is moved un inten
tiona lly (fo r example, while park ing your
vehicle), then you must firs t fold t he mir
ror electrica lly. Do not readjus t the m ir
ror ho using manua lly. You could damage
the motor which controls the mirror.
- If you wash the ve hicle in an au tomati c
ca r wash, yo u m ust fold the exterior mir-
-
Clear vi sion 4 7
rors in to reduce the risk of damage to
the mirro rs . Never fo ld powe r fo lding ex
terior m irrors* by hand. Only fo ld them
in and o ut using the power controls.
@ Tips
If there sho uld be a ma lf u nction in the
e lectr ica l system, you can sti ll adjust the
exterior mirrors by pressing the edge of
the m irror.
Dimming the mirrors
Fi g. 4 9 Auto matic dimming re arv iew m irro r*
Manual anti -glare adjustment
.,. Move the small leve r (located on the bot
tom edge o f the mirror) to the rear .
Automatically dimming mirrors*
"' To dim the rearview m irror and both exteri
or m irrors, press the@ button . The diode
@ turns on. The rearview and ex terior m ir
rors dim automatically when light shines on
them, for examp le from headlights on ave
hicle to the rear .
A WARNING
= -
Electrolyte fluid can leak from automatic
d imm ing mirrors if the glass is broken.
Electro lyte fluid can irr itate skin , eyes and
respira to ry system .
- Repeated or prolonged exposure to e lec
trolyte can cause irritation to the respira
to ry system, especially among people
wit h asthma or other resp irato ry condi
t ions. Get fresh air immediately by leav
ing the vehicle o r, if th at is no t possib le,
open w indows and doors a ll the way.
~
Page 50 of 262

48 Clear vis ion
- If electrolyte gets into the eyes, flush
them thoroughly with large amounts of
clean water for at least 15 m inutes;
med ica l attent ion is recommended .
- If electrolyte contacts skin, flush affect
ed area with clean water for at least 15
minutes and then wash affected area
with soap and water; medical attention
is recommended . Tho roughly wash af
fected clothing and shoes before reuse.
- If swallowed and person is conscious,
rinse mouth w it h wate r fo r at least 15
min utes . Do no t induc e vom iting unle ss
instructed to do so by medic al professio
nal. Get medical at tention immediately.
Liquid elect ro lyte lea king from broken mir
ror glass will damage any p lastic surfaces
i t comes in contact w ith. Clean up spilled
e lectro lyte immediate ly with clean water
and a sponge.
(D} Tips
- Switch ing off the dimming func tion of
the inside rear view mirror also deact i
vates the automatic dimmi ng f unction of
the exterior m irrors.
- The automatic dimming mirrors do not
dim when the interior lighting is turned
on or the reverse gear is se lected .
- Automatic dimmi ng for the m irror only
operates properly i f th e light striking the
i nside mirror is not hindered in any way.
Wiper and washer
system
Windshield wiper
The windshield wiper lever controls both the
windshield wipers and the washer system.
F ig . 50 W ipe r leve r: win ds hield w ipe r leve r posit io ns
The windshield wiper lever~ fig. 50 has the
following pos itions:
Intermittent wiping \91 (activating r ain
sensor)*
.,. Move the lever up to position(!).
.,. Move the interval set switch @, to change
the intervals.
Low wiper speed
.,. Move the lever up to pos it ion @.
High wiper speed
.,. Move the lever up to pos it ion @.
One-touch wiping
.,. Move the lever to posit ion @, when you
wan t to wipe the winds hield
briefly.
Automat ic wiper/wa sher
.,. Pull the lever to position ® (toward the
steering whee l) and hold .
.,. Release the lever. The washer stops and the
w ipers keep go ing for about four seconds.
Turning off the wipers
.,. Move the leve r back to position @.
T he w indshield wipers and washe r only wo rk
whe n the ign ition is turned on. If you sw itch
off the ignition with the windshie ld w iper lev -
er sti ll in the interva l wipe posit ion and then
Ill>
Page 51 of 262
.
The rain sensor* is only activated with the
wiper")
come back a while later and drive off, the rain
sensor will reactivate itself after the vehicle
speed has exceeded 4 mph (6 km/h).
The rain sensor* is only activated with the
wiper lever set to position(!). When it starts
to rain, the rain sensor will automatically acti
vate the intermittent wiping mode.
To reduce the sensitivity of the sensor, move
switch @ down. To increase the sensitivity,
move the switch up. The higher you adjust the
sensitivity, the faster the sensor will react
when it senses moisture on the windshield. The pauses between wiper turns depend not
only on the sensitivity setting, but on the ve
hicle speed as well.
During brief stops, e.g . at a red light, wiper
motion will automatically be reduced to the
next lower speed . Wipers already turning at
low speed change to intermittent wiping.
When the ignition is turned on, the washer
jets are heated .
A WARNING
-Wiper blades are crucial for safe driving!
Only when they are in good condition are
they able to clear the windows properly
to provide uncompromising visibility.
Worn or damaged wiper blades are a
safety hazard
r=;, page 51, Replacing
windshield wiper blades!
- The light/rain sensor* is only designed to
assist and support the driver.
It remains
entirely the driver's responsibility to
monitor outside weather conditions and
to manually activate the wipers as soon
as rain or drizzle reduces visibility
through the windshield.
- The windshield must not be treated with
water-repellent materials. They can in
crease glare under poor visibility condi
tions such as wetness, darkness, or when
the sun is low on the horizon. In addi
tion, they can cause the windshield wip
ers to chatter.
Clear vision 49
@ Note
In freezing or near freezing conditions:
- Always check that the wiper blades are
not frozen to the glass before you turn
the wipers on. Loosen a wiper blade
which is frozen in place before operating
the wipers to prevent damage to the
wiper blade or the wiper motor.
- Do not use the wipers to clear a frosted
window. Using the wipers as a conven ient ice scraper will destroy the wiper
blades .
- Before you take your vehicle to an auto
matic car wash, make sure you have the
windshield wiper system switched off (lever in position
0), otherwise the wind
shield wiper system could get damaged
in the car wash if it should suddenly
come on.
@ Tips
-The windshield wipers are switched off
when the ignition is turned off. Activate
the windshield wipers after the ignition
is switched back on by moving the wind
shield wiper lever to any position.
- Worn or dirty windshield wiper blades
cause smearing, which can affect the op
eration of the light/rain sensor*. Check
the condition of your windshield wiper
blades regularly.
-The rain sensor is part of the interval
wiping system. Turning off the ignition
will also deactivate the rain sensor. To re
activate the sensor, switch off the inter
val wiping function, then switch it back
on again.
-Applies to vehicles with light/rain sen
sor: When the wipers are switched on
manually and in rain conditions, the au
tomatic headlights* turn on
r=;, page 42,
Switching the headlights on and off
or
off during the day when the wipers are
no longer operating. The automatic
headlights* function is available in this
case only when the light switch is in the
"AUTO" position¢
page 42, fig. 39.
Page 52 of 262

50 Clear vis ion
- Make sure the washe r fl ui d reservoi r in
the engine compartment is topped
off
before going on a long t rip . L oo k up
c:> page 194 for checking and fi lling the
washer container.
- The w ipers only operate w ith the hood
completely closed.
Headlight washer system
App lies to vehicles : with hea dli ght washer syste m
The headlight washer system cleans the
headlights.
., Operate the windshield wiper/washer sys
tem
c:> page 48, fig. 50 ® with the head
li ghts turned on by holding the lever for lon
ger than one second.
The washe r jets extend forward o ut of the
front bumper driven by water pressure to
spray the front headlights with water.
You shou ld inspect the headlights regularly
(for example when refue ling) and clean
off
any solid dirt or insects from the lenses .
To ensure the system wo rks properly in winter,
keep the washer jets free o f snow and remove
any ice using a de- ic ing spray.
Service position
It is only possible to change wiper blades if
you move the wiper arms to the service posi
tion .
In o rder to use the windsh ie ld w ipers, the
front lid must be comp letely closed .
Moving wiper blades to the service
position
., When there is a ris k of frost, ma ke s ure that
the wiper b lades are not frozen to the wind
shield .
.. Switch the ignition on .
., Move the wiper lever to position
0
c:> page 48, fig. 50 .
., Press the I Re set I button until the D isplay
typ e
menu appears in the Driver Informa
t ion System display . .,
Using the rocker switch and the
I R ese t! but
ton, se lect the
Set > Wipe rs > Front > Serv
ice position on
funct ion . T he w indshield
w iper arms move to the service posit ion.
Mo ving wip er blades to pa rk position
., Ma ke certain that the w iper arms are ly ing
against the windshield .
., Switch the ignitio n on and move the wiper
lever from pos ition O
to 4 c:> page 48,
fig. 50. The w iper arms will move back to
the park position.
@ Note
Never drive your veh icle when the wind
sh ield wiper arms are in the service posi
tion and pulled away from the winds hield .
When you drive faster than
4 mph (6 km/
h), the wiper a rms automatically return to
the pa rk position and cou ld cause paint
damage to the front lid!
@ Tips
- Yo u can also tur n on the se rvice posit ion,
for example, if you want to p rotect the
w indshield from icing by us ing a cover.
- The service posit ion moves to
off auto
matically whe n you ope rate the w ind
shield wiper lever, o r speed exceeds
4 mph (6 km/h) .
Page 53 of 262

Replacing windshield wiper blades
Wiper blades in good condition help keep the
windshield clear .
Fig. 51 Un l atc hing wiper blades
Fig. 52 Remov ing wiper blades
Removing the wip er blade
• Move the w ipers to the service position
<:;> page 50.
• Fo ld the w indshield wiper arm away from
the g lass.
• On the upper end of the wiper arm at the
corrugation, squeeze the plastic retainer to
gether on both sides in the direction of the
arrow¢fig. 51.
• Rotate the wiper blade in the direction of
the arrow @¢
fig. 52 away from the wiper
arm .
• Lift the w iper blade off i n the direction of
the a rrow @.
Inst alling the wiper blade
• Place the rounded end of the wiper onto the
end of the wiper arm in the
opposit e direc
t ion to the arrow@¢
fig. 52 .
• Swing the wipe r in the oppo site direction to
the a rrow @onto the wiper arm.
• Sq ueeze the corrugation on the w iper un til
you hear it click in the wipe r arm .
Clear vi sion 51
• Fold the wiper arm back onto the wind
shield.
• Move the wipers to the park position
¢page SO.
The front wipe r blades measure left side
23.20 in. (590 mm) and right side 18.SO in.
(470 mm) in length.
C lean your wiper blades regularly with a wind
shield washer solution to prevent streaking. If
the blades are very dirty, for example with in
sects, carefully clean the blades with a sponge
or a soft brush.
If the wiper blades begin to streak the wind
shield, this could be caused by residue left on
the windshie ld by automatic car washes.
Fill the wi ndshield washe r container with a
spec ial solutio n availab le at your a uth orized
Audi dealer to remove the resid ue .
Be sure to inspect t he condition of your wiper
blades regularly. For safety reasons, rep lace
your wiper blades once or twice a year if nec
essary . See yo ur authorized Aud i dealer for re
placement blades.
A WARNING
- Clean your wiper blades regu larly with a
windshie ld washer so lution to prevent
streaking. If the w iper blades are very
d irty, fo r example with insects, ca refully
clean the wiper blades with a sponge or a
s oft br ush.
- For your safety, yo u should rep lace the
w iper b lades once o r twice a yea r. See
your author ized Audi dealer for repla ce
ment b lades .
(D Note
-The windshie ld w iper blades m ust only
be replaced when in the service pos ition
q page 50! Otherw ise, you risk damag
ing the paint on the hood or the w ind
shield w ipe r moto r.
Page 54 of 262

52 Clear vis ion
- To help prevent damage to the wiper sys
tem, a lways loosen blades which are fro
zen to the windsh ield before operat ing
wipers.
- To he lp prevent damage to w iper blades,
do not use gasoline, kerosene, pa int
thinner, or other solvents on or near the
wiper blades.
- To he lp prevent damage to the wiper
arms or other components, do not at
tempt to move the wipers by hand .
(D Tips
-Commercial hot waxes applied by auto
matic car washes affect the cleanability
of the glass surface .
- The front wiper blades are different
l engths; the blade on the driver's s ide is
l onger .
Digital compass
Activating or deactivating the compass
Applies to vehicles: with digital compass
The direction is displayed on the interior rear
view mirror.
Fig . 53 In side rea r vi ew m irro r: digi tal compass ac ti
v at ed
.. To activate o r deactivate, hold the@
c::> fig. 53 b utton down until the red disp lay
appe ars or d is a ppears.
The digital compass only works with the igni
tion tu rned on . T he d irect io ns are displayed as
ini tia ls :
N (North), NE (No rthe ast) , E (E as t),
SE (Southe ast), S (Sou th), SW (Southwest),
W (West) , NW (Northwest).
(D Tips
To avoid inaccurate directions, do not al
l ow any remote contro ls, electr ica l sys
tems, or metal parts close to the mirror .
Setting the magnetic deflection zone
Applies to vehicles: with digita l compass
The correct magn etic deflection zon e must be
set in order to display the dire ctions correctly.
©
Fi g. 54 North A meric a: magne tic def le ction zo ne
bo un daries
" Ho ld th e@ c::> page 52, fig . 53 button down
until the number of the set magnetic deflec
t ion zo ne appe ars on the inte rior re ar v iew
m irror.
.. Adjust the magnetic de flect ion zone by re
peated ly pressing on the @button . The set
mode automatically deact ivates after a few
seconds.
Calibrating the compass
Applies to vehicles: with digita l compass
The compass has to b e recalibrated if the dis
play is wrong or inaccurate.
.. Hold the @button down unti l th e letter C
is displayed on the inter ior rear view mirror . ..,.
Page 55 of 262
~ Drive in a circle at a speed of about 5 mph
(10 km/h) until a direction is shown on the
interior rear view mi rror.
A WARNING
The d igital compass is to be used as a di
rectional a id only. Even though you may
want to look at it wh ile you are driv ing, you
must sti ll pay attention to t raffic , road and
weather condit io ns as we ll as other possi
ble h azards.
Clear vis ion 53
Page 56 of 262

54 Seat s a nd s tor ag e
Seats and storage
General recommen
dations
Why is your seat adjustment so
important?
The safety belts and the airbag system can
only provide maximum protection if the front
seats are correctly adjusted.
There are various ways of adjust ing the front
seats to provide safe and comfortable support
for the driver and the front passenger . Adjust
your seat properly so that :
- you can easily and quick ly reach all the
switches and controls in the instrument
panel
-your body is prope rly supported thus reduc
ing physical stress and fatigue
- the safety be lts and airbag system can offer
maximum protection
¢ page 108 .
In the following sec tions, you will see exactly
how you can best adjust you r seats .
There are special regulations and instructions
for insta lling a child safety seat on the front
passenger's seat. Always heed the informa
tion rega rd ing child safety provided in
~ page 130, Child Safety.
A WARNING
Incorrect seating position of the driver and
all other passengers can result in serious
personal in jury.
- Always keep your feet on the floor when
the vehicle is in motion -never p ut your
feet on top of the instrument panel, out
of the w indow or on top of the seat cush
ion! This applies espec ially to the passen
gers .
If your seating position is incorrect
yo u increase the r isk of injury in the case
of sudden braking or an acc ident.
If the
airbag infla tes and the seating position
is incorrect this could result in personal
injury or even death.
- It is import ant for bo th the driver and
front passenger to keep a distance of at least 10 inches (25 cm) between them
selves and the steering wheel and/or in
strument panel. If you're s itting any
closer than th is, the a irbag system can
not protect you properly . In addition to
this, the front seats and head restra ints
must be adjusted to your body height so
that they can give you max imum protec
tion.
- Always try to keep as much distance as
possible between yourself and the s teer
ing wheel or instrument pane l.
- Do not adjust the driver's o r fron t pa s
senger's seat whi le the vehicle is moving.
Your seat may move unexpected ly, caus
ing sudden loss of vehicle contro l and
personal injury . If you ad just yo ur seat
while the veh icle is moving, you are out
of posit ion.
Driver's seat
The correct seat position is important for safe
and relaxed driving.
We recommend that you adjust the driver's
seat in the fo llowing manner:
.,. Adjust the seat in fore and aft direction so
t ha t you can easily p ush the peda ls to the
floor wh ile keeping your knee slightly bent
~ A in Why is your seat adjustment so im
portant? on page 54 .
.,. Adjust the seatback so that when you sit
w ith your back against the seatback, you can
still grasp the top of the steering wheel.
.,. Posit ion the head restraint accord ing to the
occupant 's height~
page 57 . For maxi
mum protection, t he top of the head re
s t raint shou ld be a t least at eye level, pref
erably higher and idea lly level with the top
of the head
¢ page 94, fig. 92.
A WARNING "--
Never place any objects in the dr iver's foot-
well. An object could get into the pedal
area and interfere with pedal function. In
case of sudden braking or an acc ident, you
would not be able to brake or accelerate!
 1
1 2
2 3
3 4
4 5
5 6
6 7
7 8
8 9
9 10
10 11
11 12
12 13
13 14
14 15
15 16
16 17
17 18
18 19
19 20
20 21
21 22
22 23
23 24
24 25
25 26
26 27
27 28
28 29
29 30
30 31
31 32
32 33
33 34
34 35
35 36
36 37
37 38
38 39
39 40
40 41
41 42
42 43
43 44
44 45
45 46
46 47
47 48
48 49
49 50
50 51
51 52
52 53
53 54
54 55
55 56
56 57
57 58
58 59
59 60
60 61
61 62
62 63
63 64
64 65
65 66
66 67
67 68
68 69
69 70
70 71
71 72
72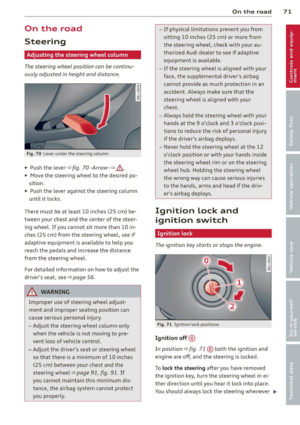 73
73 74
74 75
75 76
76 77
77 78
78 79
79 80
80 81
81 82
82 83
83 84
84 85
85 86
86 87
87 88
88 89
89 90
90 91
91 92
92 93
93 94
94 95
95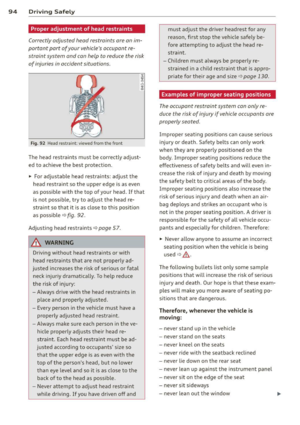 96
96 97
97 98
98 99
99 100
100 101
101 102
102 103
103 104
104 105
105 106
106 107
107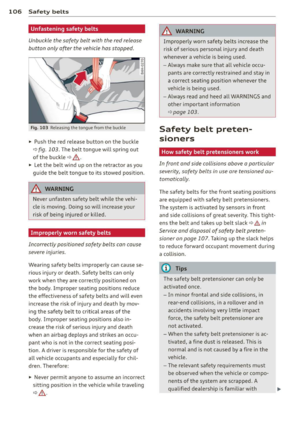 108
108 109
109 110
110 111
111 112
112 113
113 114
114 115
115 116
116 117
117 118
118 119
119 120
120 121
121 122
122 123
123 124
124 125
125 126
126 127
127 128
128 129
129 130
130 131
131 132
132 133
133 134
134 135
135 136
136 137
137 138
138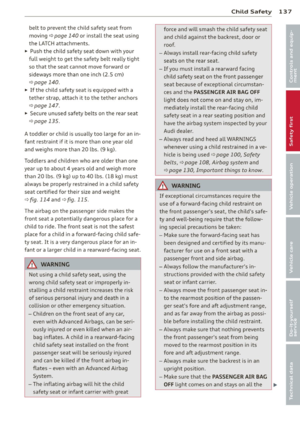 139
139 140
140 141
141 142
142 143
143 144
144 145
145 146
146 147
147 148
148 149
149 150
150 151
151 152
152 153
153 154
154 155
155 156
156 157
157 158
158 159
159 160
160 161
161 162
162 163
163 164
164 165
165 166
166 167
167 168
168 169
169 170
170 171
171 172
172 173
173 174
174 175
175 176
176 177
177 178
178 179
179 180
180 181
181 182
182 183
183 184
184 185
185 186
186 187
187 188
188 189
189 190
190 191
191 192
192 193
193 194
194 195
195 196
196 197
197 198
198 199
199 200
200 201
201 202
202 203
203 204
204 205
205 206
206 207
207 208
208 209
209 210
210 211
211 212
212 213
213 214
214 215
215 216
216 217
217 218
218 219
219 220
220 221
221 222
222 223
223 224
224 225
225 226
226 227
227 228
228 229
229 230
230 231
231 232
232 233
233 234
234 235
235 236
236 237
237 238
238 239
239 240
240 241
241 242
242 243
243 244
244 245
245 246
246 247
247 248
248 249
249 250
250 251
251 252
252 253
253 254
254 255
255 256
256 257
257 258
258 259
259 260
260 261
261 until a direction is shown on the
interior rear view mi rror.
A WARNING
The d igital compass is to be used as a di
rectiona")