Page 41 of 262

The anti-theft alarm system triggers an audi
b le alarm and turns on the emergency flasher
if an unauthor ized interference with the vehi
cle is sensed by the system.
How is the anti-theft alarm system
switched on?
T he anti -theft a larm system is switched on
when you lock the driver's door manually us
ing the fold-out key, or when you use the re
mote control. The system is activated approxi
mately 30 seconds after the veh icle is locked .
The indicator light ~
fig. 36 starts flashing
rapidly for 30 seconds and then blinks slowly.
How is the anti-theft alarm system
switched off?
The anti-theft a larm system is switched off
on ly when you use the remote contro l to un
lock your veh icle. If you do not open a door
within 30 seconds after you have un locked
with the remote cont ro l, the vehicle will lock
itself again automatically.
If you lock just the dr iver's doo r using your
key, the front passenger's door and the rear
lid remain locked.
When will the anti theft alarm system be
triggered?
When the vehicle is locked , the alarm system
monitors and protects the following pa rts of
the vehicle:
- engine compa rtment
- luggage compartment
- doors
- ignition
When the system is activated, the alarm will be triggered if one of the doors, the engine
hood or the rear lid are opened, or if the igni
tion is turned on.
The anti-theft a larm system will also go off
when the battery is disconnected.
You can also trigge r the alarm by pressing the
PANIC button on your remote-control key.
This will a lert other peop le in case of emer-
Opening and closing 39
gency. Press the PANIC button again to turn
off the alarm .
How is the anti-theft alarm switched off
when trigge red?
The alarm system is switched off when you
unlock the vehicle using the remote -control
key or when the ignition is switched on . T he
alarm will also switch itself off when it comes
to the end of its cycle .
Emergency flasher
The emergency flasher will blink briefly when
the doors, engine hood and rear lid a re prop
erly closed.
If the emergency flashers do not blink, check
the doors, engine hood and rear lid to make
sure they are properly closed. If you close a
door, the hood or the rear lid with the anti
theft alarm sw itched on, the emergency flash
ers will blink only after you have closed the
door or lid .
(!) Tips
For the anti-theft alarm system to func
tion properly, make sure all veh icle doors
and windows are closed before leaving the
vehicle.
Power windows
Controls
The driver can operate all windows .
Fig. 37 Driver 's doo r: power w indow sw itches
If the respective switch is pushed or pulled
the window w ill open or close . The power w in-
dow swi tches have a
two-position function: ..,.
Page 42 of 262

40 Openin g and clo sing
Op ening th e window s
.. Press the switch and ho ld i t down until the
window has reached the des ired position.
.. Press the switch
brie fly to open the window
automatically. By briefly pressing the switch
again, the downward travel of the window
can be stopped in any posit ion
¢ ,& .
Clos ing th e windows
.. Pu ll the switch and hold it until the window
has reached the desired position .
.. Pull the switch
brie fly to close the window
automatica lly. By briefly pressing the switch
again, the upward travel of the window can
be stopped in any position
c:> ,A .
Sw itch @ c:> fig. 37 operates the window in
the dr iver's door.
Switch @operates the window in the front
passenger's door .
A WARNING
- Do not leave children unattended in the
vehicle, especially with access to vehicle
keys. Unsupervised use of the keys can
result in starting of the engine and use
of vehicle systems such as power win
dows, etc. which could resu lt in serious
injury.
- Remember -you can still open or close
the power w indows for about ten mi
nutes after the ignition is sw itched off.
Only when e ithe r of the front doors a re
opened are the power windows switched
off.
- Be careful when closing the windows .
Check to see that no one is in the way, or
serious injury could result!
- Always remove the ignition key whenever you leave your vehicle .
- If you lock your vehicle from the ou tside,
no one, especia lly children, sho uld re
main in the vehicle.
- Do not stick anything on the windows o r
the windshield that may interfere with
the driver's fie ld of vision.
(D Tips
- When the doors are opened, the win
dows are automatically lowered 10 mm .
- The windows can still be opened and
closed for about ten minutes after the
ignition has been turned off. The power
w indows are not shut off unt il one of the
front doors is opened.
Convenience close/open feature
You can close or open the windows from out
side when you lock or unlock your car with the
key.
F ig. 38 Key turns for opening and dos ing
Closing the windows
.. Insert the key into the lock of the dr iver's
door.
.. Make sure that the windows a re not blocked
¢ ,& .
.. Turn and hold the key in the lock pos ition @
¢ fig. 38 until the windows are completely
closed.
Openin g the window s
.. Insert the key into the lock of the dr iver's
door .
.. Turn and hold the key in the open position
@ .
The automatic close f unct ion w ill cease if the
key is released .
A WARNING
= -
-Be careful when closing the windows.
Check to see that no one is in the way, or
serio us injury co uld resu lt!
Page 43 of 262
-Always read and hee d WARNI NG ¢ .&. in
General description on page 34 .
Reactivating the system after battery
disconnection
Reactivating the convenience close/open fea
ture
If t he ve hicle battery is disconnected and t hen
reconnected, the a utomat ic clos ing and open
in g funct ion w ill not work until it is react ivat
ed . T o reactivate t his featu re, pe rform t he fo l
l ow ing steps:
Reactivating close/open feature
~ Pull and hold t he power w indow switch un
t il the win dow is completely cl osed .
~ Release the switch.
~ P ull the switc h again fo r one second. The
au toma tic clos ing/opening is now react ivat
ed .
Opening and closing 41
Page 44 of 262

42 Clear vision
Clear vision Lights
Switching the headlights on and off
Fig . 39 Instr ument panel: l ight sw itch
Fig. 40 Instr ument pane l: ligh t switch w ith dayti me
running lights (DR L)
The light switch must not be overturned past
the stops in
either direct ion.
Switching on automatic headlight
control*
• Turn the light switch to AUTO* ¢ fig. 39.
Switching on the side marker lights
• Turn the light switch to :;oo:.
Switching on the headlights and high
beam
• Turn the light switch to tD .
• Push the high beam lever forward towards
the instrument panel¢
page 44.
Switching off the lights
• Turn the light switch to 0.
The head lights only work when the ignition is
switched on. While start ing the engine or
when switching off the ignition, the head- lights
will go off and only the side ma rker
lights will be on.
Daytime running lights (DRL) (USA
models)
T he daytime running lights can be turned on
or off using this function. If the function is ac
tive, the daytime ru nning lights are turned on
automatica lly when the ign it ion is switched
on.
T he daytime running lights are activated
only
when the light switch is at the AUTO* or DRL *
position.
Daytime running lights (Canada models
only)
The daytime running lights are activated only
when the light switch ¢ fig. 39 is either at the
0 or the :;oo: pos ition.
T he daytime r unning lights funct ion cannot be
turned off.
Automatic headlight control*
In the switch position AUTO the automatic
headlight control
is turned on. The low
beams are turned on automatically through a
light sensor as soon as amb ient b rightness
(e .g. when driving into a tunnel) falls below a
value preset at the factory. When ambient
brightness increases aga in, the low beams are
turned off again automatically ¢.&..
In the
AUTO position the low beams are
switched off automatically when the ignition
is turned off .
Light Sensor Malfunction*
In the event of a light sensor malfunction, the
driver is notified in the instrument cluster dis
play:
El Automatic headlights/automatic wipers
defective
For safe ty reasons the low beams are turned
on permanently with the switch in
AUTO* .
However , you can conti nue to turn the lights
on and off using the light switch. Have the
Ill>-
Page 45 of 262

light sensor ch ecked as soon as possible at a
deal ership.
Com ing home /leaving home function *
The functio n is switched on when the switch is
i n the AU TO* posi tion and the function is
shown as active in the driver information sys
tem .
The
coming hom e function illuminates the
a rea aro und the veh icle when the ign ition is
switched off and the driver 's door is opened.
The length of time the lights remain on can be
set in the menu display
( Illumin ation > Exte
rior lights > coming hom e).
The leaving home func tion i llum inates the
area around the vehicle when unlocking it.
A WARNING
- Never use dayt ime running lights to see
where you are going. They are not bright
enough and w ill not let you see far
enough ahead for safety, especially at
dusk or when it is dark . Always switch on
the low beams at dusk or when it is dark.
- Automatic headlights are only intended
to assist the dr ive r. T hey do not relieve
the driver of his responsibility to check
the headlights and to tu rn them on man
ually acco rding to the c urrent light and
visibili ty cond itions. For example, fog
and rain cannot be detected by the light
sensors . So a lways switch on the head
lights under these weather cond itions
and when driving in the dark
io .
-Crashes can happen when yo u cannot see
the road ahead and when you cannot be
seen by other motorists .
- Always tur n on t he headlights so that
you can see ahead and so that o thers
c a n see yo ur ca r from the ba ck.
- Please obse rve lega l regu lations whe n
us ing the light ing systems descr ibed .
(D Tips
-The light sensor for headlight control is
l ocated in the rear v iew m irror mount .
Do not apply a ny stic kers to the w ind-
Clear vis ion 43
shield in th is area to p revent malfunc
tions or fai lures.
- Some exter io r light ing funct ions can be
adjusted in the d river informat ion sys
tem
~ page 24.
- If you remove the ignition from the igni
tion lock while the headlights are still
on, a buzzer w ill sound as long as the
dr iver's door is open to rem ind you to
t u rn off the lights.
- Always observe the specific loca l regula
tions for your area as to when to use your
lights.
- With automatic headlights, the high
beam function is also available, but w it h
one restrict ion:
If you have not sw itched
t he high beams back to low beams dur
ing automatic headlight operation (fo r
example, afte r d riving throug h a tunnel),
only the low be ams come on the next
t ime au tomatic headlights are switched
on. To use the high beams, you firs t have
to pull the high beam lever back and
then push the leve r forward again.
- In coo l or damp weather, the inside of
the headlights, turn signals and tail
lights can fog over due to the tempera
ture difference between the inside and
outside. They w ill clear shortly after
sw itching them on. This does not affect
the se rv ice life of t he lig hti ng .
Adaptive light
Applies to veh icles: w ith Adaptive light
When driving around bends, the relevant area
of the road is better illuminated .
Fig. 4 1 Adapt ive li ght w hen driv ing
Page 46 of 262

44 Clear vis ion
The benefit o f adaptive light is that the curve
and the edge of the road are better illuminat
ed
c::> fig. 41. The adaptive light is controlled
automatically, depend ing on vehicle speed
and steering wheel angle.
When driving around bends, the head lights
are controlled according to steering wheel an
g le. So that there is no black area ahead of the
vehicle, the two main beams pivot at different
angles.
@ Tips
The system works above a speed of about
6 mph (10 km/h).
Front fog lights
Use the light switch to turn on the front fog
lights.
Fi g. 4 2 Fog light act ivation : light switc h position on
veh icles WITHOUT sensor light
Switching on the f ront fog lights }D
0
0
en ~ ci. a,
"'
.. Do not turn the light switch -'ti.-c::> fig . 42 to-
ward the fog light symbol
iD.
.. Turn the light switch to ;oo: or to io.
.. Pull the light switch to the first stop@.
When the front fog lights are on, the symbol
}D next to the light switch will i lluminate.
(D Tips
With the switch in AUTO front fog lights
cannot be turned on in addit io n.
Turn signals and high beam lever
The lever on the left side of the steering col
umn is used to operate the turn signals and
the high beam as well as the headlight flash
er.
t
'
Fi g. 4 3 Tu rn signal and high beam lever
The turn signa l and hig h beam lever has the
following functions:
Turn signals ¢¢ CD@
.. Push the leve r up as far as it can go to t urn
on t he right tu rn s ignal or down to tu rn on
the left tu rn s ignal
~ fig. 43 .
.. Move the lever briefly unti l you meet resist
ance and release it to flash three times .
.,. Move the lever (up or down) until you meet
resistance and hold it there to determine
the flashing time for the turn signals.
High beam gD @
.,. Push the lever forward to sw itch on the high
beam .
.. Pull the lever back towards you to switch off
the high beam .
Headlight fla sher gD ©
.,. Pull the lever toward the steering wheel to
use t he headlight flasher.
Not es on thes e features
- The turn signals on ly work w ith the ignition
sw itched on . The indica to r l ights
II or Bin
the instrument cluster c::> page 12 also blink.
- After you have t urned a co rner, the turn s ig -
na l switches off au toma tic ally.
- The
high beam wo rks on ly when the head-
lights are o n. The indicator light
Bl in the .,..
Page 47 of 262

instrument cluster illuminates when the
high beams are on.
- The
headlight flasher works only as long as
yo u hold the lever -even if there are no
l ights turned on . The indicator light
El in
the instrument cluster illuminates when you
use the headlight flasher.
A WARNING
Do not use the hig h beam or headlight
flasher if you know that these could blind
oncoming traffic.
Emergency flasher
The emergency flasher makes other motorists
aware that you or your vehicle are in an emer
gency situation.
Fi g. 44 Cente r co nso le: emerge ncy flasher switch
.,.. Press the switch ~ ~fig. 44, to sw itch the
eme rgency flasher on or off.
When the emergency flashe r is on, all four
turn signals blink a t the same time. The tu rn
signa l indicator lights
BB in the ins trument
cluster, as we ll as the light in the emergency
f lasher switch ~ blink likewise. The emergen
cy flashers also work when the ignition is
turned off.
The emergency flasher will automatica lly
switch on if you are in an acc ident where the
airbag has deployed.
@ Tips
You shou ld switch on the emergency flash
er when: Clear vi
sion 45
- you are the last vehicle standing in a tra f
fic jam so that any other vehicles coming
can see you, or when
- your vehicle has broken down or you are
in an emergency s ituation, or when
- your vehicle is be ing towed by a tow
truck or if you are towing another vehicle
behind you.
Interior Lights
Interior lights
The interior lights include the reading lights
for the driver and the front passenger.
Fi g. 45 Sect ion from hea dlin er: Interior lights
Activating door contact circuit
.,.. Press the button @. The LED in the b utton
illuminates .
Deactivating door contact circuit
.,.. Press the button @. The LED in the button
goes out.
Front reading lights "<~
.,.. Press one of the switches ® to turn the
r ight or left reading light on or off.
With the door contact circuit, the inter ior
lights turn on as soon as you unlock the vehi
cle or open the doors. The interior lights are
also t urned on when the ignition key is re
moved. The lights turn off about 30 seconds
after the doors are closed. When the veh icle is
locked or when the ignition is turned on, the
interior lights are turned off.
When a door is open, the interior lights are
turned off after about 10 minutes to prevent battery dra ining.
Page 48 of 262

46 Clear vision
The brightness of the lights is controlled au
tomatically by a dimmer when they are
switched on and
off.
Instrument panel illumination
The illumination of the instruments , displays
and the center console can be adjusted.
Fig. 46 Instrument panel ill um inat io n
0 ~ d. 00 m
You regulate the brightness of the instru
ments with the left thumbwheel
C t<=:> fig . 46 .
Ignition ON, light switch at@ .
With the ignition switched ON, the glow of in
strument needles
can be adjusted to appear
brighter or dimmer.
Ignition ON, light switch at ~oo:c or io.
With the lights switched on, the brightness of
instrument cluster (i.e. needles, gauges and
displays) and center console illumination can
be adjusted.
(D Note
The instrument cluster and center console
illumination (gauges and needles) comes
on when you switch on the ignition and the
vehicle headlights are off. Be aware of the
following difference between models built
to US or Canadian specifications :
- USA models: illumination of the instru
ment cluster (gauges and needles), dash
and center console around the gearshift
lever is controlled by a light sensor locat
ed in the instrument panel. The instru
ment panel illumination will automati
cally become dimmer as the daylight
fades away and eventually will go out
completely when outside light is very low.
This is to remind you, the driver, to
switch on the headlights before it gets
too dark.
- Canada models: instrument panel illumi
nation will stay brig ht regardless of the
intensity of ambient light. Always be
aware of changes in outside light condi
tions while you are driving. Respond in
time to fading daylight by turning the
light switch to position fD (or "AUTO" if
your car is equipped with this feature) to
turn on your headlights.
Luggage compartment light
The light is located on the right side of the
luggage compartment.
These lights come on automatically when the
rear lid is opened. The lights turn
off automat
ically if the lid is left open for more then 10
minutes.
Vision
, Sun visors
Using the sun visors makes driving safer .
(· 3
Fig. 47 Sun visor
The driver's and passenger's sun visors can be
pulled from the brackets above the center of
the windshield and swung toward the doors
(!)<=:>fig. 47.
The vanity mirrors in the sun visors are equip
ped with lids. When the lid is opened
@, the
mirror light in the headliner turns on auto
matically. It turns
off when the lid is closed
and the visor is folded up again.
 1
1 2
2 3
3 4
4 5
5 6
6 7
7 8
8 9
9 10
10 11
11 12
12 13
13 14
14 15
15 16
16 17
17 18
18 19
19 20
20 21
21 22
22 23
23 24
24 25
25 26
26 27
27 28
28 29
29 30
30 31
31 32
32 33
33 34
34 35
35 36
36 37
37 38
38 39
39 40
40 41
41 42
42 43
43 44
44 45
45 46
46 47
47 48
48 49
49 50
50 51
51 52
52 53
53 54
54 55
55 56
56 57
57 58
58 59
59 60
60 61
61 62
62 63
63 64
64 65
65 66
66 67
67 68
68 69
69 70
70 71
71 72
72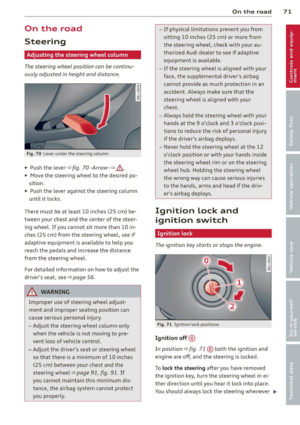 73
73 74
74 75
75 76
76 77
77 78
78 79
79 80
80 81
81 82
82 83
83 84
84 85
85 86
86 87
87 88
88 89
89 90
90 91
91 92
92 93
93 94
94 95
95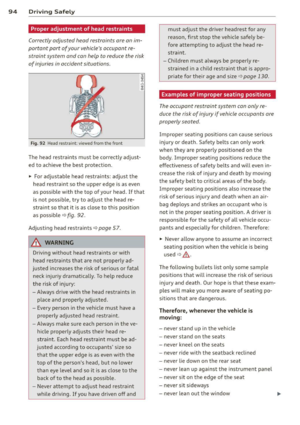 96
96 97
97 98
98 99
99 100
100 101
101 102
102 103
103 104
104 105
105 106
106 107
107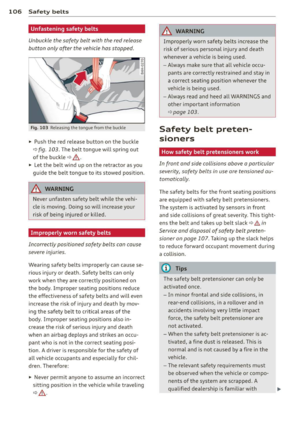 108
108 109
109 110
110 111
111 112
112 113
113 114
114 115
115 116
116 117
117 118
118 119
119 120
120 121
121 122
122 123
123 124
124 125
125 126
126 127
127 128
128 129
129 130
130 131
131 132
132 133
133 134
134 135
135 136
136 137
137 138
138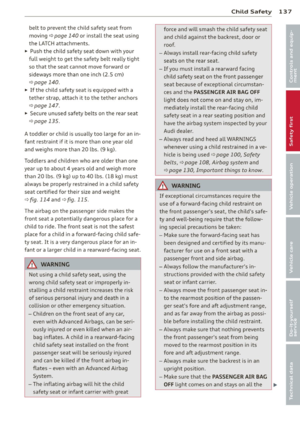 139
139 140
140 141
141 142
142 143
143 144
144 145
145 146
146 147
147 148
148 149
149 150
150 151
151 152
152 153
153 154
154 155
155 156
156 157
157 158
158 159
159 160
160 161
161 162
162 163
163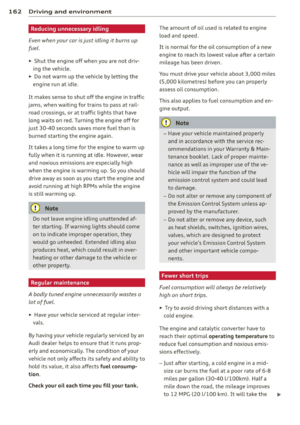 164
164 165
165 166
166 167
167 168
168 169
169 170
170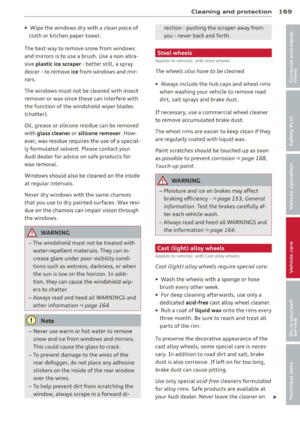 171
171 172
172 173
173 174
174 175
175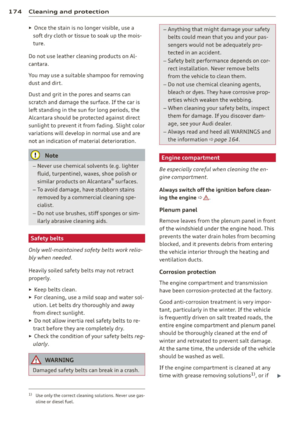 176
176 177
177 178
178 179
179 180
180 181
181 182
182 183
183 184
184 185
185 186
186 187
187 188
188 189
189 190
190 191
191 192
192 193
193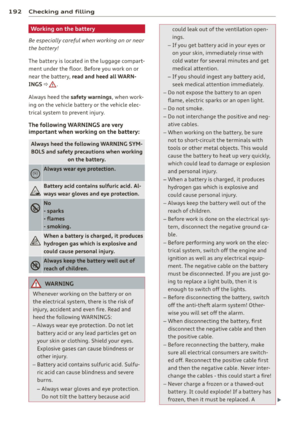 194
194 195
195 196
196 197
197 198
198 199
199 200
200 201
201 202
202 203
203 204
204 205
205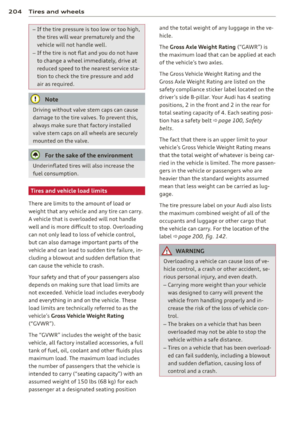 206
206 207
207 208
208 209
209 210
210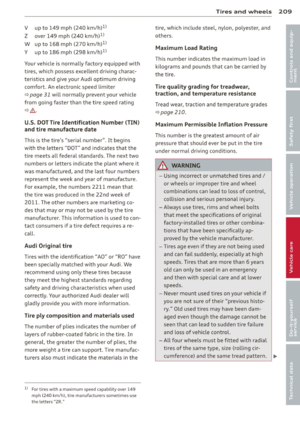 211
211 212
212 213
213 214
214 215
215 216
216 217
217 218
218 219
219 220
220 221
221 222
222 223
223 224
224 225
225 226
226 227
227 228
228 229
229 230
230 231
231 232
232 233
233 234
234 235
235 236
236 237
237 238
238 239
239 240
240 241
241 242
242 243
243 244
244 245
245 246
246 247
247 248
248 249
249 250
250 251
251 252
252 253
253 254
254 255
255 256
256 257
257 258
258 259
259 260
260 261
261