Page 57 of 262

Front passenger's seat
Always move the front passenger seat into the rearmost position .
To avoid contact with the airbag while it is de
ploying, do not sit any closer to the instru
ment panel than necessary and always wear
the three-point safety belt provided adjusted
correctly . We recommend that you adjust the
passenger's seat in the following manner:
.. Bring the backrest up to an (almost) upright
pos it ion .
Do not ride with the seat reclined .
.. The idea l posit ion for the head restraint is
with the upper edge of the restraint level
with the top of your head
¢ page 5 7. You
shou ld
not lower the top of the restraint be
low the level of your eyes .
.. Place your feet on the floor in front of the
passenger's seat.
Adjusting front seats manually
Adjustment controls
Applies to vehicles: with manual seat adjustme nt
Various controls on the manual seats provide
a wide range for individual adjustments.
Fig. S5 Ad just men t contro ls : locat ions o n drive r's seat
CD Moving the seat forward or backward
@ Adjusting the lumbar support
@ Adjusting the seat height
@ Adjusting the seatback angle
® Releasing the seatback
Seats and storage 55
@ Tips
Some of the controls are fitted on certain
models only or they are optional equip
ment .
Adjusting the manual seats
Applies to vehicles: with manual seat adjustment
Position, angle and shape of the manual
seats can be adjusted to provide safe and
comfortable seating .
Reed and heed all WARNINGS ¢.&. before
you adjust your seat .
Moving the front seats forward or
backward
.. Lift the lever CD¢ page 55, fig. 55 and slide
the seat to the desired position.
.. Release the lever and then move the seat
further until you feel and hear it engage.
Adjusting the seat height
.. Pull the lever ® up and pump it to raise the
seat .
.. Push the lever down and pump it to lower
the seat.
Adjusting the seatback angle
.. Lean forward to take your weight off the
seatback .
.. Turn the hand wheel@ in the direction you
want the seatback to tilt.
Releasing seatback
.. Pull the lever ® up .
.. Push the seatback forward.
WARNING
-Never adjust the driver's or front pas
senger's seat while the vehicle is moving.
If you do this while the vehicle is moving,
you will be out of position. Always adjust
the dr iver's or front passenger's seat
when the vehicle is not moving .
- Be careful when adjusting the seat
he ight. Check to see that no one is in the
way, or serious injury cou ld result!
Page 58 of 262

56 Seats and storage
- To reduce the r isk of injury in the case of
sudden braking or accident, front pas
sengers must never ride in
a moving ve
hicle with the seatback recl ined . Safety
belts and the airbag system only offer
maximum protection whe n the seatback
is up right and the safe ty belts a re p rop
erly posi tioned on the body. The more
the seatback is re clin ed, the greate r the
risk of personal injury from an incorrect
seating posit ion and improperly posi
t ioned safety be lts!
Power seats
Adjustment switches
App lies to vehicles: with power seats
The operating logic for the switches corre
sponds to the construction and function of
the seat.
Fi g. 56 Adjust ment sw itches : locat io ns on driver seat
The operating logic for the switches corre
sponds to the constr uction, the design and
the function of the seat . Push or pull e ither
switch in exactly the same d irect ion you want
the corresponding part of the seat to move.
Adjustment switches
CD Adjusting the lumbar s upport
@ Adjusting seat height and fore-and-aft po
sition
@ Adjusting the ang le of the seatback
@ Releasing the seatback
Power seat adjustment
Applies to vehicles: with power seats
The switches can be moved in various direc
tions to allow precise adjustment.
Read and heed all warnings before you adjust
your seat.¢ &.
Adju sting the curv atur e of the lumbar
support
.,._ Push the forward or rear depression on the
sw itch shell CD¢
page 56, fig. 56 to in
crease or decrease the back rest curvature.
Adju sting the he ight of the lumbar
support
.,._ Push the top or bottom depress ion on the
sw itch shell (!) to raise or lower the support
in the back rest .
Mo ving the front se ats forward or
ba ckward
.,._ Press the switch @forward or backward
hor izontally.
Ad ju sting the seat height
.,._ Pull or push the switch @even ly at both
ends to ra ise or lower the seat.
Angling the seat cu shion up and down
(front )
.,._ Pull or push the switch @at the front only
to raise or lower the seat .
Angling the seat cushion up and down
( rear)
.,._ Pull or push the switch @at the rear on ly
to ra ise or lower the seat.
Ad ju sting the seatback
.,._ Push or pull the switch @ in the same direc-
tion you want the seatback to tilt .
Releasing seatback
.,. Pull the lever@ up .
.,. Push the seatback forward.
Page 59 of 262

A WARNING
-Never adjust the driver's or front passen
ger seat while the vehicle is moving. If
you do this while the vehicle is moving,
you will be out of posit ion. Always adjust
the driver's or front passenger seat when
the vehicle is not moving.
- Be careful when adjusting the seat
height. Check to see that no one is in the
way, or serious injury could result!
- Beca use the seats can be electrically ad
justed wi th the ign it ion key removed,
never leave children unattended in the
vehicle. Unsupervised use of the e lectric
seat adj ustments may cause serious in
jury.
- To reduce the r isk of injury in the case of
sudden braking or accident, front pas
sengers must never ride in a moving ve hicle with the seatback recl ined. Safety
belts and the airbag system offer maxi
mum p rotection only when the seatback
is upright and the safety be lts a re prop
erly posit ioned on the body. The more
the seatback is recl ined, the greate r the
risk of personal injury from an inco rrec t
seating position and improperly posi
t ioned safety be lts!
- Always make sure the front seatbac ks are
in the upright position and securely
locked in place when driving.
S ea ts a nd s to rage 57
Head restraints
Adjusting head restraints, front seats
The head restraints must be adjusted proper
ly to provide protection.
Fi g. 57 Driver's seat head restra int: adjust ing the
he ig ht
The head restraints on the front seats can be
adjusted to provide safe support to head and
neck at the optimum height . When optimally
adjusted , the top of the rest raint should be
level with the top of the head
~ page 94,
Proper adjustment of head restraints .
.. Grasp the sides of the head restraint with
both hands and slide it upward/downward
until you fee l it click into place<>
fig. 57.
A WARNING
- Driving withou t head restraint s or wit h
head restra ints tha t are not properly ad
justed increases the risk of serious o r fa
tal neck injury dramatica lly .
- Read and heed all WARNINGS
<> page 94 .
{i) Tips
Correctly adjusted head restraints and
safety be lts are an ext reme ly effect ive
combination of safety features.
-
Page 60 of 262

58 Seat s a nd s tor ag e
Rear seats
General information
Safe transportation of passengers on the rear
seats requires proper safety precautions .
Fig. 58 Correc t seat po sit io n on the rear bench seat
A ll passengers on the rear seats must be sea t
ed in compliance w ith the sa fety guidelines
explained in
c::> page 100 and c::> page 108.
The correct seating position is critical for the
safety of front
and rear seat passengers alike
c::> page 93.
A WARNING
,--
- Occupants in the front and rear seats
must always be properly restrained.
- Persons taller than 4 feet 11 inches
(1. 50 m) must never sit in the rear seat
area . The rear passenger compartment is
too small for passenger taller than 4 feet 11 inches
(1. 50 m).
- The minimum clearance between the
passenge rs' heads and the rear window
must never, under any circumstances, be
less than 1 inc h (2.5 cm) with the pas
sengers sit ting fully upright. Ta ller per
sons, as well as children on booster seats
who are too close to the rear window, can suffer severe head and neck injuries
when the rear lid is closed or if a crash
occurs. Always make sure that rear seat
passengers ca nnot be struck when the
rear lid is closed .
- When the rear backrest is folded down
do not allow passengers to occupy the
load surface available while the vehicle is
in motion. Vehicle occupa nts must al
ways be properly restrained. -
Never store any heavy, hard objects on
the rear lid cover. This can be hazardous
for rear seat occupants if the rear lid is
opened or if the vehicle is braked sud
denly or in the event of a crash .
- Loose items inside the passenger com
partment, can fly forward in a crash or
sudden maneuver and injure occupants .
Always sto re a rticles in the luggage com
pa rtment and use the faste ning eyes, es
pecia lly when the rea r seatbacks have
been fo lded down.
- Read and heed all WARN INGS
c::> page 93, Proper seating positions
for passengers in rear seats.
Rear window shelf '
You can place light articles of clothing on the
rear window shelf behind the seatback .
A WARNING ~ -
Whenever you are driving, do not leave any
hard objects on the rear window shelf or
a llow your pet to sit on the she lf. These
could become a hazard for veh icle occu
pants in the event of sudden brak ing or a
crash!
(i) Tips
- A vent slot is located between the shelf
and the rear w indow. Do not block the
vent with any items you may place on the
rear window she lf.
- Do not place bu lky items on the rear win
dow shelf as they wou ld restr ict or block
the driver's vision t hrough the rear view
m irror .
Page 61 of 262

Luggage compartment
Expanding the luggage compartment
You can increase the available luggage space
by folding the rear seatback down .
Fig. 59 Unlocking lever of the backrest (left sid e)
Tilting the seatback forward
~ Press the lever c:> fig. 59 in the direction of
the arrow.
~ T ilt the seatback forward .
Returning the seatback to its original
position
~ T ilt the seatback until it latches securely
¢ _&..
You can fold down both parts of the seatback
either separately or together to increase the
size of the luggage compartment .
Stowing luggage
Follow instruction c:> page 96.
A WARNING
- The backrest must always be securely
latched so that the safety belt can work
properly to help protect the occupant.
- The backrest must be securely latched in
position so that no items contained in
the luggage compartment can slide for
ward upon sudden braking .
- Never allow safety belts to become dam
aged by being caught in door or seat
hardware.
- T orn or frayed safety belts can tear and
damaged belt hardware can break in a
crash. Inspect the belts periodically.
Belts showing damage to we .bbing, bind-
Seats and storage 59
ings, buckles, or retractors must be re
placed.
A WARNING
Always read and heed WARNINGS <:> A in
Loading the luggage compartment on
page 96 .
(D Note
When folding the backrest back into place,
make sure the safety belt does not get
caught, because it can be damaged. A
damaged belt can fail to provide safe re
straint .
Fastening eyelets
The luggage compartmen t is equipped wi th
four tie-down eyelets to secure luggage and
other items .
Fig. 60 Lugg ag e compar tmen t: fa st enin g eyes
~ Use the tie-down eyelets to secure your car
go properly <:>
fig. 60 -arrows-.
~ Read and heed all warnings c:> page 96,
Stowing luggage.
In a collision, the laws of physics mean that
even smaller items that are loose in the vehi
cle will turn into heavy missiles that can cause
serious injury. Items in the vehicle pick up ki
netic energy which va ries with vehicle and the
weight of the item. The vehicle speed is the
most sign ificant factor .
For example, in a frontal collision at a speed
of 30 mph (48 km/h), the forces acting on a 10 lbs (5 kg) object are about
20 times the
normal weight of the item . This means that
the weight of the item would suddenly be
Page 62 of 262
. One can easi ly imagine
the injuries that an item of that weight flying
freely through the passenger compartment can cause in a")
60 Seats and st o rage
about 200 lbs (90 kg). One can easi ly imagine
the injuries that an item of that weight flying
freely through the passenger compartment can cause in a co llision at a speed considered
relative ly low .
A WARNING
Weak, damaged or improper straps used
to secure items to t ie-downs can fail du r
ing hard b rak ing or in a col lision and cause
ser ious personal inju ry.
- Always use suitable mounting straps and
properly secure i tems to the tie-downs in
the luggage compar tment to help pre
vent items from shifting or flying for
wa rd as dangerous missiles .
- When the rear seat back rest is folded
down, always use su itab le mount ing
st raps and proper ly secure items to the
t ie-downs in the luggage compartment
to help prevent items from flying for
ward as dangerous miss iles into the pas
senger compartment.
- Never attach a child safety seat tether strap to a tie-down.
Luggage compartment cover removal
and installat ion
The luggage compar tment cover preven ts
people from looking into the luggage com
partment.
Fi g. 61 O pen rear lid w it h l uggage co m partment cove r
Removing the luggage compartment
co ve r
• Pu ll the buttons (D r::;, fig. 61
• Pull the cover @out of the brackets @
r::;, fig. 61 in the direction of the arrow.
Repl acing the luggage compartment
co ve r
• Push the cover up into the brackets @.
• Press the buttons
(D onto the ball he ads.
A WARNING
-Never store or place heavy objects on the
luggage compartment cover . If you leave
somet hing heavy o n the cove r and then
open the cover, the object could s lide fo r
ward and inju re anyo ne sit ting in t he rea r.
A lso, in the case of s udden br aking or a
crash, a heavy object on the cover could fly
fo rward and injure any passen gers.
Roof rack
First things first
A roof rack can be fitted to carry additional
luggage on the roof
• Always read and follow the instructions pro
vided by the roof rack man ufacturer when
the roof rack sys tem must be installed.
If you are transporting luggage or other ob
jects on the roof, p lease note the fo llowing:
- Yo ur vehicle has spec ially designed aerody-
namic roof rails . On ly install a roof rack spe
cifically designed for your model. Contact
the nearest Aud i dealer for information on
approved modul ar roo f racks for your vehi
cle .
- T hese approved roof racks are the basis for a
comp lete roof rack system . Additional at
tachments for the basic roof rack are neces sary to safely tran spo rt luggage, bicycles,
surf boards, skis or small boats. All necessa ry hardwar e fo r these syst ems is available at
your authorized A udi dealer.
- We recommend that you keep the installa
tion instruct ions for your roof rac k system
together w ith your Owner's literatu re i n t he
veh icle. .,.
Page 63 of 262
.
- When not in use, to reduce fuel cons")
When should the roof rack be removed?
-Before going through an automatic car wash
(it is best to ask the car wash operator for
advice).
- When not in use, to reduce fuel consump
tion, wind noise and to guard against theft.
_& WARNING
- Use of an unapproved roof rack or incor
rect mounting of an approved roof rack
can cause the roof rack or the items at
tached to it to fall off the roof onto the road .
- Objects falling from the roof of a vehicle
can cause a crash and personal injury .
- Only mount the system between the
markings shown in
¢ page 61, fig. 62.
- The roof rack system must be installed
exactly according to the instructions pro
vided.
(D Note
- Your vehicle warranty does not cover any
damages to the vehicle caused by using
roof racks or mounting structures not
approved by Audi for your vehicle. The
same applies to damage resulting from
i ncorrect roof rack installation.
- Always check the roof rack mountings
and hardware before each trip and dur
ing a trip to make sure everything is se
curely tightened.
If necessary, retighten
the mount ings and check the entire sys
tem from time to time.
- After mounting a roof rack system, or
whe n you transport objects on the roof
of your vehicle, the height of the vehicle
is naturally increased. Be careful when
driving under low br idges or in parking
garages for example. This could cause
damage to the load and even the vehicle
i tself .
Seats and storage 61
Mounting locations
The roof rack must be attached only at the
positioning bolts.
Fig. 62 Mounting locat ions for roof rac k
Installation
When installing the feet make sure that they
are pos itioned exact ly on the positioning bolts
provided @ between the side panel and the
upper roof frame ¢
fig. 62. The positioning
bolt is visib le as soon as the lip of the sealing
strip is pushed back from the roof frame with
the tool provided.
Loading the roof rack
Always distribute the loads evenly. Make sure anything on the roof rack is securely tied
down.
.,. Always distribute the loads on the roof rack
evenly.
.,. Always attach items to the roof rack secure-
ly before you drive off .
The maximum permissible roof weight is
165 lb (75 kg). The roof weight is made up of
the weight of the roof rack system and the
weight of the object being transported.
When using a roof rack system which has a
lower load carrying capacity, you must not use
up the total maximum permissible load carry
ing capacity specified above. Instead, you
should load the roof rack system only to the maximum capacity spec ified by the manufac-
turer of the roof rack system . ..,.
Page 64 of 262

62 Seats and storage
A WARNING
Weak, damaged or improper straps used
to secure items to the roof rack can fa il
during hard braking or in a collision and
cause se rious personal injury .
- Make sure the roof rack is installed exact
ly as specified above
c> page 61 .
-Always use suitable mounting straps for
sec uring items to the roof rack to help
preve nt items from shift ing o r fly ing for
wa rd.
- Items on the roof rack must always be
se cu rely mo unted.
- The use of a roof rack can negat ive ly af
fect the way a vehicle handles. Ca rgo
that is large, heavy, b ulk y, long o r flat
wi ll h ave a g reater neg ative inf luence on
t he vehicle 's aerodynamics, cen ter of
gravity and overall handling . Always
dr ive slow ly, avoid sudden braking and
maneuvers when transporting cargo on
the roof of your vehicle.
- Never e xceed the maximum permissib le
load carrying capacity of the roof o f your
vehicle, the perm issib le a xle weights and
the permiss ible total weight of your veh i
cle
c> page 238, Weights .
@) For the sake of the environment
As a result of the increased wind resist
ance created by a roof rack , your veh icle is
using fue l unnecessar ily. So remove the
roof rack after using it .
Cup holder
Fig. 63 Cup ho ld er
A WARNING
-Spilled hot liquid can cause an accident
and personal injury .
- Never carry any beverage conta iners with
hot liquids , such as hot coffee o r hot tea,
i n the vehicle while it is moving. In case
of an acc ident, sudden braking or othe r
veh icle movement, hot liquid could spill,
c a using scalding burns. Spilled hot liquid
can also cause an acci dent and personal
i njur y.
- Use o nly soft c ups in the cupholder . H ard
cups and glasses can cause injury in an
accident.
- Never use the cup hol der or adapter as an
ashtray -ris k of fire.
(D Note
Only d rink conta iners with lids should be
ca rr ied in the cuph older. Liquid could spill
out and damage you r vehicles elec tronic
equipmen t or s tain t he upho lstery, etc.
Ashtray
Fig . 64 Center co nsole : a shtr ay
Opening the ashtray
.,. Slide the cover open.
Removing ashtray insert
.,. Press t he re lease b utton c> fig. 64 .
.,. Pull the ashtray insert up and o ut.
To reinstall ashtray
.,. Press the as htray insert back into its ho lder . ..,.
 1
1 2
2 3
3 4
4 5
5 6
6 7
7 8
8 9
9 10
10 11
11 12
12 13
13 14
14 15
15 16
16 17
17 18
18 19
19 20
20 21
21 22
22 23
23 24
24 25
25 26
26 27
27 28
28 29
29 30
30 31
31 32
32 33
33 34
34 35
35 36
36 37
37 38
38 39
39 40
40 41
41 42
42 43
43 44
44 45
45 46
46 47
47 48
48 49
49 50
50 51
51 52
52 53
53 54
54 55
55 56
56 57
57 58
58 59
59 60
60 61
61 62
62 63
63 64
64 65
65 66
66 67
67 68
68 69
69 70
70 71
71 72
72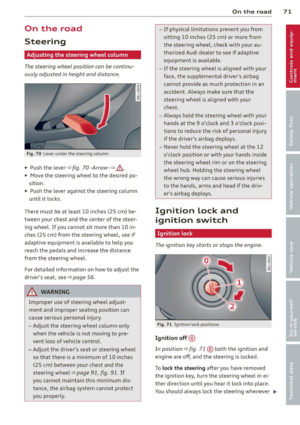 73
73 74
74 75
75 76
76 77
77 78
78 79
79 80
80 81
81 82
82 83
83 84
84 85
85 86
86 87
87 88
88 89
89 90
90 91
91 92
92 93
93 94
94 95
95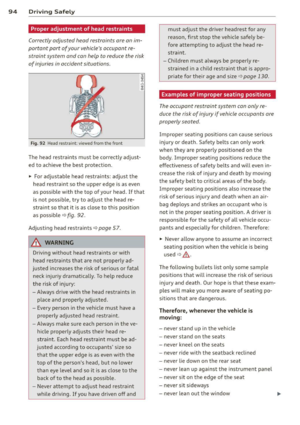 96
96 97
97 98
98 99
99 100
100 101
101 102
102 103
103 104
104 105
105 106
106 107
107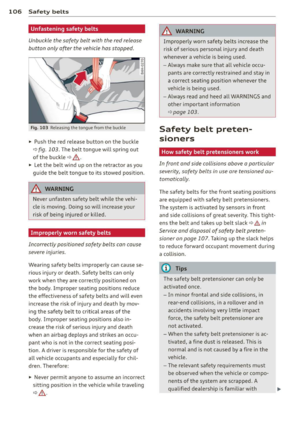 108
108 109
109 110
110 111
111 112
112 113
113 114
114 115
115 116
116 117
117 118
118 119
119 120
120 121
121 122
122 123
123 124
124 125
125 126
126 127
127 128
128 129
129 130
130 131
131 132
132 133
133 134
134 135
135 136
136 137
137 138
138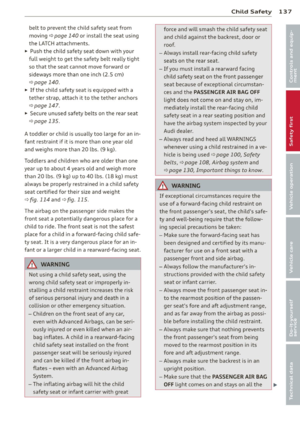 139
139 140
140 141
141 142
142 143
143 144
144 145
145 146
146 147
147 148
148 149
149 150
150 151
151 152
152 153
153 154
154 155
155 156
156 157
157 158
158 159
159 160
160 161
161 162
162 163
163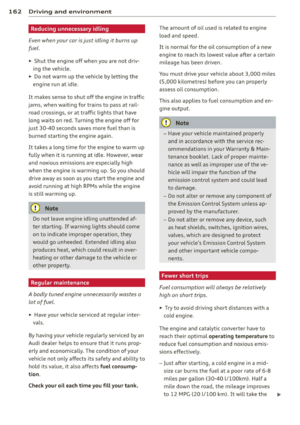 164
164 165
165 166
166 167
167 168
168 169
169 170
170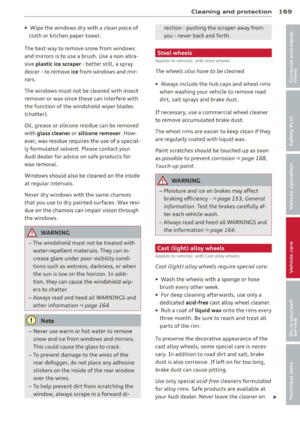 171
171 172
172 173
173 174
174 175
175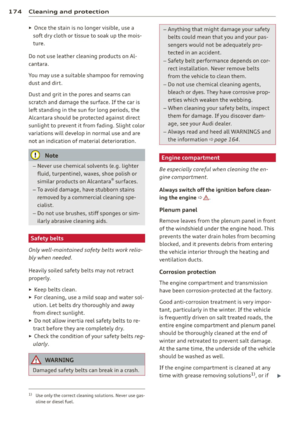 176
176 177
177 178
178 179
179 180
180 181
181 182
182 183
183 184
184 185
185 186
186 187
187 188
188 189
189 190
190 191
191 192
192 193
193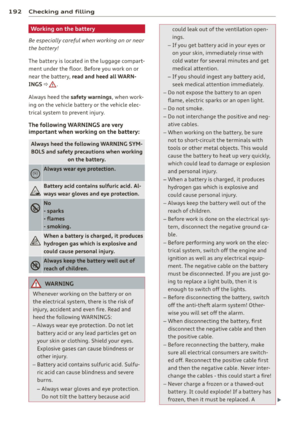 194
194 195
195 196
196 197
197 198
198 199
199 200
200 201
201 202
202 203
203 204
204 205
205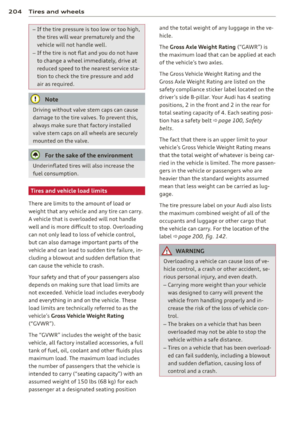 206
206 207
207 208
208 209
209 210
210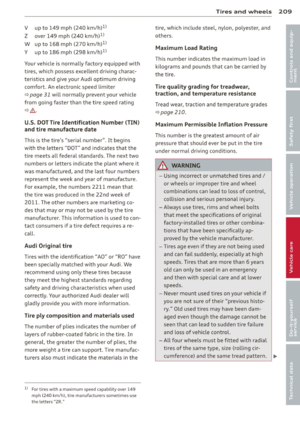 211
211 212
212 213
213 214
214 215
215 216
216 217
217 218
218 219
219 220
220 221
221 222
222 223
223 224
224 225
225 226
226 227
227 228
228 229
229 230
230 231
231 232
232 233
233 234
234 235
235 236
236 237
237 238
238 239
239 240
240 241
241 242
242 243
243 244
244 245
245 246
246 247
247 248
248 249
249 250
250 251
251 252
252 253
253 254
254 255
255 256
256 257
257 258
258 259
259 260
260 261
261