Page 241 of 286

Wheel bolts
Wheel bolts must always be tightened to the
correct torque .
The design of wheel bolts is matched to the
factory installed r ims. If differen t rims are fit
ted, the correct wheel bolts with the right l ength and correctly shaped bolt heads must
be used. This ensures that wheels are fitted
securely and that the brake system functions
correctly .
In certain circumstances, you may not use
wheel bo lts from a different vehicle -eve n if it
i s the same model
¢ page 266.
_&. WARNING
Improperly tig htened or maintained whee l
bolts can become loose ca using loss of
contro l, a co llision and serious persona l in
jury.
- Always keep the wheel bolts and the threads in the wheel hubs clean so the
whee l bolts can turn easily and be prop
erly t ightened.
- Never grease or oil the wheel bo lts and
the threads in the wheel hubs. They can become loose wh ile driving if greased or
o iled, even if tightened to the specif ied
torque .
- Only use wheel bolts that belong to the
rim being installed.
- Never use different whee ls bolts on your
vehicle .
-Always maintain the correct tighten ing
torque for the wheel bo lts to reduce the
risk of a wheel loss . If the tightening tor
que of the wheel bolts is too low, they
can loosen and come out when the vehi
cl e is moving.
If the tightening torque is
too high, the whee l bolts and threads
can be damaged and the wheel can be
come loose.
Q;) Note
The spec ified torque fo r the wheel bo lts is
90 ft lbs. (120 Nm) with a tolerance of
± 7,4 ft lbs.(± 10 Nm). Torque wheel bo lts
Tire s an d wheel s 239
diagonally. After changing a wheel, the
torque m ust be checked as soon as possi
ble with a torque wrench -preferably by an
a uthori zed Audi dea ler or qualified work
shop.
Low aspect ratio tires
Your Aud i is factory -equ ipped w ith low aspect
ratio tires . These tires have been tho roughly
tested and been se lected specifically fo r your
model for their superb perfo rmance, road fee l
and hand ling under a var iety o f driving cond i
tions. Ask your authorized Audi dealer for
more details .
T he low aspect ratio of these t ires is ind icated
by a numeral of
55 or l ess in the tire's s ize
designation. The numera l rep resents the ra tio
of the tire's sidewa ll height in relation to its
tread width expressed in percentage . Conven
tiona l tires have a he ight/w idth ratio of 60 or
more.
T he performance of low-a spe ct- ra tio tire s is
p ar tic ul ar ly se nsi tiv e to i mprop er i nfl ation
pre ssure. It is the refo re important that low
a spect ratio t ires are inflated to the specified
pr ess ure and that th e inflation pr essur e is
r e gula rly ch ecked and maintain ed. Tir e pre s
s ure s should b e check ed at l east once a
m onth and alwa ys befo re a long trip
¢ page 228, Checking tire pressure.
What you c an do to avo id tire and rim
damage
Low aspect ratio tires can be damaged mo re
easily by impact w ith potholes, curbs, g ull ies
o r ridges on the road, pa rticularly if the tire is
u nderinflated.
In orde r to minimize the occurrence of impact
damage to the tires of your vehicle, we recom
mend that you observe the following p reca u
tions:
- Always ma inta in recommended inflation
pressu res. Check your tire pressure eve ry
2,000 miles (3,000 km) and add air if neces-
sary . .., •
•
Page 242 of 286

24 0 T ire s and wheel s
- Drive carefu lly on roads with potholes, deep
gullies or ridges. The impact from driving
through or over such obstacles can damage
your tires. Impact with a curb may also
cause damage to your tires.
- After any impact, immediately inspect your tires or have them inspected by the neares t
authorized Aud i dealer. Replace a damaged
t ire as soon as possible .
- Inspect your t ires every 2 ,000 miles (3,000
km) for damage and wear . Damage is not al
ways easy to see . Damage can lead to loss of
air and underinflation, wh ich could eventu
ally cause t ire failu re. If you be lieve that a
t ire may have been damaged, replace the
t ire as soon as poss ible.
- T hese tires may wea r more quick ly than oth
ers.
- Please also remember that, whi le these t ires
deliver respons ive handling, they may ride
less comfortably and make mo re no ise than
othe r choices.
Reduced perf ormance in winter /cold
sea son condit ion s
All ti res are des igned for certa in pu rposes.
The low aspect ratio, u ltra high performance
tires originally installed on your vehicle are in
tended for max imum dry and wet road per
formance and handling . They are not suitable
for cold, snowy or icy weather condit ions. If
you dr ive under those circumstances, you
should equip your vehicle with all-season or
winter tires, which offer better traction under
those cond it ions . We suggest you use the rec
ommended snow or all-season tires specified
for your vehicle, or their equ ivalent .
Refe r to
<=> page 23 7 for more deta iled infor
ma tion regarding w inter tires.
Tire pressure
monitoring system
(l) General notes
App lies to vehicles: with tire pressure monitoring system
Each tire shou ld be checked monthly when
cold and inflated to the inflat ion p ressu re rec- ommended by the vehicle manufacturer on
the ve hicle p lacard or tire inflation press ure
label. (If yo ur vehicle has tires of a d ifferent
s iz e than the si ze indicated on the veh icle
placard or tire inflation pressure label, you
should determine the proper tire inflation pressure for those tires) .
As an added safety feature, your veh icle has
been equipped with a tire pressure monitoring
system (TPMS) that illum inates a low tire
pressure telltale when one or more of you r
tires is significantly under-inflated . Acco rding
ly, when the low tire pressure telltale illumi
nates, yo u shou ld stop and check you r tires as
soon as possib le, and inflate them to the
proper pressure . Driving on a signi ficantly un
der-inflated tire causes the tire to overheat
and can lead to tire fa ilure. Under-inflation al
so reduces fuel effic iency and tire tread life,
and may affect the vehicle's handling and
stopp ing ability.
P lease note that the TPMS is not a substitute
for proper tire ma intenance, and it is the driv
er's responsibility to maintain correct tire
pressure, even if under-inflation has not
r eached the level to tr igger illuminat ion of the
T PMS low tire pressu re tellta le.
Your vehicle has also been equipped with a
TPMS ma lfunction indicator to ind icate when
the system is not operating prope rly. The
T PMS ma lfunction ind icator is comb ined w ith
the low t ire pressure telltale . Whe n the sys
tem detects a malfunc tion , the telltale will
flash fo r approxima tely one min ute and then
remain continuously i lluminated. This se
quence wi ll continue upon subsequent vehicle
start-ups as long as the malfunct ion exists .
When the malfunction indicato r is illum inat
ed , the system may not be ab le to detect or
signal low tire pressure as intended . TPMS
malfunctions may occur for a var iety of rea
sons, including the installation of replace
ment or alternate tires or wheels on the vehi
cle that prevent the TPMS from functioning
properly . Always check the TPMS malfunction
te lltale after rep lacing one or more tires o r
whee ls on your vehicle to ens ure that the
Page 243 of 286

replacement or alternate tires and wheels a l
l ow the TPMS to continue to function proper
l y.
Tire pressure indicator appears
Applies to vehicles: with tire pressure monitoring system
The tire pressure indicator in the instrument
cluster informs you if the tire pressure is too
low or if there is a system malfunction.
F ig. 190 Display: underinflatio n warn ing
Using the ABS sensors , the t ire pressure mon i
toring system compa res the t ire tread circum
fe rence and v ibration characteristics of the in
d iv idual tires. If the pressure decreases in one
or mo re tires, th is is indicated in the instru
ment cluster with a
ti] warn ing symbol and a
message ¢
fig. 190. The driver message in the
disp lay goes out after S seconds. The driver
message can be d isplayed again by pressing
the
! S ET ! button. If only one tire is affected,
the display will indicate its pos ition .
T he t ire pressure monitoring system must be
reset via radio or MMI* each t ime the pres
sures are adjusted (e.g . when sw itching be
tween partia l and full load pressure) or after
changing o r replacing a t ire on your vehicle
¢
page 242. The TPMS indicator only moni
tors the tire p ressure that you have prev iously
stored . Yo u ca n find the recommended tire
p ress ures for you r vehi cle on the labe l on dr iv
er's side B -pi llar ¢
page 226 .
T ire tread c ircumfe rence and vibration c harac
ter ist ics can ch ange and ca use a ti re pressure
warn ing if:
- the tire pressure in one o r more t ires is too
low,
Tire s an d wheel s 241
- the t ire has struc tural damage,
- t he t ire press ure w as c hanged, wheels ro ta t-
ed or rep laced but the TPMS was not reset
¢ page 242.
Warning symbols
ti] Loss of pressure in at least one tire¢& .
Check the t ire o r tires and rep lace or repa ir if
necessary. The
ti] indi ca to r li ght in the inst ru
ment cluster a lso illuminates
¢ page 13.
Check/cor rect the press ures of all fo ur tires
and reset TPMS via radio or MMI*.
11il~1 (T ir e Pressure Monitoring System) Tire
pre ssure: Sy stem m alfunction!.
IfllilB appears after switching the ignition
o n or while d rivi ng and the
ti] ind icator l ight
i n the instr ument cluster blinks for app roxi
mately one minute and then stays on, there is
a system malfunct ion .
Attempt to sto re the co rrect tire pressu re
¢
page 242. If the ind ic a tor lig ht does not
turn off or i f it turns on sho rtly the rea fter, im
med iate ly dr iv e your vehicle to an authorized
A udi dealer or authorized repair faci lity to
have the malfunct ion corrected.
A WARNING
- If the tire pressure ind icator appears in
the instrument cluster display, one or more of your t ires is sign ificant ly unde r
inflated . Reduce you r speed immediately
a nd avoid any hard steer ing or b rak ing
maneuvers. Stop as soon as possib le and
check the tires and their pressu res . In
f late the tire pressure to the prope r pres
sure as indicated o n the vehicle's tire
pressure labe l
¢page 226. D riving on a
sign ificantly under-inflated tire causes
the t ire to overheat and can lead to tire
fa ilure. Under-inflation also is likely to
impair the vehicle's ha ndling and stop
ping ab ility .
- The drive r is responsib le for maintaini ng
the co rrect tire pressures . You must
check the tire pressures regu larly. .,..
•
•
Page 244 of 286
, the pressure monitor indi
cator may be delayed.
- Ask your")
242 Tires and wheels
-Under certain conditions (such as a spor
ty driving style, winter conditions or un
paved roads), the pressure monitor indi
cator may be delayed.
- Ask your authorized Audi dealer if run
flat tires may be used on your vehicle.
Your vehicle registration becomes invalid
if you use these tires when not permit
ted. Damage to your vehicle or accidents
could also result.
@ Tips
-The tire pressure monitoring system
stops working when there is an ESC/ABS
malfunction.
- Using snow chains may result in a system malfunction .
- The tire pressure monitoring system on
your Audi was developed using tires with the
"ROl" identification on the tire side
wall ~
page 233. We recommend using
these tires.
Reset tire pressure monitoring system
Applies to vehicles: with tire pressure monitoring system
If the tire pressure is adjusted, wheels are ro
tated or chang ed, the
TPMS must be reset via
radio or
MM!* .
.. Before resetting the TPMS, the current pres
sures of all four tires must correspond to
the specified values. Adjust the tire pressure and reset the pressure in the tire pressure
monitoring system according to the load
you are carrying
~ page 226 .
.. Turn on the ignition .
.. Select : the
ICAR I function button > Tire pres
sure monitoring > Store now .
Or
.. Select : the ICA RI function button > Car sys
tems*
control button > Servicing & checks>
Tire pressure monitoring > Store tire pres
sures.
@ Tips
Do not store the ti re pressure if there a re
snow chains on the tire.
Page 245 of 286

What do I do now?
Vehicle tool kit
The tools ore stored underneath the floor
panel in the luggage comportment.
F ig . 191 Lug gage compartment: tool kit
When you need access to the veh icle tool kit
or jack*, you will need to take o ut the cover.
The vehicle tool kit includes:
- Tire repair kit (Tire Mobility System)
- Plastic cl ip for removing wheel bo lt caps*
- Al ignment p in for ch anging the whee l
- Screwdriver with reversible blade
- Tool for chang ing light bulbs
- Reversible bit (reversible Torx bit for chang-
ing light bulbs)
- Rod for jack
- Jack *
- Lug wrench
- T owing eye
Some of the vehicle items listed above a re
prov ided o n certain models on ly o r are option
a l extras.
Before returning the jack * to its place, retract
the jack arm fully.
..&, WARNING
-
- Never use the screw d river hex head to
t igh ten whee l bol ts, si nce the bolts can
not at tain the necessary tightening tor
que if you use the hex head, poten tially
causing an accident.
- T he factory -supp lied jac k is intended on
ly for your vehicle model. Under no cir
c u mstances should it be used to lift
What do I d o now ? 243
heavy veh icles or other loads; yo u risk in
juring yourself.
- Never start the engi ne when the vehicle
is raised, which could cause an acc ident.
- Support the vehicle secure ly wit h appro
priate stands if wor k is to be performed
underneath the vehicle; otherwise, there
is a pote ntia l risk for injury.
Tire repair
General and safety pointers
Tire repair is intended only for temporary,
short-term use.
F ig . 1 9 2 Tire damage fo r wh ich the Tire Mob ility Sys
tem is not suited
Your vehicle is equipped with a tire repa ir k it,
the
Tir e Mobility Sy stem (TMS ).
In the event of a tire failure, the TM S is in the
luggage compartment under the floor. It con
s ists of the tire sealant and an electric air
pump .
Using
TM S, tire damage caused by foreign
bodies up to about
0.1 6 inch (4 mm ) in diam
eter can be sea led reliably.
The foreign object must stay in the tire .
The tire sealant must not be used:
-for cu ts or punctures in t he tire w hich a re
large r th an 0. 16 inc h (4 mm) <=>fig. 192
©
-for damage to the rim @
- if you have been driving with very low t ire
pressu res or tires with no air@
Using the
TMS is descr ibed in the section
<=> page 244.
Page 246 of 286
.
.&_ WARNING
Take the following precautions after re
pairing the tire:
- Do not d rive faster t")
244 What do I do n ow ?
TMS can be used at temperatures down to
-4°F(-20°C).
.&_ WARNING
Take the following precautions after re
pairing the tire:
- Do not d rive faster than 50 mph (80 km/
h)!
- Avoid full-throttle acce leration, heavy
braking and fast cornering.
- The veh icle's road behav ior can be affect
ed.
- Tires sealed with
T M S are intended only
for
temporar y, short-te rm use . Dam
aged tires must be replaced . Drive care
fully to the next professional repair fa
cility.
- After using the tire sea lant the tire pres
sure monitoring system may no longer
work properly. Drive carefully to the next
professional repair fac ility.
- TM S must NOT be used,
- for cuts or punctures in the tire which
are larger than 0.16 inch (4 mm)
- for damage to the r im
- if you have been dr iv ing with very low
tire pressures or t ires with no air
- Seek professional assistance if it is not
poss ible to repair the tire with the tire
sealant.
- The tire sealant must not come into con
tact with sk in, eyes or clothing.
- If you get any tire sealant in your eyes or
com e into contact with i t, rinse the af
fected area tho roughly w ith clean wate r.
Find a physician immediate ly!
- Change any clothing contaminated w ith
t ire sealant immed iate ly.
- Do not inhale t he vapo r!
- If you have swallowed t ire sealant , rinse
yo ur mouth thorough ly r ight away and
dr ink p lenty of water.
- Do not induce vomiting! Find a physi
cian immediate ly!
- If you have a llergic reactions, f ind a
physician immediate ly.
- Keep the t ire sealant away from chi ldren.
(D Note
Do not use commercially avai lab le tire
sea lants. The electr ica l components of the
tire pressure monitoring system will no
l onger work properly.
«!) For the sake of the environment
Used sealant bottles ca n be dropped off at
a recycling facility .
(D Tips
-If sea la nt has run out, allow it to dry .
Then you can peel it off .
- Have the t ire sea lant rep laced eve ry 4
years at a dealersh ip.
Making a tire repair
Fig . 19 3 Mak ing a t ire repa ir
Preliminary steps
"' If you have a flat tire, park the vehicle as far
as poss ible from moving traffic.
"' App ly the par king b rake firmly.
"' Move the se lector lever to the P position
"' Check whether a repair using the Tire Mobili
ty System is possible
c:::> page 243.
"'Have all passengers leave the vehicle and
stay away from the danger zone
c:::> _&..
"'Take the sealant bottle and the electric air
pump from the luggage compartment under
the floo r<=;>
page 243.
"' Remove the "max . SO mp h" (80 km/h) s tick
er from the sea lant bottle and affix i t to the
instr ument clus ter in the drive r's view .
Filling a tire
"' Shake the bott le thoroughly before filling. Ill>
Page 247 of 286

~ Screw the accompanying filling hose com
pletely onto the bottle. This breaks through
the foi l seal automat ically at the connec
t ion.
~ Remove the valve cap from the tire valve and
unsc rew the valve insert us ing the accompa
nying valve insert tool¢
fig. 193 .
~ Lay the valve insert on a clean surface .
~ Remove the sealing plug from the filling
hose and connect the hose to the tire v alve.
~ Hold the bottle with the bottom fac ing up
ward and emp ty the entire contents into the
tire .
~ Then pu ll out the hose and screw the valve
insert tightly back into the tire valve.
Inflating a tir e
~ Screw the filling hose for the electric a ir
pump onto the tire valve and insert the con
nector into the cigarette lighter .
~ Inflate the t ire between 2.0 and 2.5 bar and
read the pressure from the gauge.
~ If this tire pressure is not reached, drive
your vehicle approximate ly 10 meters for
ward or backwa rd so that the sealant can be
redistributed i nside the tire . If at th is time
the req uired air p ressu re still cannot be
reached, the t ire is too badly damaged and
cannot be repa ired with the tire sea lant.
Final check
~ After dr iving for about 10 minutes, stop and
chec k the t ire p ressure.
~ If tire pressure is less than 1.3 bar, the tire
is too seve rely d amaged. Do not contin ue to
dr ive . Seek pro fessional assistance.
& WARNING
- Turn on the emergency flashers and set
up the emergency triangle if you have
flat tire while in mov ing traffic. This is
for your protection and the for the safety
of other drivers.
- Have all passengers leave the vehicle and
stay away from the danger zone (for ex
amp le, beh ind a guard rail) .
What do I do now? 245
-Read and follow the manufacturer's safe
ty precautions on the compressor and in
the instructions on the bottle of sealant!
- If a tire pressure of 2.0 bar cannot
reached after inf lating for six minutes,
then the tire is too severely damaged. Do not continue driving!
- Obta in qua lified help if it is not possible
to pe rform the repair wit h the t ire seal
a nt.
- If the tire pressure is less than 1.3 bar
after 10 m inutes of driv ing, then the the
tire is too seve rely damaged. Do not con
tinue dr iving . Seek profess iona l assis
tance .
(D Note
Particular care is necessary if you are mak
i ng a tire repa ir on a steep incl ine .
(D Tips
-Do not operate the electric air pump for
more than 6 minutes without stopping,
otherwise it can over heat. When the a ir
pump has coo led down, you can continue
t o use it.
- If sea lant has spilled out, let it dry and
then you can remove it by peeling it away
like a foil.
- Remember to obtain a new bott le of
sealant from yo ur autho rized Aud i dea le r
afte r repairing a tire. After this, the func
tionality of the tire repa ir set is restored.
- Obey all laws.
Changing a wheel
Before changing a wheel
Observe the following precautions for your
own and your passenger 's safety when chang
ing a wheel.
~ After you experience a tire failure, pull the
car we ll away from moving traffic and try to
reach
le vel ground before you stop ¢ ,&..
~ All passengers should lea ve the car and
move to a safe location (for instance, behind
the guardrail) ¢
,&.. ..,.
•
•
Page 248 of 286

24 6 What do I do no w?
• Engage the par king br ake to prevent your
vehicle from rolling unintentionally
c> _&..
• Move the sel ector le ver to the P po sition.
• Take the jack c> page 243 out of the luggage
compartment.
A WARNING
You or your passengers could be injured
wh ile cha nging a wheel if you do not fol
low these safety precautions:
- If you have a flat t i re, move a safe dis
tance off the road . Turn off the engine,
tu rn the emergen cy flashers on and use
other wa rning dev ices to alert other mo
torists.
- Make su re that passengers wait i n a safe
pla ce away from the vehicle and well
away from the road and traff ic.
- T o help prevent the veh icle from mov ing
sudden ly and possibly slipping off the
jack, a lways fully set the parking brake
and block the whee l diagona lly opposite
the whee l being changed with the fo ld
ing chocks or other objects. When one
front whee l is lifted off the ground, plac
ing the Automat ic Transmiss ion in "P"
(Pa rk) w ill
not prevent the vehicle from
moving.
- Before you change a wheel, be sure the ground is level and firm . If necessary,
use a sturdy board unde r the jack.
- Always store the vehicle tool kit, the
jack* and the replaced tire in the luggage
compartment
c> page 124.
(D Note
If you are chang ing the wheel on a steep
incline, use a rock or similar object to
b loc k the opposite wheel to prevent the
veh icle from mov ing.
Obey all laws.
-
Changing a wheel
When you change a wheel, follow these
quence described below step-by-step and in
exactly that order .
l. Remove the wheel bolt caps* . For more
details see also
c> page 247, Wheels with
wheel bolt caps.
2. Loosen the wh eel bolts c>page 247.
3. Locate the p roper mounting point fo r the
ja ck a nd align the jack below that point
c>page248 .
4. Lift the car with the jack c> page 248 .
5. Remove the wheel with the flat tire and
then insta ll the other wheel
c> page 249.
6. Tighten all wheel bolts lightly.
7.
Lower the vehicle with the jack .
8. Use the wheel bolt w rench and
firmly
t ighten all wheel bolts in a crisscross pat
te rn
c> page 247.
9. Replace the wheel bolt cap s*.
A WARNING
Always read and fo llow all WARN INGS and
informat ion c> .&. in Raising the vehicle on
page 248
and c> page 250 .
After changing a wheel
A wheel change is not comple te without the
doing the following .
• Always store the vehicle tool kit, the jack*,
and the rep laced tire in the luggage com
partment
c> page 124.
• As soon as possib le, have the t ightening
torque s
on all whee l bolts checked with a
torque wrench. The correct tightening tor
que is 90 ft lbs. (120 Nm).
• Have the flat tire
re plac ed as soon as possi
ble.
(D Tips
- If you not ice that the wheel bolts are
corroded and difficult to turn while
chang ing a tire, they should be replaced
before you check the tightening torque .
 1
1 2
2 3
3 4
4 5
5 6
6 7
7 8
8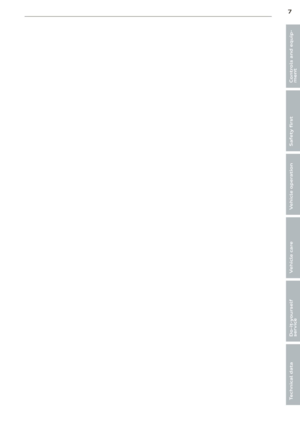 9
9 10
10 11
11 12
12 13
13 14
14 15
15 16
16 17
17 18
18 19
19 20
20 21
21 22
22 23
23 24
24 25
25 26
26 27
27 28
28 29
29 30
30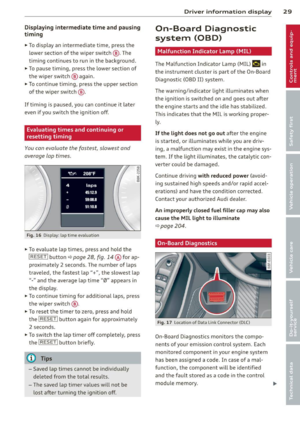 31
31 32
32 33
33 34
34 35
35 36
36 37
37 38
38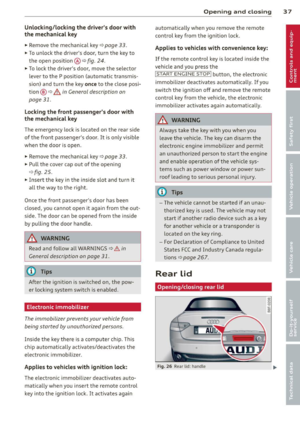 39
39 40
40 41
41 42
42 43
43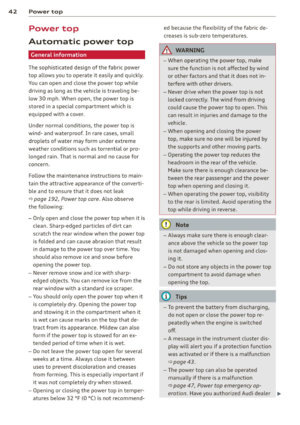 44
44 45
45 46
46 47
47 48
48 49
49 50
50 51
51 52
52 53
53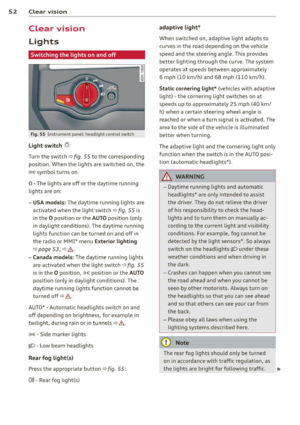 54
54 55
55 56
56 57
57 58
58 59
59 60
60 61
61 62
62 63
63 64
64 65
65 66
66 67
67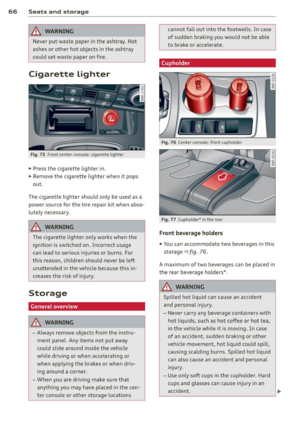 68
68 69
69 70
70 71
71 72
72 73
73 74
74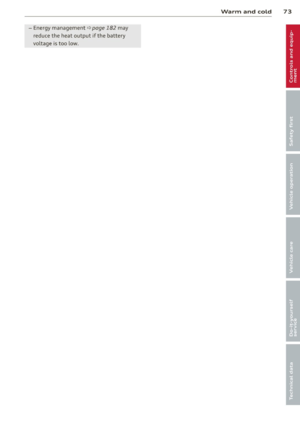 75
75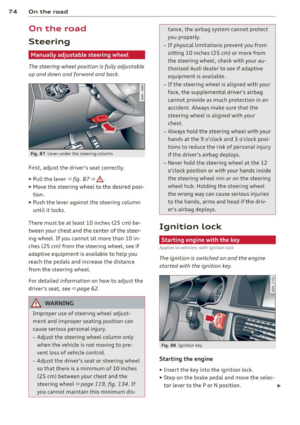 76
76 77
77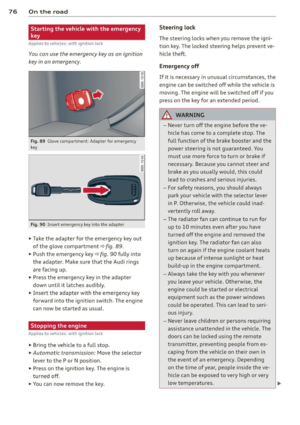 78
78 79
79 80
80 81
81 82
82 83
83 84
84 85
85 86
86 87
87 88
88 89
89 90
90 91
91 92
92 93
93 94
94 95
95 96
96 97
97 98
98 99
99 100
100 101
101 102
102 103
103 104
104 105
105 106
106 107
107 108
108 109
109 110
110 111
111 112
112 113
113 114
114 115
115 116
116 117
117 118
118 119
119 120
120 121
121 122
122 123
123 124
124 125
125 126
126 127
127 128
128 129
129 130
130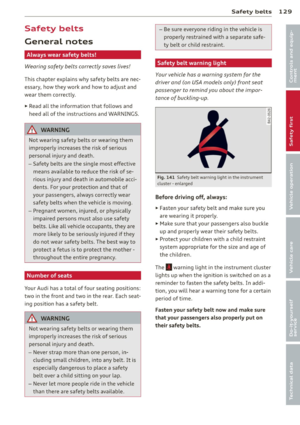 131
131 132
132 133
133 134
134 135
135 136
136 137
137 138
138 139
139 140
140 141
141 142
142 143
143 144
144 145
145 146
146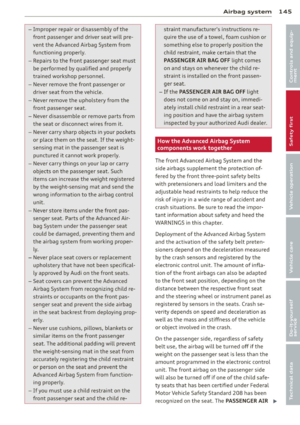 147
147 148
148 149
149 150
150 151
151 152
152 153
153 154
154 155
155 156
156 157
157 158
158 159
159 160
160 161
161 162
162 163
163 164
164 165
165 166
166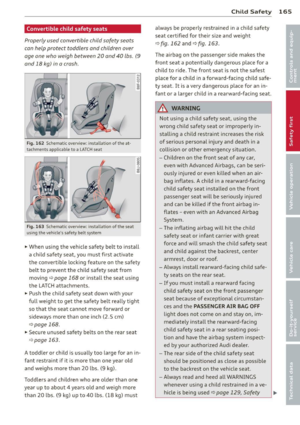 167
167 168
168 169
169 170
170 171
171 172
172 173
173 174
174 175
175 176
176 177
177 178
178 179
179 180
180 181
181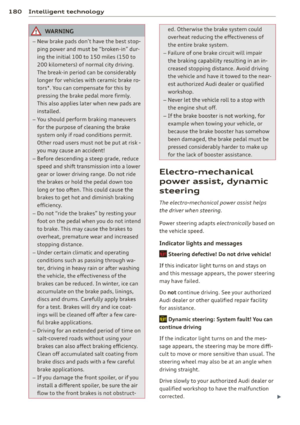 182
182 183
183 184
184 185
185 186
186 187
187 188
188 189
189 190
190 191
191 192
192 193
193 194
194 195
195 196
196 197
197 198
198 199
199 200
200 201
201 202
202 203
203 204
204 205
205 206
206 207
207 208
208 209
209 210
210 211
211 212
212 213
213 214
214 215
215 216
216 217
217 218
218 219
219 220
220 221
221 222
222 223
223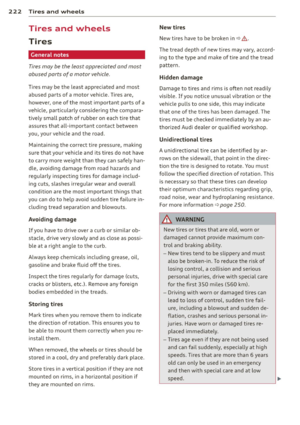 224
224 225
225 226
226 227
227 228
228 229
229 230
230 231
231 232
232 233
233 234
234 235
235 236
236 237
237 238
238 239
239 240
240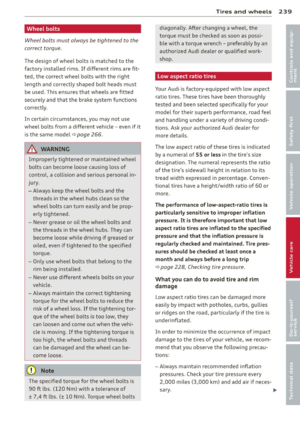 241
241 242
242 243
243 244
244 245
245 246
246 247
247 248
248 249
249 250
250 251
251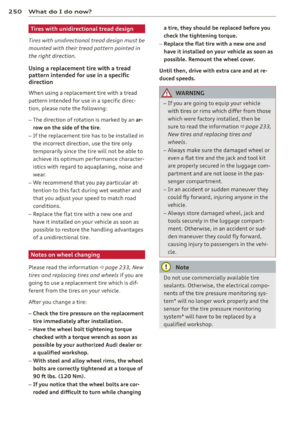 252
252 253
253 254
254 255
255 256
256 257
257 258
258 259
259 260
260 261
261 262
262 263
263 264
264 265
265 266
266 267
267 268
268 269
269 270
270 271
271 272
272 273
273 274
274 275
275 276
276 277
277 278
278 279
279 280
280 281
281 282
282 283
283 284
284 285
285