Page 49 of 286

Power top emergency
operation
General information
The power top can be closed by hand if there
is a malfunction .
~ Activate the parking b rake .
~ Open the windows
~ Remove the key from the ign ition.
Only close the powe r top ma nually in an eme r
gency. The best solu tion is to have your au
thor ized Audi dealer co rrect the cause of the
mal func tion.
Powe r top emergency operation consists of
the following steps:
- Unlocking the power top compartment
cover:
The cover on the power top compart
me nt must be released by hand .
-Closing the power top: The power top must
be lifted o ut of the tray and close d.
- Locking the power top: The powe r top
latches must be locked with the emergency
key .
A WARNING
- W hen positioning th e power top, avoid
co ntac t wi th th e suppo rts or o ther mov
ing parts. Make su re al l of the windows
are lowered . Otherw ise you cou ld pi nch
yo ur hands.
- N ever dr ive when the power top is not
locked correct ly . The win d from drivin g
cou ld cause t he power to p to open . This
can res ult in injur ies and damage to the
vehicle .
@ Tips
Have a second person assi st when clos ing
the power top . Posit io ning t he power top
is easier when t here is a second person to
he lp.
-
Power top 4 7
Step 1: Unlocking the power top
compartment cover
T he release lever for the powe r top compart
ment is lo cated under the trim in the luggage
compartmen t.
Fig. 40 Lu gg ag e compart men t: re lease lever
Fig. 4 1 Lugg ag e compart ment: s ide trim
~ Open the luggage compartment lid. The
emergency release can be used if the l ug
gage compartment lid wi ll not open
c::;,page 38.
~ Reach your finger i nto the gap behind the
t rim near the cente r of th e vehicle .
~ Pull the re lease lever down to release t he
power to p compa rtment cover
c::;, fig . 40 .
~ Open the left side tri m a nd pre ss the yellow
lever in the direction of the arrow ¢
fig. 41.
~ Remove the emergency key from t he com
partment on the left side @.
~ Open the right side tr im and press the yel
low lever in the direct ion of the arrow .
Page 50 of 286

48 Power top
Step 2: Lifting the power top
compartment cover out
Fig. 42 Luggage compartment lid completely open
Fig. 43 Storage bay cover part ially open
.,. Press the luggage compartment lid in the
direction of the arrow
c::, fig. 42 .
.,. Raise the power top compartment cover out
of the powe r top tray and ho ld it in p lace
c::> fig . 43 c::> .al·
Have a second person assist when raising the
power top compartment cover. That pe rson
should stand on the oppos ite side of the veh i
cle and perform the same s teps.
A WARNING
When raising the power top compartment
cover, avoid contact with the s upports or
other movi ng pa rts . Othe rwise you cou ld
pinch your hands.
Step 3 : Lifting the power top storage
bay cover out
Fig. 44 Luggage compa rtment lid closed
Fi g. 4 5 Power top storage bay cover comple tely open
.,. Close the luggage compartment lid.
.,. Open the power top storage bay cover com
pletely
c::> fig . 45 .
_&. WARNING
When raising the power top s torage bay
cover, avoid contac t with the supports or
other mov ing parts. Otherwise yo u could
pinch your hands .
-
Page 51 of 286

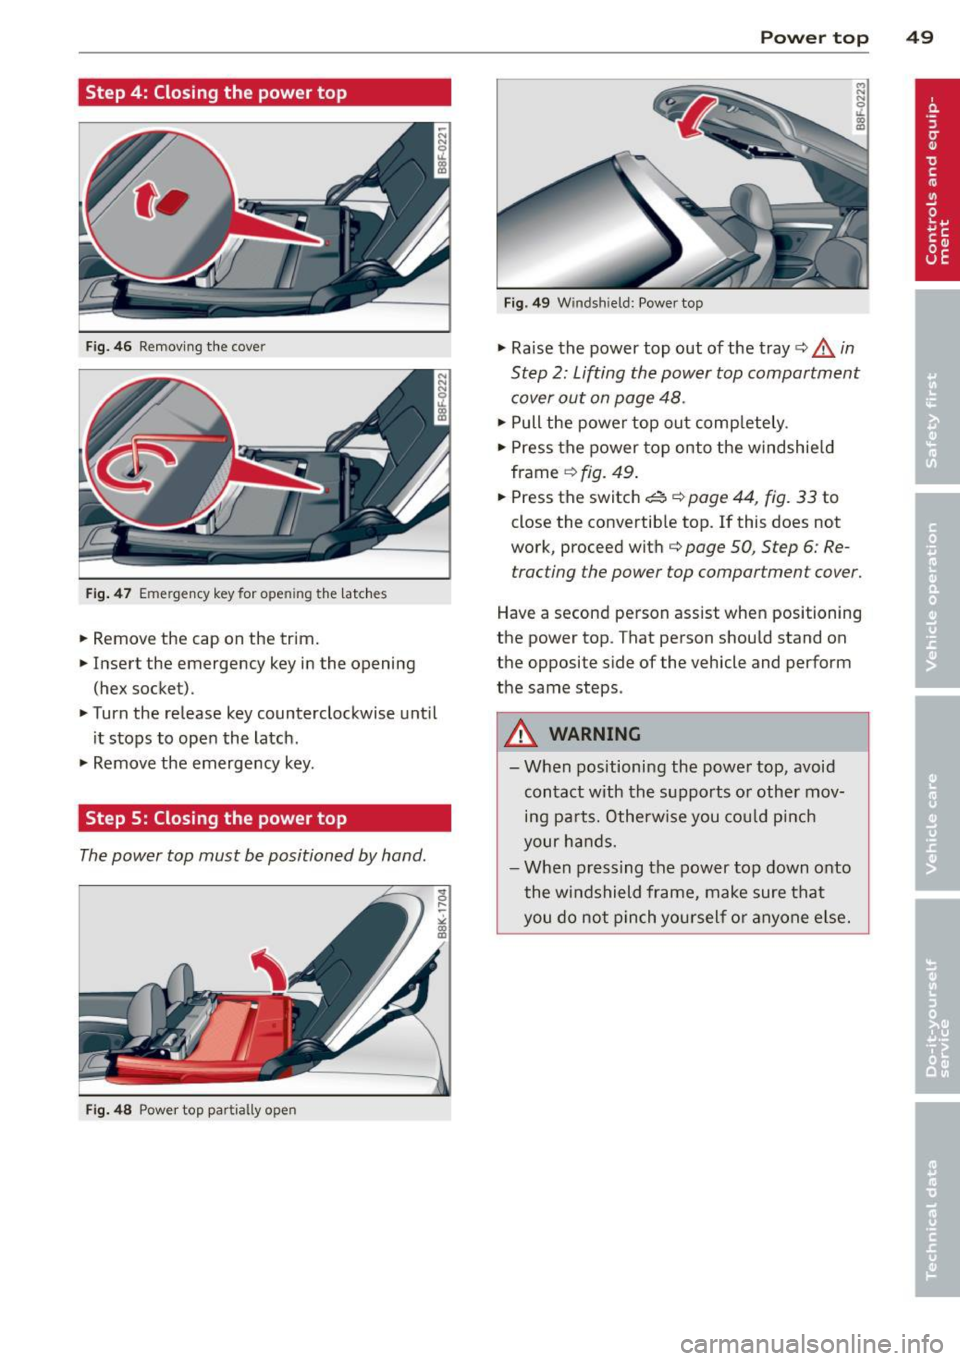
Step 4: Closing the power top
Fig. 46 Removing the cover
Fig. 47 Emergency key for ope ning the latches
.. Remove the cap on the trim.
.. Insert the emergency key in the opening
(hex socket) .
.. Turn the release key counterclockwise until
it stops to open the latch .
.. Remove the emergency key .
Step S: Closing the power top
The power top must be positioned by hand .
Fig. 48 Power top partially open
Power top 49
Fig. 49 W ind shield: Power top
.. Raise the power top out of the tray¢.&. in
Step 2: Lifting the power top compartment
cover out on page 48 .
.. Pull the power top out completely .
.. Press the power top onto the windshield
frame
q fig . 49 .
.. Press the switch~ ¢ page 44, fig. 33 to
close the convertible top. If this does not
work, proceed with
q page 50, Step 6: Re
tracting the power top compartment cover.
Have a second person assist when positioning
the power top . That person should stand on
the opposite side of the vehicle and perform
the same steps.
A WARNING
-
- When positioning the power top, avoid
contact with the supports or other mov
ing parts. Otherwise you could pinch
your hands.
- When pressing the power top down onto
the windshield frame, make sure that
you do not pinch yourself or anyone else.
Page 52 of 286

50 Power top
Step 6: Retracting the power top
compartment cover
The power top compartment cover must be
retracted by hand.
Fig. 50 Power top raised
.,.. Raise the rear of the power top and hold it in
place ¢
fig. 50 (D ¢ A in Step 2: Lifting the
power top compartment cover out on
page 48 .
.,.. Slide the power top compartment forward
until it reaches the end position @. Release
the power top.
&_ WARNING
Do not pinch yourself or others when clos
ing the power top compartment.
Step 7: Locking the power top
The Locking system for the power top Latches
are located on the inside of the power top.
Fig. 51 Inside of the power top: hex key for emergency
operat ion
.,.. Insert the emergency key in the opening and
turn it clockwise unti l it stops to lock the
power top .
.,.. Remove the emergency key.
.,.. Cover the opening with the cap.
(D Tips
Make sure the locking mechanisms are
lock ed securely.
Step 8: Loosening the headliner
Fig. 52 Power top: area around the right side of the
r ea r window
Fig . 53 Area around the right side of the rear windo w:
h eadliner partially loosened
Perform the following steps in the rear win
dow area of the power top on each side.
.,.. Pull the loops (marked in yellow) with the
emergency key to loosen the headliner .
.,.. Pull at the yellow marking again to loosen
the headliner around the rear window (ap
proximately 30 cm) .
Step 9: Securing the latch
Fig. 54 Rear of the power top: Secu ring the latch
., 0 ....
~
"'
Page 53 of 286
The latches must be secured on the left and
right sides of the vehicle .
.,. Pull the power top headliner to the side in
the area around the rear headrests to sec ure
the latches ¢
fig. 54 ¢.& in Step 2: Lifting
the power top compartment cover out on
page 48 .
... Then remove the emergency key and insert
the short end into the power top support at
the ye llow marking .
... Press the emergency key in the direction of
the a rrow @unt il the latch is secure .
.&, WARNING
Do not pinch yo urself o r othe rs when clos
ing the power top compartment.
Power top 51
Page 54 of 286

52 Clear vis ion
Clear vision
Lights
Switching the lights on and off
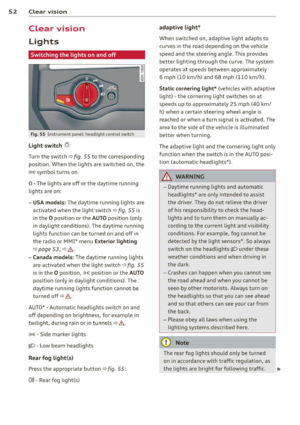
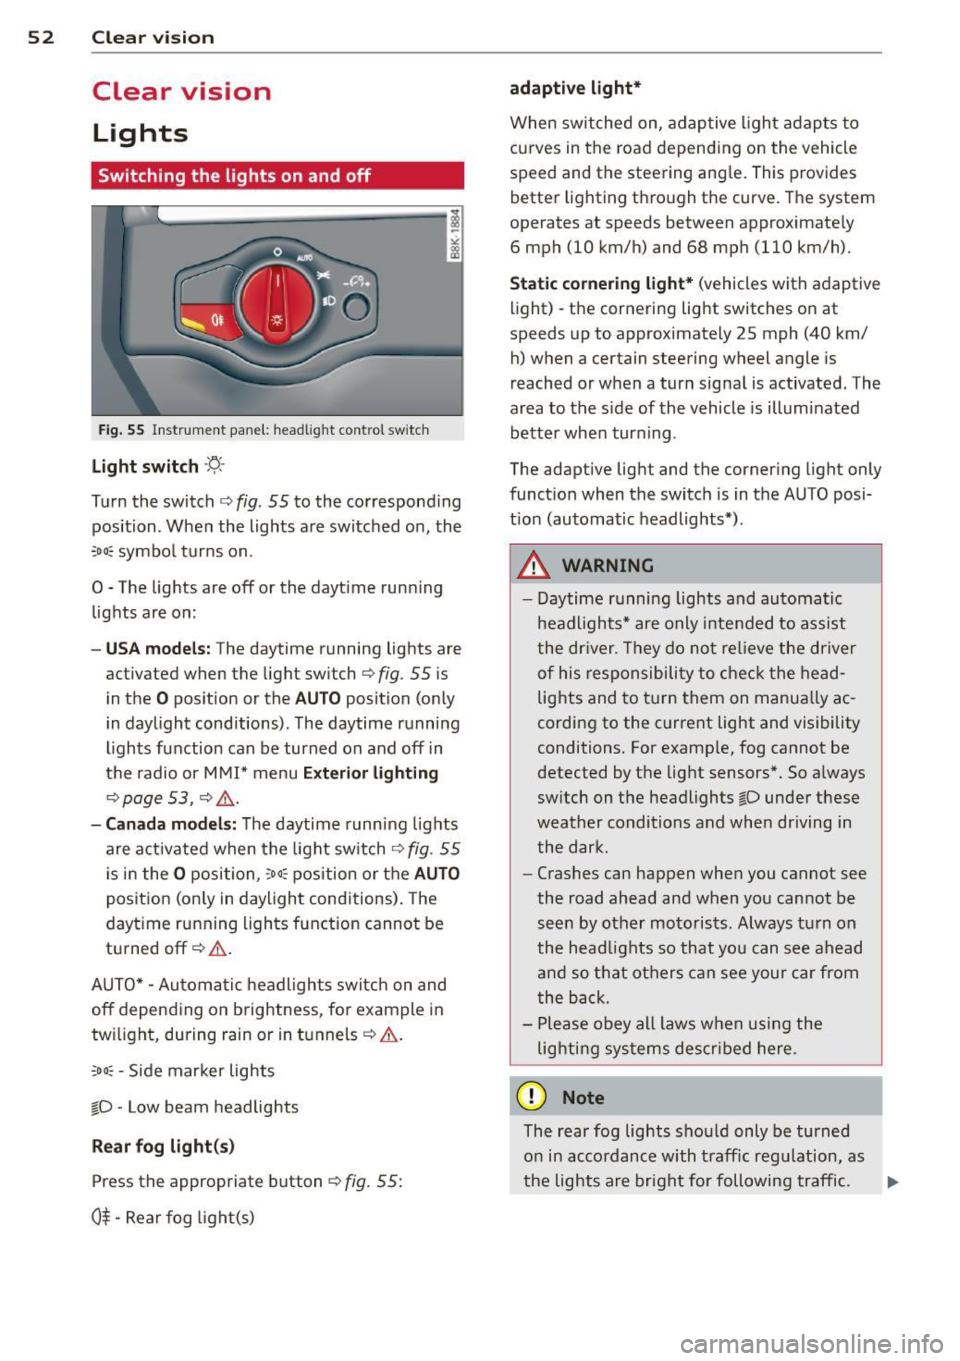
Fig . 55 Instr ument pane l: headlight con trol switch
Light switch -~ -
Turn the switch c:> fig . 55 to the correspond ing
position . When the lights are switched on, the
,o o~ symbo l tu rns on.
0 -The lights are off or the dayt ime run ning
lights are on:
- USA model s: The daytime running lights are
activated when the light sw itch
c:> fig . 55 is
in the
O position or the AUTO position (o nly
in dayl ight conditions) . The daytime running
lights function can be turned on and off in
the radio or MMI* menu
Exterior ligh ting
c:> page 53 , c:> ,&..
-Canada model s: The daytime runn ing lights
are activated when the light sw itch
c:> fig . 55
is in the O position, :oo; position or the AUTO
pos it ion (on ly in daylight cond itions) . The
dayt ime running lights function cannot be
tu rned off
c:> &. .
AUTO* -Au toma tic h eadlights switch on and
off depending on b rightness, fo r example in
tw ilight, during rain or in t unnels
c:> &. .
:o o; -Side marker lights
io -Low beam headlights
Rear fog light (s)
Press the appropriate b utton c:> fig. 55:
0$ -Rear fog light(s)
adaptive light*
When switched on, adaptive ligh t adap ts to
curves in the road depend ing on the vehicle
speed and the steering ang le . This provides
b etter l ighting t hro ugh the curve . The system
operates at speeds between app roximate ly
6 mph (10 km/h) and 68 mph (110 km/h).
Static cornering light* (vehicles with adaptive
light) - the cornering light switches on at
speeds up to approximately 25 mph (40 km/
h) when a certain steering wheel angle is
reached or when a turn signa l is activated. The
area to the s ide of the vehicle is illuminated
better when turning .
The adaptive light and the cornering light only
funct ion when the switch is in t he AU TO posi
t ion (automatic headlights*) .
A WARNING
--
- Daytime r unning lights and automatic
headlights* are only inte nded to assist
the dr iver . Th ey do n ot relieve the driver
of his re s ponsibili ty to chec k the head
lights and to t urn them on manua lly ac
cordin g to the c urrent light and visibility
conditions . For examp le, fog cannot be
detected by the light sensors *. So a lways
sw itch on t he headlights
io under these
weather conditions and when driving in
the dark .
- Crashes can happen whe n you cannot see
the road ahead and when yo u cannot be
see n by other moto rists. Always tu rn on
the head lights so that you can see ahead
a nd so t hat other s can see your car fr om
the b ack.
- P lease obey all laws when using the
lighting sys tems descri bed here .
(D Note
The rear fog lights sho uld only be turned
o n in acco rdanc e with t raff ic regu lation, as
the lights are bright for following traffic. ..,
Page 55 of 286

(D Tips
-The light sensor * for headl ight control is
l ocated in the rear view m irror mount.
You should therefore not apply any st ick
ers to the windsh ield in this area in order
to prevent malfunctions or failures .
- Some exterior lighting functions can be
adjusted
¢page 53.
-When yo u remove you r key from the igni
tion w hile the vehicle's lights are turned
on, a buzzer sounds as long as the driv
er's door is open.
- In cool or damp weather, t he ins ide of
the headlights, turn signa ls and tail
li ghts can fog ove r due to the tem pera
ture diffe ren ce betwe en the inside and
outside. They will clear shor tly after
swi tching t hem on. This d oes not aff ect
the service life of the ligh ting.
- In the even t of a ligh t sensor malfunc
tion, the drive r is no tifie d in the inst ru
ment cluster disp lay ~
page 2 2.
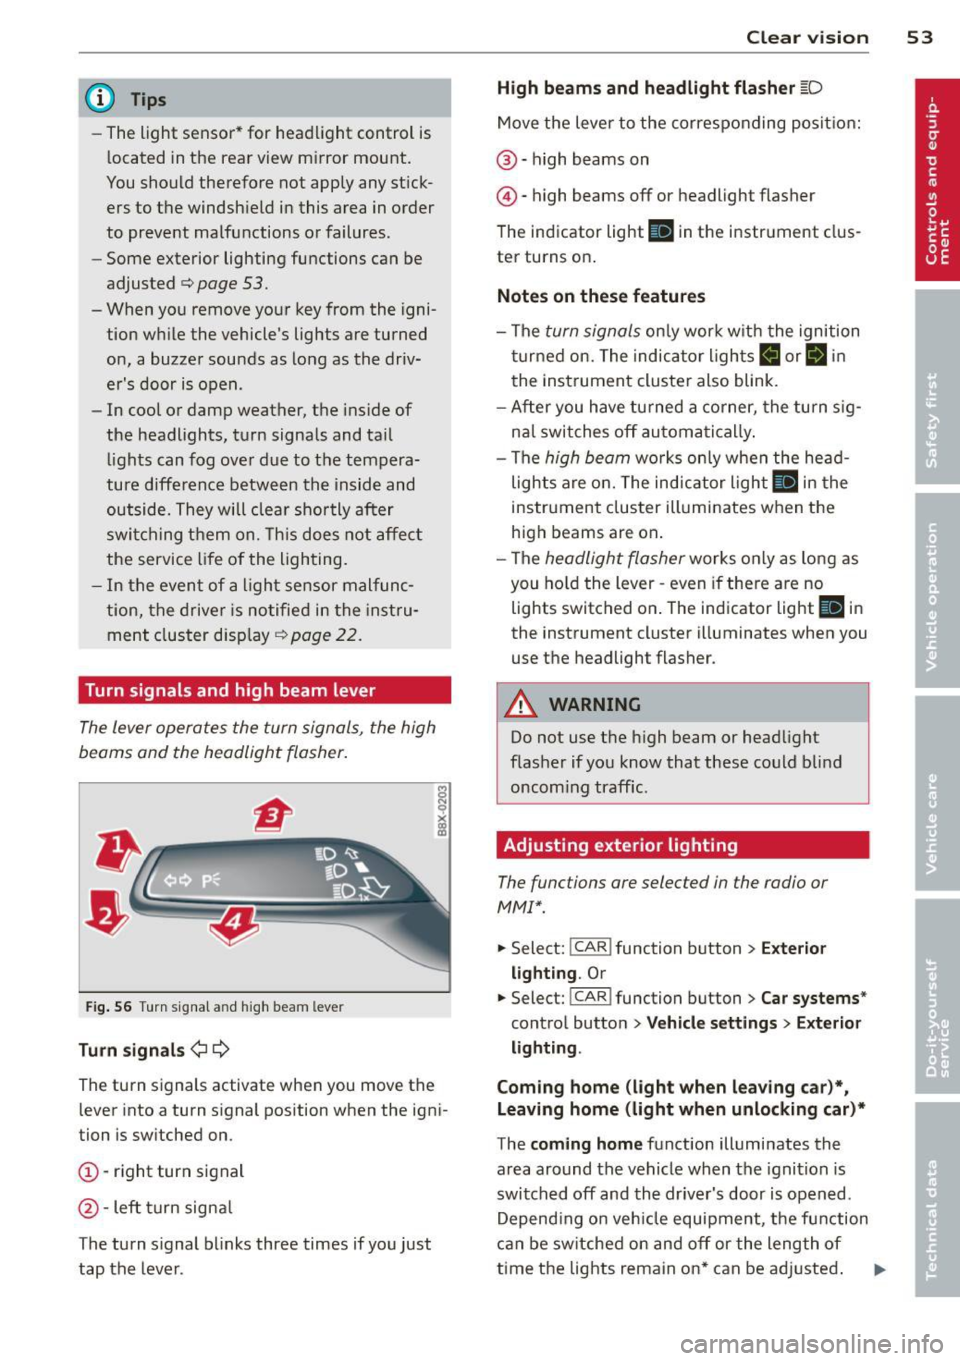
Turn signals and high beam lever
The lever operates the turn signal s, the high
beams and the headlight flasher .
Fig. 56 T urn sig na l and high beam leve r
Turn signals ¢i ¢
The turn s ignals activate when you move the
l ever into a turn s ignal position when the ign i
tion is sw itched on.
(D -right turn signal
@ -Left turn signa l
The turn s ignal b links three times if you just
tap the lever .
Clear vision 5 3
High beams and headlight flasher @:D
Move the lever to the corresponding posit io n:
@ -high beams on
@-high beams off or headlight flasher
T he ind icator light
II in the instr ument clus
ter turns on .
Notes on these features
-The turn signals on ly wor k w it h t he ignition
t urned on. The indica tor l igh ts
11 or II in
the instrument cluste r also blink .
- Aft er you have tu rned a corner, the turn s ig
na l swi tches off au tom atically .
- The
high beam wo rks only when the head
lights a re on. The indicator Ligh t. in the
instrumen t clus ter illuminates when the
high beams are on .
- The
headligh t flasher works on ly as long as
you ho ld the lever -even if the re are no
lights switched o n. The ind icator light
Ill i n
the inst rument cluster illuminates when you
use the headlight flasher.
&_ WARNING
Do not use the h igh beam or head light
flasher if you kn ow that these could b lind
oncom ing traffic.
Adjusting exterior lighting
The functions are selected in the radio or
MM!* .
.. Select: !CAR I function button> Exterior
light ing .
Or
.. Select: !CAR I function button > Car systems*
contro l butto n > Vehicle settings > Exterior
lighting .
Coming home (light when leav ing car )*,
Leaving home (light when unlocking car)*
The coming home function illumi nates the
area around the vehicle when the ignition is
switched off and the drive r's door is open ed.
Depend ing on ve hicle equipment, t he fu nction
can be sw itched on and off or the length of
time the lights rem ain on* can be ad justed . .._
Page 56 of 286

54 Clear vis ion
The lea ving home function i lluminates the
area around the vehicle when unlocking it.
This funct ion can be switched on and
off.
The c o ming ho me and leav ing h ome func
tions on ly operate when it is dark and the
light switch is in the AUTO position
r::!) page 52, fig. 55 .
Auto headlight s*
When the light switch is in the AUTO
r::!) page 52 position, the sw itch-on po int of the
lights can be changed in the automatic driving
light function.
Daytime running lights
USA m odels: You can switch the dayt ime run
ni ng lights
on and o ff .
Canada mod els: The function cannot be
turned off .
It is activated automat ica lly each
time the ign ition is switched on.
Travel mod e*
The headlight beam is asymmetrical. This pro
vides stronger illum ination on the s ide of the
road on wh ich you are driving . If you a re driv
ing i n a count ry that d rives on the opposite
side of the road from you r own country, th is
will cause glare for oncoming dr ivers. To pre
vent glare :
- Trave l mode must be selected in vehicles
with Xenon headlights*.
- In vehicles with halogen head lights, certain
areas of the head light lenses must be cov
ered w ith wate rproof adhesive covers tha t
p revent light from passing through. For
more information, p lease see your author
i zed Audi dea ler or author ized repair fac ility .
@ Tips
When trave l mode is activated, a display in
the driver information system indicates
this each time you switch the ignitio n on.
Emergency flashers
Fi g. 5 7 Center co nsole : em ergency flashe r sw itch
The emergency flashers makes other moto
rists aware that you or your vehicle are in an
emergency situation .
... Press the switch~
r::!) fig. 57 to turn the
emergency flashers on or
off.
When the emergency flashers are on, all four
turn s ignals b link at the same time. The turn
s ignal indicator lights
H II in the instrument
cluster, as well as the l ight in the emergency
flasher switch ~ blink likewise.
You can indicate a lane change or a t urn when
the emergency flashers are switched on by us
ing t he turn signal lever. The emergency flash
ers stop temporarily .
T he emergency flashers also work when the
ignition is turned off .
T he emergency flashers wi ll tu rn on automat i
ca lly if yo u are in an accident where the airbag
has deployed.
(D Tips
You sho uld turn on the emergency flas hers
when:
- yo u are the last veh icle standing in a t ra f
fic jam so that any other vehicles corning can see you, o r whe n
- yo ur vehicle has bro ken down or you are
in an emergency s ituation, or when
- yo ur vehicle is be ing towed by a tow
t ruck or if you are towing ano ther vehicle
beh ind you .