2012 MERCEDES-BENZ SL ROADSTER ECO mode
[x] Cancel search: ECO modePage 206 of 637
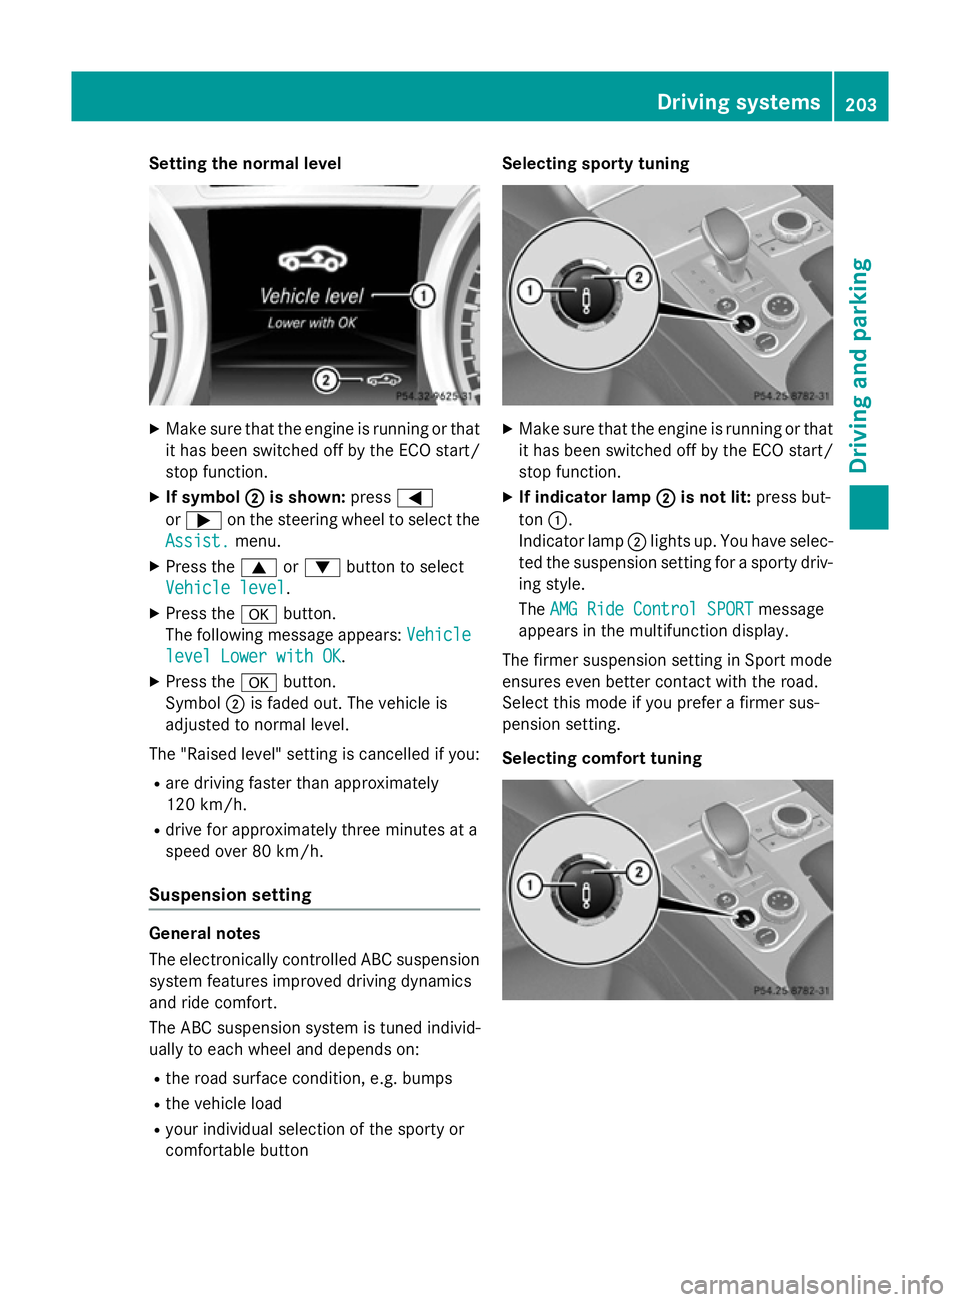
Setting the normal level
X
Make sure that the engine is running or that
it has been switched off by the ECO start/
stop function.
X If symbol ;
; is shown: press=
or ; on the steering wheel to select the
Assist.
Assist. menu.
X Press the 9or: button to select
Vehicle level
Vehicle level.
X Press the abutton.
The following message appears: Vehicle
Vehicle
level Lower with OK
level Lower with OK.
X Press the abutton.
Symbol ;is faded out. The vehicle is
adjusted to normal level.
The "Raised level" setting is cancelled if you:
R are driving faster than approximately
120 km/h.
R drive for approximately three minutes at a
speed over 80 km/h.
Suspension setting General notes
The electronically controlled ABC suspension
system features improved driving dynamics
and ride comfort.
The ABC suspension system is tuned individ-
ually to each wheel and depends on:
R the road surface condition, e.g. bumps
R the vehicle load
R your individual selection of the sporty or
comfortable button Selecting sporty tuning
X
Make sure that the engine is running or that
it has been switched off by the ECO start/
stop function.
X If indicator lamp ; ;is not lit: press but-
ton :.
Indicator lamp ;lights up. You have selec-
ted the suspension setting for a sporty driv- ing style.
The AMG Ride Control SPORT AMG Ride Control SPORT message
appears in the multifunction display.
The firmer suspension setting in Sport mode
ensures even better contact with the road.
Select this mode if you prefer a firmer sus-
pension setting.
Selecting comfort tuning Driving systems
203Driving and parking Z
Page 207 of 637
X
Make sure that the engine is running or that
it has been switched off by the ECO start/
stop function.
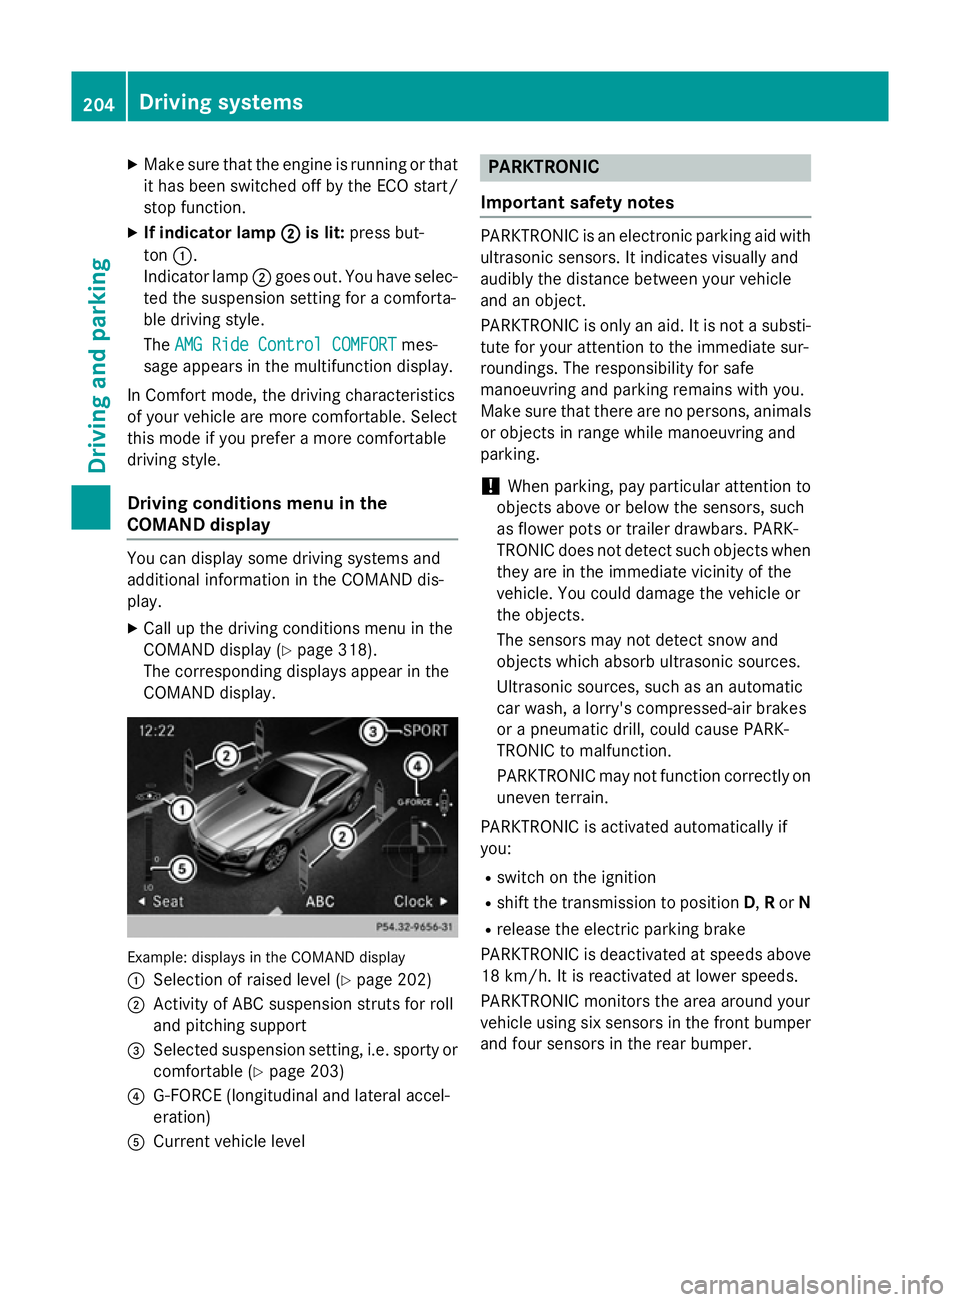
X If indicator lamp ;
; is lit: press but-
ton :.
Indicator lamp ;goes out. You have selec-
ted the suspension setting for a comforta-
ble driving style.
The AMG Ride Control COMFORT
AMG Ride Control COMFORT mes-
sage appears in the multifunction display.
In Comfort mode, the driving characteristics
of your vehicle are more comfortable. Select
this mode if you prefer a more comfortable
driving style.
Driving conditions menu in the
COMAND display You can display some driving systems and
additional information in the COMAND dis-
play.
X Call up the driving conditions menu in the
COMAND display (Y page 318).
The corresponding displays appear in the
COMAND display. Example: displays in the COMAND display
:
Selection of raised level (Y page 202)
; Activity of ABC suspension struts for roll
and pitching support
= Selected suspension setting, i.e. sporty or
comfortable (Y page 203)
? G-FORCE (longitudinal and lateral accel-
eration)
A Current vehicle level PARKTRONIC
Important safety notes PARKTRONIC is an electronic parking aid with
ultrasonic sensors. It indicates visually and
audibly the distance between your vehicle
and an object.
PARKTRONIC is only an aid. It is not a substi- tute for your attention to the immediate sur-
roundings. The responsibility for safe
manoeuvring and parking remains with you.
Make sure that there are no persons, animals
or objects in range while manoeuvring and
parking.
! When parking, pay particular attention to
objects above or below the sensors, such
as flower pots or trailer drawbars. PARK-
TRONIC does not detect such objects when they are in the immediate vicinity of the
vehicle. You could damage the vehicle or
the objects.
The sensors may not detect snow and
objects which absorb ultrasonic sources.
Ultrasonic sources, such as an automatic
car wash, a lorry's compressed-air brakes
or a pneumatic drill, could cause PARK-
TRONIC to malfunction.
PARKTRONIC may not function correctly on uneven terrain.
PARKTRONIC is activated automatically if
you:
R switch on the ignition
R shift the transmission to position D,Ror N
R release the electric parking brake
PARKTRONIC is deactivated at speeds above
18 km/h. It is reactivated at lower speeds.
PARKTRONIC monitors the area around your
vehicle using six sensors in the front bumper and four sensors in the rear bumper. 204
Driving systemsDriving and parking
Page 244 of 637
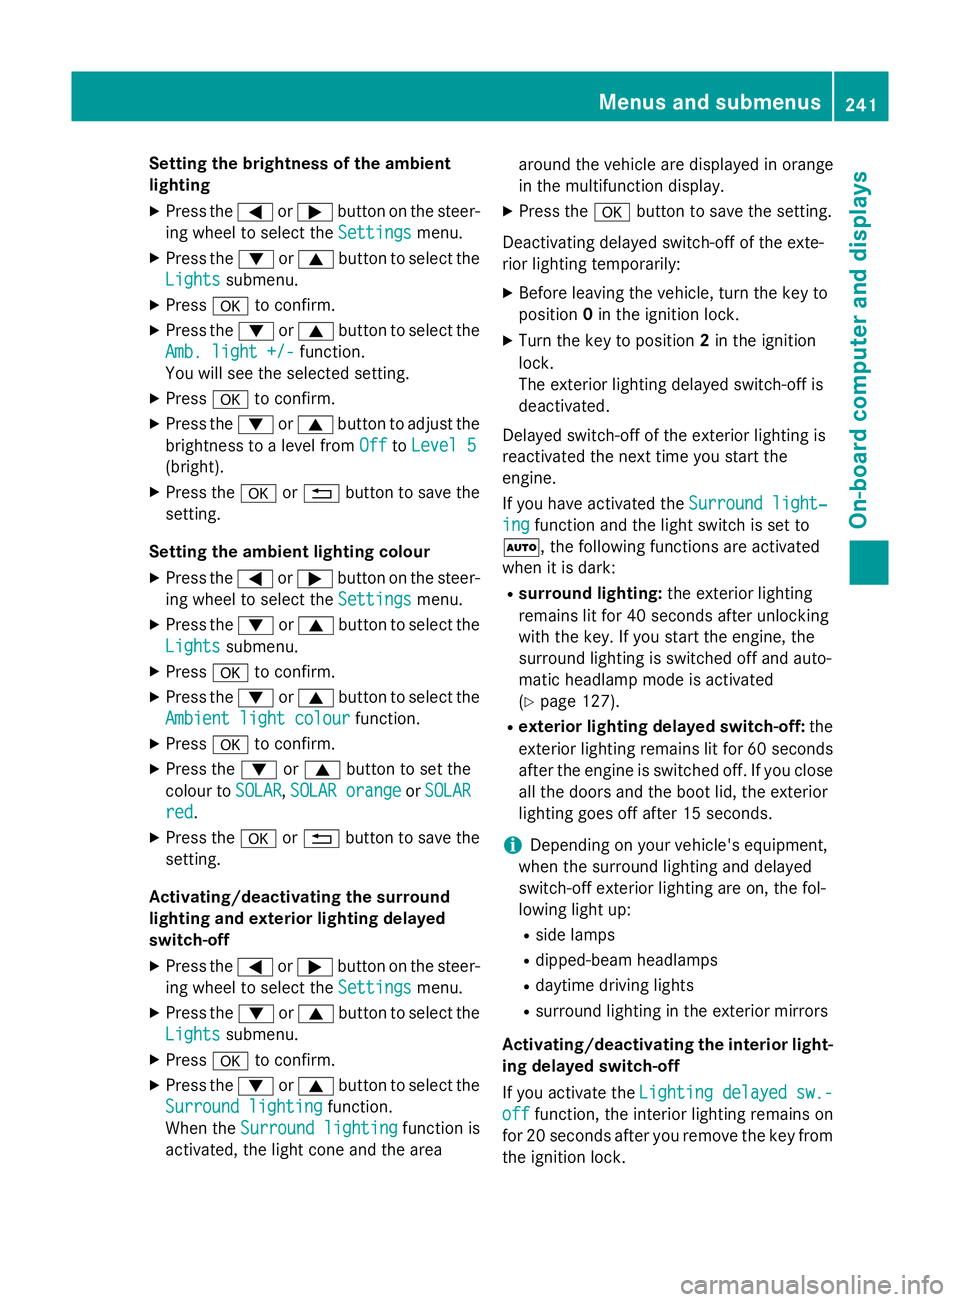
Setting the brightness of the ambient
lighting
X Press the =or; button on the steer-
ing wheel to select the Settings Settingsmenu.
X Press the :or9 button to select the
Lights Lights submenu.
X Press ato confirm.
X Press the :or9 button to select the
Amb. light +/-
Amb. light +/- function.
You will see the selected setting.
X Press ato confirm.
X Press the :or9 button to adjust the
brightness to a level from Off
OfftoLevel 5
Level 5
(bright).
X Press the aor% button to save the
setting.
Setting the ambient lighting colour
X Press the =or; button on the steer-
ing wheel to select the Settings
Settingsmenu.
X Press the :or9 button to select the
Lights
Lights submenu.
X Press ato confirm.
X Press the :or9 button to select the
Ambient light colour
Ambient light colour function.
X Press ato confirm.
X Press the :or9 button to set the
colour to SOLAR
SOLAR,SOLAR orange
SOLAR orange orSOLAR
SOLAR
red
red.
X Press the aor% button to save the
setting.
Activating/deactivating the surround
lighting and exterior lighting delayed
switch-off X Press the =or; button on the steer-
ing wheel to select the Settings
Settings menu.
X Press the :or9 button to select the
Lights Lights submenu.
X Press ato confirm.
X Press the :or9 button to select the
Surround lighting
Surround lighting function.
When the Surround lighting
Surround lighting function is
activated, the light cone and the area around the vehicle are displayed in orange
in the multifunction display.
X Press the abutton to save the setting.
Deactivating delayed switch-off of the exte-
rior lighting temporarily: X Before leaving the vehicle, turn the key to
position 0in the ignition lock.
X Turn the key to position 2in the ignition
lock.
The exterior lighting delayed switch-off is
deactivated.
Delayed switch-off of the exterior lighting is
reactivated the next time you start the
engine.
If you have activated the Surround light‐
Surround light‐
ing ing function and the light switch is set to
Ã, the following functions are activated
when it is dark:
R surround lighting: the exterior lighting
remains lit for 40 seconds after unlocking
with the key. If you start the engine, the
surround lighting is switched off and auto-
matic headlamp mode is activated
(Y page 127).
R exterior lighting delayed switch-off: the
exterior lighting remains lit for 60 seconds
after the engine is switched off. If you close all the doors and the boot lid, the exterior
lighting goes off after 15 seconds.
i Depending on your vehicle's equipment,
when the surround lighting and delayed
switch-off exterior lighting are on, the fol-
lowing light up:
R side lamps
R dipped-beam headlamps
R daytime driving lights
R surround lighting in the exterior mirrors
Activating/deactivating the interior light-
ing delayed switch-off
If you activate the Lighting delayed sw.- Lighting delayed sw.-
off
off function, the interior lighting remains on
for 20 seconds after you remove the key from
the ignition lock. Menus and submenus
241On-board computer and displays Z
Page 248 of 637
SETUP shows the drive program, the ESP
®
(Electronic Stability Program) mode, the
SPORT handling mode and the suspension
setting. X Press the =or; button on the steer-
ing wheel to select the AMG AMGmenu.
X Press the 9button repeatedly until
SETUP is displayed.
or
X Briefly press the AMG button on the centre
console (Y page 167).
RACETIMER Displaying and starting the RACETIMER
The RACETIMER is only intended for use on a closed race circuit. Do not use the function on
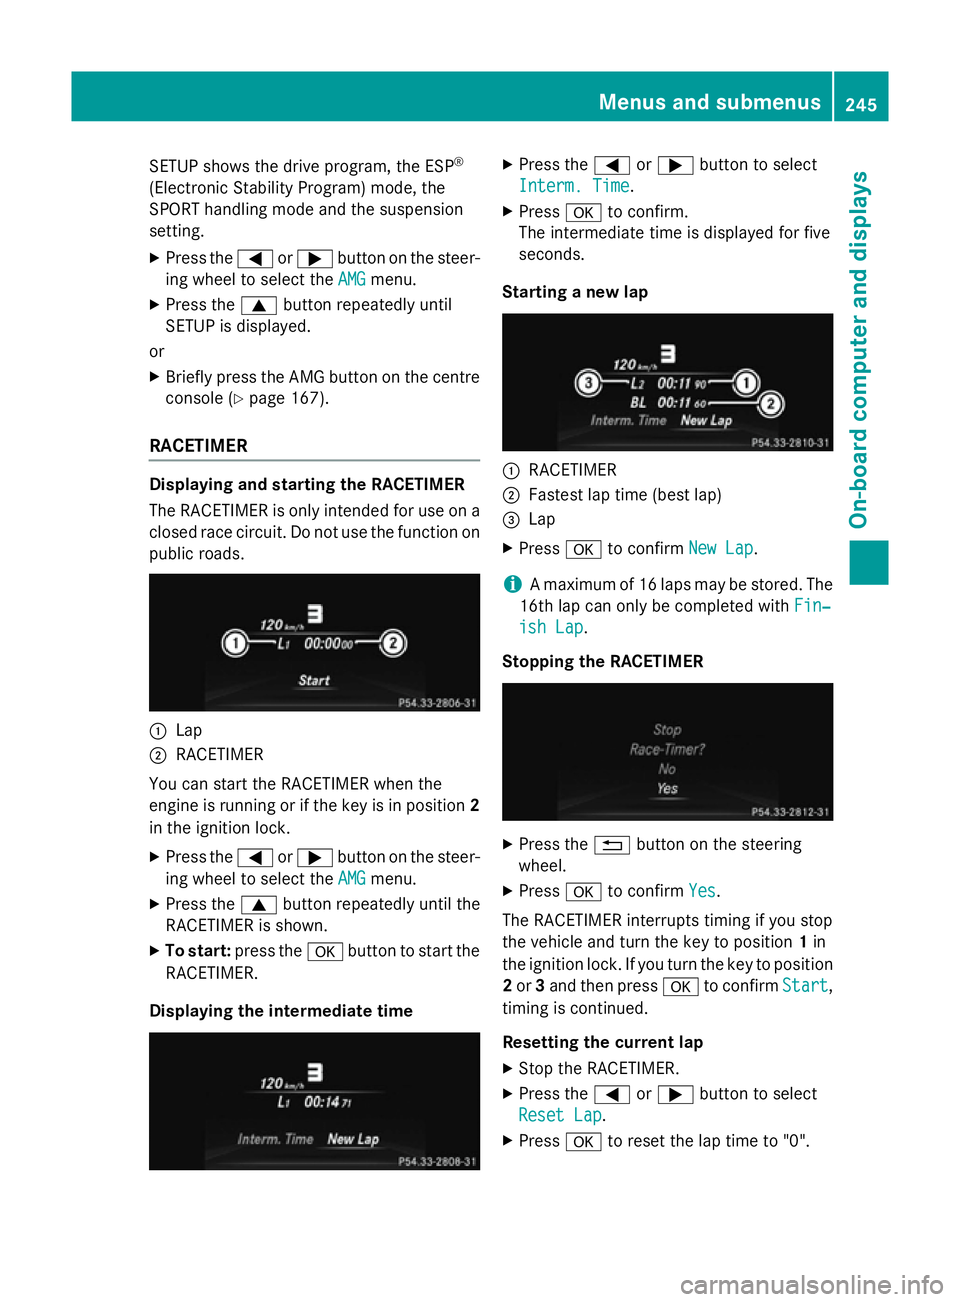
public roads. :
Lap
; RACETIMER
You can start the RACETIMER when the
engine is running or if the key is in position 2
in the ignition lock.
X Press the =or; button on the steer-
ing wheel to select the AMG
AMGmenu.
X Press the 9button repeatedly until the
RACETIMER is shown.
X To start: press the abutton to start the
RACETIMER.
Displaying the intermediate time X
Press the =or; button to select
Interm. Time
Interm. Time.
X Press ato confirm.
The intermediate time is displayed for five
seconds.
Starting a new lap :
RACETIMER
; Fastest lap time (best lap)
= Lap
X Press ato confirm New Lap New Lap.
i A maximum of 16 laps may be stored. The
16th lap can only be completed with Fin‐
Fin‐
ish Lap
ish Lap .
Stopping the RACETIMER X
Press the %button on the steering
wheel.
X Press ato confirm Yes
Yes.
The RACETIMER interrupts timing if you stop
the vehicle and turn the key to position 1in
the ignition lock. If you turn the key to position
2 or 3and then press ato confirm Start
Start,
timing is continued.
Resetting the current lap
X Stop the RACETIMER.
X Press the =or; button to select
Reset Lap Reset Lap .
X Press ato reset the lap time to "0". Menus and submenus
245On-board computer and displays Z
Page 293 of 637
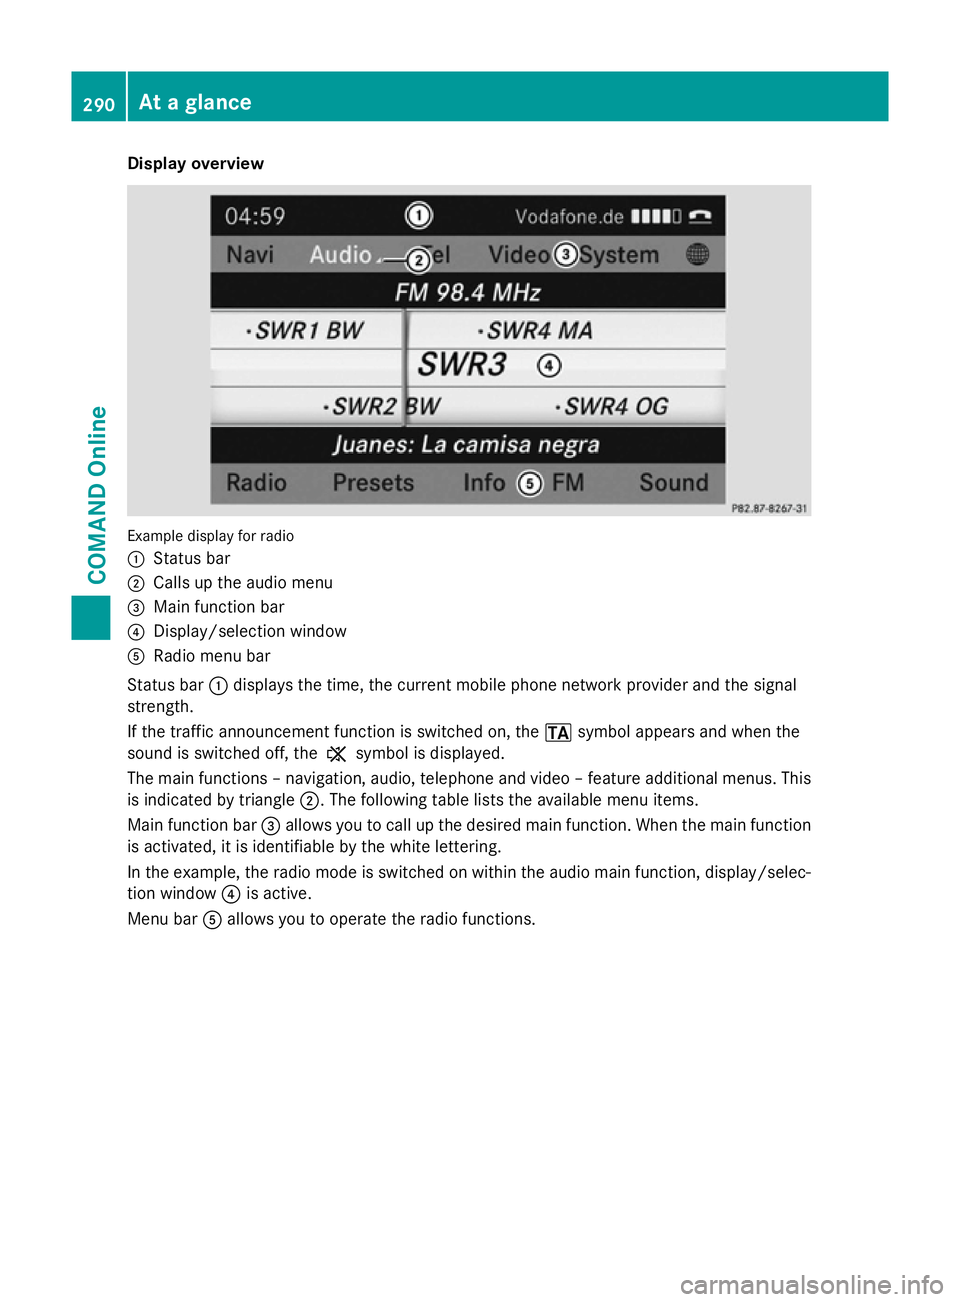
Display overview
Example display for radio
:
Status bar
; Calls up the audio menu
= Main function bar
? Display/selection window
A Radio menu bar
Status bar :displays the time, the current mobile phone network provider and the signal
strength.
If the traffic announcement function is switched on, the .symbol appears and when the
sound is switched off, the ,symbol is displayed.
The main functions – navigation, audio, telephone and video – feature additional menus. This
is indicated by triangle ;. The following table lists the available menu items.
Main function bar =allows you to call up the desired main function. When the main function
is activated, it is identifiable by the white lettering.
In the example, the radio mode is switched on within the audio main function, display/selec-
tion window ?is active.
Menu bar Aallows you to operate the radio functions. 290
At a glanceCOMAND Online
Page 297 of 637
COMAND control panel
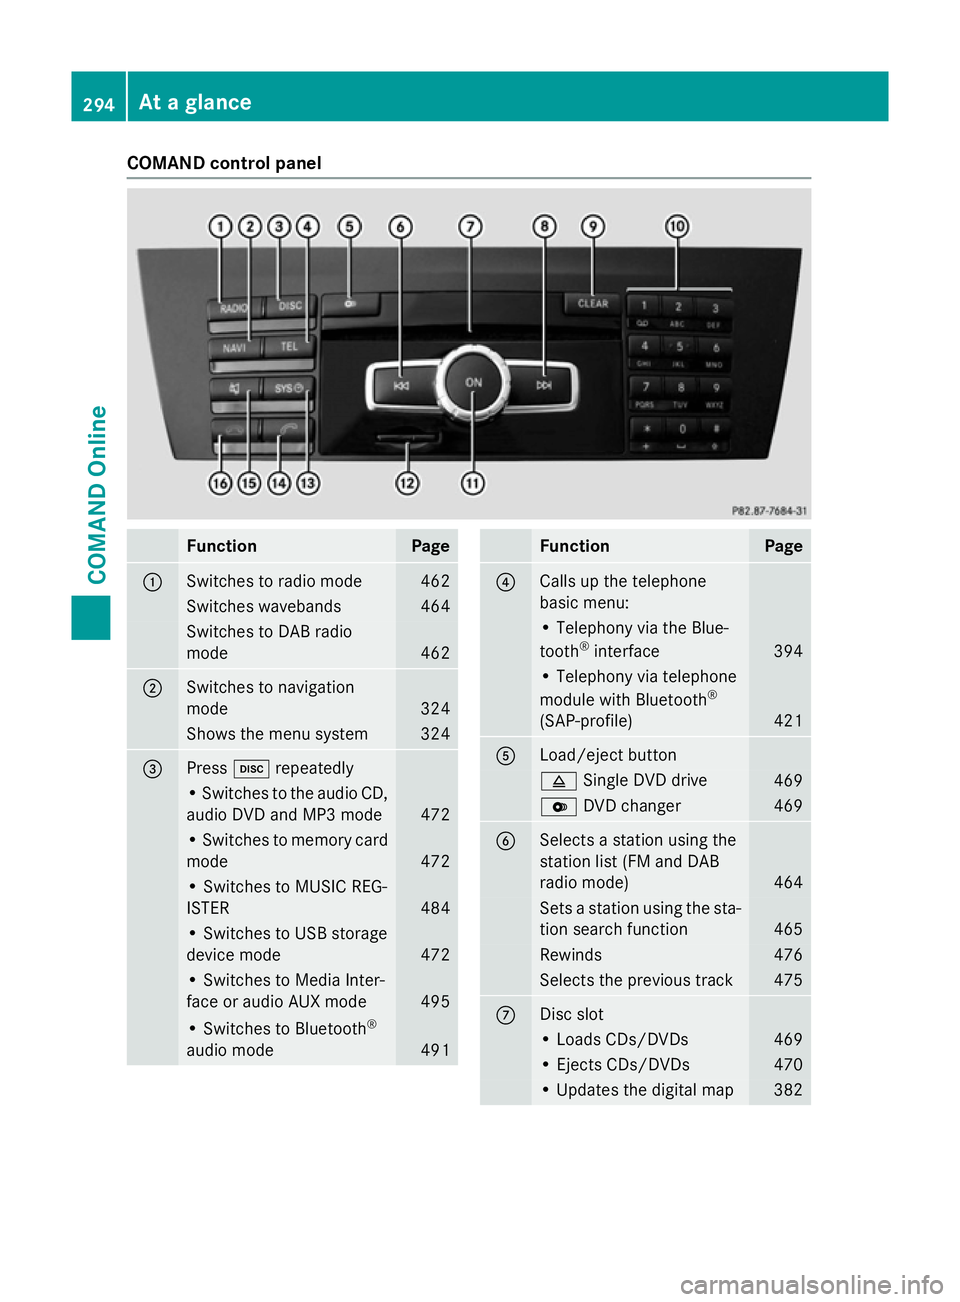
Function Page
:
Switches to radio mode 462
Switches wavebands 464
Switches to DAB radio
mode
462
;
Switches to navigation
mode
324
Shows the menu system 324
=
Press
hrepeatedly • Switches to the audio CD,
audio DVD and MP3 mode 472
• Switches to memory card
mode 472
• Switches to MUSIC REG-
ISTER
484
• Switches to USB storage
device mode
472
• Switches to Media Inter-
face or audio AUX mode
495
• Switches to Bluetooth
®
audio mode 491 Function Page
?
Calls up the telephone
basic menu:
• Telephony via the Blue-
tooth
®
interface 394
• Telephony via telephone
module with Bluetooth
®
(SAP-profile) 421
A
Load/eject button
8
Single DVD drive 469
V
DVD changer 469
B
Selects a station using the
station list (FM and DAB
radio mode)
464
Sets a station using the sta-
tion search function 465
Rewinds 476
Selects the previous track 475
C
Disc slot
• Loads CDs/DVDs 469
• Ejects CDs/DVDs 470
• Updates the digital map 382294
At a glanceCOMAND Online
Page 299 of 637
COMAND controller
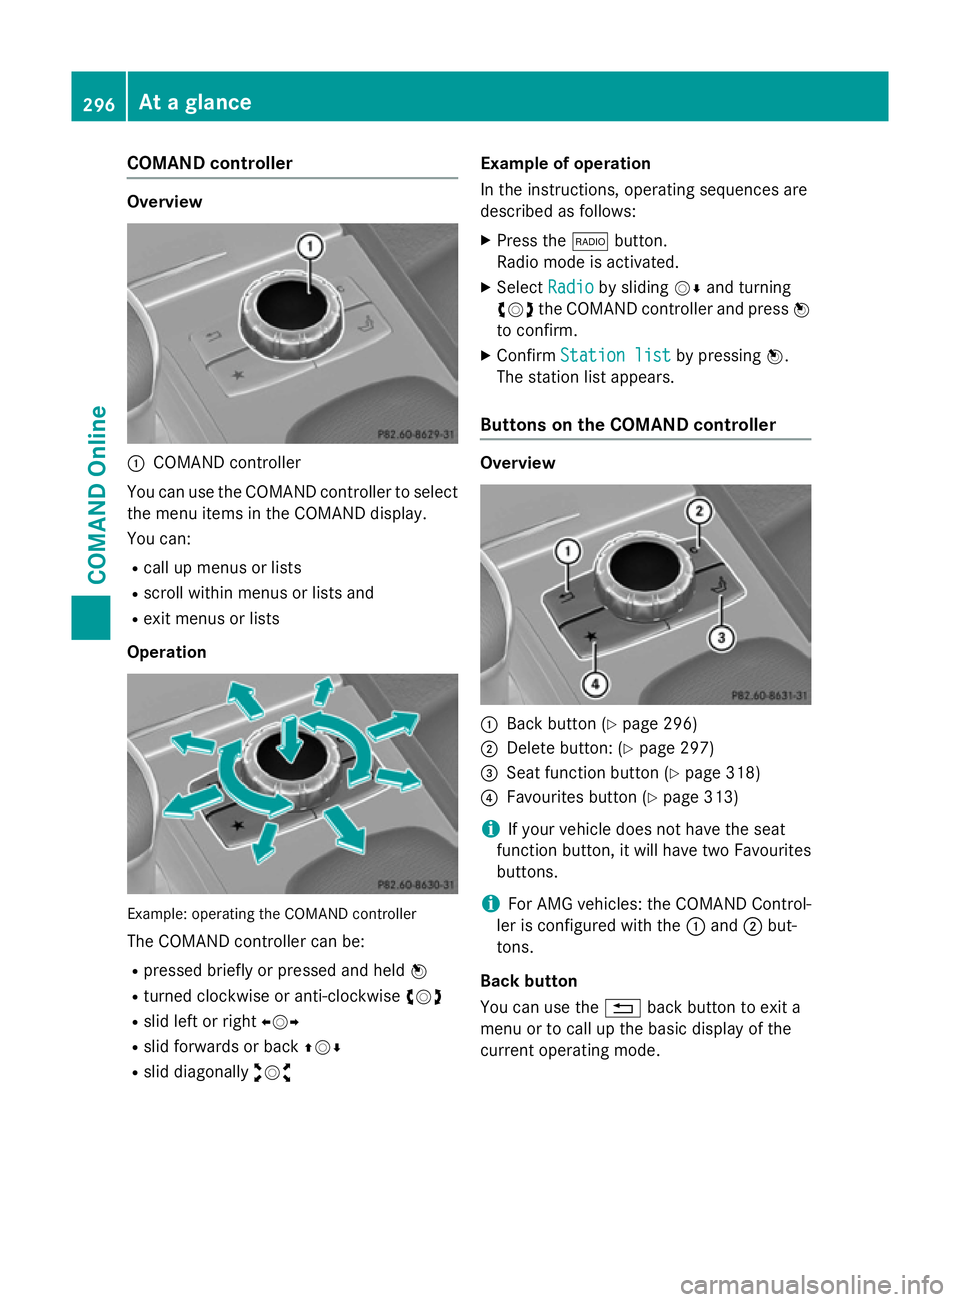
Overview
:
COMAND controller
You can use the COMAND controller to select the menu items in the COMAND display.
You can:
R call up menus or lists
R scroll within menus or lists and
R exit menus or lists
Operation Example: operating the COMAND controller
The COMAND controller can be:
R pressed briefly or pressed and held W
R turned clockwise or anti-clockwise cVd
R slid left or right XVY
R slid forwards or back ZVÆ
R slid diagonally aVb Example of operation
In the instructions, operating sequences are
described as follows:
X Press the $button.
Radio mode is activated.
X Select Radio Radioby sliding VÆand turning
cVd the COMAND controller and press W
to confirm.
X Confirm Station list Station list by pressingW.
The station list appears.
Buttons on the COMAND controller Overview
:
Back button (Y page 296)
; Delete button: (Y page 297)
= Seat function button (Y page 318)
? Favourites button (Y page 313)
i If your vehicle does not have the seat
function button, it will have two Favourites buttons.
i For AMG vehicles: the COMAND Control-
ler is configured with the :and ;but-
tons.
Back button
You can use the %back button to exit a
menu or to call up the basic display of the
current operating mode. 296
At a glanceCOMAND Online
Page 301 of 637
Selecting the menu of a main function
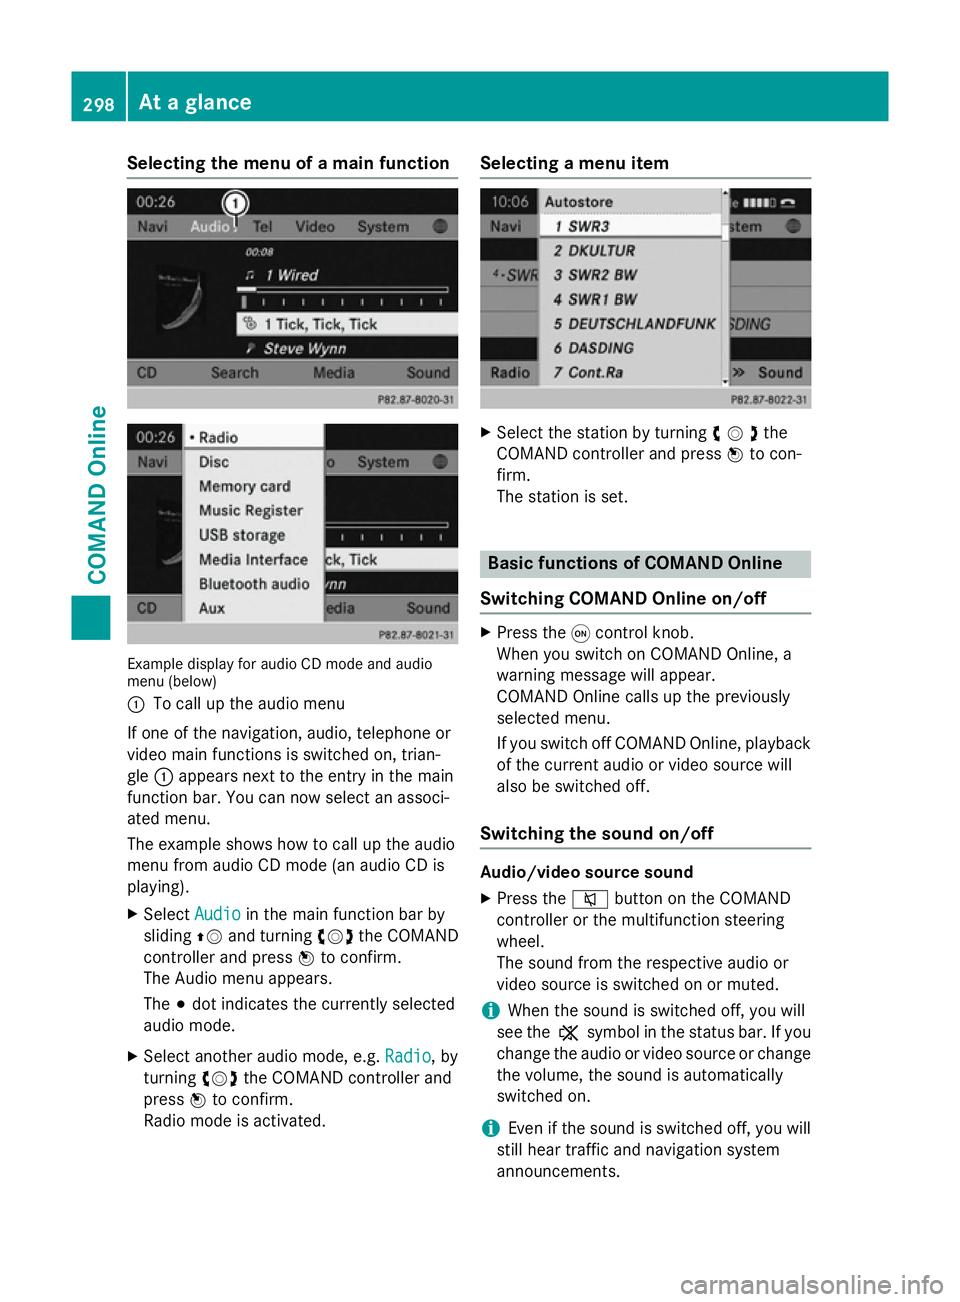
Example display for audio CD mode and audio
menu (below)
: To call up the audio menu
If one of the navigation, audio, telephone or
video main functions is switched on, trian-
gle :appears next to the entry in the main
function bar. You can now select an associ-
ated menu.
The example shows how to call up the audio
menu from audio CD mode (an audio CD is
playing).
X Select Audio
Audio in the main function bar by
sliding ZVand turning cVdthe COMAND
controller and press Wto confirm.
The Audio menu appears.
The #dot indicates the currently selected
audio mode.
X Select another audio mode, e.g. Radio Radio, by
turning cVdthe COMAND controller and
press Wto confirm.
Radio mode is activated. Selecting a menu item
X
Select the station by turning cVdthe
COMAND controller and press Wto con-
firm.
The station is set. Basic functions of COMAND Online
Switching COMAND Online on/off X
Press the qcontrol knob.
When you switch on COMAND Online, a
warning message will appear.
COMAND Online calls up the previously
selected menu.
If you switch off COMAND Online, playback of the current audio or video source will
also be switched off.
Switching the sound on/off Audio/video source sound
X Press the 8button on the COMAND
controller or the multifunction steering
wheel.
The sound from the respective audio or
video source is switched on or muted.
i When the sound is switched off, you will
see the ,symbol in the status bar. If you
change the audio or video source or change
the volume, the sound is automatically
switched on.
i Even if the sound is switched off, you will
still hear traffic and navigation system
announcements. 298
At a glanceCOMAND Online