2012 MERCEDES-BENZ SL ROADSTER driver seat adjustment
[x] Cancel search: driver seat adjustmentPage 26 of 637

Route demonstration
........................ 359
Route guidance .................................. 353
Cancel ........................................... 356
Continue ........................................ 356
Destination reached ...................... 357
General information ....................... 351
Lane recommendations ................. 353
Off-road ......................................... 362 S
Safety Child restraint systems .................... 61
Safety notes .............................. 468, 511
Audio CD/DVD and MP3 mode ..... 468
Using the telephone ....................... 387
Video DVD mode ........................... 511
Safety system
see Driving safety systems
Saving the crosshair position .......... 373
Screen ................................................ 520
Selecting for remote operation ...... 520
SD memory card
Ejecting .......................................... 472
Inserting ........................................ 472
Seat
Balance (seat heating) ................... 320
Resetting adjustments ................... 322
Seat functions (COMAND Online) .. 318
Selecting for adjustment
(COMAND Online) .......................... 319
Seat belt
Seat belt guide ............................... 115
Switching belt adjustment on/off
(on-board computer) ...................... 243
Seat belts
Adjusting the driver's and front-
passenger seat bel t......................... 59
Belt force limite r.............................. 60
Belt tensioner .................................. 60
Cleaning ......................................... 574
Fastening ......................................... 59
Important safety guidelines ............. 57
Releasing ......................................... 59
Warning lamp ................................. 274
Warning lamp (function) ................... 60
Seats
Active multicontour seat ................ 319 Adjusting (electrically) ................... 114
Adjusting lumbar support
(COMAND Online) .......................... 319
Adjusting the head restraint .......... 115
Belt guide ...................................... 115
Cleaning the cover ......................... 573
Correct driver's seat position ........ 112
Important safety notes .................. 113
Multicontour seat .......................... 319
Overview ........................................ 113
Seat heating problem .................... 117
Seat ventilation problem ................ 117
Sliding forward/back ..................... 115
Storing settings (memory func-
tion) ............................................... 123
Switching AIRSCARF on/of
f.......... 117
Switching seat heating on/of f....... 116
Switching the seat ventilation on/ off .................................................. 117
Selecting channels
TV .................................................. 503
Selecting the country ....................... 327
Selector lever
Cleaning ......................................... 573
Positions ........................................ 163
Sensors (cleaning instructions) ....... 571
Service
see ASSYST PLUS
Service menu (on-board com-
puter) .................................................. 238
Service products
Brake fluid ..................................... 627
Coolant (engine) ............................ 627
Engine oil ....................................... 626
Fuel ................................................ 623
Important safety notes .................. 622
Washer fluid ................................... 628
Setting the air distribution ............... 145
Setting the airflow ............................ 146
Setting the audio format
Audio DVD ..................................... 478
Rear Seat Entertainment System ... 539
Video DVD ..................................... 515
Setting the date format .................... 311
Setting the day design ...................... 310
Setting the language
COMAND ....................................... 313 Index
23
Page 60 of 637
If the seat belts are not released:
X Move the backrest or seat back slightly, but
only when the vehicle is stationary.
Seat belt pre-tensioning is reduced and the locking mechanism is released.
The seat-belt adjustment is an integral part of
the PRE-SAFE ®
convenience function. More
information about seat-belt adjustment can
be found under "Seat-belt adjustment"
(Y page 59). NECK-PRO head restraints
Important safety notes G
WARNING
Only use head restraint covers which have
been tested and approved by Mercedes-Benz
for your vehicle model.
The use of non-approved head restraint cov-
ers may prevent NECK-PRO head restraints
from triggering properly. Consequently, the
NECK-PRO head restraints cannot provide the
intended level of protection.
Consult a Mercedes-Benz Service Centre
regarding availability.
NECK-PRO head restraints reduce the likeli-
hood of head and chest injuries. The NECK-
PRO head restraints on the driver's and front-
passenger seats are moved forwards and
upwards in the event of a rear-end collision of
a certain severity. This provides better head
support.
If the NECK-PRO head restraints have been
triggered in an accident, reset the NECK-PRO head restraints on the driver’s and front-
passenger seat (Y page 57). Otherwise, the
additional protection will not be available in
the event of another rear-end collision. You
can recognise when NECK-PRO head
restraints have been triggered by the fact that they have moved forwards and can no longerbe adjusted.
Mercedes-Benz recommends that you have
the NECK-PRO head restraints checked at a qualified specialist workshop after a rear-end
collision.
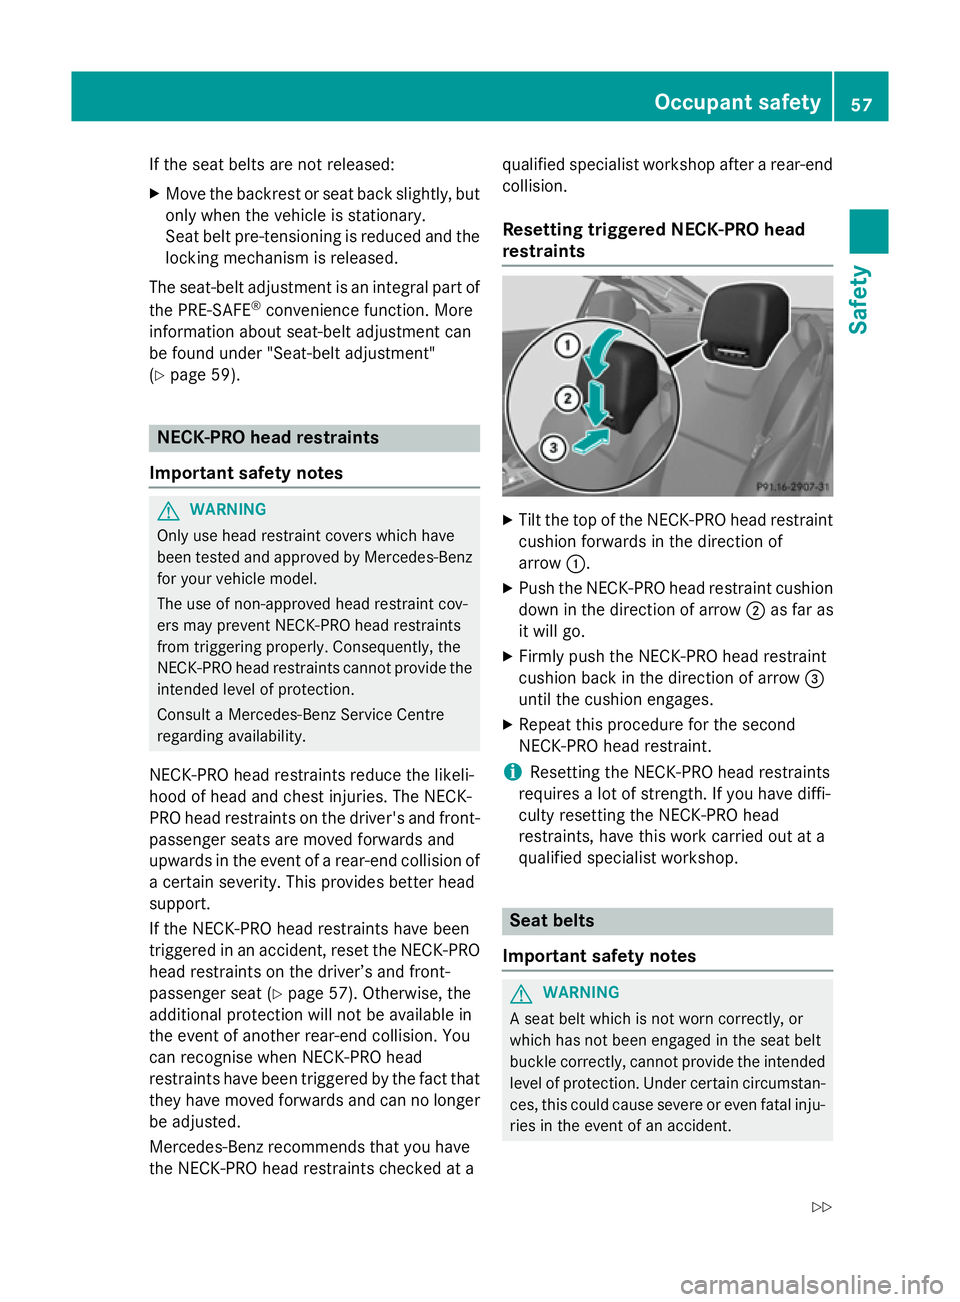
Resetting triggered NECK-PRO head
restraints X
Tilt the top of the NECK-PRO head restraint
cushion forwards in the direction of
arrow :.
X Push the NECK-PRO head restraint cushion
down in the direction of arrow ;as far as
it will go.
X Firmly push the NECK-PRO head restraint
cushion back in the direction of arrow =
until the cushion engages.
X Repeat this procedure for the second
NECK-PRO head restraint.
i Resetting the NECK-PRO head restraints
requires a lot of strength. If you have diffi-
culty resetting the NECK-PRO head
restraints, have this work carried out at a
qualified specialist workshop. Seat belts
Important safety notes G
WARNING
A seat belt which is not worn correctly, or
which has not been engaged in the seat belt
buckle correctly, cannot provide the intended level of protection. Under certain circumstan-
ces, this could cause severe or even fatal inju- ries in the event of an accident. Occupant safety
57Safety
Z
Page 62 of 637
reduces the risk of vehicle occupants coming
into contact with parts of the vehicle interior.
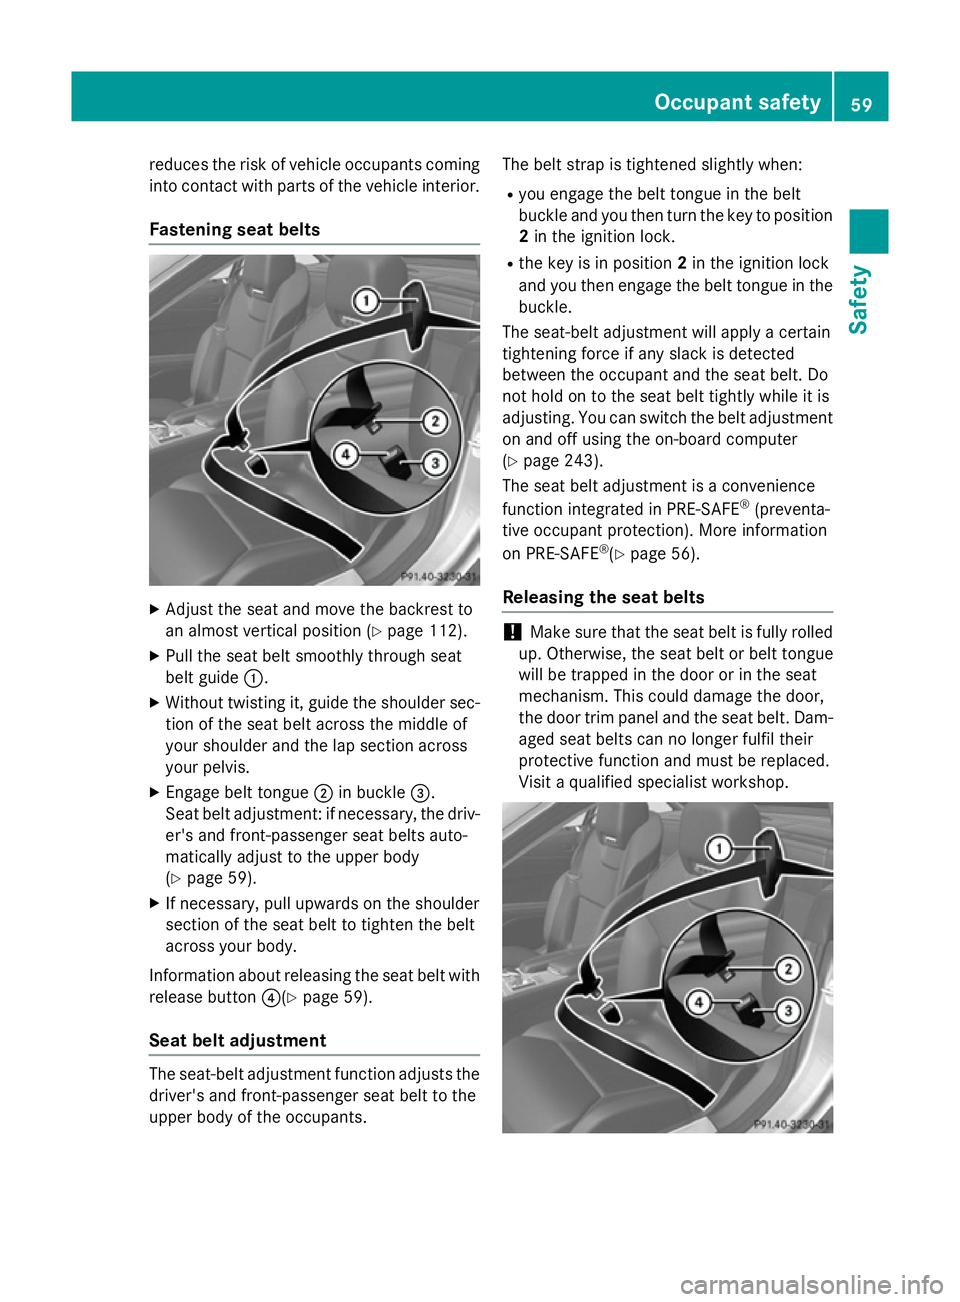
Fastening seat belts X
Adjust the seat and move the backrest to
an almost vertical position (Y page 112).
X Pull the seat belt smoothly through seat
belt guide :.
X Without twisting it, guide the shoulder sec-
tion of the seat belt across the middle of
your shoulder and the lap section across
your pelvis.
X Engage belt tongue ;in buckle =.
Seat belt adjustment: if necessary, the driv- er's and front-passenger seat belts auto-
matically adjust to the upper body
(Y page 59).
X If necessary, pull upwards on the shoulder
section of the seat belt to tighten the belt
across your body.
Information about releasing the seat belt with
release button ?(Ypage 59).
Seat belt adjustment The seat-belt adjustment function adjusts the
driver's and front-passenger seat belt to the
upper body of the occupants. The belt strap is tightened slightly when:
R you engage the belt tongue in the belt
buckle and you then turn the key to position
2 in the ignition lock.
R the key is in position 2in the ignition lock
and you then engage the belt tongue in the buckle.
The seat-belt adjustment will apply a certain
tightening force if any slack is detected
between the occupant and the seat belt. Do
not hold on to the seat belt tightly while it is
adjusting. You can switch the belt adjustment
on and off using the on-board computer
(Y page 243).
The seat belt adjustment is a convenience
function integrated in PRE-SAFE ®
(preventa-
tive occupant protection). More information
on PRE-SAFE ®
(Y page 56).
Releasing the seat belts !
Make sure that the seat belt is fully rolled
up. Otherwise, the seat belt or belt tongue
will be trapped in the door or in the seat
mechanism. This could damage the door,
the door trim panel and the seat belt. Dam-
aged seat belts can no longer fulfil their
protective function and must be replaced.
Visit a qualified specialist workshop. Occupant safety
59Safety Z
Page 115 of 637
Useful information
i This Owner's Manual describes all mod-
els, series and optional equipment for your
vehicle that were available at the time of
going to press. National variations are pos- sible. Note that your vehicle may not be
equipped with all of the functions descri-
bed. This is also the case for systems and
functions relevant to safety.
i Read the information on qualified special-
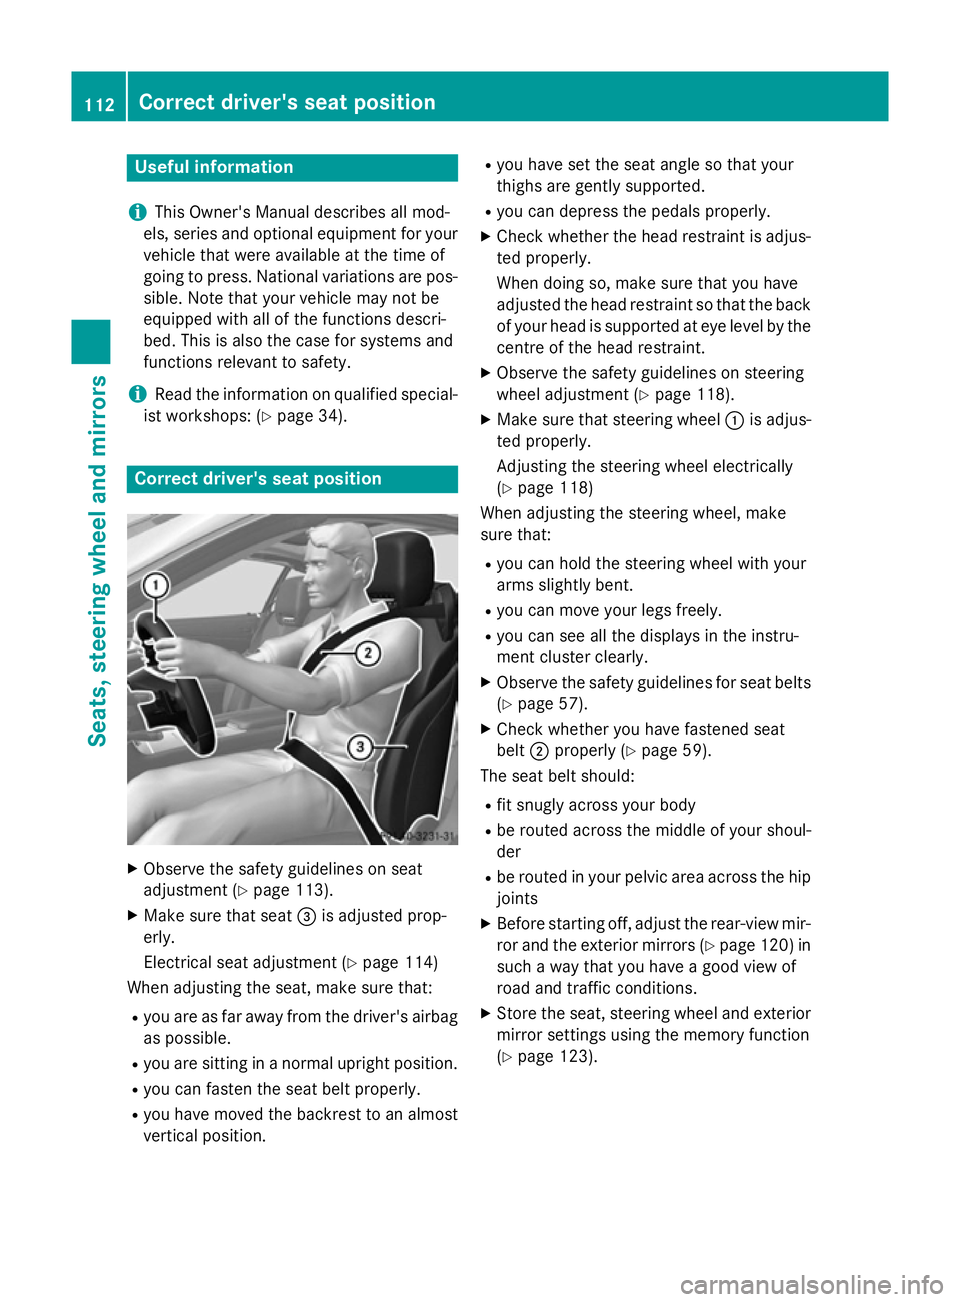
ist workshops: (Y page 34). Correct driver's seat position
X
Observe the safety guidelines on seat
adjustment (Y page 113).
X Make sure that seat =is adjusted prop-
erly.
Electrical seat adjustment (Y page 114)
When adjusting the seat, make sure that:
R you are as far away from the driver's airbag
as possible.
R you are sitting in a normal upright position.
R you can fasten the seat belt properly.
R you have moved the backrest to an almost
vertical position. R
you have set the seat angle so that your
thighs are gently supported.
R you can depress the pedals properly.
X Check whether the head restraint is adjus-
ted properly.
When doing so, make sure that you have
adjusted the head restraint so that the back
of your head is supported at eye level by the centre of the head restraint.
X Observe the safety guidelines on steering
wheel adjustment (Y page 118).
X Make sure that steering wheel :is adjus-
ted properly.
Adjusting the steering wheel electrically
(Y page 118)
When adjusting the steering wheel, make
sure that:
R you can hold the steering wheel with your
arms slightly bent.
R you can move your legs freely.
R you can see all the displays in the instru-
ment cluster clearly.
X Observe the safety guidelines for seat belts
(Y page 57).
X Check whether you have fastened seat
belt ;properly (Y page 59).
The seat belt should:
R fit snugly across your body
R be routed across the middle of your shoul-
der
R be routed in your pelvic area across the hip
joints
X Before starting off, adjust the rear-view mir-
ror and the exterior mirrors (Y page 120) in
such a way that you have a good view of
road and traffic conditions.
X Store the seat, steering wheel and exterior
mirror settings using the memory function
(Y page 123). 112
Correct driver's seat positionSeats, steering wheel and mirrors
Page 116 of 637
Seats
Important safety notes
G
WARNING
If children adjust the seats, they could
become trapped, especially if they are unat-
tended. There is a risk of injury.
When leaving the vehicle, always take the key with you and lock the vehicle. Never leave
children unattended in the vehicle. G
WARNING
If the driver's seat is not engaged, it can move unexpectedly while the vehicle is in motion.
This could cause you to lose control of the
vehicle. There is a risk of an accident.
Always make sure that the driver's seat is
engaged before starting the engine. G
WARNING
If you adjust the seat height carelessly, you or other vehicle occupants could be trapped andthereby injured. Children in particular could
accidentally press the electrical seat adjust-
ment buttons and become trapped. There is a
risk of injury.
While moving the seats, make sure that your
hands or other body parts do not get under the
lever assembly of the seat adjustment sys-
tem. G
WARNING
When adjusting a seat, you or another vehicle occupant could become trapped by the guiderail of the seat, for instance. There is a risk of
injury.
Make sure that no one has any part of their
body within the sweep of the seat when
adjusting it. G
WARNING
The head restraints cannot provide the inten-
ded protection unless they are fitted and
adjusted correctly. There is an increased risk of injury to the head and neck in the event of
an accident or sudden braking, for example.
Always drive with the head restraints fitted.
Ensure that the centre of the head restraints
support the back of each vehicle occupant's
head at eye level before driving off. G
WARNING
You could lose control of the vehicle while
driving if you:
R adjust the driver's seat, steering wheel or
mirror
R fasten the seat belt.
There is a risk of an accident.
Adjust the driver's seat, steering wheel or
mirror and fasten the seat belt before starting
the engine.
! To avoid damage to the seats and the seat
heating, observe the following information:
R do not spill any liquids on the seats. If
liquid is spilled on the seats, dry them as
soon as possible.
R if the seat covers are damp or wet, do not
switch on the seat heating. The seat
heating should also not be used to dry
the seats.
R clean the seat covers as recommended;
see the "Interior care" section.
R do not transport heavy loads on the
seats. Do not place sharp objects on the
seat cushions, e.g. knives, nails or tools. The seats should only be occupied by
passengers, if possible.
R when the seat heating is in operation, do
not cover the seats with insulating mate- rials, e.g. blankets, coats, bags, seat cov-
ers, child seats or booster seats. Seats
113Seats, steering wheel and mirrors Z
Page 117 of 637
!
To avoid damage to the seats and the seat
heating, observe the following information:
R do not spill any liquids on the seats. If
liquid is spilled on the seats, dry them as soon as possible.
R if the seat covers are damp or wet, do not
switch on the seat heating. The seat
heating should also not be used to dry
the seats.
R clean the seat covers as recommended;
see "Interior care".
R do not transport heavy loads on the
seats. Do not place sharp objects on the seat cushions, e.g. knives, nails or tools. The seats should only be occupied by
passengers, if possible.
R when the seat heating is in operation, do
not cover the seats with insulating mate-
rials, e.g. blankets, coats, bags, seat cov- ers, child seats or booster seats.
! Make sure that there are no objects in the
footwell or behind the seats when moving
the seat back. There is a risk that the seats and/or the objects could be damaged.
i The head restraints cannot be removed.
For more information, contact a qualified
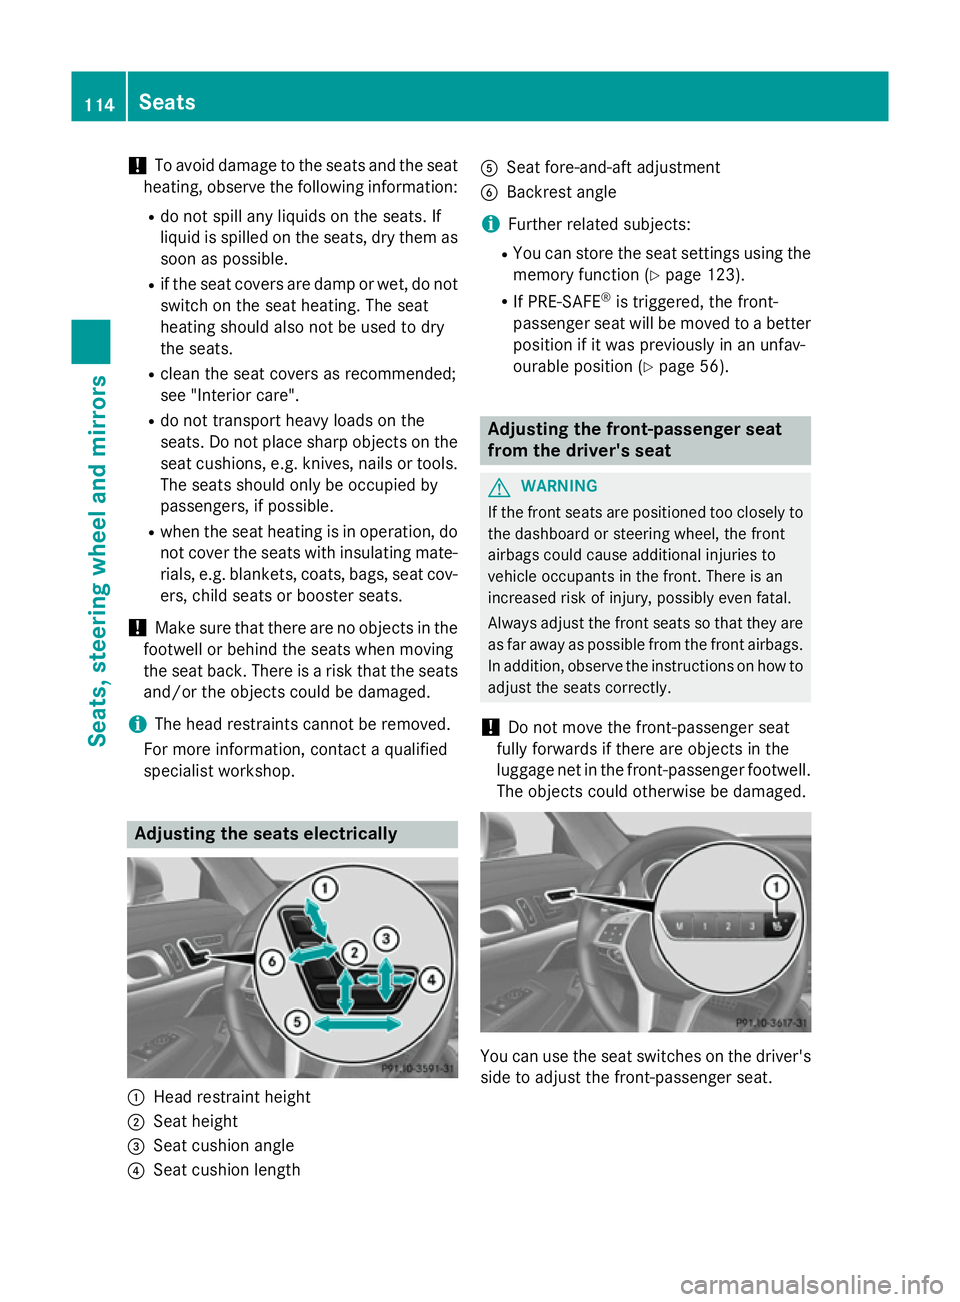
specialist workshop. Adjusting the seats electrically
:
Head restraint height
; Seat height
= Seat cushion angle
? Seat cushion length A
Seat fore-and-aft adjustment
B Backrest angle
i Further related subjects:
R You can store the seat settings using the
memory function (Y page 123).
R If PRE-SAFE ®
is triggered, the front-
passenger seat will be moved to a better
position if it was previously in an unfav-
ourable position (Y page 56). Adjusting the front-passenger seat
from the driver's seat
G
WARNING
If the front seats are positioned too closely to the dashboard or steering wheel, the front
airbags could cause additional injuries to
vehicle occupants in the front. There is an
increased risk of injury, possibly even fatal.
Always adjust the front seats so that they are
as far away as possible from the front airbags.
In addition, observe the instructions on how to
adjust the seats correctly.
! Do not move the front-passenger seat
fully forwards if there are objects in the
luggage net in the front-passenger footwell. The objects could otherwise be damaged. You can use the seat switches on the driver's
side to adjust the front-passenger seat. 114
SeatsSeats, steering wheel and mirrors
Page 118 of 637
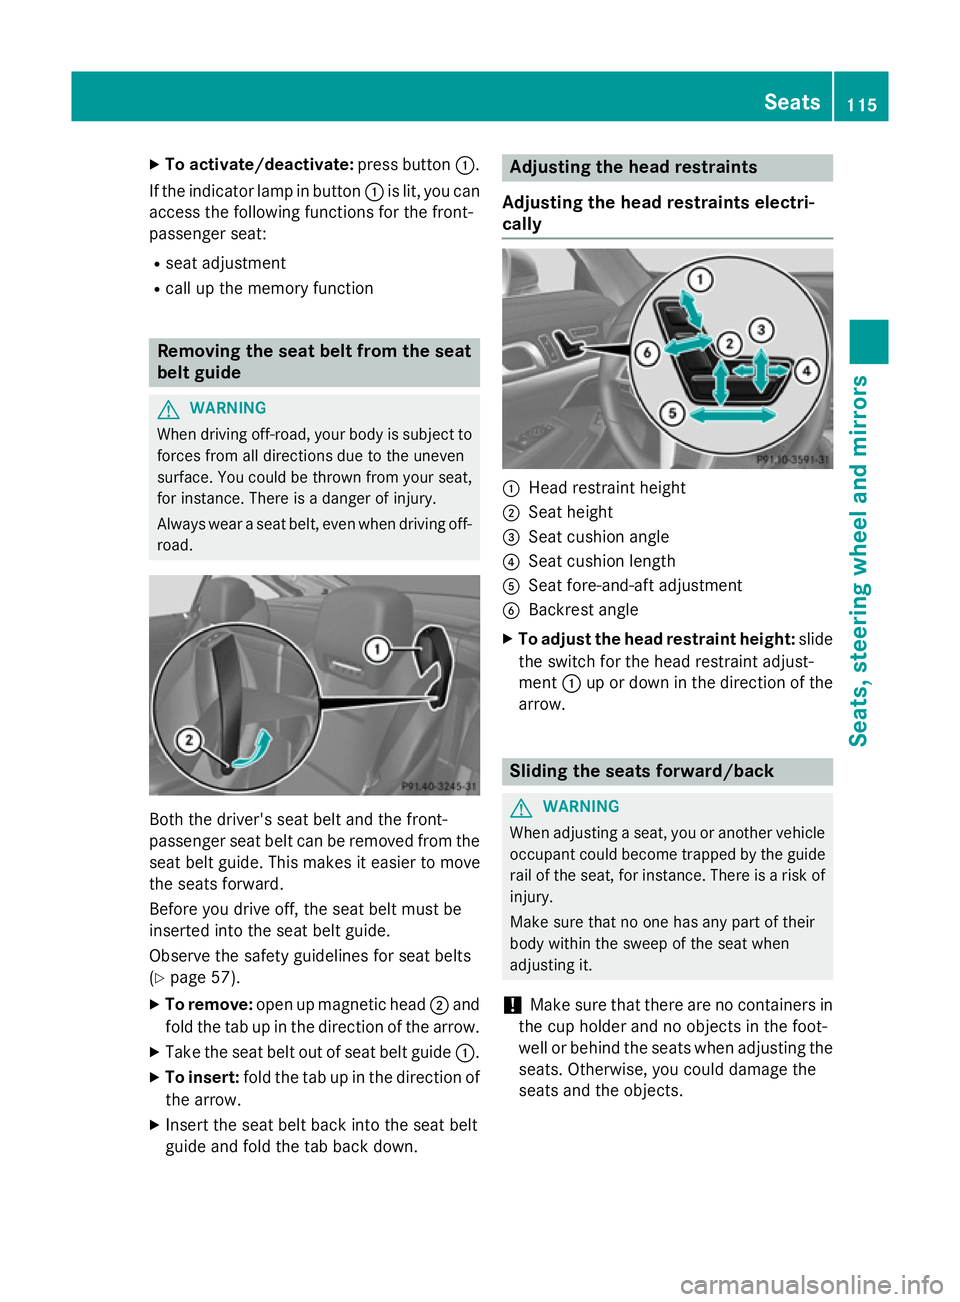
X
To activate/deactivate: press button:.
If the indicator lamp in button :is lit, you can
access the following functions for the front-
passenger seat:
R seat adjustment
R call up the memory function Removing the seat belt from the seat
belt guide
G
WARNING
When driving off-road, your body is subject to forces from all directions due to the uneven
surface. You could be thrown from your seat,
for instance. There is a danger of injury.
Always wear a seat belt, even when driving off-
road. Both the driver's seat belt and the front-
passenger seat belt can be removed from the
seat belt guide. This makes it easier to move
the seats forward.
Before you drive off, the seat belt must be
inserted into the seat belt guide.
Observe the safety guidelines for seat belts
(Y page 57).
X To remove: open up magnetic head ;and
fold the tab up in the direction of the arrow.
X Take the seat belt out of seat belt guide :.
X To insert: fold the tab up in the direction of
the arrow.
X Insert the seat belt back into the seat belt
guide and fold the tab back down. Adjusting the head restraints
Adjusting the head restraints electri-
cally :
Head restraint height
; Seat height
= Seat cushion angle
? Seat cushion length
A Seat fore-and-aft adjustment
B Backrest angle
X To adjust the head restraint height: slide
the switch for the head restraint adjust-
ment :up or down in the direction of the
arrow. Sliding the seats forward/back
G
WARNING
When adjusting a seat, you or another vehicle occupant could become trapped by the guiderail of the seat, for instance. There is a risk of
injury.
Make sure that no one has any part of their
body within the sweep of the seat when
adjusting it.
! Make sure that there are no containers in
the cup holder and no objects in the foot-
well or behind the seats when adjusting the
seats. Otherwise, you could damage the
seats and the objects. Seats
115Seats, steering wheel and mirrors Z
Page 121 of 637
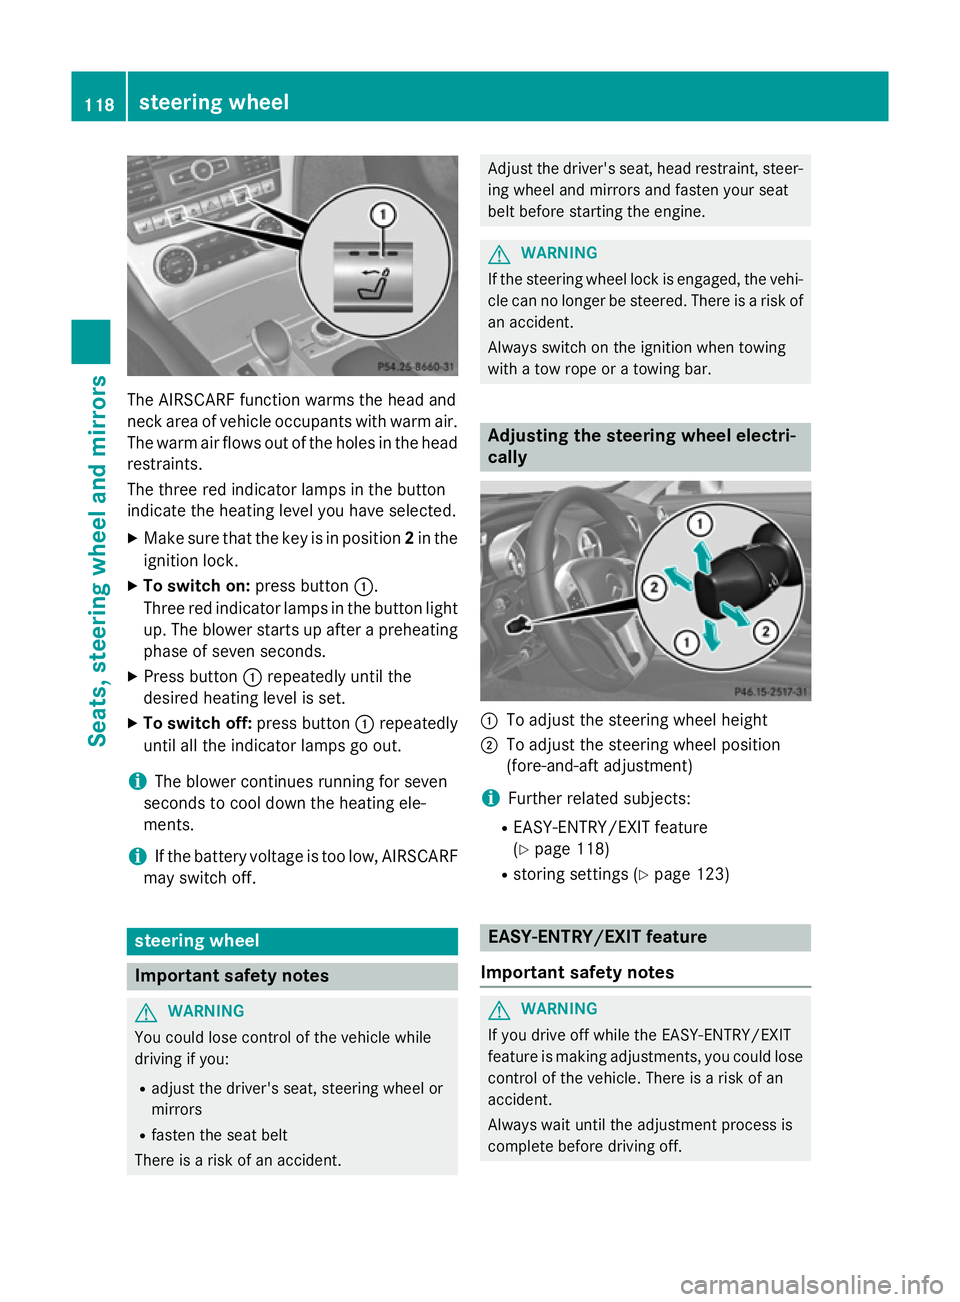
The AIRSCARF function warms the head and
neck area of vehicle occupants with warm air.
The warm air flows out of the holes in the head restraints.
The three red indicator lamps in the button
indicate the heating level you have selected.
X Make sure that the key is in position 2in the
ignition lock.
X To switch on: press button:.
Three red indicator lamps in the button light up. The blower starts up after a preheating
phase of seven seconds.
X Press button :repeatedly until the
desired heating level is set.
X To switch off: press button:repeatedly
until all the indicator lamps go out.
i The blower continues running for seven
seconds to cool down the heating ele-
ments.
i If the battery voltage is too low, AIRSCARF
may switch off. steering wheel
Important safety notes
G
WARNING
You could lose control of the vehicle while
driving if you:
R adjust the driver's seat, steering wheel or
mirrors
R fasten the seat belt
There is a risk of an accident. Adjust the driver's seat, head restraint, steer-
ing wheel and mirrors and fasten your seat
belt before starting the engine. G
WARNING
If the steering wheel lock is engaged, the vehi- cle can no longer be steered. There is a risk of
an accident.
Always switch on the ignition when towing
with a tow rope or a towing bar. Adjusting the steering wheel electri-
cally
:
To adjust the steering wheel height
; To adjust the steering wheel position
(fore-and-aft adjustment)
i Further related subjects:
R EASY-ENTRY/EXIT feature
(Y page 118)
R storing settings (Y page 123) EASY-ENTRY/EXIT feature
Important safety notes G
WARNING
If you drive off while the EASY-ENTRY/EXIT
feature is making adjustments, you could lose
control of the vehicle. There is a risk of an
accident.
Always wait until the adjustment process is
complete before driving off. 118
steering wheelSeats, steering wheel and mirrors